Introduction
With the advancement of technology, 3D printers have become an indispensable tool for creators, hobbyists, and professionals. However, monitoring the printing process can often be time-consuming and inconvenient. Thankfully, remote monitoring software has emerged as a valuable solution.
Remote monitoring allows you to keep a close eye on your 3D printer from anywhere in the world, providing greater flexibility and peace of mind. Whether you’re away from home or simply in another room, you can easily access live camera feeds, check the progress of your prints, and monitor critical parameters such as temperature and filament usage.
In this article, we will guide you through the process of setting up a remote monitoring system for your 3D printer. We will discuss the essential steps you need to follow in order to choose the right software, set up a webcam, install a remote monitoring app, and connect your 3D printer to Wi-Fi. Additionally, we will provide tips on securing your remote monitoring system and troubleshooting common issues that may arise.
By the end of this guide, you will have the knowledge and tools required to remotely monitor your 3D printer with ease. Let’s get started on harnessing the power of remote monitoring to enhance your 3D printing experience!
Getting Started
Before diving into the world of remote monitoring for your 3D printer, there are a few initial steps you need to take. These steps will ensure a smooth setup process and help you make the most out of your remote monitoring experience. Let’s explore them below:
1. Choosing the Right Remote Monitoring Software
The first step is to select a remote monitoring software that suits your needs. Take some time to research and evaluate different options available in the market. Look for features like compatibility with your specific printer model, ease of use, real-time monitoring capabilities, and the ability to set up alerts for critical parameters.
2. Setting Up a Webcam
In order to view live camera feeds of your 3D printer, you will need to set up a webcam. Ensure that you have a compatible webcam and connect it to your computer or a Raspberry Pi. Position the webcam in a strategic location that allows you to capture the entire printing area and adjust the settings to achieve the desired image quality.
3. Installing a Remote Monitoring App
Next, you will need to install a remote monitoring app on your computer or mobile device. This app will connect to your 3D printer and allow you to remotely monitor it. Make sure to choose an app that is user-friendly and provides all the necessary features for monitoring the printing process.
4. Connecting the 3D Printer to Wi-Fi
To enable remote monitoring, you need to connect your 3D printer to Wi-Fi. Check if your printer has built-in Wi-Fi capabilities or if you need to use an external device, such as a Wi-Fi module, to establish a connection. Follow the manufacturer’s instructions to set up the Wi-Fi connection properly.
5. Securing the Remote Monitoring System
As with any online-connected system, security should be a top priority. Change the default login credentials of your remote monitoring software and ensure that you have a strong, unique password. Additionally, consider enabling two-factor authentication for an extra layer of security. Regularly update your software and keep an eye out for any security patches or updates.
By completing these initial steps, you will be well on your way to setting up a reliable and efficient remote monitoring system for your 3D printer. With the groundwork laid, you can now move on to monitoring your prints remotely and enjoying the convenience and flexibility it offers.
Choosing the Right Remote Monitoring Software
When it comes to remote monitoring for your 3D printer, choosing the right software is crucial. There are several options available, each with its own set of features and capabilities. Here are some key factors to consider when selecting remote monitoring software:
Compatibility: Ensure that the software you choose is compatible with your specific printer model. Different printers may require different protocols or interfaces for remote monitoring. It’s important to check if the software supports your printer’s requirements.
Ease of Use: Look for software that is intuitive and user-friendly. You don’t want to spend hours trying to figure out complex configurations and settings. A simple and straightforward interface will make the setup and monitoring process much more enjoyable.
Real-Time Monitoring: One of the key benefits of remote monitoring is the ability to view the printing process in real-time. Make sure the software offers a live camera feed feature, allowing you to monitor the progress of your print job as it happens. This feature can be especially valuable if you need to make adjustments or intervene in case of any issues.
Alerts and Notifications: It’s important to be alerted of critical events or issues with your 3D printer. Look for software that allows you to set up alerts and notifications, such as filament runout, power loss, or abnormal temperature fluctuations. This way, you can take immediate action and minimize potential problems.
Community Support: Consider software that has an active and supportive user community. This can be advantageous when seeking assistance or troubleshooting any issues that may arise during the setup or monitoring process. Online forums or dedicated support channels can be valuable resources for getting help and learning from others’ experiences.
Features for Advanced Users: If you’re an advanced user looking for additional customization and control, consider software that offers more advanced features. These may include features like time-lapse recording, print analytics, or integration with other tools and platforms.
Cost and Updates: Lastly, consider the cost of the software and the frequency of updates. Some remote monitoring software may be free or offer a trial version, while others may require a subscription or one-time payment. Additionally, ensure that the software has a history of regular updates and bug fixes to ensure compatibility and security.
Take the time to explore different remote monitoring software options, read user reviews, and understand the features and limitations of each. This will help you make an informed decision and choose the software that best fits your needs and preferences. Remember, the right software can greatly enhance your remote monitoring experience and simplify your 3D printing journey.
Setting Up a Webcam
Setting up a webcam is an essential step in enabling remote monitoring for your 3D printer. A webcam will allow you to capture live camera feeds of the printing process, giving you a visual overview of your prints. Here’s a step-by-step guide to setting up a webcam for your remote monitoring system:
1. Check Webcam Compatibility: Ensure that your webcam is compatible with your computer or the device you plan to use for remote monitoring. Most webcams today are compatible with both Windows and Mac computers, but it’s always a good idea to double-check the system requirements before making a purchase.
2. Connect the Webcam: Connect the webcam to your computer using a USB cable. Most webcams are plug-and-play, meaning they will be automatically recognized by your operating system. If prompted, follow the on-screen instructions to install any necessary drivers or software for your webcam.
3. Position the Webcam: Place your webcam in a strategic location that provides a clear view of the 3D printer’s printing area. Consider the angle and distance to ensure that you capture the entire print bed and have a good view of the print head in action. Experiment with different positions to find the optimal placement for the webcam.
4. Adjust Webcam Settings: Once your webcam is set up physically, adjust the settings to optimize the image quality. Many webcams come with software or settings that allow you to adjust parameters such as brightness, contrast, and resolution. Take some time to configure these settings based on your preferences and the lighting conditions in your printing area.
5. Test the Webcam: Before integrating the webcam into your remote monitoring system, it’s a good idea to test it to ensure everything is working properly. Open the integrated camera app on your computer or use third-party webcam software to verify that the webcam is capturing the video feed correctly. Make any necessary adjustments to the positioning or settings if required.
6. Mount the Webcam (Optional): If you want a more permanent and stable setup for your webcam, consider mounting it. There are various mounting options available, such as tripods, clamps, or adhesive mounts. Choose a mounting solution that best suits your needs and ensures the webcam remains securely in place during the printing process.
Setting up a webcam is an essential part of the remote monitoring process. Follow these steps to ensure your webcam is properly connected, positioned, and configured. When integrated with your remote monitoring software, the webcam will provide you with real-time visual updates of your 3D prints, enhancing your monitoring experience and enabling you to stay connected with your printing projects from anywhere in the world.
Installing a Remote Monitoring App
Installing a remote monitoring app is essential for seamlessly connecting your 3D printer to your monitoring device. With the right app, you can easily monitor and control your printer’s progress remotely. Follow these steps to install a remote monitoring app:
1. Research and Choose an App: Start by researching different remote monitoring apps available for your specific 3D printer model. Look for apps that are compatible, user-friendly, and offer the features you need. Read reviews and gather feedback from other users to make an informed decision.
2. Download and Install the App: Once you have selected the app, visit the official website or app store associated with your device’s operating system. Download the app onto your smartphone, tablet, or computer. Follow the installation instructions and ensure that you have the latest version of the app.
3. Create an Account: After installing the app, you may need to create an account. This account will serve as your login credentials to access the remote monitoring features. Follow the app’s registration process, providing the necessary information such as your email address and password.
4. Connect the App to your 3D Printer: Open the remote monitoring app and follow the setup wizard or instructions provided. This usually involves connecting your 3D printer to your local network or inputting relevant information such as IP addresses or access codes. The app may guide you step-by-step or offer a scanning feature to detect your printer automatically.
5. Configure App Settings: Once connected, explore the app’s settings and customize them according to your preferences. Settings may include options for notifications, print job history, temperature graphs, and more. Adjust these settings to match your specific monitoring needs.
6. Test Connectivity: Before you begin monitoring your printer, it’s crucial to test the connectivity between the app and your 3D printer. Send a test print job or command to your printer and verify if the app receives the data and provides real-time updates. Troubleshoot any connectivity issues and ensure a stable connection.
7. Familiarize Yourself with the App’s Features: Take some time to explore the features and functionalities of the remote monitoring app. Learn how to navigate through the app, view live camera feeds, receive real-time print updates, and access additional options such as pausing or canceling print jobs. Familiarize yourself with all the tools available so you can leverage them effectively.
By following these steps, you can easily install a remote monitoring app and connect it to your 3D printer. Remember to choose a reliable app, create an account, configure the settings, and test the connectivity before diving into remote monitoring. Once set up, you’ll have the convenience of monitoring and controlling your 3D printer from anywhere, at any time.
Connecting the 3D Printer to Wi-Fi
Connecting your 3D printer to Wi-Fi is a crucial step in enabling remote monitoring and control. By establishing a wireless connection, you can monitor your print jobs and manage your 3D printer from anywhere within your network. Follow these steps to connect your 3D printer to Wi-Fi:
1. Check Wi-Fi Compatibility: Confirm if your 3D printer has built-in Wi-Fi capabilities or requires an external device to connect to Wi-Fi. Some printers may have Wi-Fi functionality, while others might need an additional Wi-Fi module. Refer to the manufacturer’s documentation or website to determine the Wi-Fi compatibility of your printer.
2. Configure Network Settings: Access the settings menu on your 3D printer’s control panel or interface. Locate the network settings and choose the Wi-Fi option. You may need to enter the network name (SSID) and password (Wi-Fi key) to connect to your Wi-Fi network. Make sure the entered details are correct and match your network credentials.
3. Connect to Wi-Fi: Once you have entered the network information, select the “Connect” or “Join” option to establish a connection with your Wi-Fi network. The printer will attempt to connect to the network using the provided credentials. Wait for the connection process to complete and for the printer to display a confirmation message indicating a successful connection.
4. Confirm Connectivity: To ensure that your 3D printer is properly connected to the Wi-Fi network, verify the network settings on the printer’s interface or control panel. Look for indicators like signal strength or a network connection icon. Additionally, check if the IP address assigned to the printer matches the IP range of your Wi-Fi network.
5. Test Connectivity: To confirm that your printer is connected to the Wi-Fi network, send a test print job or command from your computer or remote monitoring app. If the printer receives the command and starts the print job, this indicates a successful connection. Monitor the print job and verify that the printer communicates the progress and status updates to your remote monitoring software as expected.
6. Troubleshoot Connectivity Issues: In case of connectivity issues, first check if your Wi-Fi network is functioning correctly and other devices are able to connect to it. Verify that the entered network name (SSID) and password (Wi-Fi key) are accurate. If the problem persists, consult the manufacturer’s documentation or customer support for troubleshooting steps specific to your printer model.
Connecting your 3D printer to Wi-Fi opens up a world of possibilities for remote monitoring and control. Once successfully connected, you can monitor print jobs, receive real-time updates, and even start or stop print jobs from your remote monitoring app or computer. Enjoy the convenience and flexibility that Wi-Fi connectivity brings to your 3D printing experience!
Securing the Remote Monitoring System
Securing your remote monitoring system is essential to protect your 3D printer and personal data from unauthorized access. By implementing security measures, you can ensure the privacy and integrity of your remote monitoring system. Here are important steps to secure your system:
1. Change Default Login Credentials: After installing the remote monitoring software, it is crucial to change the default login credentials. Default usernames and passwords are often widely known and can be exploited by attackers. Use a strong, unique password that includes a combination of uppercase and lowercase letters, numbers, and special characters.
2. Enable Two-Factor Authentication: Two-factor authentication adds an extra layer of security to your remote monitoring system. Enable this feature if available, as it requires a verification code in addition to your password to access your account. This ensures that even if your password is compromised, an attacker would still need the verification code to gain access.
3. Keep Software Updated: Regularly update your remote monitoring software to ensure you have the latest security patches and bug fixes. Developers often release updates to address vulnerabilities and improve overall system security. Enable automatic updates whenever possible to ensure you stay protected with minimal effort.
4. Use a Secure Network: Ensure that your remote monitoring system is connected to a secure Wi-Fi network. Use a strong and unique Wi-Fi password to prevent unauthorized access. Avoid using public Wi-Fi networks, as they can be insecure and pose a higher risk of security breaches. If you need remote access outside your home network, consider using a virtual private network (VPN) for a secure connection.
5. Regularly Monitor and Review Logs: Check the logs and activity records of your remote monitoring system for any suspicious or unauthorized access attempts. Monitoring these logs can help you identify any potential security breaches or unusual activities. Regularly review and analyze the logs to stay on top of your system’s security.
6. Maintain Firmware and Printer Security: Keep your 3D printer’s firmware up to date by installing the latest updates released by the manufacturer. Firmware updates often include security enhancements and bug fixes. Additionally, ensure that physical access to your printer is restricted and that it is located in a secure area to prevent unauthorized tampering.
7. Educate Users: If multiple individuals have access to the remote monitoring system, such as team members or family members, educate them about best security practices. Instruct them on creating strong passwords, safeguarding login credentials, and being cautious with granting access to the system.
By implementing these security measures, you can significantly enhance the protection of your remote monitoring system. Remember, securing your system is an ongoing process, and staying vigilant is key to maintaining the integrity and privacy of your 3D printer and associated data.
Monitoring Your 3D Printer
Once you have set up your remote monitoring system for your 3D printer, you can start enjoying the benefits of real-time monitoring and control. Here are key aspects to consider when monitoring your 3D printer:
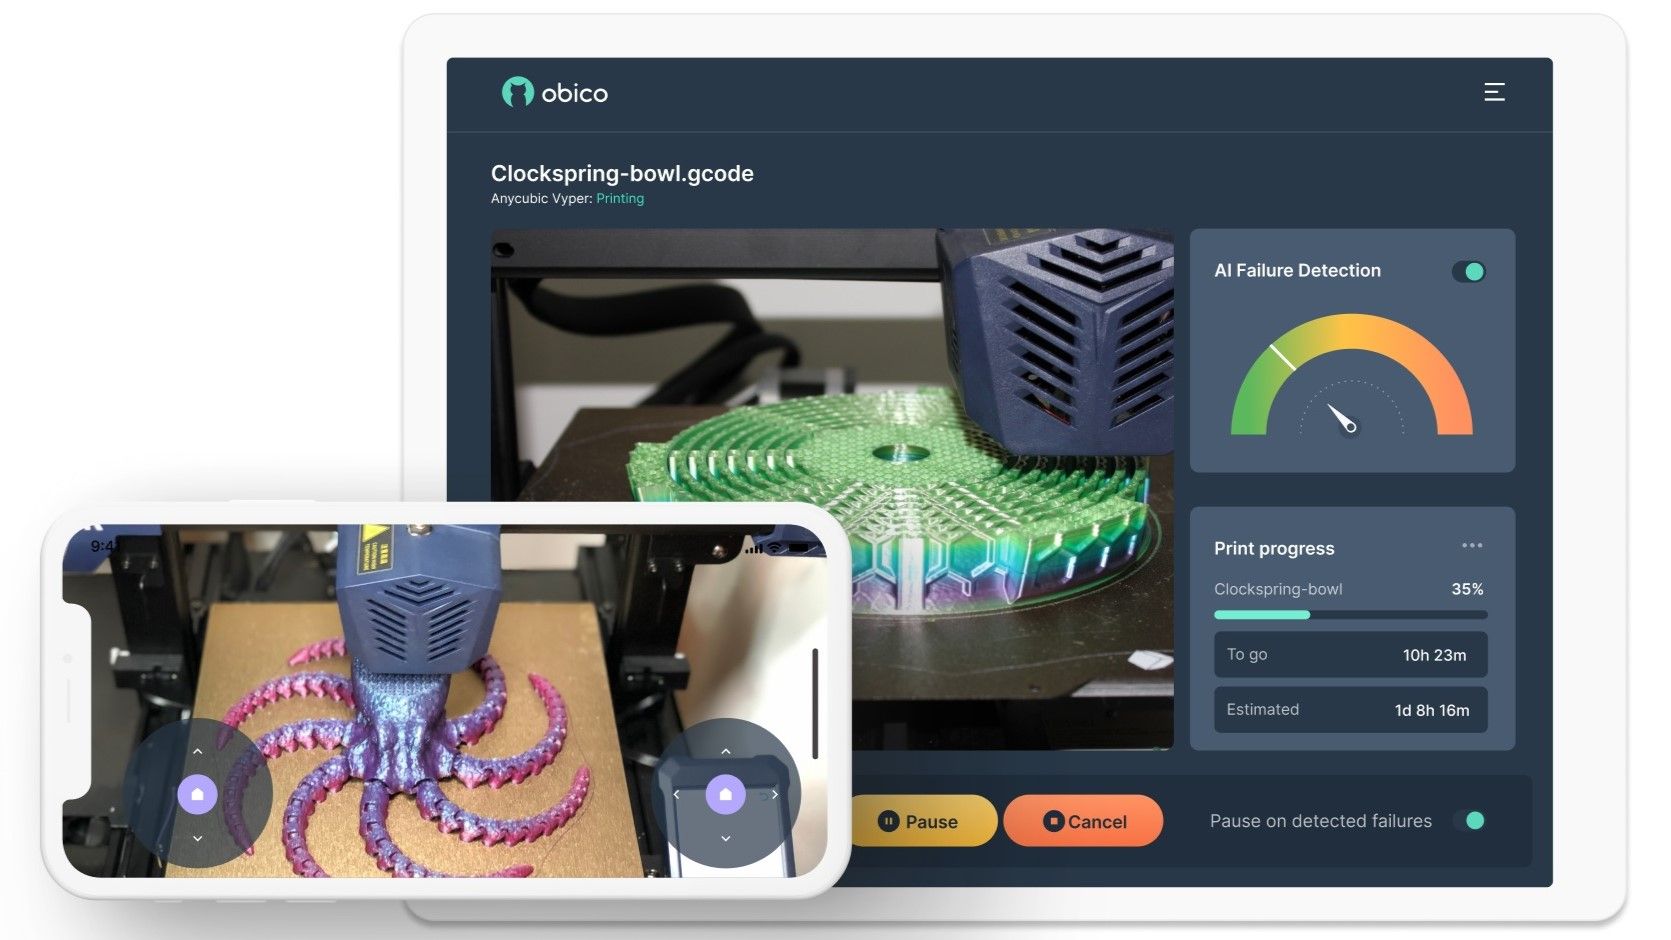
1. Viewing Live Camera Feeds: Take advantage of the live camera feed feature provided by your remote monitoring software. This allows you to visually monitor your 3D printer in real time. Keep an eye on the print bed, filament flow, and overall printing process. This visual feedback can help you detect any issues or abnormalities that may occur during the print job.
2. Getting Real-Time Print Updates: Stay updated on the progress of your print job through the remote monitoring app or software. Monitor the completion percentage, estimated time remaining, and layer-by-layer progress. Real-time updates allow you to plan your time effectively and intervene if necessary, such as pausing or canceling a print job if you notice an issue.
3. Monitoring Temperature and Progress: Keep an eye on the temperature of your 3D printer’s hotend, heated bed, and ambient environment. Remote monitoring software may provide temperature graphs or indicators to help you ensure that the printer is operating within the optimal temperature range. Additionally, monitor the progress of each layer being printed to ensure accurate and consistent results.
4. Receive Notifications: Configure your remote monitoring system to send you notifications for certain events or conditions. For example, you can set up alerts for filament runout, power loss, or critical temperature fluctuations. Notifications ensure that you are immediately aware of any issues and can take appropriate action in a timely manner.
5. Remote Print Control: Some advanced remote monitoring systems allow you to control your 3D printer remotely. This includes pausing or stopping print jobs, adjusting print settings, or starting new print jobs. Take advantage of these features to manage your printer without being physically present, adding flexibility and convenience to your 3D printing workflow.
6. Review Print History: Many remote monitoring apps or software offer a print history feature, allowing you to review past print jobs. This can be helpful for analyzing print successes, identifying any recurring issues, and learning from previous experiences. Use this feature to track your progress, troubleshoot problems, and improve your overall printing results.
Monitoring your 3D printer remotely provides you with valuable insights and control over the printing process. By utilizing live camera feeds, real-time updates, and notifications, you can stay connected with your prints and address any issues promptly. Take advantage of the available features to enhance your printing experience and achieve optimal results.
Viewing Live Camera Feeds
One of the significant benefits of remote monitoring for your 3D printer is the ability to view live camera feeds of the printing process. This feature allows you to visually monitor the printer in real time, providing you with valuable insights and the ability to address any issues promptly. Here’s why viewing live camera feeds is an essential aspect of remote monitoring:
Real-Time Visual Feedback: By accessing live camera feeds, you gain the advantage of real-time visual feedback on the printing process. You can observe the movement of the print head, filament extrusion, and overall progress of the print job. This visual feedback enables you to detect any issues, such as misprints or bed adhesion problems, and take timely corrective measures.
Remote Accessibility: Live camera feeds give you the freedom to monitor your 3D printer from anywhere, as long as you have an internet connection. Whether you are at work, running errands, or even traveling, you can view the printing process without being physically present in your printing area. This remote accessibility allows you to stay connected with your prints and ensures that you are always in control of the process.
Identifying Potential Problems: With live camera feeds, you have the opportunity to identify potential problems as soon as they arise. This includes issues like filament jams, failed prints, and other mechanical or technical challenges. By monitoring the live feed, you can catch these issues early and intervene to prevent major print failures or wasted filament.
Adjustments and Interventions: Viewing live camera feeds empowers you to make adjustments and interventions when necessary. For instance, if you notice any part of the print lifting or warping, you can stop the print job momentarily and apply adhesion solutions or adjust the print settings to rectify the issue. This capability saves time and reduces material wastage by allowing you to address problems in real time.
Quality Assurance: Live camera feeds also serve as a quality assurance tool. You can closely monitor the details of the print, ensuring that it meets your standards and expectations. Observing the fine details, layer adhesion, and overall print quality helps you verify that the print is progressing as desired, ensuring a successful end result.
Educational and Troubleshooting Purposes: Live camera feeds can be invaluable for educational purposes or troubleshooting as well. You can review the footage to analyze the printing process, identify areas for improvement, or diagnose potential issues. This visual documentation allows you to learn from each print and refine your techniques for future printing endeavors.
Viewing live camera feeds provides real-time visual feedback, remote accessibility, and the ability to identify and address potential problems. It allows you to make adjustments, ensure print quality, and serves as a valuable tool for educational and troubleshooting purposes. By taking advantage of this feature in your remote monitoring system, you can maximize your control and the success of your 3D printing projects.
Getting Real-Time Print Updates
Real-time print updates are a crucial component of remote monitoring for your 3D printer. They provide you with current and accurate information about the progress of your print job, allowing you to stay informed and make informed decisions. Here’s why getting real-time print updates is essential:
Instant Progress Tracking: With real-time print updates, you can track the progress of your print job instantly. The remote monitoring software provides live updates on the completion percentage and estimated time remaining for the print. This information helps you plan your time effectively and ensures that you are aware of the print’s progress at all times.
Timely Intervention: Real-time print updates enable you to intervene in case of any issues or anomalies that occur during the print job. If you notice any abnormalities in the print, such as layer shifting or filament runout, you can take immediate action to address the problem. This timely intervention can help prevent print failures and minimize wastage of time and materials.
Optimizing Workflow: By receiving real-time print updates, you can optimize your workflow and allocate your time and resources efficiently. You can plan your activities based on the estimated time remaining for the print, allowing you to multitask or prepare for subsequent print jobs. This optimization ensures maximum productivity and reduces unnecessary waiting time.
Managing Multiple Print Jobs: If you have multiple print jobs queued up, real-time print updates support effective management of these jobs. You can monitor the progress of each print job simultaneously, allowing you to prioritize or reschedule as needed. This feature enables efficient utilization of your 3D printer’s capacity and ensures a smooth workflow.
Identifying Print Completion: By receiving real-time updates, you can be alerted when your print job is nearing completion. This allows you to be prepared and ready to remove the finished print from the print bed as soon as it completes. This feature is particularly useful when printing time-sensitive or large-scale projects, preventing any delays or damage to the printed object.
Remote Monitoring Convenience: Real-time print updates provide the convenience of monitoring your print job from anywhere within your network. Whether you are in another room, at work, or even outside the house, you can stay connected to your print progress. This flexibility ensures that you can monitor your printer whenever and wherever you are, enhancing your overall user experience.
Getting real-time print updates allows you to track the progress of your print job instantly, intervene when necessary, optimize your workflow, and manage multiple print jobs efficiently. It enables you to stay informed and in control of your printing process, ensuring successful and timely completion of your 3D printing projects.
Monitoring Temperature and Progress
Monitoring the temperature and progress of your 3D printer is a critical aspect of remote monitoring. By keeping a close eye on these parameters, you can ensure optimal print quality, prevent potential issues, and maintain a safe printing environment. Here’s why monitoring temperature and progress is essential:
Temperature Control: Monitoring the temperature of your 3D printer is crucial for successful and accurate prints. Remote monitoring software allows you to keep track of the hotend temperature, heated bed temperature, and ambient temperature. By monitoring these temperatures in real-time, you can ensure that they remain within the recommended range for the filament and prevent issues such as underextrusion, warping, or overheating.
Identifying Abnormalities: By monitoring the temperature, you can quickly identify any abnormalities during the printing process. Sudden fluctuations in temperature or prolonged periods outside of the target range can indicate potential problems. Identifying these abnormalities allows you to take necessary actions, such as adjusting temperature settings, checking for clogs, or ensuring proper cooling, to avoid print failures or poor print quality.
Optimizing Print Settings: Monitoring temperature and progress provides valuable insights into the behavior of your 3D printer. By observing the temperature dynamics throughout the print, you can fine-tune your print settings for future projects. Analyzing the impact of different temperature ranges on print quality can help you optimize parameters like layer adhesion, bridging performance, or overhangs, leading to improved overall print results.
Ensuring Consistent Layering: Monitoring the progress of each layer being printed allows you to verify that the printer is functioning properly. Through real-time updates, you can ensure that each layer adheres correctly and is properly aligned. Any deviations or inconsistencies can be identified immediately, allowing you to address issues like layer shifting, misalignment, or skipping, which can interfere with print quality.
Troubleshooting: Monitoring the temperature and progress of your printer also facilitates troubleshooting. If you encounter print failures or anomalies, reviewing the recorded temperature and progress data can help you pinpoint the cause. By analyzing these parameters alongside print quality, you can quickly identify potential issues and make the necessary adjustments or repairs to improve future prints.
Ensuring Safety: Remote monitoring of temperature is vital for ensuring the safety of your 3D printing environment. By monitoring the hotend and heated bed temperatures, you can prevent overheating, reduce the risk of thermal runaway, and minimize the chance of fire hazards. Real-time temperature monitoring provides crucial data to help ensure a safe and secure printing environment.
Monitoring the temperature and progress of your 3D printer allows you to maintain proper temperature control, identify abnormalities, optimize print settings, ensure consistent layering, troubleshoot issues, and prioritize safety. By leveraging these monitoring capabilities through remote monitoring software, you can achieve higher print quality, avoid potential pitfalls, and enjoy a safer and more successful 3D printing experience.
Troubleshooting and Tips
While remote monitoring can greatly simplify the 3D printing process, it’s important to be prepared for potential troubleshooting scenarios. Here are some common issues you may encounter and tips to help you resolve them:
1. Ensuring a Stable Internet Connection: A stable internet connection is crucial for remote monitoring. If you experience connectivity issues, try rebooting your router or repositioning your Wi-Fi router closer to your 3D printer. Additionally, consider using a wired Ethernet connection for more reliable connectivity.
2. Resolving Connectivity Issues: If your remote monitoring app or software fails to connect to your printer, double-check that your 3D printer’s Wi-Fi settings are correct. Verify that the printer is connected to the same Wi-Fi network as your monitoring device. Restarting both the printer and the monitoring device can often resolve connectivity issues.
3. Understanding Error Messages: Error messages can provide valuable information when troubleshooting. Take note of any error codes or messages displayed by your 3D printer or monitoring software. Refer to the printer’s documentation or manufacturer’s support resources to understand the meaning of the error messages and troubleshoot accordingly.
4. Maintaining Printer Security: Keep your 3D printer’s firmware up to date by checking for regular updates from the manufacturer. Firmware updates often include bug fixes and security enhancements. Additionally, consider implementing physical security measures such as securing your printer in a locked enclosure to prevent unwanted access.
5. Calibrating and Leveling: Proper calibration and bed leveling are key to achieving good print quality. Regularly check and calibrate your printer’s extruder, hotend temperature, and bed leveling. Use a reliable calibration tool and follow the manufacturer’s instructions to ensure accurate and consistent prints.
6. Optimizing Print Settings: Experiment with different print settings such as layer height, print speed, and infill density to find the optimal configuration for your prints. Adjusting these settings can help you achieve higher print quality or improved printing speed, depending on your priorities.
7. Filament Maintenance: Properly storing and handling filament is crucial. Avoid exposure to moisture by storing filament in a dry container or using desiccant packs. Make sure the filament is properly loaded and guided through the printer’s filament path to prevent snags or tangles during prints.
8. Regular Maintenance: Regularly maintain and clean your printer to ensure smooth operation. Keep the print bed clean, remove any debris or residual filament, and inspect the printer’s components for signs of wear or damage. Following proper maintenance practices can extend the lifespan of your printer and improve its performance.
9. Utilizing Support Communities: When facing more complex issues, don’t hesitate to seek help from online support communities and forums. Engaging with experienced 3D printing enthusiasts can provide valuable insights and solutions. Describe your problem clearly, provide relevant details, and be open to suggestions and troubleshooting guidelines.
By being proactive and using these troubleshooting tips, you can overcome common issues and make the most out of your remote monitoring system. With proper maintenance, settings optimization, and the utilization of support resources, you can achieve consistent and successful prints, enhancing your overall 3D printing experience.
Ensuring a Stable Internet Connection
A stable internet connection is crucial for effectively utilizing remote monitoring for your 3D printer. Without a reliable connection, you may experience interruptions or difficulties in monitoring and controlling your printer remotely. Here are some important factors to consider in ensuring a stable internet connection:
1. Router Placement and Signal Strength: The placement of your Wi-Fi router plays a significant role in the stability of your internet connection. Position your router in a central location and away from obstacles that may hinder the signal. Ensure that it is not being blocked by walls, furniture, or other devices that could interfere with the Wi-Fi signal. Consider using a Wi-Fi range extender or mesh network system if you have a large printing area or face signal strength issues.
2. Rebooting the Router and Modem: If you are experiencing connectivity issues, a simple reboot of your router and modem can often resolve the problem. Turn off the devices, wait for a few seconds, and then power them back on. This can help clear any temporary glitches or conflicts that may be affecting the stability of your connection.
3. Network Congestion: Heavy network traffic or congestion can impact the stability of your internet connection. If possible, schedule your 3D printing jobs during off-peak hours when there is less network activity in your area. This can help minimize the chances of experiencing slowdowns or disruptions in your remote monitoring connection.
4. Wired Ethernet Connection: If your 3D printer and monitoring device are in close proximity, consider using a wired Ethernet connection instead of relying solely on Wi-Fi. Wired connections are generally more stable and can provide a more consistent and reliable internet connection, reducing the likelihood of connection drops or lagging issues.
5. Bandwidth Allocation: Ensure that your network bandwidth is appropriately allocated to minimize disruptions to your remote monitoring connection. Avoid running bandwidth-intensive activities, such as streaming videos or large file downloads, while actively monitoring and controlling your 3D printer. Allocating sufficient bandwidth to your remote monitoring software will help maintain a stable connection.
6. Wi-Fi Router Settings: Check your Wi-Fi router settings and make sure they are optimized for stability. Choose the appropriate channel for your network, preferably one with minimal interference from other nearby networks. Adjust the router’s transmission power to strike a balance between coverage and stability. These settings can vary depending on your specific router model, so consult the manufacturer’s instructions or documentation for guidance.
7. Test Connection Speed: Use online tools to test the speed and stability of your internet connection. This can help identify any potential issues that may be affecting your remote monitoring experience. If you consistently experience low speeds or frequent drops in connection, contact your internet service provider to address the issue.
8. Network Security: Ensure that your network is secure to prevent unauthorized access that could compromise your remote monitoring system. Use a strong and unique Wi-Fi password and consider enabling encryption protocols such as WPA2. Regularly update your router’s firmware to address any security vulnerabilities that may exist.
By addressing these considerations and following best practices for stability, you can ensure a reliable and stable internet connection for your remote monitoring system. A stable connection will allow you to monitor and control your 3D printer remotely with confidence, enhancing your overall 3D printing experience.
Resolving Connectivity Issues
Connectivity issues can be frustrating when using remote monitoring for your 3D printer. However, with some troubleshooting steps, you can resolve these issues and ensure a stable connection between your monitoring device and printer. Here are some tips to help you resolve connectivity issues:
1. Verify Wi-Fi Settings: Double-check the Wi-Fi settings on your 3D printer. Ensure that the printer is connected to the correct Wi-Fi network and that the network password is entered correctly. Incorrect Wi-Fi settings can lead to connection failures, so it’s essential to verify these settings before troubleshooting further.
2. Restart Printer and Monitoring Device: Sometimes, simply restarting both your printer and monitoring device can resolve connectivity issues. Power down both devices, wait for a few seconds, and then power them back on. Restarting can help clear any temporary network glitches that may be causing the connectivity problem.
3. Check Wi-Fi Signal Strength: If your 3D printer and monitoring device are too far apart, the signal strength may weaken, resulting in connectivity issues. Ensure that your monitoring device is within the range of your Wi-Fi router. If the signal strength is weak, consider moving the router closer to your printer or using a Wi-Fi range extender to boost the signal strength.
4. Update Firmware and Driver Software: Outdated firmware or driver software can cause compatibility issues and hinder connectivity. Check for any available firmware updates for both your 3D printer and monitoring device. Updating to the latest firmware can address compatibility issues and improve connectivity performance.
5. Check Network Security Settings: Ensure that your network security settings are not blocking the connection between your printer and monitoring device. Disable any firewall settings that may be preventing communication between the devices. Additionally, check if your router has a MAC address filtering feature and ensure that both devices’ MAC addresses are added to the allowed list.
6. Update Monitoring Software: If you are using dedicated software for remote monitoring, ensure that it is up to date. Developers often release updates that address bugs and improve compatibility with different devices. Check for updates to your monitoring software and install them to ensure optimal performance and connectivity.
7. Check for Interference: Other nearby electronic devices or environmental factors can interfere with Wi-Fi signals and cause connectivity issues. Make sure your printer and monitoring device are not placed near devices that emit strong electromagnetic signals, such as cordless phones or microwaves. Reduce potential interference by repositioning your devices and minimizing obstacles between them and the Wi-Fi router.
8. Contact Technical Support: If you have tried the above steps and are still experiencing connectivity issues, reach out to the technical support for your 3D printer or remote monitoring software. They can provide further guidance and assist you in troubleshooting specific to your device or software.
By following these troubleshooting tips, you can resolve connectivity issues and ensure a stable connection between your monitoring device and 3D printer. A stable connection allows for seamless remote monitoring, giving you the ability to monitor and control your prints from anywhere with ease.
Understanding Error Messages
Error messages can be frustrating but are often valuable clues that can help you troubleshoot and resolve issues with your 3D printer. When you encounter an error message, understanding what it means is the first step towards finding a solution. Here are some tips to help you decipher and understand these error messages:
1. Read the Error Message Carefully: Take the time to thoroughly read and understand the error message displayed by your 3D printer or remote monitoring software. Pay attention to the wording and any specific error codes or numbers mentioned. Error messages often provide valuable clues about the underlying problem.
2. Consult the Printer Documentation: Refer to the documentation provided by the manufacturer of your 3D printer. Error messages are often documented, and the manufacturer may provide guidance on how to troubleshoot and resolve specific error messages. Look for a troubleshooting section or an error code glossary that can help you understand the meaning and potential solutions for the error message.
3. Search Online Forums and Communities: Online forums and communities dedicated to 3D printing can be an excellent resource for understanding error messages. Often, other users have encountered similar issues and may have shared their experiences and solutions. Search for the specific error message or error code to see if others have encountered the same problem and found a resolution.
4. Contact Manufacturer Support: If you are unable to find a resolution through online resources, don’t hesitate to reach out to the manufacturer’s technical support. They can provide specific guidance and troubleshooting steps tailored to your printer model and the error message you are encountering. Contacting the support team can also be helpful if the error message indicates a potential hardware issue that requires professional attention.
5. Take Note of When the Error Occurs: Pay attention to any patterns or specific circumstances when the error message appears. Does it occur during a particular phase of the print job? Is it always associated with certain print settings or materials? Gathering this information can help you narrow down the cause of the error and find a more targeted solution.
6. Experiment with Troubleshooting Steps: Based on the information you gathered from the error message, documentation, and online resources, try out recommended troubleshooting steps. This can include actions such as checking connections, cleaning the printer components, adjusting print settings, or updating firmware. Be systematic in your troubleshooting approach and note the results of each step to help you narrow down the underlying issue.
7. Document and Discuss with the Community: If you are unable to resolve the issue on your own, document the error message, the steps you have taken, and any additional observations. Share this information with the online 3D printing community or support forums to seek further assistance. Providing specific details can help others understand the problem better and offer potential solutions.
Understanding and interpreting error messages is crucial for effective troubleshooting and resolving issues with your 3D printer. By following these tips and utilizing available resources, you can gain insights into the cause of the error and find appropriate solutions, helping you get back to successful and uninterrupted 3D printing.
Maintaining Printer Security
Ensuring the security of your 3D printer is essential to protect your device, data, and personal information from unauthorized access or potential risks. Here are some key practices to maintain printer security:
1. Regular Firmware Updates: Stay up to date with the latest firmware updates provided by the manufacturer of your 3D printer. These updates often include security patches and bug fixes, addressing known vulnerabilities and improving the overall security of your printer.
2. Secure Physical Access: Limit physical access to your 3D printer by keeping it in a secure location, especially in shared spaces or areas with public access. Consider using a locked enclosure or cabinet to prevent unauthorized manipulation or tampering with the printer’s components.
3. Change Default Credentials: Update the default credentials of your 3D printer’s control panel, remote monitoring software, or any other associated applications. Change the default username and password to a strong and unique combination that is not easily guessable. Regularly update your login credentials for added security.
4. Network Protection: Secure your network to prevent unauthorized access to your 3D printer and associated devices. Set a strong Wi-Fi password for your network and enable encryption protocols such as WPA2. Implement MAC address filtering to allow only trusted devices to connect to your network.
5. Secure Remote Access: If you are using remote monitoring software or accessing your 3D printer remotely, take extra precautions to ensure secure remote access. Consider using a virtual private network (VPN) to establish a secure connection between your monitoring device and the printer, protecting your data and preventing unauthorized access.
6. Safe File Sharing and Transfers: When sharing 3D print files or transferring them from your computer to the printer, practice safe file handling. Avoid downloading files from untrusted sources and use reputable platforms or websites for acquiring 3D models. Scan files for viruses or malware before transferring them to your printer to prevent any potential security risks.
7. Monitor Network Activity: Regularly review the network activity logs of your 3D printer and associated devices. Keep an eye out for any suspicious or unauthorized access attempts. Unusual or unexpected network activity may be an indication of security threats or potential breaches.
8. Educate Users: Ensure that all users, including yourself and any other individuals who access your 3D printer, are aware of good security practices. Educate them on the importance of strong passwords, regular firmware updates, and safe file handling. Encourage them to report any suspicious activities or issues promptly.
9. Regularly Backup Printer Settings: Back up the settings and configuration of your 3D printer regularly. This will allow you to have a snapshot of the working configuration, making it easier to restore in case of any security incidents or unforeseen system failures.
By implementing these printer security practices, you can safeguard your 3D printer and keep your data and personal information protected. Maintaining printer security reduces the risk of unauthorized access or potential vulnerabilities, ensuring a more secure and reliable 3D printing experience.
Conclusion
Remote monitoring has revolutionized the way we interact with and manage our 3D printers. By harnessing the power of technology and the convenience of a stable internet connection, we can now monitor and control our printers from anywhere in the world. This guide has provided valuable insights and tips on setting up a remote monitoring system, choosing the right software, and troubleshooting common issues.
We started by understanding the importance of remote monitoring and the benefits it brings to our 3D printing experience. We then delved into the necessary steps to get started, including choosing the right remote monitoring software, setting up a webcam, installing a remote monitoring app, connecting the printer to Wi-Fi, and securing the remote monitoring system.
Monitoring your 3D printer remotely allows you to view live camera feeds, receive real-time print updates, and monitor critical parameters such as temperature and progress. This level of insight and control enables you to address issues promptly, optimize print quality, and ensure a smooth workflow. Additionally, we explored troubleshooting techniques and provided tips for maintaining printer security.
As with any technology, it’s essential to stay informed about the latest advancements in remote monitoring and keep up with firmware updates, security practices, and best printing practices. Exploring online communities and networking with fellow 3D printing enthusiasts can provide ongoing support and helpful insights.
By embracing remote monitoring, you can take your 3D printing endeavors to new heights. Enjoy the convenience, flexibility, and peace of mind that remote monitoring offers as you create and bring your innovative ideas to life!