Introduction
Welcome to the world of electric skateboarding! Whether you’re a thrill-seeker, a tech enthusiast, or someone looking for a fun and eco-friendly mode of transportation, building your own electric skateboard is an exciting and rewarding endeavor. But what sets apart a great electric skateboard from a good one? Range. In this article, we’ll guide you through the process of building an electric skateboard with a long range, so you can enjoy longer rides with fewer interruptions.
Long range is a crucial factor to consider when building an electric skateboard. It determines how far you can travel on a single charge, and directly affects the overall usability and satisfaction of your ride. To achieve an extended range, careful consideration must be given to components, construction, and optimization.
In this guide, we’ll cover all the essential steps to help you build an electric skateboard with an impressive range. We’ll start with choosing the right components, including the motor, battery, ESC (Electronic Speed Controller), and more. Then, we’ll guide you through building the deck and mounting the motors and wheels. Next, we’ll walk you through the installation of the battery and electronics, as well as the wiring and connection process. We’ll also provide tips for setting up the remote controller and testing the skateboard for optimal performance.
Once you have your electric skateboard built, we’ll delve into fine-tuning it specifically for achieving a long range. We’ll explore various optimization techniques and adjustments to maximize efficiency and extend battery life. By the end of this article, you’ll have all the knowledge and guidance needed to create your very own electric skateboard with an impressive long range.
So, let’s get started and embark on the journey of building an electric skateboard that will take you further than ever before!
Choosing the Right Components
One crucial factor in building an electric skateboard with a long range is selecting the right components. Each component plays a vital role in determining the overall performance and efficiency of your skateboard. Here are the key components to consider:
1. Motor: The motor is the powerhouse of your electric skateboard. Opt for a high-quality brushless motor with a higher Kv rating (RPM per volt) for better efficiency and longer range. Consider motors with lower resistance to reduce power loss and increase overall performance.
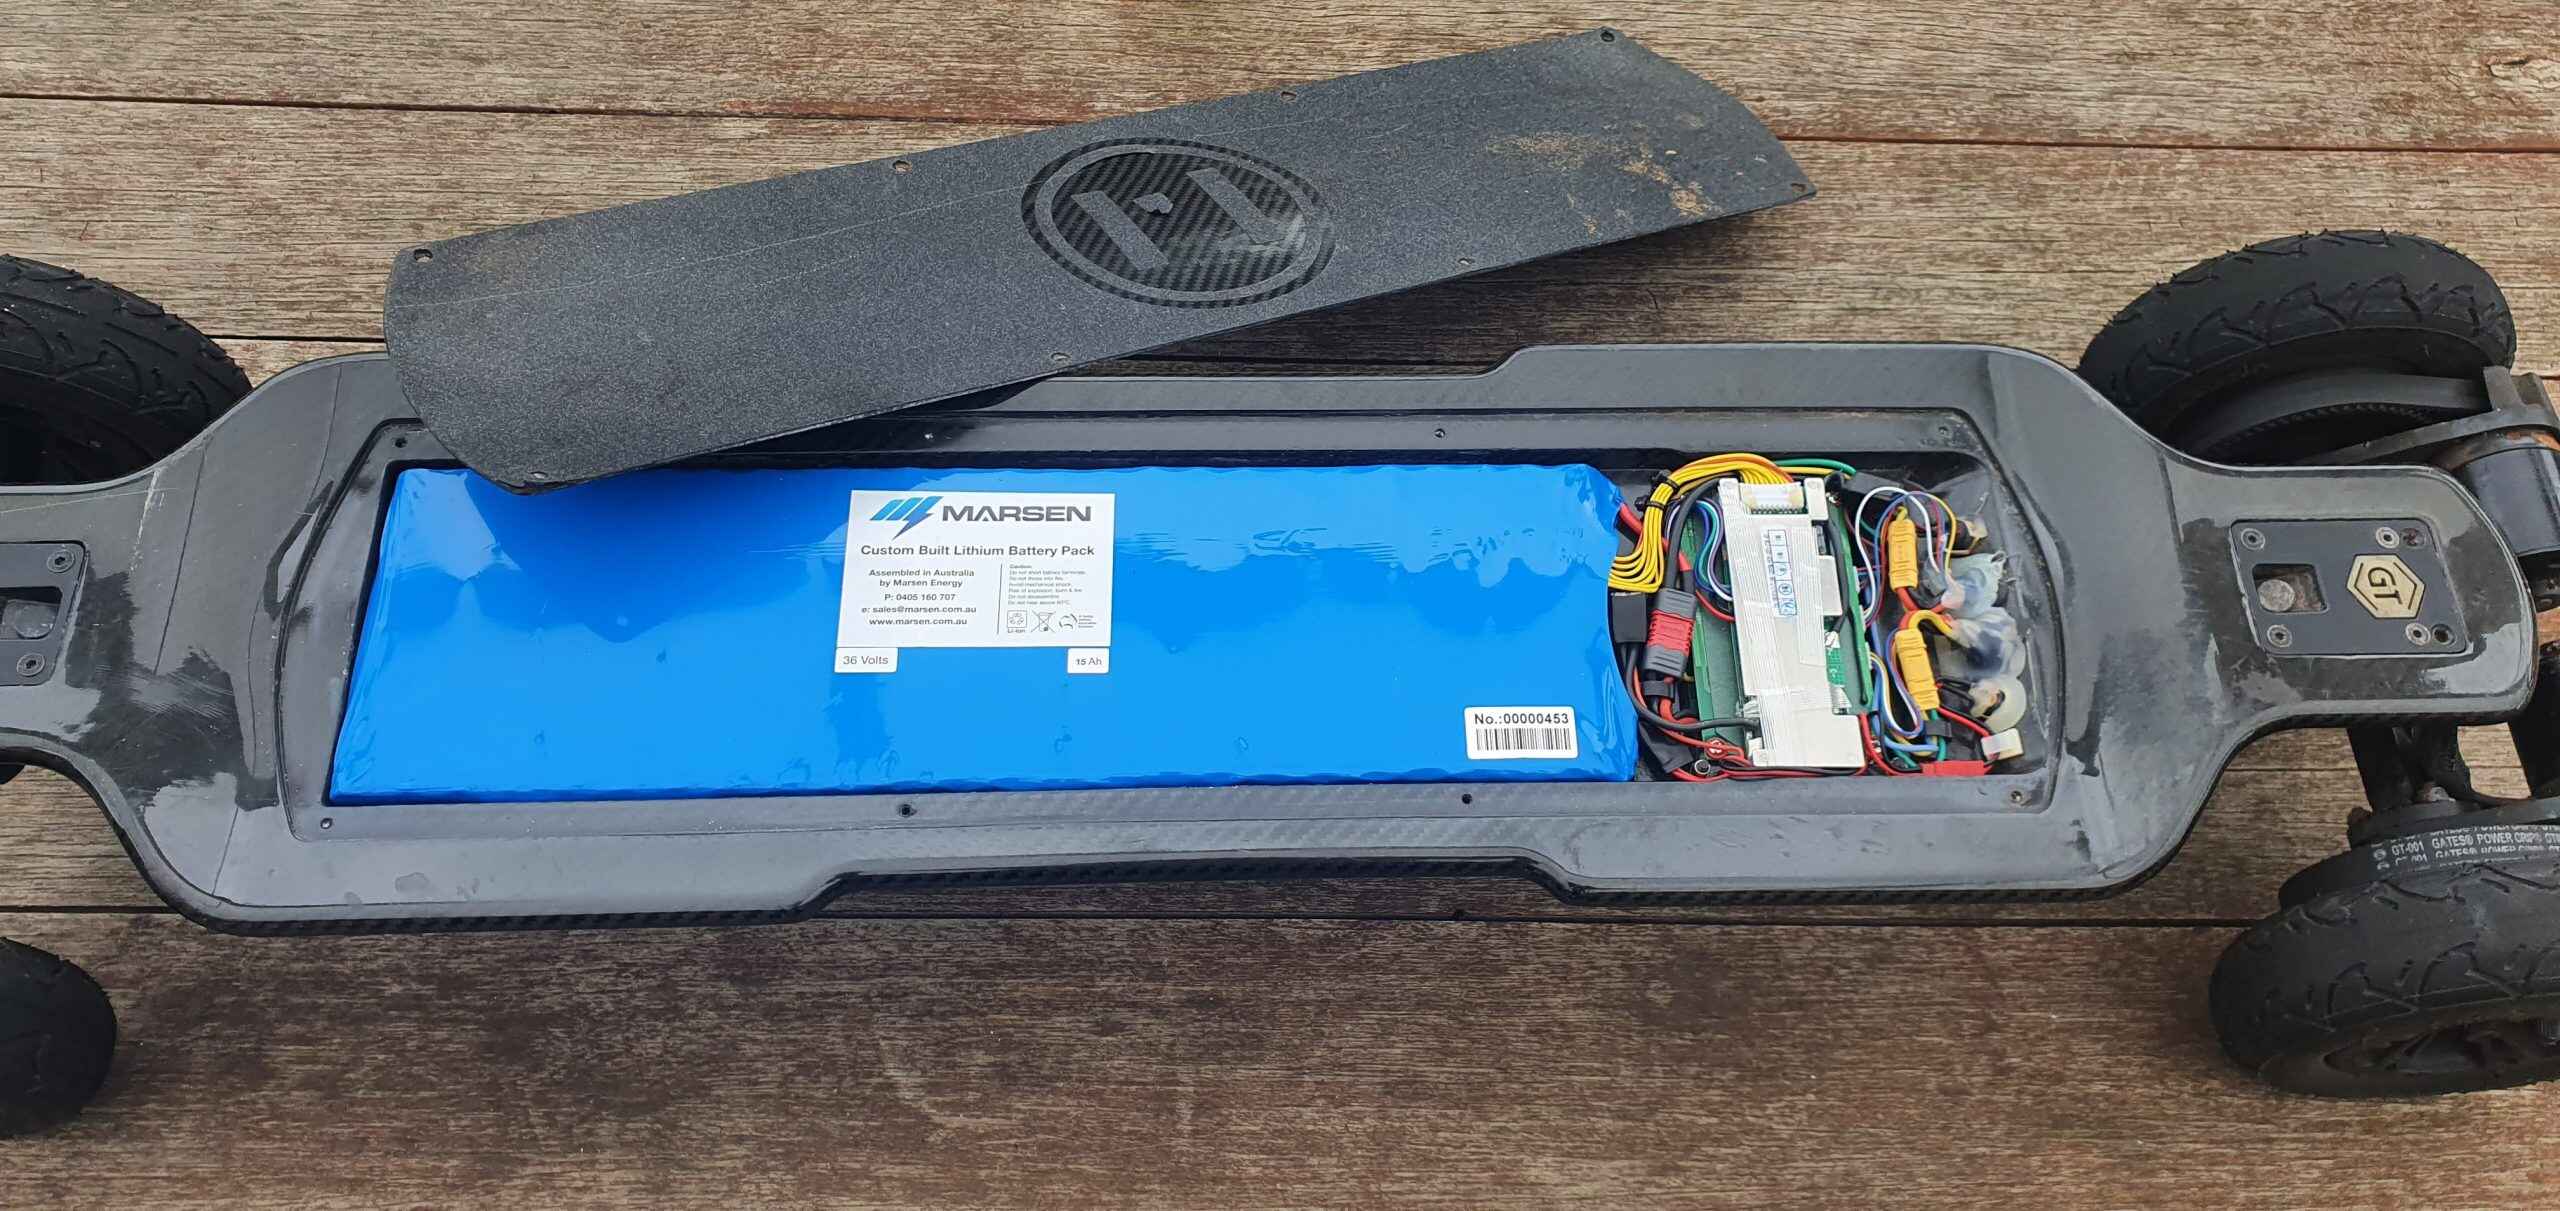
2. Battery: The battery is the backbone of your electric skateboard’s range. Lithium-ion (Li-ion) batteries are the preferred choice due to their high energy density and lighter weight. Look for batteries with a higher voltage (such as 36V or 42V) and larger capacity (e.g., 10Ah or higher) to extend your range. Consider battery cells with a higher discharge rate to provide ample power to the motor.
3. ESC (Electronic Speed Controller): The ESC controls the speed, acceleration, and braking of your electric skateboard. Opt for a reputable and reliable ESC with advanced features like regenerative braking, which helps recharge the battery when braking, ultimately increasing your range.
4. Wheels: The choice of wheels significantly impacts your electric skateboard’s range. Larger diameter wheels with a harder durometer (around 80A or higher) are ideal for reducing rolling resistance and maximizing efficiency. Look for high-quality polyurethane wheels that can handle various terrains while providing a smooth and stable ride.
5. Deck: The deck’s material and construction can affect the weight of your electric skateboard, which in turn affects the range. Opt for a lightweight and durable deck made of materials like bamboo, fiberglass, or carbon fiber. These materials offer a good balance of strength, flexibility, and weight reduction.
6. Other Considerations: Additionally, consider factors like the weight of the rider, terrain conditions, and overall design of the skateboard. Lighter riders generally experience longer range due to reduced overall load on the components. Smoother surfaces and flatter terrains also contribute to better range by minimizing resistance.
By carefully selecting the right components for your electric skateboard, you can set the foundation for an impressive long range. Remember to prioritize quality and reliability over cost, as investing in high-performance components will result in a more efficient and enjoyable riding experience.
Building the Deck
The deck of your electric skateboard not only provides a platform for you to stand on but also contributes to its overall weight and durability. Building a sturdy and lightweight deck is essential for maximizing the range of your electric skateboard. Here are the key steps to build a deck that meets these criteria:
1. Material Selection: Choose a lightweight yet durable material for your deck, such as bamboo, fiberglass, or carbon fiber. These materials offer the perfect balance of strength, flexibility, and weight reduction for optimal performance.
2. Shape and Dimensions: Determine the desired shape and dimensions of your deck based on personal preference and riding style. Consider factors like concave, width, length, and wheelbase to ensure stability and comfort during rides.
3. Deck Design: Enhance the aesthetics of your electric skateboard by adding your own unique design to the deck. You can use decals, grip tape patterns, or even custom paint jobs to give your skateboard a personalized touch.
4. Cutting and Shaping: Use appropriate tools like a jigsaw or bandsaw to cut out the desired shape of the deck from the chosen material. Take precise measurements and markings to ensure accuracy.
5. Sanding and Finishing: Smooth out any rough edges and imperfections by sanding the deck. This step not only improves the overall look and feel of the deck but also reduces any potential sharp edges that might cause injuries.
6. Mounting Holes: Drill holes in the deck to mount the trucks and other components securely. Ensure proper alignment and spacing for proper functionality.
7. Protective Coating: Apply a protective coating, such as clear polyurethane, to seal and protect the deck from moisture, scratches, and wear. This step adds durability to the deck and prolongs its lifespan.
Remember to take your time and pay attention to detail when building the deck of your electric skateboard. A well-constructed deck not only enhances the range but also contributes to a comfortable and enjoyable riding experience. With the right materials and careful craftsmanship, you can create a deck that blends aesthetics, durability, and lightweight design for optimal electric skateboard performance.
Mounting the Motors and Wheels
Mounting the motors and wheels correctly is essential to ensure proper functionality and stability of your electric skateboard. This section will guide you through the process of securely mounting these crucial components:
1. Motor Placement: Determine the ideal placement of the motors on your electric skateboard. Most commonly, motors are mounted at the back, but some designs may require a dual-motor setup with one motor on the front as well. Ensure that the motor mounts align properly with the mounting holes on the deck.
2. Motor Mounts: Use sturdy and reliable motor mounts that are compatible with your chosen motors and deck. These mounts should securely hold the motors in place and provide the necessary stability during rides. Make sure to tighten the screws and bolts properly to prevent any loose connections.
3. Wheel Assembly: Attach the wheels to the motor mounts. Depending on your specific setup, this may involve inserting the wheel onto an axle or attaching it to a hub motor. Ensure that the wheels are properly aligned and tightened to prevent any wobbling or instability while riding.
4. Belt or Direct Drive: Determine whether you want to use a belt drive or a direct drive system. Belt drives involve attaching a pulley to the motor and connecting it to another pulley on the wheel using a belt. Direct drives, on the other hand, eliminate the need for belts by directly engaging the motor with the wheel. Choose a setup that suits your preference and riding style.
5. Tensioning the Belts: If you opt for a belt drive system, ensure that the belts are appropriately tensioned. Tighten the belt enough to prevent slipping but not so tight that it puts excessive strain on the motor. Adjust the tension as needed to achieve optimal performance.
6. Wheel Alignment: Check the alignment of the wheels to ensure they are parallel and facing the right direction. Misalignment can lead to uneven wear, reduced efficiency, and potential issues with stability and control.
7. Test and Adjust: Before finalizing the mounting, perform a test run to ensure that the motors and wheels are functioning correctly. Check for any unusual noises, vibrations, or inconsistencies. Make any necessary adjustments to optimize performance and eliminate any problems.
Remember to follow the manufacturer’s guidelines and instructions when mounting the motors and wheels. Secure and precise mounting is crucial for the overall performance and safety of your electric skateboard, allowing you to enjoy a smooth and reliable ride while maximizing the range.
Installing the Battery and Electronics
Installing the battery and electronics correctly is crucial in building a functional and efficient electric skateboard. This section will guide you through the process of safely and securely installing these essential components:
1. Battery Selection: Choose a high-quality lithium-ion battery with the appropriate voltage and capacity for your electric skateboard. Consider factors such as size, weight, and discharge rate to ensure compatibility with your chosen deck and motor setup.
2. Battery Enclosure: Select a suitable battery enclosure that can securely house the battery while protecting it from impacts, moisture, and other environmental factors. Ensure that the enclosure provides proper ventilation to prevent overheating.
3. Mounting the Battery: Place the battery inside the chosen enclosure and position it on the deck in a balanced and secure manner. Use straps, brackets, or other fastening methods to hold the battery and enclosure firmly in place. Ensure that the weight distribution is even to maintain stability and control during rides.
4. Cable Management: Properly organize and secure the cables and wiring to prevent tangling, damage, or interference with other components. Use cable management solutions like zip ties or cable clips to keep the cables neatly organized and away from moving parts or areas prone to damage.
5. ESC Installation: Mount the ESC (Electronic Speed Controller) in a convenient and accessible location on the deck. Ensure that it is securely fastened and protected from vibrations and impacts. Follow the manufacturer’s instructions for proper wiring and connection to the battery and motor.
6. Other Electronics: Install any additional electronics required for your electric skateboard, such as a receiver for the remote controller or a voltage display for monitoring battery status. Securely mount these components in suitable locations, ensuring easy access and protection from external elements.
7. Testing: Before fully securing all components, perform a thorough test to ensure that the battery and electronics are functioning correctly. Test the connectivity, responsiveness, and overall performance of the ESC, remote controller, and other electronic systems. Address any issues or malfunctions promptly.
Remember, safety should always be a priority when installing the battery and electronics. Avoid shortcuts, use high-quality components, and follow proper wiring and installation practices. Taking the time to install these components properly will ensure a reliable and enjoyable electric skateboard experience, while maximizing the range and efficiency of your ride.
Wiring and Connecting the Components
Proper wiring and connection of the components in your electric skateboard is essential for seamless functionality and optimal performance. This section will guide you through the process of wiring and connecting the various components:
1. Plan Your Wiring: Before starting the wiring process, take the time to plan the layout and routing of the cables. Consider factors such as component placement, cable length, and accessibility. This will help ensure a clean and organized wiring setup.
2. Battery Connections: Connect the positive (+) and negative (-) terminals of the battery to the corresponding terminals of the ESC. Use high-quality connectors or solder the connections for reliability and to prevent accidental disconnections. Double-check the polarity of the connections to avoid damaging the components.
3. ESC Wiring: Follow the manufacturer’s instructions to connect the ESC to the motor(s), remote receiver, and other necessary components. Securely connect the motor phase wires to the appropriate connectors on the ESC, ensuring the correct order and polarity. Connect the remote receiver to the ESC for wireless control.
4. Motor Connections: If your electric skateboard has a dual-motor setup, ensure that both motors are properly connected to the ESC. Each motor should have its own set of phase wires connected to the corresponding motor output on the ESC. Check for any loose connections or issues with the motor wiring.
5. Sensor and Sensorless Motors: If you are using a sensorless motor, you can skip connecting the motor sensor wires to the ESC. For sensor motors, carefully connect the sensor wires from the motor to the corresponding sensor input on the ESC. Ensure proper alignment and polarity.
6. Cable Management: Neatly organize and secure the cables using cable ties, clips, or conduit to prevent tangling, damage, or interference. Adequately protect the cables from abrasion, vibrations, and exposure to the elements. Keep the cables away from moving parts or areas that can potentially cause damage.
7. Test and Troubleshoot: After completing the wiring, perform a thorough test to ensure all components are functioning properly. Test the throttle, braking, and reverse functionality using the remote controller. Check for any electrical issues, loose connections, or abnormal behavior. Troubleshoot and fix any problems accordingly.
Throughout the wiring process, pay close attention to detail and ensure meticulous connections. Properly wired and connected components significantly contribute to the reliability and performance of your electric skateboard, allowing for a seamless and enjoyable ride with an extended range.
Setting up the Remote Controller
The remote controller is a vital part of your electric skateboard as it allows you to control the speed, acceleration, and braking of the board. Properly setting up and calibrating the remote controller is essential for a smooth and responsive ride. Follow these steps to effectively set up your remote controller:
1. Read the Manual: Familiarize yourself with the user manual or instructions that come with your remote controller. Understand the specific features and functions of your controller, as this may vary depending on the brand and model.
2. Insert Batteries: Ensure the remote controller has fresh batteries or is fully charged if it uses a rechargeable battery. Follow the instructions provided to correctly insert the batteries or charge the remote.
3. Pairing: Pairing the remote controller with the receiver on your electric skateboard is crucial for communication between the two devices. Follow the manufacturer’s instructions to establish a stable connection between the remote and receiver.
4. Calibration: Most remote controllers have a calibration function to ensure accurate throttle response. Consult the manual for specific calibration instructions. Typically, this involves holding certain buttons or combinations while turning the remote or following a sequence of steps.
5. Test Range and Functions: In a safe and open area, test the range of your remote controller. Walk away from your electric skateboard while operating the remote to ensure that it maintains a reliable connection. Test all the functions, including acceleration, deceleration, and braking, to ensure they are working correctly.
6. Adjust Settings: Many remote controllers offer adjustable settings, such as speed modes or sensitivity controls. Explore these options to customize your riding experience according to your skill level and preferences.
7. Secure the Remote: Use a wrist strap or other methods provided to secure the remote controller to your hand or wrist. This reduces the risk of accidentally dropping or losing control of the remote during rides.
8. Regular Maintenance: Keep your remote controller in good condition by regularly cleaning and inspecting it for any signs of damage or wear. Ensure that the buttons, dials, or switches are functioning properly and respond accurately to your commands.
Properly setting up your remote controller ensures that you have complete control over your electric skateboard, allowing you to fully enjoy your rides while maximizing the range. Take the time to understand and calibrate your remote controller to enhance your overall riding experience and safety.
Testing and Troubleshooting
Once you have built and set up your electric skateboard, it’s crucial to perform thorough testing to ensure everything is functioning correctly. Additionally, it’s important to know how to troubleshoot any issues that may arise. Follow these guidelines for effective testing and troubleshooting:
1. Pre-Ride Inspection: Before each ride, inspect your electric skateboard for any visible damage, loose connections, or abnormal sounds. Check the tightness of the bolts, the integrity of the wiring, and the condition of the wheels and trucks.
2. Test the Motor and Braking: In a safe and open area, test the motor performance and braking by gradually accelerating and then applying the brakes. Observe for any unusual noises, vibrations, or inconsistency in speed or braking power. Adjust the throttle and brake settings if necessary.
3. Range Test: To determine the range of your electric skateboard, fully charge the battery and take it for a ride until the battery is almost fully depleted. Note the distance covered and compare it with the expected range based on the specifications of your components. This will give you an idea of the actual range you can expect from your skateboard.
4. Battery Monitoring: Keep an eye on the battery level throughout your rides. Slow down or return to a charging point when the battery level drops significantly to ensure you don’t get stranded with a dead battery. Regularly monitor and maintain the battery to prolong its lifespan.
5. Troubleshooting: If you encounter any issues during testing or while riding, troubleshoot the problem systematically. Check for loose connections, damaged wires, or faulty components. Refer to the user manuals or online resources for specific troubleshooting steps related to your electric skateboard’s components.
6. Seek Professional Help if Needed: If you are unable to identify or resolve the issue on your own, consider reaching out to a professional electric skateboard technician or the manufacturer’s customer support for assistance. They can provide expert guidance and help diagnose and fix any complex problems.
7. Regular Maintenance: Regularly maintain your electric skateboard by cleaning and inspecting it for any signs of wear or damage. Keep the components clean and lubricate the moving parts as per the manufacturer’s recommendations. This will help prolong the lifespan of your electric skateboard and ensure optimal performance and range.
Testing your electric skateboard and troubleshooting any issues is a crucial part of owning and maintaining a reliable and high-performance ride. By following these guidelines, you can address any potential problems and enjoy a safe and smooth riding experience with your electric skateboard.
Fine-tuning for Long Range
If you want to maximize the range of your electric skateboard, there are several fine-tuning techniques and adjustments you can make. By optimizing various aspects of your skateboard, you can extend the distance you can travel on a single charge. Here are some tips for fine-tuning your electric skateboard for long range:
1. Aerodynamics: Reduce wind resistance by adjusting your riding position. Crouch down slightly and position your body to decrease drag, allowing you to maintain higher speeds for longer distances. It may take some practice to find the most aerodynamic riding posture.
2. Tire Pressure: Adjusting the tire pressure can significantly impact the range of your electric skateboard. Lower tire pressure increases rolling resistance but provides better shock absorption on rough terrains. Higher tire pressure reduces rolling resistance, enabling the skateboard to roll more efficiently. Experiment and find the right balance based on your riding style and the type of terrain you typically encounter.
3. Smooth Riding Techniques: Smooth and controlled acceleration can improve efficiency and conserve battery power. Avoid sudden bursts of speed or aggressive braking. Instead, gradually increase speed and use gentle braking techniques. Enhance your balance and stability to maintain a consistent and efficient riding experience.
4. Terrain Selection: Consider choosing flatter routes to maximize your electric skateboard’s range. Hilly terrains require more power to ascend and can deplete the battery quicker. If possible, plan your rides to minimize steep inclines and utilize more even surfaces.
5. Energy Recovery: Take advantage of regenerative braking, if your electric skateboard supports it. Regenerative braking converts the energy generated during braking back into the battery, effectively extending the range. Practice controlled and gradual braking to optimize energy recovery.
6. Energy-saving Features: Some electric skateboards come with energy-saving features like eco mode or different speed modes. Utilize these features to adjust the power output and optimize the range according to your riding needs. Riding in lower power or eco mode can significantly increase the distance you can travel on a single charge.
7. Battery Maintenance: Properly maintain your battery by following the manufacturer’s guidelines. Regularly charge and store the battery according to the recommended procedures. Avoid extreme temperatures and keep the battery within the specified voltage range. Ensuring the health and longevity of your battery will help maintain its capacity and overall range.
8. Weight Reduction: Minimize unnecessary weight on your electric skateboard to increase range. Remove any accessories or cargo that might add unnecessary load to the skateboard. Consider opting for lighter components during the building process to reduce overall weight.
By implementing these fine-tuning techniques, you can significantly increase the range of your electric skateboard. Experiment with different adjustments and configurations to find the optimal setup that suits your riding preferences and desired distance goals.
Conclusion
Building an electric skateboard with a long range requires careful consideration of components, construction, and optimization techniques. By selecting the right components, such as a high-quality motor, battery, ESC, and wheels, you set the foundation for extended range and improved performance. Building a sturdy and lightweight deck, mounting the motors and wheels correctly, and installing the battery and electronics securely ensure the reliability and functionality of your electric skateboard. Proper wiring, connection, and setup of the remote controller allow for precise control and responsiveness.
Once your electric skateboard is built, it’s important to thoroughly test its performance, range, and functionality. Engage in troubleshooting and fine-tuning to address any issues and optimize various aspects of your skateboard for long range. Factors like aerodynamics, tire pressure, smooth riding techniques, and energy recovery all contribute to maximizing the distance you can travel on a single charge.
Regular maintenance, including battery care and weight reduction, helps preserve the range and overall performance of your electric skateboard. By following these guidelines and investing time and effort into building and fine-tuning your skateboard, you can create a reliable, efficient, and enjoyable electric skateboard experience with an impressive long range.
So, gear up, get your tools ready, and start building your own electric skateboard with a long range. Embark on this exciting journey and discover the freedom and thrill of gliding effortlessly while conquering longer distances on your electric skateboard!