Introduction
Welcome to this comprehensive guide on how to make an electric skateboard battery. Electric skateboards have gained immense popularity in recent years, offering an exciting and eco-friendly mode of transportation. One critical component of an electric skateboard is the battery, which powers the motor and allows for a smooth and reliable ride.
In this guide, we will take you through the step-by-step process of creating your own electric skateboard battery. Whether you’re a DIY enthusiast, an electric skateboard enthusiast, or simply looking for a cost-effective solution, this guide is for you.
Creating your own electric skateboard battery can be a rewarding and fulfilling project. Not only will you have a battery specifically tailored to your skateboard’s needs, but you’ll also gain a deeper understanding of the technology behind electric skateboards.
Throughout this guide, we will discuss the materials needed, the planning and research required, and the step-by-step process of assembling and testing your battery pack. We will also cover essential safety considerations to ensure that you have a reliable and secure battery for your electric skateboard.
Please note that creating an electric skateboard battery requires some technical knowledge and skills, particularly in soldering and electronics. If you don’t feel comfortable undertaking this project on your own, it’s always advised to seek assistance from a professional or experienced DIYer.
Ready to get started? Let’s dive into the materials needed for this exciting endeavor.
Materials Needed
Before you begin assembling your electric skateboard battery, it’s important to gather all the necessary materials. Having everything prepared and organized will streamline the process and help ensure a successful outcome. Here are the materials you’ll need:
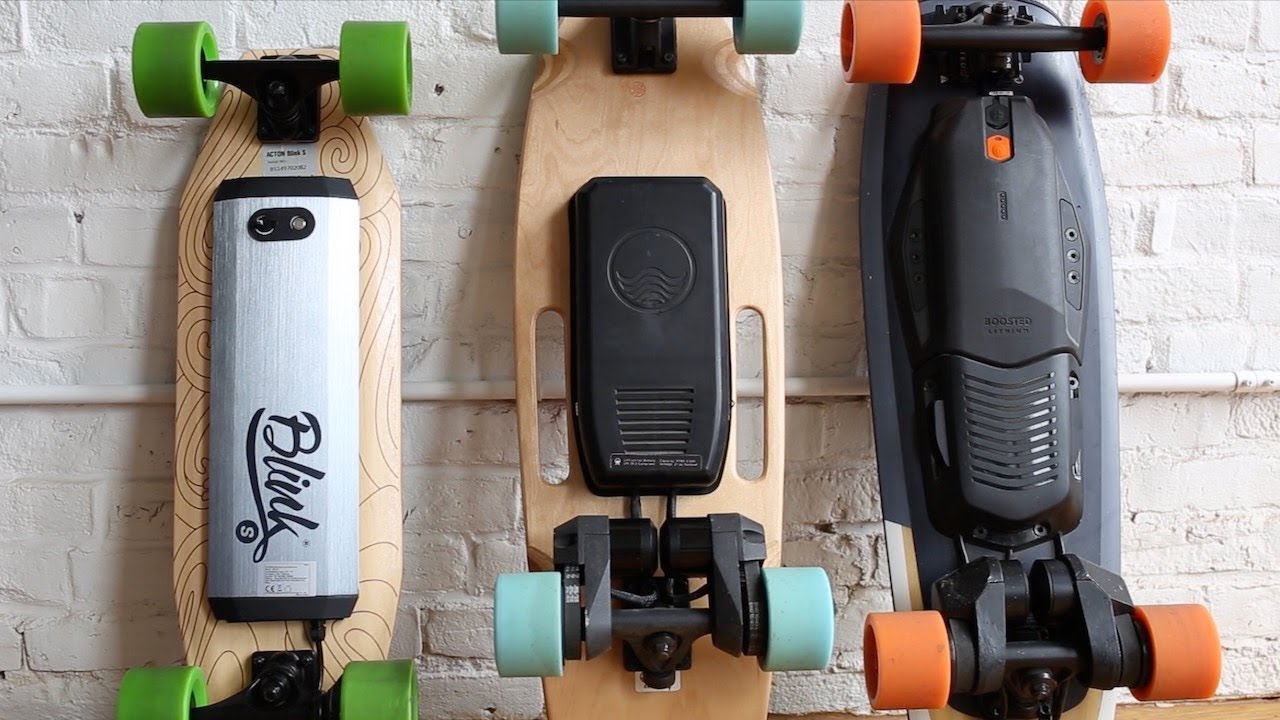
- Battery Cells: The heart of your electric skateboard battery pack, you’ll need high-quality lithium-ion battery cells. Choose cells that are suitable for your skateboard’s voltage and capacity requirements.
- Battery Management System (BMS): A BMS is vital for monitoring and protecting your battery pack. It balances the cells, prevents overcharging and discharging, and provides temperature and voltage monitoring.
- Nickel Strip: Nickel strips are used for connecting the battery cells. Ensure that you have enough of the appropriate width and thickness for your battery assembly.
- Soldering Iron: A good quality soldering iron is essential for connecting the nickel strips and other components. It’s important to have a soldering iron with temperature control to prevent damage to the cells.
- Solder: High-quality solder is necessary for creating reliable connections between the battery cells and other components. Choose a solder that is suitable for electronics work.
- Wire: You’ll need wire of appropriate gauge for connecting the battery cells to the BMS and other components. Make sure that the wire is capable of handling the current flow without excessive voltage drop.
- Heat Shrink Tubing: Heat shrink tubing is used to insulate and protect the connections and ensure they remain secure. Have a variety of sizes available to accommodate different wire and component sizes.
- Enclosure: Depending on your skateboard design, you’ll need an enclosure to house the battery pack. This can be a custom-made case, a waterproof box, or a purchased battery enclosure.
- Velcro Straps or Mounting Hardware: To secure the battery pack to your electric skateboard, you’ll need appropriate straps or mounting hardware. Consider the weight and stability of your battery pack when selecting these materials.
- Protective Gear: Last but not least, ensure that you have proper safety gear such as safety glasses, gloves, and a suitable workspace to protect yourself during the assembly process.
These are the essential materials needed for creating your own electric skateboard battery. It’s crucial to source high-quality components to ensure the safety and performance of your battery pack. Now that you have all the necessary materials, it’s time to move on to the planning and research phase.
Step 1: Research and Planning
Embarking on the journey of making your own electric skateboard battery begins with thorough research and careful planning. This step is crucial to ensure that your battery assembly meets your skateboard’s requirements and performs optimally. Here are the key aspects to consider during this phase:
Skateboard Specifications: Start by understanding your electric skateboard’s specifications. Take note of the required voltage and capacity for the battery pack, as well as any physical limitations on size and weight. This information will guide your selection of battery cells and other components.
Battery Type: There are different types of batteries available, but for electric skateboards, lithium-ion batteries are the most common choice due to their high energy density and lighter weight. Research various lithium-ion battery chemistries, such as LiFePO4 or Li-ion NMC, and determine which one best suits your requirements in terms of performance, safety, and cost.
Capacity and Range: Determine the desired battery capacity and range for your electric skateboard. Higher-capacity batteries will provide longer ride times, but keep in mind that they will also be heavier. Consider the weight-to-range ratio that aligns with your needs.
Cell Configuration: Decide on the configuration of your battery cells. Common configurations include series, parallel, or a combination of both. Series connections increase voltage, while parallel connections increase capacity. Determine the right balance based on your skateboard’s voltage and capacity requirements.
Battery Management System (BMS): A BMS is crucial for ensuring the safety and longevity of your battery pack. Research and select a BMS that is compatible with your battery cells and offers features like overcharge protection, temperature monitoring, and balancing capabilities.
Charging and Discharging: Understand the charging and discharging requirements of your battery. Determine the appropriate charger and charging method to maintain the battery’s health and maximize its lifespan.
Safety Considerations: Safety should be a top priority when working with electric skateboard batteries. Research proper handling techniques, storage guidelines, and safety measures to minimize the risk of accidents or damage. Be aware of potential hazards, such as short circuits or overcharging, and take necessary precautions.
Cost and Budget: Consider your budget and the overall cost of materials and components. Research different suppliers, compare prices, and make informed decisions to ensure you stay within your budget while maintaining quality.
By thoroughly researching and planning every aspect of your electric skateboard battery, you will have a solid foundation for the subsequent steps of the assembly process. Understanding the requirements, choosing the right components, and considering safety precautions are crucial for a successful outcome. With your research and planning complete, it’s time to move on to the next step: selecting the battery type.
Step 2: Selecting the Battery Type
Selecting the right battery type is a critical decision when making an electric skateboard battery. The battery type will directly affect the performance, range, and overall experience of your electric skateboard. Here are some factors to consider when choosing the battery type:
Energy Density: Energy density refers to the amount of energy that can be stored in a given volume or weight. For electric skateboards, it’s important to choose a battery type with high energy density to maximize the range and keep the weight of the battery pack as low as possible. Lithium-ion batteries, such as LiFePO4 or Li-ion NMC, are popular choices due to their high energy density.
Cycle Life: Cycle life refers to the number of charge and discharge cycles a battery can undergo while retaining a substantial capacity. It’s essential to choose a battery type that offers a high cycle life to ensure long-term reliability and durability for your electric skateboard battery.
Voltage and Capacity: Consider the voltage and capacity requirements of your skateboard. The voltage will depend on the motor specifications, while capacity will determine the range of your skateboard. Ensure that the selected battery type can provide the required voltage and capacity to meet your performance expectations.
Safety: Safety is of utmost importance when selecting a battery type. Look for batteries that have built-in safety features such as thermal protection, overcharge protection, and short circuit protection. It’s better to invest in a battery type that prioritizes safety to prevent any potential accidents or damages.
Cost: Cost is another factor to consider when choosing the battery type. While it’s tempting to opt for cheaper options, it’s important to balance cost with quality and performance. Investing in a high-quality battery type may be more expensive initially, but it will likely offer better performance and longevity in the long run.
Availability: Ensure that the chosen battery type is readily available from reliable suppliers. This will make it easier to source replacement batteries or expand your battery pack in the future if desired. It’s also recommended to check customer reviews and feedback to gauge the reliability and performance of the battery type.
By considering these factors, you can make an informed decision when selecting the battery type for your electric skateboard. The right battery type will provide the necessary power and performance, ensuring an exhilarating and reliable ride. Once you’ve chosen the battery type, the next step is purchasing the battery cells required for your battery pack assembly.
Step 3: Purchasing Battery Cells
After deciding on the battery type for your electric skateboard, the next step is to purchase the battery cells. Battery cells are the building blocks of your battery pack and choosing the right cells is crucial for optimal performance and safety. Here are some key considerations when purchasing battery cells:
Quality and Brand: It’s important to choose high-quality battery cells from reputable brands. Quality cells will ensure reliability, longevity, and consistent performance for your electric skateboard.
Cell Specifications: Look for battery cells that meet the voltage and capacity requirements of your skateboard. Consider the specific chemistry, such as LiFePO4 or Li-ion NMC, and the nominal voltage and capacity of the cells. Be sure to match the cell specifications with your skateboard’s needs.
Cell Configuration: Determine the cell configuration based on your desired voltage and capacity. Decide whether you want to connect the cells in series, parallel, or a combination of both to achieve the desired voltage and capacity for your electric skateboard.
Seller’s Reputation: Purchase battery cells from reputable sellers who specialize in lithium-ion or electric vehicle batteries. Do your research, read reviews, and ensure that the seller has a good reputation for quality products and customer service.
Battery Tests and Certifications: Check if the battery cells have undergone relevant tests and certifications, such as UN38.3 for transportation safety or IEC 62133 for cell safety. This ensures that the cells meet safety standards and are suitable for use in your electric skateboard.
Capacity and Discharge Rating: Consider the capacity and discharge rating of the battery cells. Higher capacity cells will provide longer ride times, while cells with higher discharge ratings can handle more current and deliver better performance.
Quantity: Determine the number of battery cells you’ll need for your skateboard’s voltage and capacity requirements. Consider purchasing a few extra cells as spares or for future upgrades.
Budget: Consider your budget when purchasing battery cells. While it’s important to invest in high-quality cells, be mindful of the cost and look for cells that offer a good balance between quality and affordability.
Once you have thoroughly researched and considered these factors, you can confidently proceed with purchasing the battery cells for your electric skateboard. Remember to double-check the compatibility of the chosen cells with your battery type, skateboard specifications, and other components. With the battery cells in hand, you’re ready to move on to the next step: calculating the battery capacity and voltage.
Step 4: Calculating Battery Capacity and Voltage
Now that you have purchased the battery cells for your electric skateboard, it’s time to calculate the battery capacity and voltage. These calculations will determine the overall performance and range of your skateboard. Here’s how to calculate the battery capacity and voltage:
Battery Capacity: The battery capacity refers to the amount of electrical charge the battery can store. It is typically measured in ampere-hours (Ah) or milliampere-hours (mAh). To calculate the battery capacity, multiply the capacity of a single battery cell by the total number of cells in your battery pack. For example, if each battery cell has a capacity of 2.2Ah and you have 8 cells in your battery pack, the total capacity would be 2.2Ah x 8 = 17.6Ah.
Battery Voltage: The battery voltage is the electrical potential difference between the positive and negative terminals of the battery. To calculate the battery voltage, multiply the nominal voltage of a single battery cell by the number of cells connected in series. For example, if each battery cell has a nominal voltage of 3.7V and you have 10 cells connected in series, the total voltage would be 3.7V x 10 = 37V.
Total Energy: The total energy of the battery pack can be calculated by multiplying the battery capacity by the battery voltage. This will give you the total energy in watt-hours (Wh). For example, if you have a battery capacity of 17.6Ah and a voltage of 37V, the total energy would be 17.6Ah x 37V = 651.2Wh.
Estimated Range: The estimated range of your electric skateboard can be calculated by considering the efficiency of your skateboard’s motor and the average power consumption during rides. Divide the total energy of the battery pack by the average power consumption to get an approximate range. Keep in mind that other factors, such as terrain and rider weight, can also affect the range.
By accurately calculating the battery capacity and voltage, you can ensure that your electric skateboard performs optimally and meets your desired range requirements. These calculations will guide you in determining the appropriate battery configuration, charger specifications, and other components for your battery assembly. With the battery capacity and voltage calculated, you’re ready to move on to the next step: assembling the battery pack.
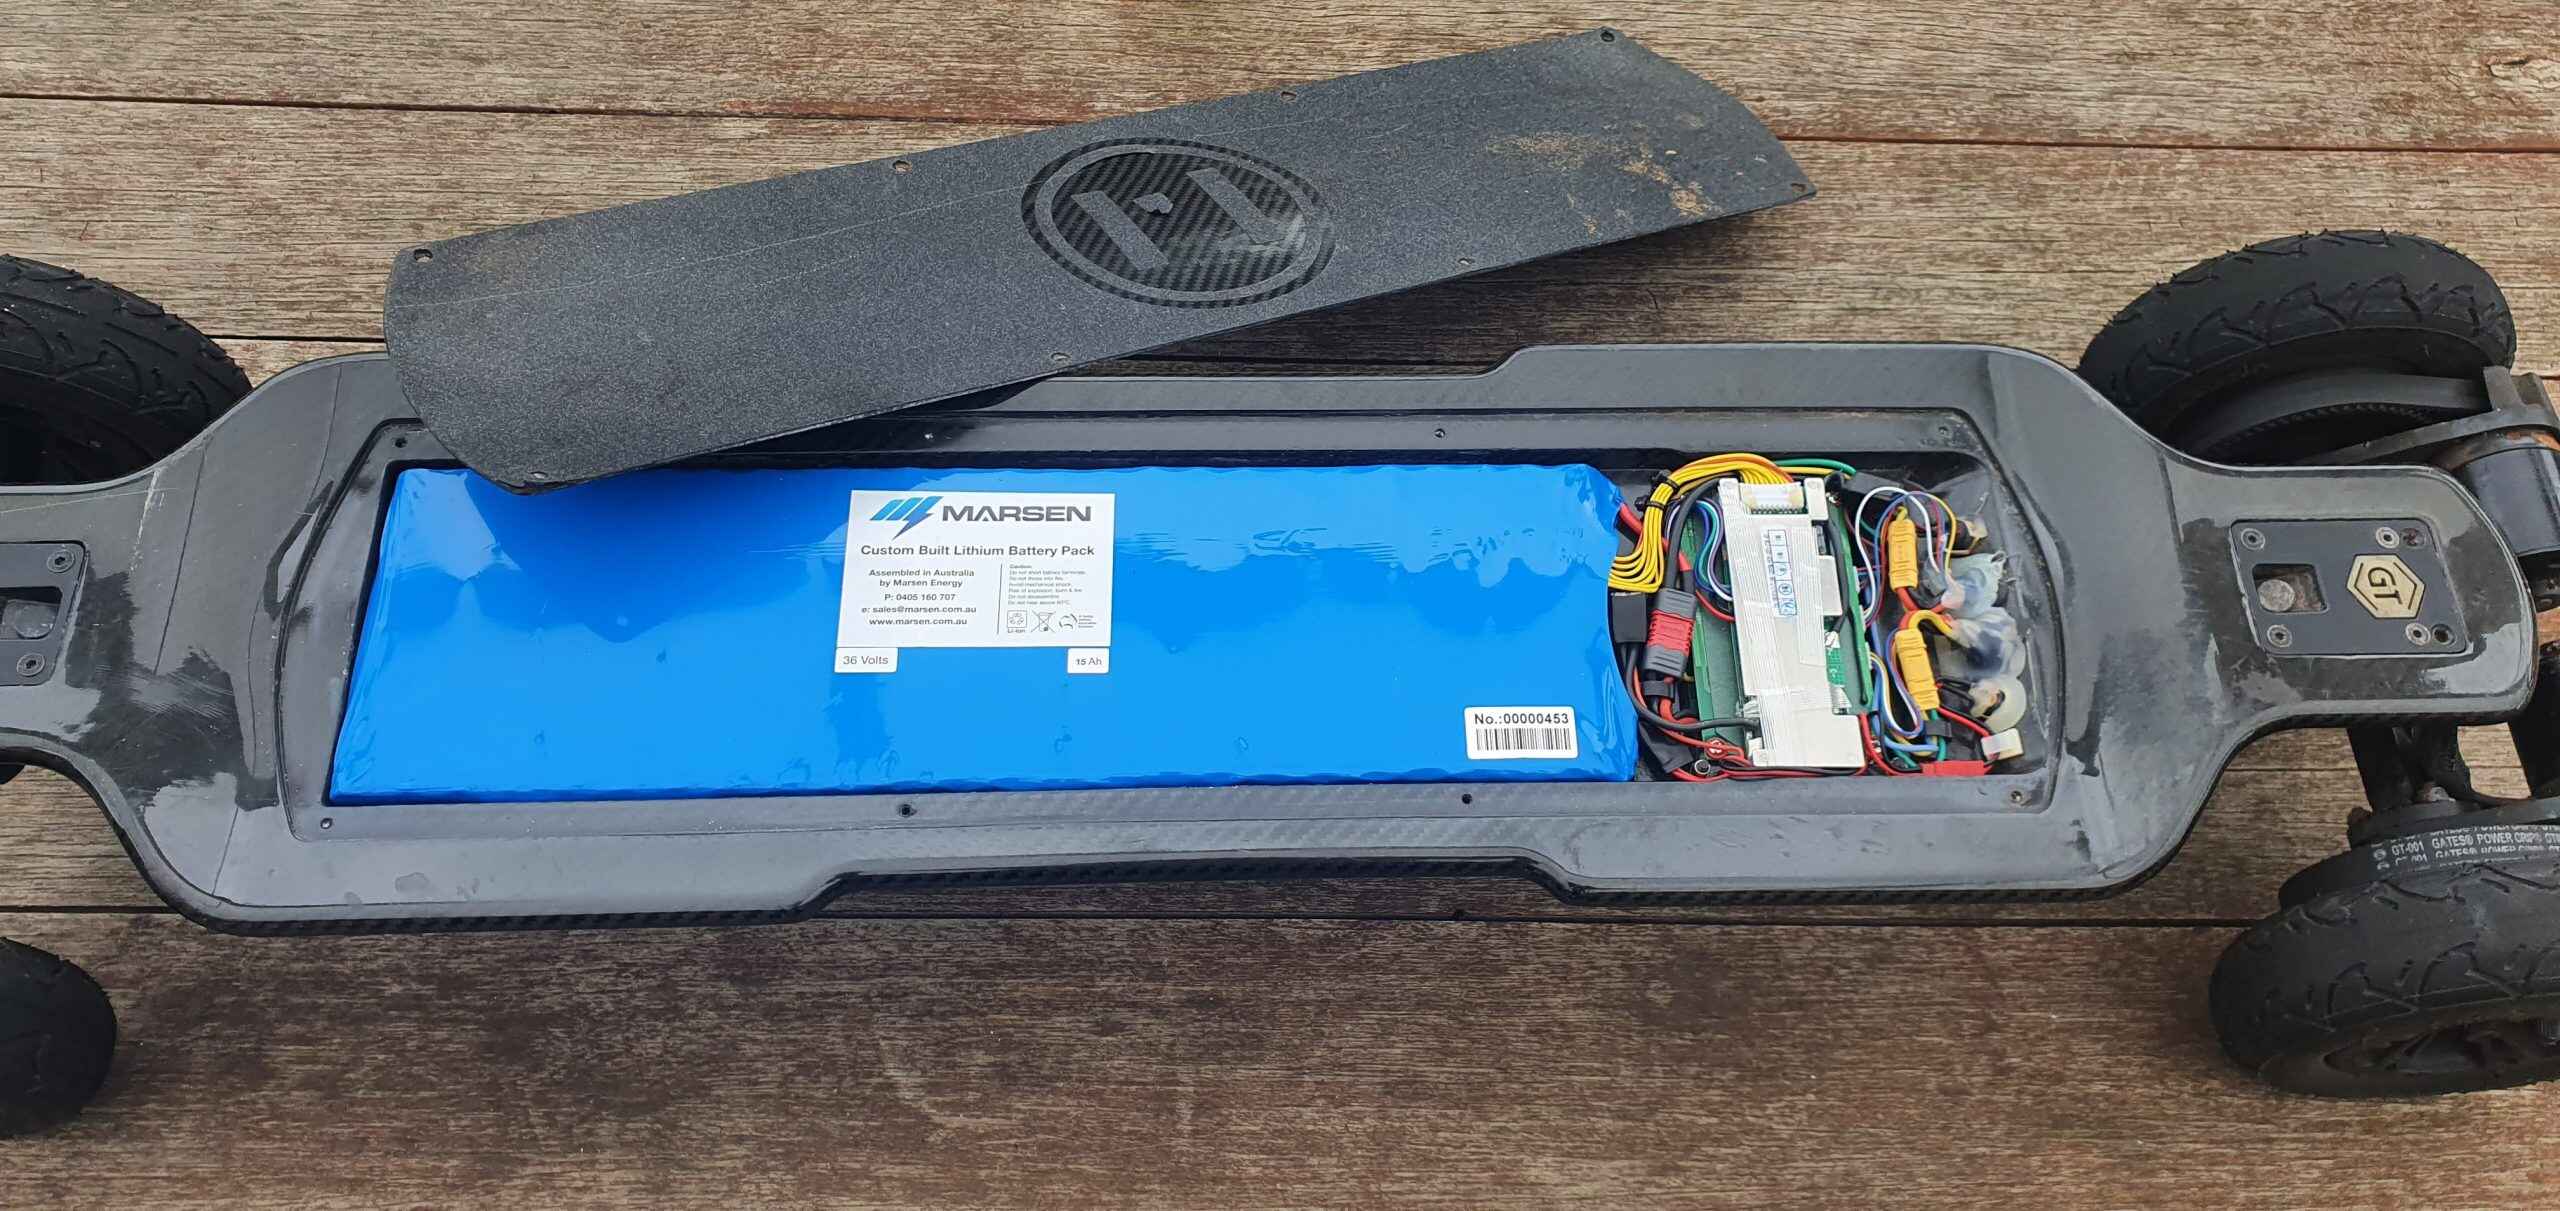
Step 5: Assembling Battery Pack
Now that you have the battery cells, calculated the capacity and voltage, it’s time to assemble the battery pack for your electric skateboard. The assembly process requires attention to detail and careful handling of the cells to ensure a safe and reliable battery pack. Here’s how to assemble the battery pack:
Prepare the Battery Cells: Start by inspecting the battery cells for any damage or defects. Ensure that the cells are properly balanced in terms of voltage. If necessary, balance the voltage using a battery balancer to equalize the charge levels of each cell.
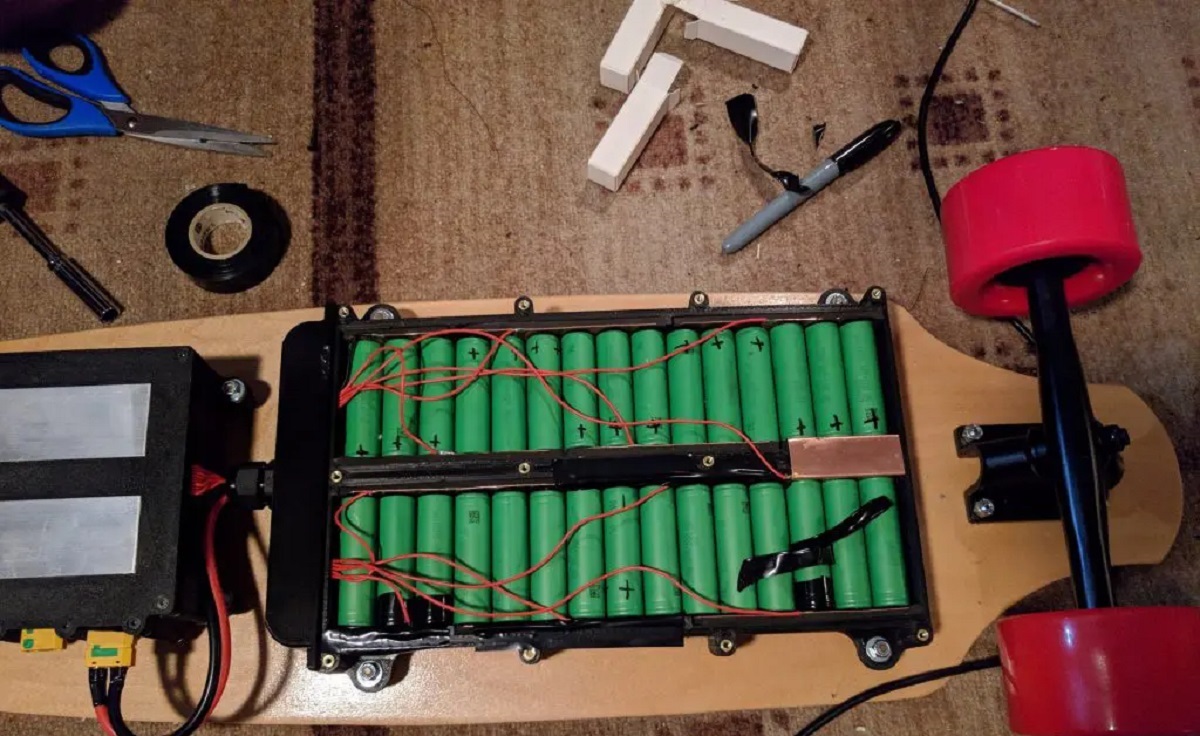
Arrange the Battery Cells: Based on your calculated battery configuration, arrange the battery cells accordingly. Connect the cells in series and/or parallel using nickel strips and soldering. Make sure to follow the correct polarity and wiring sequence to avoid any short circuits.
Solder the Battery Connections: Use a soldering iron and solder to securely join the nickel strips and battery cell terminals. Apply heat to the connection point and feed solder onto the joint until it forms a strong and reliable bond. Avoid overheating the cells and use heat-resistant materials to protect them during the soldering process.
Add the Battery Management System (BMS): Attach the Battery Management System (BMS) to the battery pack. Connect the BMS to the appropriate terminals of the battery cells, ensuring correct polarity. Follow the manufacturer’s instructions for wiring and connecting the BMS components properly.
Insulate and Protect the Connections: Cover the soldered connections and exposed battery terminals with heat shrink tubing to insulate and protect them. Use a heat gun to carefully shrink the tubing around the connections, creating a secure and insulated barrier. Ensure that there are no exposed metal parts that can cause a short circuit.
Secure the Battery Pack: Place the assembled battery pack in the chosen enclosure or secure it to the skateboard frame using Velcro straps or mounting hardware. Ensure that the battery pack is securely fastened and provides proper weight distribution for the skateboard.
Double-Check the Connections: Before proceeding, double-check all the connections, wiring, and polarity. Look for any potential issues or loose connections that could affect the battery pack’s performance or safety. Ensure that all wiring is properly insulated and routed to avoid any accidental damage during use.
It’s important to exercise caution during the battery pack assembly process and refer to reputable resources or seek guidance from experienced DIYers if needed. Take your time and double-check each step to ensure a proper and reliable battery pack for your electric skateboard. With the battery pack assembled, the next step is to add a Battery Management System (BMS) for monitoring and protection.
Step 6: Soldering Battery Cells
Soldering the battery cells is a crucial step in assembling the battery pack for your electric skateboard. Proper soldering ensures secure connections between the battery cells, allowing for efficient power transfer and overall performance. Here’s a step-by-step guide for soldering the battery cells:
Prepare the Work Area: Set up a clean and well-ventilated workspace before starting the soldering process. Ensure that you have all the necessary tools and materials within reach.
Prepare the Battery Cells: Inspect the battery cells for any defects or damages. Clean the terminals of the battery cells using a battery terminal cleaner or isopropyl alcohol to remove any dirt or residue.
Strip the Nickel Strips: Cut nickel strips to the appropriate length for connecting the battery cells. Strip the ends of the nickel strips to expose the bare metal. It is important to use a sharp tool to prevent any damage to the cells during the stripping process.
Apply Flux: Apply a small amount of flux to the stripped ends of the nickel strips. Flux helps to improve the flow of solder and ensures a stronger connection between the nickel strips and the battery cell terminals.
Position the Nickel Strips: Carefully position the nickel strips on the battery cell terminals, ensuring proper alignment. The nickel strip should cover a portion of the terminal and extend beyond the cell surface to allow for soldering.
Solder the Connections: Use a soldering iron with temperature control to heat the nickel strip and battery terminal. Apply a small amount of solder to the joint, allowing it to flow and create a secure bond. Be careful not to apply excessive heat to the cell to avoid damaging it.
Inspect the Solder Joints: After soldering each connection, visually inspect the solder joints to ensure they are smooth, shiny, and free from any cold joints or solder bridges. Cold joints can cause poor conductivity and potential issues with the battery pack’s performance.
Repeat for Each Connection: Repeat the soldering process for each nickel strip and battery cell connection in your desired configuration. Take your time and ensure that each joint is properly soldered and secure.
Allow Cooling and Insulate the Connections: Allow the soldered connections to cool down before proceeding. Once cool, apply heat shrink tubing to insulate and protect each connection. Use a heat gun to carefully shrink the tubing over the joint, ensuring complete coverage and a secure seal.
Double-Check the Connections: Before moving on to the next step, double-check all the soldered connections for any loose or weak joints. Ensure that there are no exposed metal parts that could potentially cause a short circuit.
Remember to follow proper safety precautions, such as wearing safety glasses and working in a well-ventilated area, when soldering the battery cells. If you are new to soldering or feel unsure about the process, it is recommended to seek guidance from experienced individuals or consult reputable resources. Once the battery cells are soldered, the next step is to add a Battery Management System (BMS) for monitoring and protection.
Step 7: Adding Battery Management System (BMS)
Adding a Battery Management System (BMS) to your electric skateboard battery pack is a crucial step to ensure the safe and efficient operation of your skateboard. The BMS monitors and protects the battery pack, balancing the cells, and providing vital information about the battery’s status. Here’s a step-by-step guide to adding a BMS:
Selecting the Right BMS: Choose a BMS that is compatible with your battery type, voltage, and capacity. Ensure that the BMS has the necessary features, such as overcharge protection, short circuit protection, temperature monitoring, and balancing capabilities.
Take Safety Precautions: Before working with the BMS, disconnect the battery pack from any power source or charging equipment. Wear safety gloves and make sure your work area is clean and free from any potential hazards.
Locate the BMS Placement: Decide where you will install the BMS in your battery pack. Consider factors such as accessibility, ventilation, and protection from external elements. Popular locations include inside the battery enclosure or secured to the skateboard frame.
Connect the Main Wires: Identify the main wires of the BMS, including the positive and negative terminals. Connect the positive wire from the BMS to the positive terminal of the battery pack and the negative wire to the negative terminal. Ensure proper polarity and secure connections.
Balance Charge Wires: Many BMS units have separate balance charge wires that connect to each battery cell. Connect these wires to the corresponding battery terminals while following the manufacturer’s instructions. This allows the BMS to monitor and balance the voltage of individual cells.
Connect the Additional Wires: Depending on your BMS model, there may be additional wires for functions such as on/off switch, charging port, and communication (e.g., UART or CAN bus). Connect these wires according to the manufacturer’s instructions while ensuring proper polarity and secure connections.
Insulate and Secure the Connections: Once all the wires are connected, insulate the connections using heat shrink tubing or electrical tape. This protects the wires from short circuits and ensures a neat and secure setup. Additionally, use zip ties or adhesive mounts to secure the BMS and wiring in place.
Test the BMS Functionality: Before sealing the battery pack, test the functionality of the BMS. Connect the battery pack to the appropriate charger and verify that the BMS is working correctly. Ensure that the BMS balances the cells, protects against overcharging, and provides accurate voltage and temperature readings.
Perform Final Checks: Double-check all the connections, wiring, and polarity of the BMS. Verify that all the wires are properly insulated and routed to reduce the risk of damage during use. Inspect the entire battery pack assembly for any potential issues or loose components.
Adding a BMS ensures the safety and longevity of your electric skateboard battery pack. It provides valuable monitoring and protection features, enhancing the overall performance and lifespan of your battery. Once the BMS is successfully integrated, you’re ready for the next step: wiring and connecting the components.
Step 8: Wiring and Connecting Components
Now that the battery pack and BMS are in place, it’s time to wire and connect the components that will power your electric skateboard. Proper wiring and connections ensure the smooth operation and reliability of your skateboard’s electrical system. Here’s a step-by-step guide for wiring and connecting the components:
Gather the Components: Identify the components you need to wire and connect, such as the motor controller, power switch, charging port, and any additional accessories you may have.
Plan the Layout: Determine the optimal location for each component in your skateboard. Consider factors such as accessibility, protection from elements, and weight distribution. Sketch out a wiring diagram or refer to the manufacturer’s instructions to plan the layout effectively.
Prepare the Wires: Cut and strip the wires to the appropriate lengths, ensuring they are long enough to connect each component. Use wire strippers to remove the insulation and expose a small section of the conductor.
Connect the Motor Controller: First, connect the motor controller to the battery pack via the BMS. Confirm the correct polarity and make secure connections using appropriate connectors or soldering. Follow the manufacturer’s instructions for proper wiring.
Wire the Power Switch: Connect the power switch to the battery pack and the motor controller. Double-check the connections and ensure that the switch is properly secured. This switch will allow you to turn the skateboard’s power on and off.
Install the Charging Port: Wire the charging port to the battery pack and the BMS. Make sure the polarity is correct, and consider adding a fuse or circuit protection device for added safety. This port will allow you to recharge the battery pack.
Add Additional Accessories: If you have any additional accessories such as lights or a display panel, wire them according to the manufacturer’s instructions. Ensure that the connections are secure and properly insulated to prevent any electrical issues.
Insulate and Secure the Connections: Once all the components are wired, use heat shrink tubing or electrical tape to insulate the connections. This protects the wires from short circuits and ensures a neat and secure setup. Additionally, use zip ties or adhesive mounts to secure the wiring in place.
Double-Check the Connections: Before moving on, double-check all the connections and wiring to ensure everything is secure and properly routed. Verify that the polarity is correct and that there are no loose or exposed wires that could potentially cause issues.
Wiring and connecting the components properly is crucial for the safe and efficient operation of your electric skateboard. Take your time during this step and refer to wiring diagrams and manufacturer’s instructions as needed. With everything wired and connected, it’s time to move on to the next step: encasing the battery pack and components.
Step 9: Encasing the Battery Pack
To ensure the protection and durability of your electric skateboard battery pack, encasing the battery pack is an important step. The enclosure provides a shield against external elements and safeguards the components within. Here’s a step-by-step guide for encasing the battery pack:
Select an Enclosure: Choose an enclosure that suits the size and shape of your battery pack. Consider factors such as material, weight, and protection against water and impact. Popular options include custom-made cases, waterproof boxes, or purchased battery enclosures.
Prepare the Enclosure: Before placing the battery pack into the enclosure, prepare it by drilling holes for components such as power switch, charging port, and any additional accessories. Ensure the holes are properly sized and aligned for a snug fit.
Position the Battery Pack: Carefully place the battery pack into the enclosure, ensuring proper positioning and alignment. Be mindful of wire routing and ensure that all components are properly fitted within the enclosure.
Secure the Battery Pack: Use Velcro straps, mounting brackets, or adhesive materials to secure the battery pack within the enclosure. Ensure that the battery pack is held securely to prevent it from moving or shifting during use.
Install Components: Install the components such as the power switch, charging port, and any additional accessories into their respective holes in the enclosure. Secure them properly using the provided hardware or adhesive materials.
Seal the Enclosure: Seal any gaps or openings in the enclosure using silicone or rubber gaskets to prevent water, dust, or debris from entering. Ensure that the enclosure is properly sealed to provide maximum protection for the battery pack and components.
Test and Verify: Before finalizing the enclosure, conduct a functional test to ensure that all components are working properly. Verify that the power switch, charging port, and any additional accessories are functioning as intended.
Double-Check and Finalize: Double-check all the connections, the positioning of the battery pack, and the sealing of the enclosure. Ensure that there are no loose wires or exposed connections. Once satisfied, secure the enclosure using screws or fasteners provided.
Verify Accessibility: Verify that all essential components, such as the charging port, power switch, and any display panels, are easily accessible without needing to dismantle the enclosure.
Encasing the battery pack provides protection and durability for your electric skateboard. Proper enclosure selection, secure placement of the battery pack, and ensuring components are properly sealed contribute to a safe and functional electric skateboard. With the battery pack encased, it’s time for the final step: testing the battery pack and considering safety precautions.
Step 10: Testing and Safety Considerations
As you near the completion of your electric skateboard battery assembly, it’s crucial to conduct thorough testing and consider important safety precautions. Testing ensures that your battery pack operates reliably and efficiently, while safety considerations help prevent potential hazards. Here are the final steps to complete your electric skateboard battery:
Testing the Battery Pack: Connect your fully assembled electric skateboard battery pack to the motor controller and perform a functionality test. Ensure that the battery pack delivers the correct voltage and that all components, such as the motor and accessories, are functioning as intended. Pay attention to any abnormal behavior or performance issues and address them before using the skateboard.
Range and Performance Testing: Take your electric skateboard for a test ride to assess its range and performance. Monitor the battery’s voltage and capacity during the ride to understand the discharge behavior and ensure that it meets your expectations. Observe the motor’s responsiveness and the skateboard’s overall performance.
Charging and Discharging Guidelines: Adhere to the recommended charging and discharging guidelines to maintain optimal battery health and longevity. Follow the manufacturer’s instructions for charging rates, storage procedures, and any specific recommendations for your battery pack.
Safety Considerations: Prioritize safety when using your electric skateboard battery pack. Securely fasten the battery pack and all components within the skateboard to minimize the risk of loose connections or damage during use. Regularly inspect the battery pack and wiring for any signs of wear or damage and address them promptly.
Use Proper Safety Gear: Always wear appropriate safety gear, such as a helmet, knee pads, and elbow pads, when riding your electric skateboard. This protects you from potential injuries and provides an added layer of safety in case of accidents or falls.
Follow Local Regulations: Familiarize yourself with local laws and regulations regarding electric skateboards. Observe speed limits, usage restrictions, and any other relevant guidelines to ensure safe and lawful operation of your electric skateboard.
Continuous Monitoring: Regularly monitor the condition of the battery pack and check for any signs of degradation or abnormal behavior. Take note of any changes in performance or capacity over time and address them as necessary.
Proper Disposal: It’s important to dispose of batteries responsibly. When the battery pack reaches the end of its life cycle, consult local guidelines or recycling centers to properly dispose or recycle the battery pack components.
By conducting proper testing, considering safety precautions, and adhering to recommended guidelines, you can ensure that your electric skateboard battery pack operates safely and efficiently. Remember, safety should always be a priority when using high-capacity lithium-ion batteries. With your electric skateboard battery pack successfully tested and implemented, you’re now ready to enjoy the exhilarating rides your electric skateboard has to offer.
Conclusion
Congratulations on successfully completing the assembly of your electric skateboard battery! Through thorough research, careful planning, and step-by-step execution, you have created a custom battery pack that powers your skateboard. It’s an impressive achievement that reflects your technical skills and dedication to the DIY spirit.
By following the steps outlined in this guide, you’ve learned how to research and select the right battery type, calculate capacity and voltage, solder battery cells, add a Battery Management System (BMS), wire and connect components, encase the battery pack, and conduct testing and safety considerations. Each step was essential in ensuring the performance, reliability, and safety of your electric skateboard battery pack.
Remember, safety should always be a top priority. Adhere to recommended guidelines, wear proper safety gear, and continuously monitor the condition of your battery pack. It’s crucial to take proper care of your battery pack to ensure its longevity and optimal performance.
Building your own electric skateboard battery pack not only provides a sense of accomplishment but also gives you a deeper understanding of the technology behind electric skateboards. You’ve taken customization to a new level and have the advantage of having a battery pack that specifically suits your skateboard’s needs.
Always keep in mind that working with batteries and high currents carries inherent risks. If you ever feel unsure or uncomfortable about a specific aspect of the assembly process, it’s recommended to seek assistance from professionals or experienced DIYers.
Now, it’s time to hit the streets with your newly assembled electric skateboard battery pack. Enjoy the thrilling rides and the freedom of electric-powered transportation. Stay safe, obey local regulations, and continue exploring the world of DIY projects. Happy skateboarding!