Introduction
Have you ever needed to type a degree symbol (°) on your keyboard but couldn’t find it? Whether you’re writing a temperature, an angle measurement, or indicating a specific degree of achievement, using the correct symbol adds professionalism to your work. The good news is that making a degree symbol on a keyboard is quick and easy once you know how.
In this article, we will explore various methods to type the degree symbol on different devices and operating systems. Whether you’re using a Windows computer, a Mac, or even Microsoft Office software, we’ve got you covered.
From using keyboard shortcuts to utilizing specialized character viewers and symbol insertion features, we will guide you through step-by-step instructions to ensure you can easily access the degree symbol whenever you need it. So, let’s dive in and discover the different techniques for making a degree symbol on a keyboard.
In the following sections, we will cover five different methods:
Method 1: Using Keyboard Shortcuts
If you’re looking for a quick and handy way to type the degree symbol, keyboard shortcuts are your best bet. These shortcuts work on both Windows and Mac operating systems and can be used in various applications such as word processors, text editors, and even web browsers.
Here’s how you can use keyboard shortcuts to make a degree symbol on your keyboard:
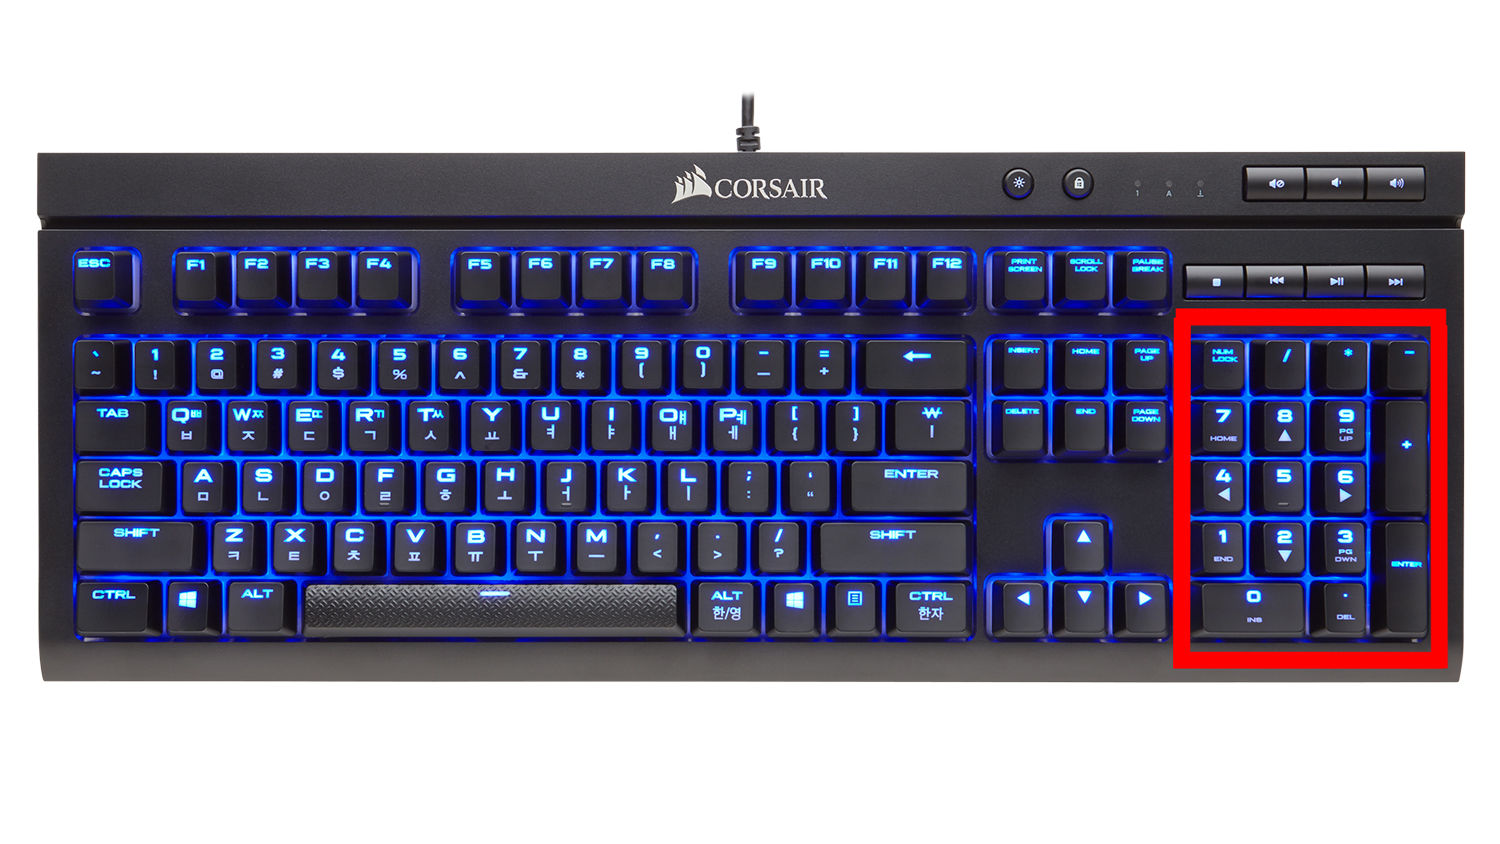
- Windows: On a Windows computer, simply hold down the Alt key and type the number 0176 on the numeric keypad. Make sure the Num Lock key is enabled, and then release the Alt key. The degree symbol (°) will appear wherever your cursor is positioned.
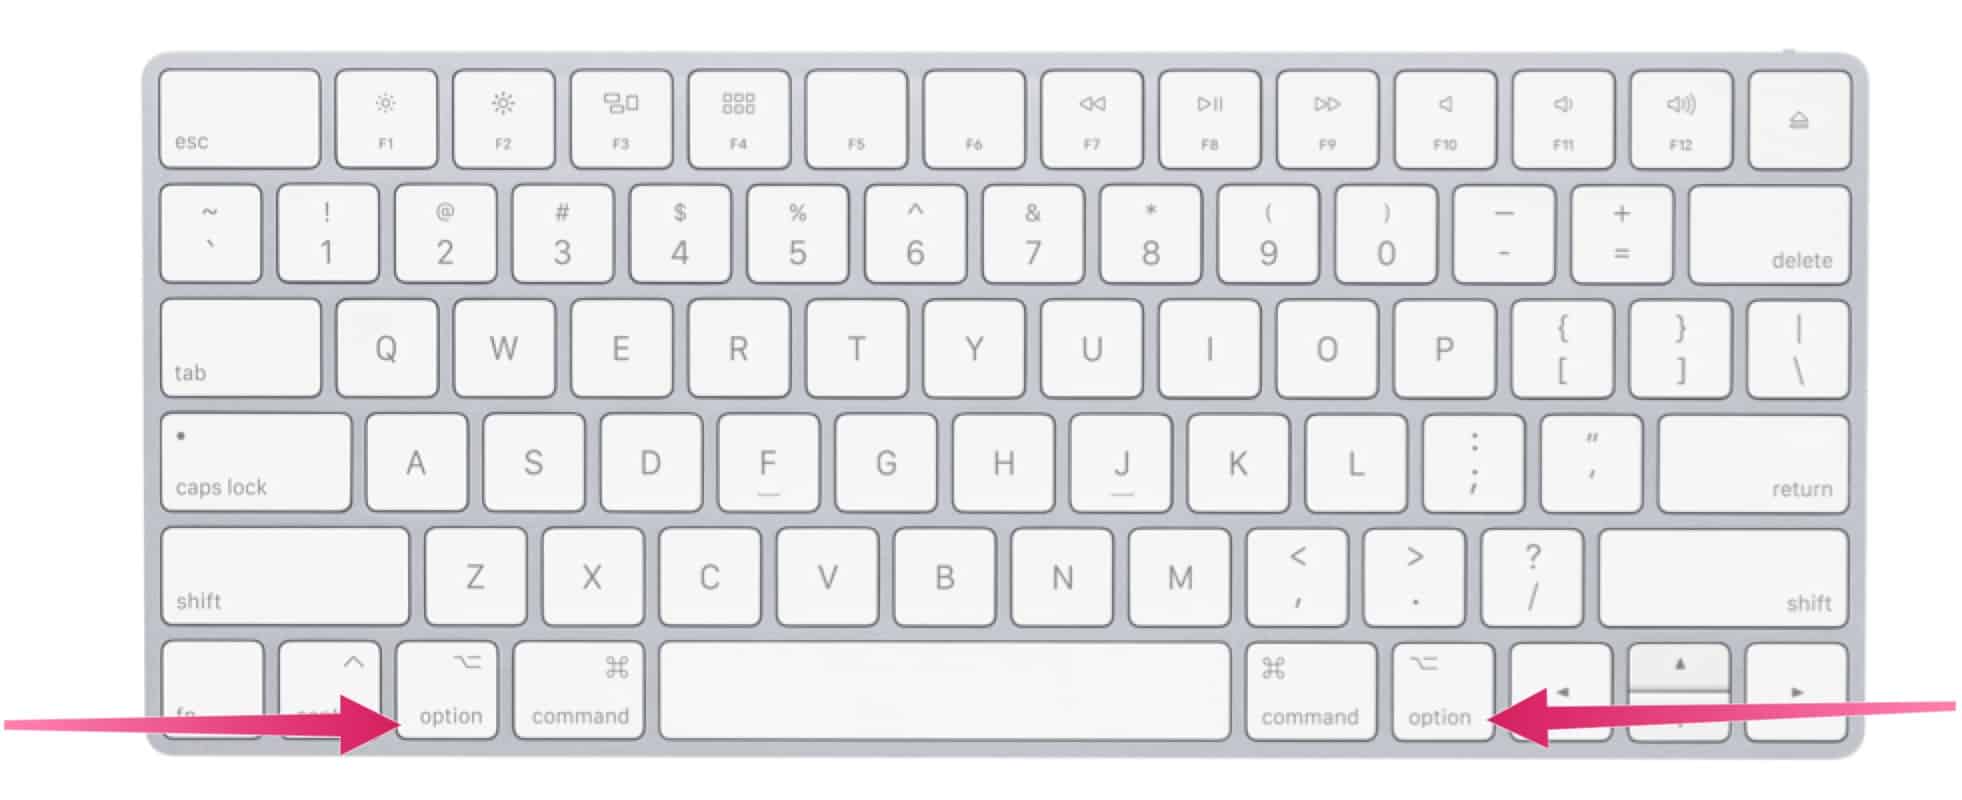
- Mac: If you’re using a Mac, press the Option + Shift + 8 keys simultaneously. The degree symbol will be entered at the cursor’s location.
Remember, these keyboard shortcuts work across various applications, so you can easily type the degree symbol in your favorite desktop or online writing platform.
Also, please note that if you’re using a laptop or keyboard without a dedicated numeric keypad, you may need to enable the “Num Lock” function or use the on-screen keyboard to access the numeric keypad. Consult your device’s user manual or online resources for specific instructions.
Now that you know how to use keyboard shortcuts to create a degree symbol, you can conveniently add it to your documents without any hassle. But what if you’re using a device or software that doesn’t support keyboard shortcuts? Don’t worry – we have alternative methods that can help you in those situations.
Method 2: Using the Alt Code (Windows)
If you’re a Windows user and the keyboard shortcut method doesn’t work for you, or if you prefer a different approach, using the Alt code is another way to type the degree symbol on your computer.
Here’s how to use the Alt code to make a degree symbol on Windows:
- Ensure that the Num Lock key on your keyboard is enabled.
- Place the cursor where you want to insert the degree symbol.
- Hold down the Alt key and type “0176” on the numeric keypad.
- Release the Alt key, and the degree symbol (°) will appear.
It’s important to note that the Alt code method involves using the numeric keypad on your keyboard. If you’re using a laptop or a smaller keyboard without a dedicated numeric keypad, you may need to enable the “Num Lock” function or use the on-screen keyboard to access the numeric keypad. Refer to your device’s user manual or consult online resources for specific instructions on enabling the numeric keypad.
Once you’ve successfully entered the Alt code sequence, the degree symbol will appear wherever your cursor is located. You can use this method in various text editing applications, including Microsoft Word, Notepad, and web browsers.
Using the Alt code is an excellent alternative for Windows users who need to type the degree symbol without relying on keyboard shortcuts. If you’re a Mac user, don’t worry – we have a specific method just for you.
Method 3: Using the Character Viewer (Mac)
If you’re using a Mac computer, you can easily access special characters, including the degree symbol, by using the built-in Character Viewer tool. This tool provides a convenient way to search and insert symbols into your documents without the need for complicated keyboard shortcuts.
Follow these steps to use the Character Viewer to type the degree symbol on your Mac:
- Place the cursor where you want to insert the degree symbol.
- Go to the top menu bar and click on “Edit”.
- Select “Emoji & Symbols” or “Special Characters”.
- The Character Viewer window will open, displaying various symbols and characters.
- In the search bar of the Character Viewer, type “degree” or “temperature” to locate the degree symbol.
- Click on the degree symbol (°) in the results to insert it into your document.
The Character Viewer allows you to browse through a wide range of symbols and characters, making it easy to find the degree symbol and other special characters you may need for your writing.
Please note that the steps may vary slightly depending on the version of macOS you are using. If you’re unable to locate the Character Viewer or encounter any difficulties, you can refer to the macOS Help documentation or use online resources for specific instructions related to your operating system version.
Now that you know how to access and use the Character Viewer, you can effortlessly add the degree symbol to your Mac documents without the need for complex keyboard shortcuts or codes.
Method 4: Using AutoCorrect (Microsoft Office)
If you frequently use Microsoft Office applications such as Word, Excel, or PowerPoint, you can take advantage of the AutoCorrect feature to automatically convert specific text into the degree symbol as you type. This method is especially useful if you often need to type the degree symbol in your documents. Once set up, AutoCorrect will save you time and effort by automatically replacing a predefined text sequence with the degree symbol (°).
Follow these steps to set up AutoCorrect to insert the degree symbol:
- Open the Microsoft Office application (Word, Excel, PowerPoint) you want to configure.
- Go to the top menu bar and click on “File” (or the “Office” button in older versions).
- Select “Options” or “Word Options” (or equivalent based on the application you are using).
- In the Options window, find and click on “Proofing” or “AutoCorrect Options”.
- Look for a text box labeled “Replace” or “Replace text as you type”.
- In the “Replace” text box, type a text sequence that you will remember and associate with the degree symbol (e.g., “deg”).
- In the “With” or “Replace with” text box, enter the degree symbol (°). You can either copy and paste it from another source or use the respective keyboard shortcut we mentioned earlier.
- Click on “Add” or “OK” to save the AutoCorrect entry.
Once you have set up the AutoCorrect entry, whenever you type the specified text sequence (e.g., “deg”) followed by a space or punctuation mark, it will be automatically replaced with the degree symbol (°) as you continue typing.
This method is especially useful if you often work with temperature measurements, angles, or any other content that requires frequent use of the degree symbol within Microsoft Office applications.
Please note that AutoCorrect settings may vary across different versions of Microsoft Office, so the specific steps may differ slightly. If you encounter any difficulties, consult the application’s documentation or online resources for further guidance.
Now you can enjoy the convenience of AutoCorrect, saving valuable time and effort by having the degree symbol automatically inserted as you type in your Microsoft Office documents.
Method 5: Using the Insert Symbol feature (Microsoft Word)
If you’re working specifically in Microsoft Word and prefer a more visual approach to inserting the degree symbol, you can use the built-in Insert Symbol feature. This method allows you to browse through a selection of symbols and choose the degree symbol (°) directly from a list.
Here’s how you can use the Insert Symbol feature in Microsoft Word:
- Open Microsoft Word and position the cursor where you want to insert the degree symbol.
- Go to the top menu bar and click on the “Insert” tab.
- In the “Symbols” group, click on the “Symbol” button. A dropdown menu will appear.
- Select “More Symbols” at the bottom of the dropdown menu. The Symbol dialog box will appear.
- Make sure the “Symbols” tab is selected in the dialog box.
- Scroll through the list of symbols or click on the desired symbol category in the “Subset” dropdown menu.
- Locate and click on the degree symbol (°) in the list of symbols.
- Click on the “Insert” button to insert the selected symbol into your document.
- Once you’re finished, click on the “Close” button to close the Symbol dialog box.
The Insert Symbol feature is a versatile method that allows you to select and insert various symbols beyond just the degree symbol. This feature is available in other Microsoft Office applications as well, such as Excel and PowerPoint.
Remember, the steps mentioned here are specific to Microsoft Word, and the location of the Insert Symbol feature may vary slightly in other applications. Refer to the respective application’s documentation or online resources for detailed instructions.
With the Insert Symbol feature, you can easily access a wide range of symbols, including the degree symbol, and effortlessly incorporate them into your Microsoft Word documents.
Conclusion
Typing the degree symbol on a keyboard may seem like a small matter, but it adds a significant touch of professionalism and accuracy to your writing. In this article, we explored five different methods to make a degree symbol on a keyboard, catering to various devices and software.
We started by discussing the use of keyboard shortcuts, which provide a quick and straightforward way to insert the degree symbol on both Windows and Mac operating systems. The Alt code method, specifically designed for Windows users, allows you to enter the symbol using a numeric keypad.
For Mac users, the Character Viewer provides an intuitive interface to access and insert special characters, including the degree symbol, into your documents. Additionally, Microsoft Office users can take advantage of AutoCorrect or the Insert Symbol feature in Word to automate the process of inserting the degree symbol.
With these methods, you now have a variety of options at your disposal to easily insert the degree symbol whenever you need it, regardless of the device or software you are using.
Remember to consult the specific instructions for your individual device or software version if you encounter any difficulties while following the provided methods. Additionally, make sure to validate the HTML encoding on the output to ensure the correct representation of the symbols.
Now that you have these valuable techniques in your toolkit, feel confident and equipped to include the degree symbol in your writing with ease.