


Introduction
Welcome to the world of live streaming! Whether you are a casual gamer or an aspiring content creator, streaming your gameplay on platforms like Twitch can be an exciting way to share your gaming experiences with others. If you’re a PlayStation owner, you’ll be pleased to know that it’s easier than ever to link your PlayStation console to Twitch and start streaming your gameplay in no time.
In this article, we will guide you through the step-by-step process of linking your PlayStation to Twitch. Whether you’re a seasoned streamer or just starting out, our instructions will help you set up your console, install the Twitch app, and configure your streaming settings. We’ll also provide tips on how to interact with your viewers and manage your stream effectively.
Before we dive into the details, let’s quickly go over why Twitch is such a popular platform for game streaming. Twitch is the go-to platform for gamers and gaming enthusiasts, hosting millions of live streams and providing a dedicated community for viewers and broadcasters. It offers a unique opportunity to showcase your gaming skills, engage with like-minded individuals, and even potentially build a brand around your content.
Now that we’ve covered the basics, let’s jump into the steps required to set up your PlayStation console for streaming on Twitch. But before you get started, make sure you have access to a stable internet connection and that your PlayStation console is connected to it. With everything in place, let’s begin the journey of connecting your PlayStation to Twitch and streaming your gameplay for the world to see!
Step 1: Create a Twitch Account
The first step to linking your PlayStation to Twitch is to create a Twitch account. If you already have an account, you can skip this step and proceed to the next one.
To create a Twitch account, follow these simple steps:
- Open your preferred web browser and go to the Twitch website.
- Click on the “Sign Up” button located at the top-right corner of the page.
- Fill in the required information, including your username, email address, and password. Make sure to choose a username that represents you or your brand.
- Complete the reCAPTCHA verification to prove that you’re not a robot.
- Read and accept the Twitch terms of service and privacy policy.
- Click on the “Sign Up” button at the bottom of the page to create your account.
Once you’ve successfully created your Twitch account, you’ll receive a confirmation email. Simply follow the instructions in the email to verify your account and you’re ready to move on to the next step.
Having a Twitch account is not only essential for streaming your gameplay, but it also allows you to engage with other streamers and viewers in the Twitch community. You can follow your favorite streamers, join their chat rooms, and even chat with other viewers while watching a live stream.
Now that you have your Twitch account set up, it’s time to move on to the next step and configure your PlayStation console for streaming on Twitch.
Step 2: Set up your PlayStation Console
Before you can start streaming your gameplay on Twitch, you need to ensure that your PlayStation console is set up correctly. Here’s how you can do it:
- Turn on your PlayStation console and sign in to your account.
- Navigate to the “Settings” menu on your PlayStation home screen.
- Scroll down and select “Account Management”.
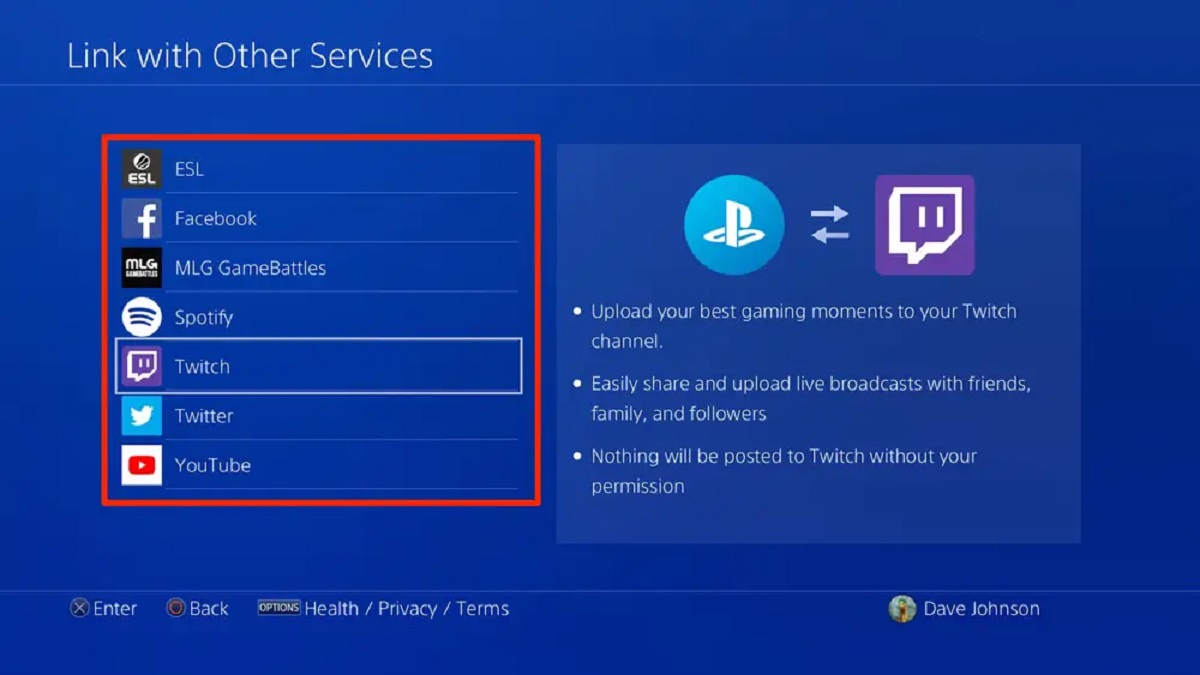
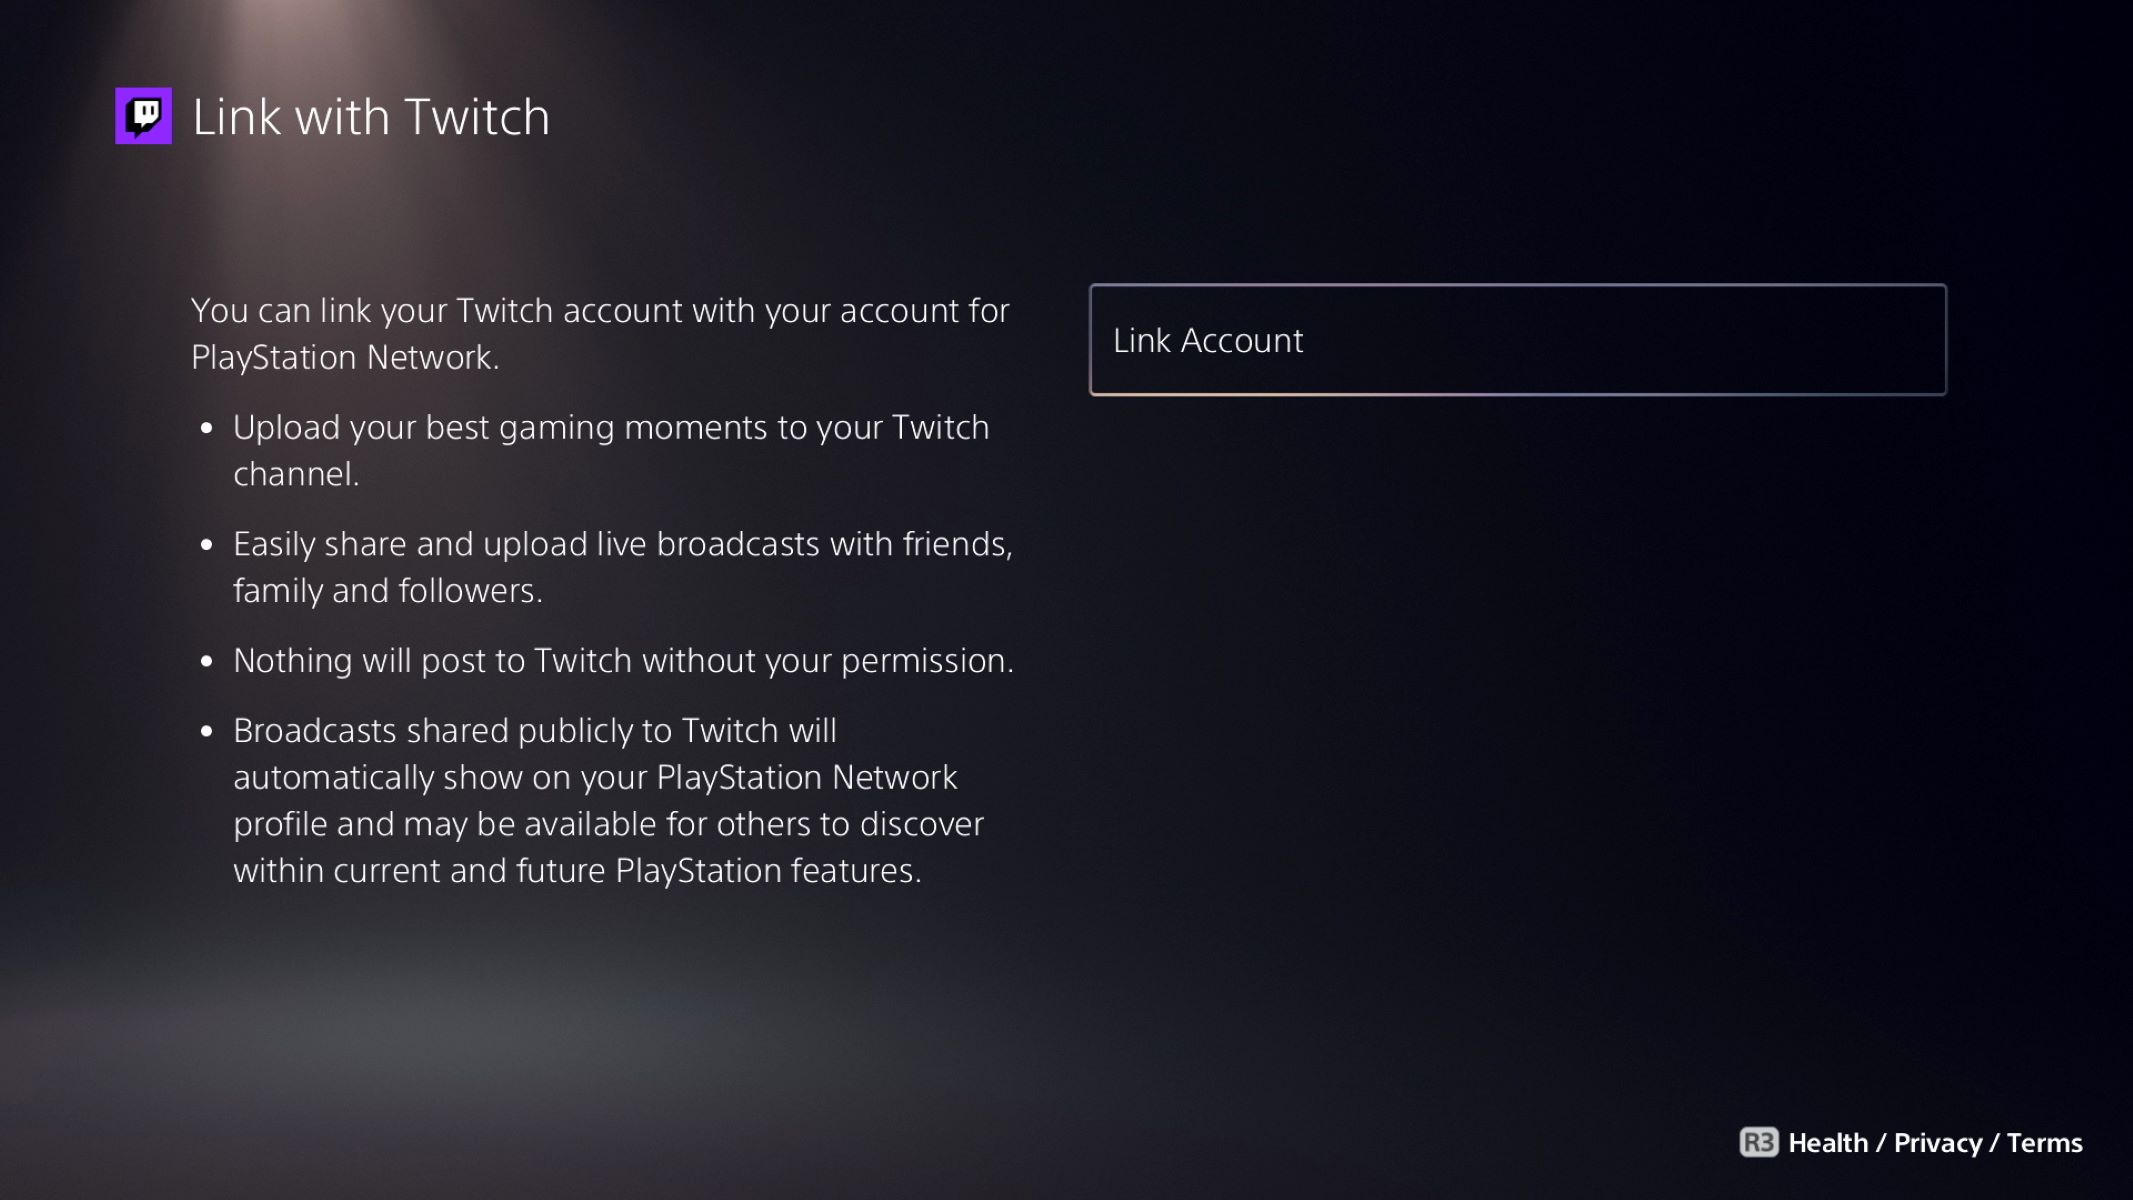
- Choose “Link with Other Services” from the options.
- Select “Twitch” from the list of available services.
- You may be prompted to enter your Twitch account credentials. Follow the on-screen instructions to sign in to your Twitch account on your PlayStation console.
- Once you’ve successfully signed in, your PlayStation console will be linked to your Twitch account.
By linking your PlayStation console to Twitch, you’ll be able to easily broadcast your gameplay to your Twitch channel and interact with viewers. This step is an important part of the setup process, as it establishes the connection between your console and the streaming platform.
It’s worth mentioning that if you ever decide to unlink your PlayStation console from Twitch, you can do so by following a similar set of steps. Simply navigate to the “Settings” menu, select “Account Management”, choose “Link with Other Services”, and then select “Twitch” to unlink the accounts.
With your PlayStation console successfully set up and linked to your Twitch account, you’re now ready to move on to the next step: downloading and installing the Twitch app.
Step 3: Download and Install the Twitch App
Now that your PlayStation console is linked to your Twitch account, the next step is to download and install the Twitch app on your console. The Twitch app allows you to easily access your Twitch account, manage your stream, and interact with viewers. Here’s how to do it:
- On your PlayStation home screen, navigate to the “PlayStation Store”.
- Select the “Search” option and type “Twitch” in the search bar.
- Locate the Twitch app in the search results and select it.
- Click on the “Download” button to start the installation process. Wait for the download to complete.
- Once the Twitch app is installed, you can find it on your PlayStation home screen. Open the app.
- Sign in to your Twitch account using the credentials you created earlier.
After signing in, you’ll have access to the various features and functionalities of the Twitch app. This includes managing your stream settings, moderating your chat, checking your viewership statistics, and much more.
It’s important to note that the Twitch app is regularly updated by Twitch itself, so make sure to keep it up to date to ensure you have the latest features and bug fixes. To update the app, simply navigate to the “Library” section on your PlayStation home screen, find the Twitch app, and select “Check for Updates”.
With the Twitch app successfully installed on your PlayStation console, you’re one step closer to starting your streaming journey. In the next step, we’ll guide you through the process of logging in to your Twitch account on your PlayStation.
Step 4: Log in to your Twitch Account on PlayStation
Now that you have the Twitch app installed on your PlayStation console, it’s time to log in to your Twitch account. Logging in will allow you to access your account, customize your stream settings, and interact with your viewers. Follow these steps to log in:
- Open the Twitch app on your PlayStation home screen.
- On the app’s main screen, you’ll see a prompt to log in. Select the “Log In” option.
- A code will be generated on your screen.
- Using a web browser on your computer or smartphone, go to the Twitch activation webpage: twitch.tv/activate.
- Enter the code displayed on your PlayStation into the provided field on the activation webpage.
- Sign in to your Twitch account using your Twitch credentials.
- Once you’re signed in, the Twitch app on your PlayStation console will be linked to your Twitch account.
With a successful login, you’ll have access to your Twitch account settings and features directly on your PlayStation console. You can update your stream title, choose the game you’re playing, enable or disable chat moderation, and much more.
Keep in mind that if you ever need to log out of your Twitch account on your PlayStation console, you can do so by navigating to the settings within the Twitch app and selecting the “Log Out” option. This will disconnect your Twitch account from the console.
Now that you’re logged in to your Twitch account on your PlayStation, it’s time to move on to the next step: configuring your streaming settings.
Step 5: Configure Streaming Settings
Configuring the streaming settings on your PlayStation console is an essential step before you start streaming your gameplay on Twitch. These settings allow you to optimize your stream’s quality, customize the audio and video options, and set up overlays for your viewers. Here’s how to configure your streaming settings:
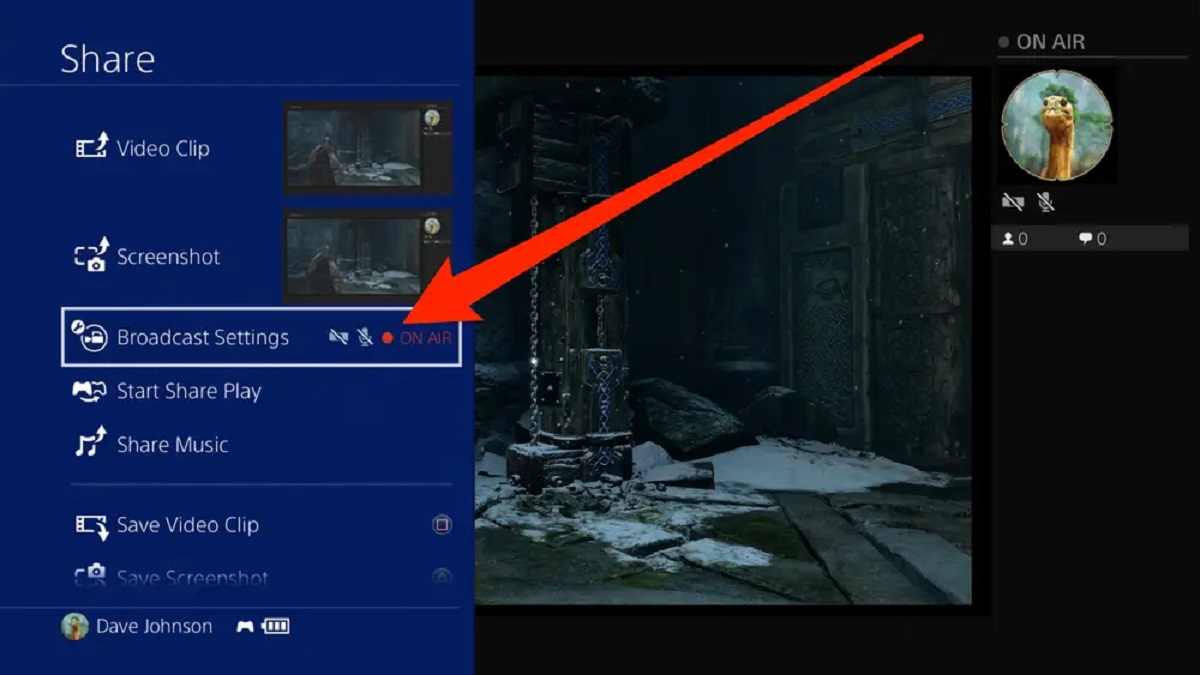
- Open the Twitch app on your PlayStation console.
- In the app’s main menu, select the “Broadcast” option to access the streaming settings.
- Under the “Broadcast” tab, you’ll find various options to customize your stream settings.
- Start with the “Title” field and enter an engaging title for your stream. This will help attract viewers to your stream.
- Next, choose the game you’ll be playing from the “Game” dropdown menu. This will categorize your stream under the selected game on Twitch.
- Under the “Camera and Microphone” section, you can enable or disable your PlayStation camera and microphone for your stream.
- Adjust the microphone audio settings to ensure your voice is clear and audible to your viewers.
- Explore other options, such as video quality, streaming resolution, frame rate, and audio bitrate, to find the settings that suit your streaming needs.
- If desired, you can also set up overlays for your stream, such as chat overlays, follower notifications, and stream labels. These can enhance the visual appeal of your stream.
By taking the time to configure your streaming settings, you can ensure that your Twitch stream is of high quality and tailored to your preferences. Experiment with different settings to find the optimal configuration that works for you.
Once you’ve customized your streaming settings, you’re ready to embark on your streaming adventure. In the next step, we’ll guide you through the process of starting your stream on Twitch.
Step 6: Start Streaming to Twitch
With your Twitch account linked and streaming settings configured, it’s time to launch your stream and start sharing your gameplay with the world. Follow these steps to start streaming to Twitch from your PlayStation console:
- Open the Twitch app on your PlayStation console.
- In the app’s main menu, select the “Broadcast” option.
- Choose the “Start Broadcast” or “Go Live” option to initiate your stream.
- Before your stream starts, ensure that your camera and microphone (if desired) are properly positioned and functioning as intended.
- Once you’re ready, select the “Start Broadcasting” option to begin your stream.
Now, your gameplay will be live on your Twitch channel, and viewers can tune in to watch and interact with you. While streaming, you can monitor your stream chat, engage with viewers, provide commentary, and showcase your gaming skills.
During the stream, it’s important to pay attention to the quality of your stream and the chat interaction. Engage with your viewers by answering their questions, acknowledging their comments, and creating a welcoming and interactive experience. Remember to be yourself and have fun while streaming.
It’s worth noting that Twitch offers additional features such as stream markers, stream analytics, and channel customization options. These features can enhance your streaming experience and help you grow your community of viewers.
When you’re ready to end your stream, simply select the “Stop Broadcast” option in the Twitch app. This will conclude your live stream and save it as a video on your Twitch channel for later viewing.
Congratulations! You have successfully started streaming to Twitch from your PlayStation console. In the next step, we’ll discuss how you can interact with viewers and manage your stream effectively.
Step 7: Interact with Viewers and Manage Your Stream
Interacting with your viewers and managing your stream is crucial in building a thriving community and ensuring a positive streaming experience for yourself and your audience. Here are some tips on how to effectively interact with viewers and manage your stream:
- Engage with Viewers: Pay attention to your stream chat and actively engage with your viewers. Respond to their questions, comments, and greetings to make them feel involved and appreciated. Building a connection with your audience helps foster a loyal and supportive community.
- Moderate Chat: Implement chat moderation to maintain a friendly and respectful chat environment. Set up moderation tools to filter out inappropriate messages, spam, or any form of harassment. Encourage positive and inclusive discussions among your viewers.
- Use Overlays and Alerts: Customize your stream layout with overlays, widgets, and alerts to enhance the visual experience for your viewers. Display information like recent followers, subscriptions, and donations to acknowledge and thank your supporters.
- Stream Consistently: Establish a consistent streaming schedule that suits your availability and inform your followers about it. Consistency helps your viewers anticipate and plan to join your streams, allowing you to build a dedicated audience base.
- Stay Engaged on Social Media: Utilize social media platforms to promote your streams, engage with your community, and share highlights or upcoming events. Interacting with your viewers beyond the stream can deepen your connection with them.
- Review Stream Analytics: Take advantage of the analytics provided by Twitch to gain insights into your stream’s performance. Analyze metrics like viewer count, chat activity, and stream duration to understand what works best for your audience and make informed decisions to improve your streams.
- Seek Feedback and Improve: Regularly seek feedback from your viewers to understand their preferences and areas for improvement. Create polls, ask for suggestions, and listen to their opinions to constantly enhance your stream quality and content.
Remember, building a successful stream takes time and dedication. Focus on connecting with your viewers, providing high-quality content, and constantly refining your stream based on feedback. Be yourself, have fun, and let your passion for gaming shine through your streams.
By following these steps and implementing effective strategies to interact with viewers and manage your stream, you’ll be on the path to becoming a successful Twitch streamer with a thriving community of followers.
Conclusion
Congratulations! You have reached the end of our guide on how to link your PlayStation to Twitch and start streaming your gameplay. We’ve covered all the necessary steps, from creating a Twitch account to configuring your streaming settings and interacting with viewers.
Streaming on Twitch can be an exciting journey that allows you to share your gaming experiences, connect with fellow gamers, and potentially even build a community around your content. It provides a platform for you to showcase your skills, engage with viewers, and create memorable live moments.
Remember that success on Twitch comes with dedication, consistency, and genuine interactions with your audience. Take the time to understand your viewers’ preferences, learn from their feedback, and continuously improve your stream’s quality and content.
Don’t forget to promote your streams on social media and engage with your community beyond the stream. Building a loyal and supportive community is key to your success as a Twitch streamer.
As you embark on your streaming journey, always stay true to yourself and have fun. Let your passion for gaming shine through your streams, and enjoy the connections you build with viewers who share your love for gaming.
Remember, streaming on Twitch is not just about the numbers or becoming an overnight sensation. It’s about creating memorable experiences, fostering a welcoming community, and sharing your gaming adventures with others.
Thank you for reading our guide, and we wish you the best of luck in your Twitch streaming endeavors. So go ahead, link your PlayStation to Twitch, and let the gaming world be your stage!


![How to Stream on Twitch Easily [Beginner-Friendly]](https://robots.net/wp-content/uploads/2020/10/Twitch-Featured-300x148.jpg)


