Introduction
Streaming has become an incredibly popular form of entertainment, allowing gamers to showcase their skills, connect with other players, and engage with an audience in real-time. With the rise of platforms like Twitch and YouTube Gaming, streaming from your PlayStation console has never been easier or more accessible.
In this article, we will guide you through the process of setting up your PlayStation for streaming, choosing a streaming platform, configuring your stream settings, and optimizing your audio and visual setup. Whether you’re a seasoned streamer looking to enhance your broadcasting experience or a beginner venturing into the world of streaming for the first time, this guide will provide you with the knowledge and tools you need to get started.
Streaming from your PlayStation opens up a whole new level of interaction and engagement. You can connect with your viewers, build a community, and even monetize your content through donations and subscriptions. The ability to share your gaming experiences and connect with like-minded individuals has turned streaming into a thriving community that spans across the globe.
But before you dive into the world of streaming, there are a few key steps to consider. First, you’ll need to set up your PlayStation for streaming purposes and ensure that your console is properly connected to the internet. This step is crucial to ensure a stable and smooth streaming experience.
Next, you’ll need to choose a streaming platform that best suits your needs and preferences. Platforms like Twitch and YouTube Gaming offer different features and benefits, so it’s important to evaluate your options before making a decision.
Once you’ve chosen a platform, you’ll need to create a streaming account. This account will serve as your online presence and allow viewers to follow and interact with you during streams.
Configuring your stream settings on your PlayStation is the next step in the process. This involves adjusting video quality, stream resolution, and audio settings to ensure optimal performance and viewer experience.
In addition to gameplay, engaging with your audience through a microphone and camera can further enhance the streaming experience. We will guide you through the steps of connecting your microphone and camera to your PlayStation for seamless communication with your viewers.
Customizing your stream layout is another aspect that can make your stream stand out. From overlay designs to alerts and widgets, there are various options available to personalize your stream and make it visually appealing.
Furthermore, optimizing your audio and visual settings is essential for delivering high-quality content. We’ll provide tips and tricks on how to improve audio clarity, reduce background noise, and enhance video quality to captivate your audience.
Before going live, it’s crucial to test your stream setup. This ensures that everything is working properly and allows you to make any necessary adjustments before sharing your content with a live audience.
In this guide, we’ll share valuable tips and tricks to help you achieve a successful streaming experience. From engaging with your viewers and managing chat to promoting your channel and sustaining viewer engagement, we’ll cover everything you need to know.
Streaming from your PlayStation offers an exciting opportunity to showcase your gaming skills, connect with a community, and even turn your passion into a career. So, let’s dive in and explore the world of streaming from your PlayStation console!
Setting up your PlayStation for streaming
Before you can start streaming from your PlayStation console, you need to ensure that your setup is optimized for broadcasting. Follow these steps to get your PlayStation ready for streaming:
1.Connect to the internet: Make sure your PlayStation is connected to a stable and high-speed internet connection. Streaming requires a consistent and fast internet connection to maintain a smooth stream without buffering or lagging.
2. Update your console: It’s essential to keep your PlayStation software up to date. Regular updates often include improvements and bug fixes that can enhance your streaming experience. Go to the Settings menu, select System Software Update, and follow the prompts to install any available updates.
3. Adjust privacy settings: Depending on your preferences, you may want to adjust your privacy settings before starting to stream. By default, your PlayStation profile may be set to display your real name, profile picture, and other personal information. To modify your privacy settings, go to the Settings menu, select Account Management, and choose Privacy Settings.
4. Enable HDCP Off: To capture and stream gameplay footage, you need to disable HDCP (High-bandwidth Digital Content Protection). HDCP prevents capturing devices from recording gameplay, so make sure it’s turned off. Go to the Settings menu, select System, then uncheck the box next to Enable HDCP.
5. Set your audio and video output: Ensure that your audio and video settings are correctly configured for streaming. Go to the Settings menu, select Sound and Screen, and adjust settings such as output resolution, audio format, and audio output device.
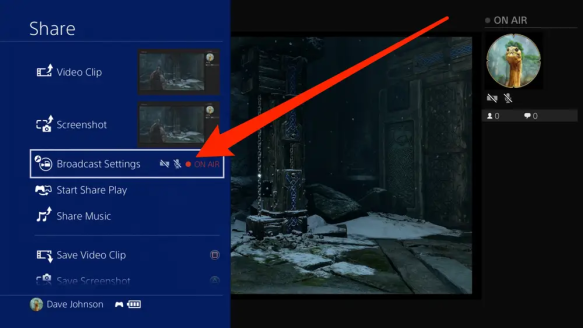
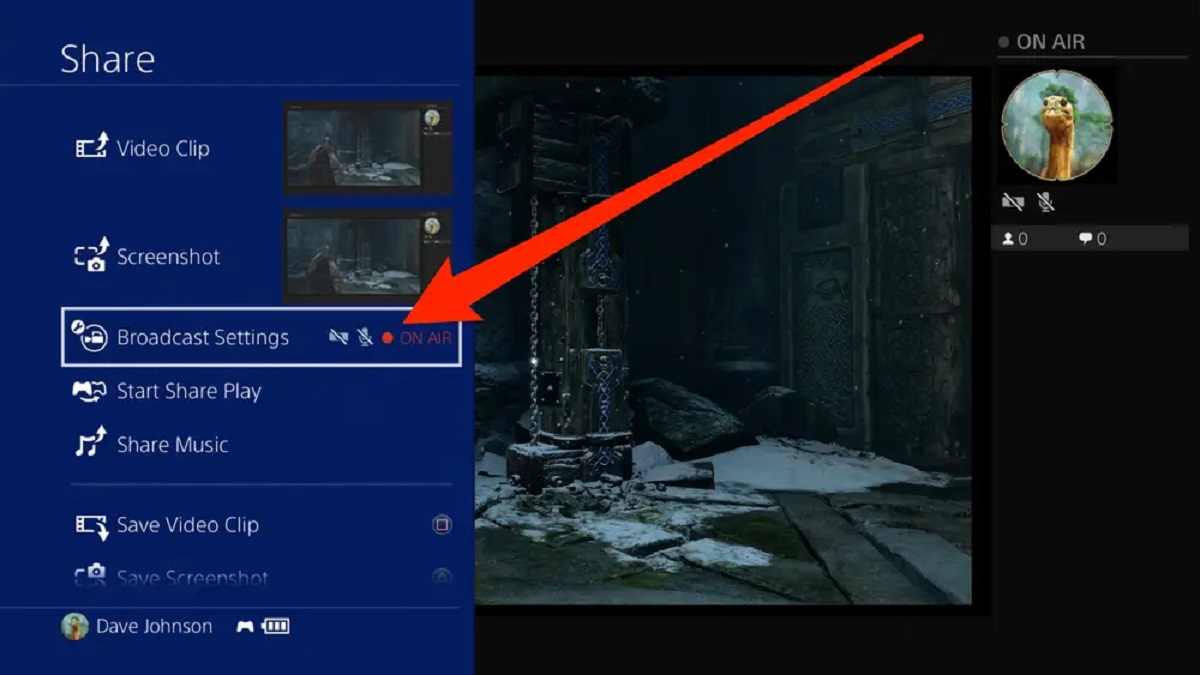
6. Enable broadcast settings: To access the streaming features on your PlayStation, you’ll need to enable the broadcast settings. Go to the Settings menu, select Sharing and Broadcasts, and enable the options for broadcast settings and related features. This will allow you to access further customization options.
7. Choose your streaming quality: Select the streaming quality that suits your internet connection and overall streaming goals. The options typically range from 480p to 1080p. Keep in mind that higher resolutions require more bandwidth, so choose a resolution that your internet connection can support without causing buffering or interruptions.
8. Set up a wired connection: For the best streaming experience, consider using a wired internet connection instead of Wi-Fi. A wired connection provides a more stable and consistent internet connection, minimizing the risk of dropouts or lags during your stream. Connect an Ethernet cable from your PlayStation to your modem or router for a reliable connection.
9. Manage notifications: Streaming can be interrupted by notifications popping up on your screen. To avoid disruptions during your stream, you can temporarily disable notifications or limit them to crucial ones. Go to the Settings menu, select Notifications, and adjust the settings to your preference.
Once you have completed these steps, your PlayStation will be ready for streaming. Setting up your console correctly ensures a smoother and more enjoyable streaming experience for both you and your viewers. Now, let’s move on to choosing the right streaming platform.
Choosing a streaming platform
When it comes to streaming from your PlayStation, choosing the right streaming platform is crucial. There are several popular platforms to consider, each with its own features and community. Here are some of the top streaming platforms to help you make an informed decision:
Twitch: Twitch is one of the most popular live streaming platforms, with a large and diverse community of gamers. It offers a variety of features such as chat interactions, channel customization, and a partnership program for monetization. Twitch is known for its emphasis on gaming content, making it an ideal choice for PlayStation streamers.
YouTube Gaming: As part of the YouTube platform, YouTube Gaming provides a seamless integration with your existing YouTube channel. It offers features like live chat, channel memberships, and the potential for wider exposure through the YouTube algorithm. If you already have a strong presence on YouTube or prefer a platform with broader content categories, YouTube Gaming is worth considering.
Mixer: Mixer is a streaming platform that offers low latency, allowing for real-time interactions with your audience. With features like co-streaming, interactive buttons, and built-in integration with Xbox consoles, Mixer is an attractive choice for PlayStation streamers who want to engage with their viewers on a more personal level.
Facebook Gaming: Facebook Gaming provides a unique advantage with its large user base and built-in social network integration. If you have an existing Facebook following or are looking to tap into a broader audience, streaming on Facebook Gaming can help you reach a wide range of viewers. It also offers features like monetization options and livestream cross-posting.
Consider the type of community and features that these platforms offer, as well as your goals as a streamer. Each platform has its own strengths and weaknesses, so take the time to research and familiarize yourself with the platform that aligns best with your needs.
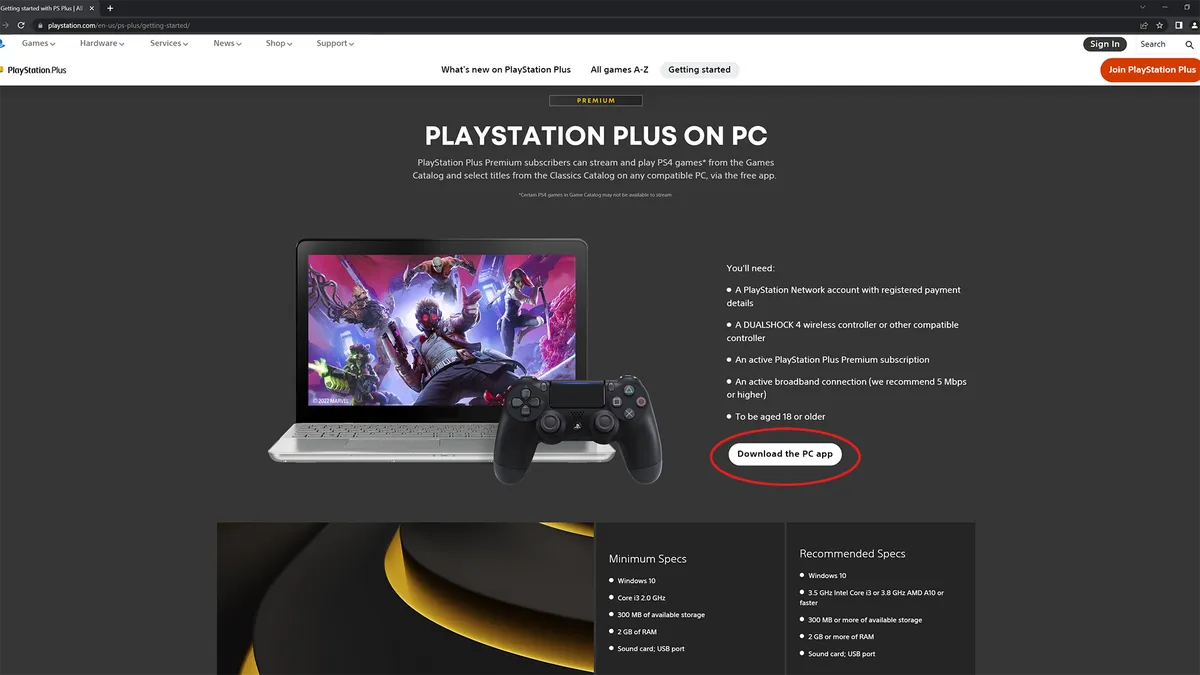
Additionally, it’s worth exploring the streaming capabilities of PlayStation’s built-in streaming feature. With its direct integration and simplicity, it provides an accessible option for beginners or casual streamers who want to start streaming right away without the need for third-party software or platforms.
Ultimately, the choice of streaming platform boils down to personal preference and goals. Consider the features, community, and potential for growth on each platform before making your decision. You can also experiment with streaming on multiple platforms to see which one resonates best with your audience and helps you achieve your streaming objectives.
Now that you have chosen a streaming platform, the next step is to set up a streaming account. We’ll guide you through the process in the next section.
Setting up a streaming account
Now that you have chosen a streaming platform, it’s time to set up a streaming account. This account will serve as your online presence and allow viewers to follow, interact, and connect with you during your streams. Follow these steps to get your streaming account up and running:
1. Visit the platform’s website: Go to the website of the streaming platform you have chosen, such as Twitch, YouTube Gaming, Mixer, or Facebook Gaming.
2. Create an account: Look for the “Sign Up” or “Create Account” button on the website’s homepage. Click on it to begin the account creation process.
3. Provide the necessary information: Fill out the registration form with the required details, which typically include your username, email address, password, and any additional information specific to the platform.
4. Verify your account: Some streaming platforms require account verification to ensure that you are a real person and not a bot. Follow the instructions provided to verify your account, which may include clicking on a verification link sent to your email address.
5. Set up your profile: Once your account is verified, it’s time to customize your streaming profile. Upload a profile picture, write a compelling bio, and choose a username that represents your brand or gaming persona. Make sure to add any relevant social media links or websites you want to showcase.
6. Explore account settings: Take some time to familiarize yourself with the account settings on the platform. You may find options to customize your stream layout, set up stream notifications, manage privacy settings, and more. Customize these settings according to your preferences and requirements.
7. Add channel artwork: Enhance the visual appeal of your streaming channel by adding unique channel artwork. This can include a channel banner, offline screen, and overlay designs. Many streaming platforms provide built-in tools or allow you to upload custom artwork to personalize your channel’s appearance.
8. Connect social media accounts: Link your streaming account to your social media profiles, such as Twitter, Instagram, or Discord. This allows you to cross-promote your streams and engage with your community across multiple platforms.
9. Enable streaming features: Explore the platform’s streaming features and settings. This includes options like chat moderation tools, stream key configuration, stream title customization, and more. Familiarize yourself with these features to maximize your streaming experience.
Once you have completed these steps, your streaming account will be ready to go. Take some time to perfect your profile, experiment with different settings, and craft a strong branding identity that sets you apart from other streamers.
Remember, your streaming account is your digital persona and brand. Interact with your viewers, promote your streams on social media, and create a welcoming and engaging environment for your audience. With a well-structured streaming account, you’ll be ready to dive into the world of streaming and connect with viewers from around the globe.
In the next section, we will discuss how to configure stream settings on your PlayStation for an optimal streaming experience.
Configuring stream settings on PlayStation
Configuring the stream settings on your PlayStation is essential to ensure optimal performance and viewer experience during your streams. Here are the steps to configure your stream settings:
1. Access the settings: On your PlayStation, navigate to the settings menu by scrolling left on the home screen and selecting the gear icon.
2. Go to Sharing and Broadcasts: From the settings menu, select “Sharing and Broadcasts” to access the streaming options.
3. Select Broadcast Settings: Within the Sharing and Broadcasts menu, choose “Broadcast Settings” to configure your stream settings.
4. Select the streaming platform: Choose the streaming platform you will be using, such as Twitch, YouTube Gaming, Mixer, or Facebook Gaming. This enables the PlayStation to connect to your chosen platform.
5. Configure video settings: Adjust the video settings to ensure optimal stream quality. You can set your desired resolution, frame rate, and video encoding options. It’s important to consider your internet connection capabilities and the preferences of your target audience when selecting these settings.
6. Audio settings: Configure your audio settings to deliver clear and balanced audio during your streams. You can adjust options like microphone volume, microphone audio mix, and audio sharing settings.
7. Set stream comments: Choose whether to allow comments on your stream and select the display location of the comments on the screen. This gives your viewers the ability to interact with you through comments during the stream.
8. Enable archiving: Decide whether you want to save your streams as videos for future viewing. Enabling archiving allows viewers who missed the live stream to catch up on the content later.
9. Customize stream title and description: Add a catchy and descriptive title to your stream to attract viewers. Write a brief description to give viewers an idea of what they can expect from your stream.
10. Configure privacy settings: Set your desired privacy settings for your stream. You can choose to go live publicly, limit access to specific friends, or have your stream available only to a select group of people.
11. Test broadcast: Before going live, take advantage of the “Test Broadcast” option to ensure that everything is working correctly. This allows you to make any necessary adjustments and troubleshoot any issues without interrupting a live stream.
By configuring these settings, you can tailor your stream to your preferences and deliver high-quality content to your viewers. Experiment with different settings and adjust them as needed based on viewer feedback and streaming goals.
Now that you have configured your stream settings, it’s time to connect your microphone and camera for optimal communication and engagement during your streams. We will guide you through the process in the next section.
Connecting your microphone and camera
Adding a microphone and camera to your PlayStation setup can greatly enhance your streaming experience, allowing you to communicate with your viewers and create a more immersive stream. Here’s how you can connect your microphone and camera to your PlayStation:
1. Connecting a microphone: There are different options available for connecting a microphone to your PlayStation. One common method is to use a USB microphone that you can plug directly into one of the available USB ports on your console. Another option is to use a gaming headset with a built-in microphone, which offers convenience and mobility.
If you’re using a USB microphone, simply plug it into one of the available USB ports on your PlayStation. The console should recognize the microphone automatically. If you’re using a gaming headset, connect it to the audio jack on your controller or use a USB adapter if needed.
2. Setting up microphone audio: Once your microphone is connected, you’ll need to configure the audio settings on your PlayStation. Go to the settings menu, select “Devices,” then “Audio Devices.” From there, you can adjust the volume, input levels, and microphone output settings according to your preferences.
3. Testing your microphone: Before going live, it’s important to test your microphone to ensure that it’s working properly and that your audio levels are balanced. From the settings menu, select “Sound and Screen,” then “Audio Output Settings.” Choose “Output to Headphones” and select “All Audio.” This will allow you to hear your microphone playback through your headset or speakers while streaming.
4. Connecting a camera: If you want to add a camera to your streaming setup, you have a few options. You can use a PlayStation Camera, which is specially designed for PlayStation consoles and provides optimal compatibility. Alternatively, you can connect a compatible USB webcam to your console.
If you’re using a PlayStation Camera, simply connect it to one of the available USB ports on your PlayStation console. If you’re using a USB webcam, connect it to one of the USB ports as well. The console should recognize the camera automatically.
5. Configuring camera settings: After connecting your camera, you can adjust the camera settings to your preference. Go to the settings menu, select “Devices,” then “Camera.” From there, you can enable or disable the camera, adjust zoom and pan settings, and customize other camera-related options.
6. Previewing your camera: To ensure that your camera is working correctly, you can preview the camera feed from the settings menu. Select “Broadcast Settings,” then “Advanced Settings.” Choose “Camera Video Settings” and select “Preview Camera.” This will display the camera feed on your screen so you can confirm that everything looks good before going live.
By connecting a microphone and camera to your PlayStation, you can provide commentary, engage with your viewers, and add a personal touch to your streams. Make sure to position the microphone and camera in a way that doesn’t obstruct your gameplay but still provides clear audio and a good view of your face.
Now that your microphone and camera are connected, you’re ready to customize your stream layout and make it visually appealing. We’ll discuss stream layout customization in the next section.
Customizing your stream layout
Customizing your stream layout is an excellent way to make your stream stand out and provide a unique visual experience for your viewers. Here are some steps to help you customize your stream layout on your PlayStation:
1. Overlay designs: Consider adding custom overlay designs to your stream. These overlays can include elements such as a webcam frame, social media handles, donation goals, or recent subscriber notifications. You can create your own overlays using graphic design software or use pre-designed templates available online.
2. Alerts and widgets: To engage your audience, you can set up alerts and widgets that display on your stream. These can include follower alerts, subscriber alerts, donation alerts, and chat boxes. Many streaming platforms provide built-in tools or allow you to integrate third-party tools to customize and display these alerts and widgets on your stream.
3. Logo and branding: Incorporate your logo or branding elements into your stream layout. Displaying your logo prominently on the screen or using a branded color scheme can enhance brand recognition and create a cohesive visual identity that viewers can associate with your content.
4. Scene transitions: Utilize scene transitions to add a professional touch to your stream. Scene transitions are animated effects that smoothly transition between different scenes, such as starting soon, gameplay, or intermission screens. You can find ready-to-use scene transitions or create your own using video editing software.
5. Stream labels: Consider adding stream labels to provide real-time information to your viewers. Stream labels can include elements like your current game title, recent followers, top donations, or subscriber count. These labels can be displayed on your stream overlay or included as part of your scene transitions.
6. Experiment with layouts: Don’t be afraid to experiment with different layouts and configurations to find what works best for you and your content. Play around with the placement of your webcam, overlays, and other elements to ensure they don’t obstruct important gameplay visuals while still adding visual interest to your stream.
7. Stay consistent: Maintain a consistent stream layout and branding across your streams. This helps your viewers easily recognize your stream and creates a sense of familiarity and professionalism.
Remember that customization options may vary depending on the streaming platform you’re using. Explore the available options and settings on your chosen platform to find the customization features that suit your aesthetic and streaming goals.
When customizing your stream layout, it’s important to strike a balance between visual appeal and not overloading your stream with distractions. Ensure that your stream elements complement your content and enhance the viewer experience without overpowering the gameplay or your presence on the screen.
Now that you have customized your stream layout, it’s time to optimize your audio and visual settings for the best streaming experience. We’ll cover audio and visual settings in the next section.
Setting up audio and visual settings
Setting up the audio and visual settings on your PlayStation is crucial for delivering high-quality and immersive content to your viewers. Follow these steps to optimize your audio and visual settings for a top-notch streaming experience:
1. Audio settings: Start by fine-tuning your audio settings to ensure clear and balanced sound during your streams. Go to the settings menu, select “Sound and Screen,” then “Audio Output Settings.” Adjust the volume, audio format, and output device to your preference.
2. Microphone settings: Make sure your microphone is set up correctly to capture your voice without unwanted background noise or distortion. Test your microphone’s sensitivity and adjust the input levels accordingly. You can use the “Adjust Microphone Level” option in the settings menu to find the optimal level for your specific microphone.
3. Reduce background noise: Minimize background noise that may interfere with your stream’s audio quality. Find a quiet location for streaming, close any unnecessary applications or programs that might produce noise, and consider using a noise-cancelling microphone or acoustic treatment for your streaming area.
4. Video settings: Configure your video settings to ensure a visually appealing stream. Go to the settings menu, select “Sound and Screen,” then “Video Output Settings.” Adjust the resolution, color space, and aspect ratio based on your preferences and the capabilities of your display.
5. Camera positioning: Position your camera in a way that captures you properly and provides a good field of view for your viewers. Experiment with different angles and positions to find the most flattering and visually appealing setup.
6. Lighting: Pay attention to the lighting conditions in your streaming environment. Good lighting can greatly enhance the quality of your stream. Position lights in front of you to avoid casting shadows on your face, and make sure the lighting is balanced and natural-looking. Consider using studio lights or ring lights to achieve professional-looking results.
7. Green screen: If you want to replace your background with a virtual one, you can use a green screen. Setting up a green screen allows you to use chroma keying, where the green color is replaced with a custom background. Ensure the green screen is evenly lit and properly positioned for the best results.
8. Frame rate and bitrate: Adjust your stream’s frame rate and bitrate based on your internet connection and desired stream quality. Higher frame rates and bitrates provide smoother gameplay and crisper visuals but require a more robust internet connection. Strike a balance that delivers quality while maintaining a stable stream without excessive buffering for your viewers.
9. Monitor your stream: Regularly monitor your stream to ensure that your audio and video quality remain consistent throughout the broadcast. Pay attention to any issues such as audio sync problems, video stuttering, or visual artifacts, and make adjustments as needed.
Remember to test your audio and visual settings before going live to ensure everything is working properly. Use the available tools in the streaming platform or third-party software to preview and fine-tune your stream’s audio and visual elements.
By setting up optimal audio and visual settings, you can provide an immersive and enjoyable streaming experience for your viewers, enhancing their engagement and increasing the professionalism of your content.
In the next section, we will cover the importance of testing your stream before going live to ensure a smooth broadcast.
Test streaming before going live
Before you go live with your stream, it’s crucial to test your setup to ensure everything is working properly and to make any necessary adjustments. Testing your stream allows you to identify and address any potential issues and ensures a smooth broadcasting experience. Here are some steps to follow when testing your stream:
1. Check your audio and video: Start by testing your audio and video quality. Make sure your microphone is capturing clear sound without any distortion or background noise. Check your camera feed to ensure it’s displaying properly and adjust the positioning and framing if needed. Listen back to recordings or use the preview feature on your streaming platform to assess the quality.
2. Monitor your internet connection: Check your internet connection stability and speed to ensure it can handle the demands of streaming. Run an internet speed test to ensure you have sufficient upload bandwidth. A stable internet connection with a minimum upload speed of 5 Mbps is typically recommended for smooth streaming. If you experience latency or dropped frames, consider using a wired internet connection or adjusting your streaming settings.
3. Simulate stream interactions: To test viewer interactions, invite a friend or family member to watch your test stream and provide feedback. Encourage them to use features like chat, follow, and donation alerts to ensure these functionalities are working as intended. This will give you an idea of how your viewers will interact with your stream and allow you to make any necessary adjustments to improve viewer engagement.
4. Test your stream’s visual elements: Ensure that your overlays, notifications, and widgets are displaying correctly. Check that your scene transitions are smooth and that any stream labels or graphics are visible and in the desired location. Make adjustments as needed to optimize the visual appeal of your stream.
5. Monitor performance in streaming software: If you’re using third-party broadcasting software, pay attention to its performance during the test stream. Monitor CPU, GPU, and RAM usage to ensure your system can handle the streaming workload without significant issues. Adjust settings as needed to optimize performance without affecting stream quality.
6. Assess stream quality: Evaluate the overall quality of your stream during testing. Look for any dropped frames, buffering, or video artifacts. Pay attention to audio-sync issues and ensure that your stream’s resolution and bitrate settings provide a clean and high-quality viewing experience for your audience.
7. Make necessary adjustments: Based on the results of your test stream, make any necessary adjustments to improve the overall quality of your broadcast. This may involve tweaking audio settings, adjusting stream layout, optimizing encoding settings, or upgrading your hardware. Regular testing will help you identify areas for improvement and ensure your stream is in top shape before going live.
Remember to communicate with your viewers during the test stream and ask for their feedback on audio, video quality, and overall stream experience. Their insights can provide valuable information and help you fine-tune your streaming setup.
By thoroughly testing your stream before going live, you can ensure a polished and professional broadcast. Fixing any issues early on will help you deliver a seamless streaming experience to your audience and increase their engagement and satisfaction with your content.
Now that you’ve tested your stream and made necessary adjustments, you’re ready to go live and share your gaming adventures with the world.
Tips and tricks for a successful streaming experience
Streaming can be a rewarding and enjoyable experience, but it also requires effort, dedication, and some insider knowledge to stand out from the crowd. Here are some tips and tricks to help make your streaming experience a success:
1. Define your niche: Identify what sets you apart as a streamer and what unique value you bring to your viewers. Focus on a specific game genre, playstyle, or content theme that aligns with your interests and expertise. By carving out a niche, you can attract a dedicated community of viewers who appreciate your content.
2. Interact with your viewers: Engage with your audience and create a welcoming and interactive environment during your streams. Respond to chat messages, address viewers by name, and ask for their input. Encouraging viewer interaction not only makes your streams more enjoyable, but it also fosters a sense of community and loyalty among your viewers.
3. Maintain a consistent streaming schedule: Establish a consistent streaming schedule that aligns with your availability and informs your audience of when they can expect to see you live. Consistency helps build anticipation and allows your viewers to plan their time around your streams. Treat streaming as a regular commitment to keep your community engaged and coming back for more.
4. Network with other streamers: Collaborate and network with other streamers in your niche. Engaging with other streamers can expose you to new viewers and help you learn from experienced broadcasters. Host or join multiplayer game sessions, participate in streaming communities, and extend your reach by appearing as a guest on other streams. Networking can lead to valuable partnerships and cross-promotion opportunities.
5. Promote your streams: Utilize social media platforms, such as Twitter, Instagram, and Discord, to promote your streams and engage with your community. Share updates, highlights, and behind-the-scenes content to generate excitement and attract new viewers. Collaborate with other content creators, participate in gaming forums, and leverage relevant hashtags to expand your reach and attract a wider audience.
6. Invest in quality equipment: While you don’t need the most expensive equipment to start streaming, investing in decent hardware can greatly enhance the overall quality of your streams. Consider upgrading your microphone, webcam, and internet connection to provide clear audio and high-definition video. A reliable and stable internet connection is especially crucial for delivering a smooth streaming experience.
7. Continuously improve your stream: Regularly evaluate and improve your stream based on viewer feedback and personal reflections. Pay attention to what works well and what needs improvement. Experiment with new stream elements, game genres, or streaming techniques to keep your streams fresh and engaging.
8. Learn from analytics: Utilize the analytics and data provided by your streaming platform to gain insights into viewer demographics, stream duration, peak viewership times, and more. Analyzing these metrics can help you understand which content resonates with your audience and make informed decisions to grow your viewership.
9. Take care of yourself: Streaming can be demanding, so it’s important to prioritize self-care. Take breaks, maintain a healthy work-life balance, and avoid burnout. Stay hydrated, eat well, exercise, and get enough sleep to ensure you have the energy and focus to deliver entertaining streams.
10. Have fun and be authentic: Ultimately, streaming should be an enjoyable experience for both you and your viewers. Stay true to yourself, be authentic, and let your personality shine through. Viewers appreciate genuine streamers who are passionate about what they do and create a positive and enjoyable environment.
By implementing these tips and incorporating your own unique style, you can create a successful streaming experience that attracts and retains a loyal community of viewers. Remember, streaming is a continuous journey of learning and growth, so embrace the process and have fun along the way!
Conclusion
Streaming from your PlayStation console is a fantastic way to connect with others, share your gaming adventures, and build a thriving community of viewers. By following the steps outlined in this guide, you can set up your PlayStation for streaming, choose the right streaming platform, create a streaming account, configure stream settings, connect a microphone and camera, customize your stream layout, optimize audio and visual settings, test your stream before going live, and implement tips and tricks for a successful streaming experience.
Taking the time to properly set up your equipment, customize your stream, and optimize your settings will not only enhance the quality of your streams but also provide a more enjoyable experience for your viewers. Engaging with your audience, networking with other streamers, and promoting your streams through social media will help you grow your audience and create a loyal community of viewers.
Remember, streaming is an ongoing journey of learning and improvement. Continuously evaluate your stream, gather feedback from your viewers, and make adjustments to enhance your content and delivery. Stay true to yourself, have fun, and enjoy the process of connecting with viewers from around the world through your shared love of gaming.
Now that you have the knowledge and tools to confidently stream from your PlayStation, it’s time to dive into the wonderful world of streaming. So, fire up your PlayStation, engage with your audience, and let your gaming adventures unfold for all to see. Happy streaming!