Introduction
Welcome to this guide on how to use a Kensington lock with your XPS 13 Ultrabook. If you are a proud owner of this sleek and powerful laptop, you know how important it is to keep your investment safe and secure. With its slim and portable design, the XPS 13 Ultrabook is a popular choice for professionals and students alike. However, its lightweight nature also makes it a target for thieves.
That’s where a Kensington lock comes in handy. A Kensington lock is a simple and effective security device that allows you to physically secure your laptop to a fixed object, such as a desk or table, using a steel cable and lock. This can provide you with peace of mind, knowing that your XPS 13 Ultrabook is protected from theft, whether you’re working in a crowded coffee shop, studying in the library, or leaving your laptop unattended in your office.
In this guide, we will walk you through the process of choosing the right Kensington lock for your XPS 13 Ultrabook and show you how to properly install and secure it. By following these steps, you can ensure that your laptop stays safe and secure, giving you the freedom to focus on your work or studies without worrying about theft.
So, if you’re ready to learn how to Kensington lock your XPS 13 Ultrabook, let’s get started!
What is a Kensington lock?
A Kensington lock is a popular security mechanism designed to prevent theft of laptops and other valuable electronic devices. It consists of a steel cable, a lock, and a small attachment point on the laptop or device, commonly known as the Kensington lock slot. The lock is connected to the laptop via the cable, and the other end of the cable is secured to a fixed object, such as a desk or table.
The concept behind the Kensington lock is simple yet effective. By physically attaching the laptop to a fixed object, it becomes much more difficult for opportunistic thieves to snatch the device and make a quick getaway. This gives you, as the laptop owner, added peace of mind when working in public places or leaving your laptop unattended in a shared office or classroom.
Kensington locks have become a standard feature on many laptops, including the XPS 13 Ultrabook, due to their convenience and effectiveness. The lock slot is typically located on the side or back of the laptop, providing a discreet and secure attachment point for the cable lock.
It’s important to note that while a Kensington lock can be a deterrent and provide a level of security, it is not foolproof. Determined thieves armed with the right tools may still be able to bypass the lock. However, for most opportunistic thefts, a Kensington lock provides a significant barrier and makes it much less likely for your laptop to be targeted.
Now that you understand the concept and purpose of a Kensington lock, let’s move on to the next section and explore why you need a Kensington lock for your XPS 13 Ultrabook.
Why do you need a Kensington lock for your XPS 13 Ultrabook?
When it comes to protecting your XPS 13 Ultrabook from theft, a Kensington lock is an essential accessory. Here are a few reasons why you should consider using a Kensington lock with your XPS 13 Ultrabook:
- Peace of mind: The XPS 13 Ultrabook is a highly portable and valuable device. Whether you’re working in a coffee shop, attending classes, or traveling, the thought of leaving your laptop unattended can be worrisome. With a Kensington lock, you can secure your XPS 13 Ultrabook to a fixed object, giving you peace of mind knowing that it is less likely to be stolen.
- Prevention of opportunistic theft: Opportunistic thieves often target unattended laptops in public spaces. By using a Kensington lock, you significantly reduce the risk of someone snatching your XPS 13 Ultrabook and walking away with it while your back is turned or you’re momentarily distracted. The sight of a secured laptop acts as a deterrent to potential thieves.
- Protection of valuable data: Losing your XPS 13 Ultrabook to theft is not just a financial loss but also a loss of valuable data and personal information. By locking your laptop with a Kensington lock, you prevent unauthorized access and protect your sensitive files and personal data from falling into the wrong hands.
- Added security in shared spaces: If you work in a shared office or a co-working space, a Kensington lock provides an extra layer of security. Even if you trust your colleagues, it’s always better to take precautions. By locking your XPS 13 Ultrabook, you can leave it unattended without worrying about someone accidentally or intentionally taking it.
Overall, a Kensington lock is a cost-effective investment that can save you from the inconvenience, financial loss, and potential data breach associated with laptop theft. It provides a visible deterrent, adds security to shared spaces, and gives you the peace of mind to focus on your work or studies.
Now that you understand why a Kensington lock is crucial for your XPS 13 Ultrabook, let’s move on to the next section and learn how to choose the right Kensington lock for your laptop.
Step 1: Choosing the right Kensington lock for your XPS 13 Ultrabook
When it comes to choosing a Kensington lock for your XPS 13 Ultrabook, there are a few factors to consider to ensure compatibility and maximum security. Here are the steps to follow:
- Check the Kensington lock slot: Begin by inspecting your XPS 13 Ultrabook to locate the Kensington lock slot. It is usually located on the side or back of the laptop. Take note of the slot’s size and shape, as different laptops may have variations in their lock slot designs.
- Research compatibility: Look for Kensington locks specifically designed for the XPS 13 Ultrabook or those that list compatibility with laptops of similar dimensions. Review the product details and specifications to ensure that the lock will fit securely into your laptop’s lock slot.
- Consider the lock type: Kensington locks come in various types, including key locks, combination locks, and keyed-alike locks. Consider your preferences and requirements when selecting the lock type. Key locks offer the highest level of security but may require careful management of the keys. Combination locks eliminate the need for keys but may be less tamper-proof. Keyed-alike locks allow you to use a single key for multiple locks, making it easier to manage.
- Read customer reviews: Before making a final decision, take the time to read customer reviews and ratings of the Kensington locks you are considering. This will give you insights into the product’s durability, ease of use, and overall customer satisfaction.
- Consider additional security features: Some Kensington locks come with extra features like a tamper-proof design, carbon steel cables, or built-in alarms. Evaluate these additional security features to determine if they are important to you and align with your security needs.
By following these steps, you can ensure that you select a Kensington lock that is compatible with your XPS 13 Ultrabook and meets your security requirements. Taking the time to research and choose the right lock is an important step towards effectively securing your laptop and protecting it from theft.
Now that you have chosen the right Kensington lock for your XPS 13 Ultrabook, we can move on to the next step: locating the Kensington lock slot on your laptop.
Step 2: Locating the Kensington lock slot on your XPS 13 Ultrabook
Locating the Kensington lock slot on your XPS 13 Ultrabook is crucial before you can install and secure the Kensington lock. Follow these steps to find the lock slot:
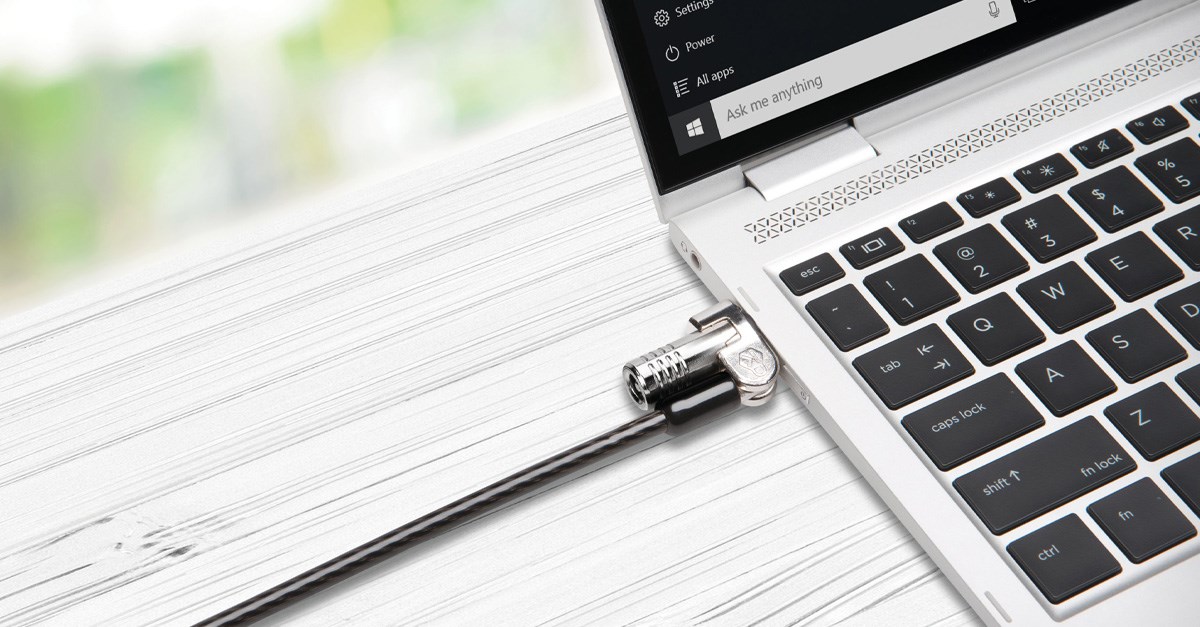
- Inspect the sides and back of your XPS 13 Ultrabook: Begin by visually inspecting the sides and back of your laptop. Look for a small, rectangular slot that is slightly larger than the lock cable. This slot is where the Kensington lock will be attached.
- Refer to the user manual: If you’re having trouble locating the lock slot, consult the user manual or the manufacturer’s website for specific instructions. They often provide detailed diagrams or descriptions of the laptop’s physical features, including the location of the lock slot.
- Look for the Kensington lock symbol: Some XPS 13 Ultrabooks may have a small icon or engraving near the lock slot to indicate its location. This symbol resembles a padlock with an upward-facing arrow, indicating where the lock should be inserted.
- Check for labeling or markings: In some cases, the lock slot may be labeled or have markings near it. Look for words like “Kensington Lock” or “Lock Slot” to help identify the location.
- Try a gentle tug: If you’re still uncertain, gently tug on the laptop’s edges or corners. The lock slot should be securely attached and not come loose or shift when lightly pulled.
Once you have successfully located the Kensington lock slot on your XPS 13 Ultrabook, you are ready to proceed with the next step: preparing the lock for installation. Knowing the exact location of the lock slot ensures proper alignment and ease of installation, allowing you to effectively secure your laptop.
Now that you have found the Kensington lock slot on your XPS 13 Ultrabook, let’s move on to the next step: preparing the lock for installation.
Step 3: Preparing the lock for installation
Before you can install the Kensington lock on your XPS 13 Ultrabook, it’s important to properly prepare the lock itself. Follow these steps to get the lock ready for installation:
- Gather the components: Make sure you have all the necessary components for the Kensington lock installation – the lock itself, the cable, and any additional keys or combination codes that may be included.
- Inspect the lock: Take a moment to inspect the lock for any damage or defects. Ensure that the locking mechanism moves smoothly and is free from obstructions or debris.
- Check the cable: Examine the cable for any signs of fraying or damage. Ensure that it is securely connected to the lock and does not have any twists or kinks that could affect its functionality.
- Test the lock mechanism: Before proceeding, test the lock to ensure it functions correctly. Insert the key or enter the combination code if applicable, and make sure the lock opens and closes smoothly and securely.
- Verify the fit: Check the size and shape of the lock head to ensure it matches the dimensions of the Kensington lock slot on your XPS 13 Ultrabook. It should fit snugly and securely without any excessive gaps or movement.
- Review the instructions: Take a few moments to review the provided instructions or guides for any specific preparation steps recommended by the manufacturer. This can help you familiarize yourself with any unique features or requirements of your particular Kensington lock model.
By carefully preparing the lock and cable, you can ensure a smooth and hassle-free installation process. These steps help you verify the condition and compatibility of the lock, ensuring its functionality and effectiveness in securing your XPS 13 Ultrabook.
Now that you have prepared the lock for installation, let’s move on to the next step: inserting the lock into the Kensington lock slot on your XPS 13 Ultrabook.
Step 4: Inserting the lock into the slot
Once you have prepared the Kensington lock, it’s time to insert it into the Kensington lock slot on your XPS 13 Ultrabook. Follow these steps for a proper and secure installation:
- Align the lock: Hold the lock head in your hand and align it with the Kensington lock slot on your XPS 13 Ultrabook. The lock should be positioned in a way that allows the cable to extend straight out from the slot without any kinks or twists.
- Insert the lock head: Firmly insert the lock head into the Kensington lock slot, applying steady, even pressure. Ensure that the lock slides smoothly into the slot without any resistance.
- Verify the connection: Once the lock is inserted into the slot, check that it is securely connected and cannot be easily detached. Gently tug on the lock to confirm that it is locked in place and does not come loose.
- Test the lock movement: With the lock securely inserted, test the lock’s movement by attempting to rotate or swivel it. It should have some resistance, indicating that it is properly engaged and cannot be easily manipulated or removed without the key or combination code.
- Double-check the alignment: Take a moment to ensure that the lock and cable are properly aligned and positioned. This helps prevent any unnecessary strain on the cable, reducing the risk of accidental damage or disconnection.
By following these steps, you can ensure that the Kensington lock is securely inserted into the Kensington lock slot on your XPS 13 Ultrabook. Proper alignment and a secure connection are essential for the effectiveness of the lock, providing peace of mind and protection against theft.
Now that you have successfully inserted the lock, we can move on to the next step: securing the lock in place.
Step 5: Securing the lock in place
Securing the Kensington lock in place is the next crucial step in ensuring the protection of your XPS 13 Ultrabook. Follow these steps to properly secure the lock:
- Choose a secure anchor point: Identify a sturdy and immovable object near your workspace, such as a desk, table leg, or other fixed structure. This anchor point should be difficult to remove or tamper with.
- Wrap the cable around the anchor: Loop the Kensington lock cable around the chosen anchor point. Ensure that the cable is snugly wrapped and there is minimal slack. This prevents someone from easily pulling or removing the laptop.
- Insert the lock into the lock slot on the anchor: Some anchors may have a slot specifically designed to accommodate the Kensington lock. Insert the lock into this slot, similar to how it was inserted into the Kensington lock slot on your XPS 13 Ultrabook.
- Rotate the lock barrel: Once the lock is inserted into the anchor’s lock slot, rotate the lock barrel to secure it in place. This action engages the locking mechanism and prevents the lock from being easily dislodged.
- Test the security: Give the cable and lock a gentle tug to ensure that they are securely in place and cannot be easily removed. Verify that the laptop is firmly attached to the anchor point without any significant movement.
By properly securing the Kensington lock in place and choosing a secure anchor point, you greatly reduce the chances of your XPS 13 Ultrabook being stolen from your workspace. Maintaining a taut cable and ensuring the lock is engaged provides an additional layer of security, deterring opportunistic thieves from targeting your laptop.
Now that you have securely installed the lock on your XPS 13 Ultrabook and effectively secured it to an anchor point, we can move on to the final step: testing the lock for stability.
Step 6: Testing the lock for stability
After securing the Kensington lock in place, it is essential to test its stability to ensure that your XPS 13 Ultrabook is effectively protected. Follow these steps to test the lock’s stability:
- Perform a stability check: Gently test the stability of your XPS 13 Ultrabook by tugging the laptop in different directions. Apply light pressure to see if there is any movement or slack in the cable. The laptop should remain tightly secured to the anchor point without any significant shifting.
- Check for unwanted disconnects: While testing the stability, pay attention to the connection between the lock and the Kensington lock slot. Ensure that the lock remains securely inserted without any accidental disconnections. It should maintain a firm grip on the lock slot throughout the testing process.
- Assess the cable tension: Evaluate the tension of the cable to prevent any sagging or excessive slack. The cable should be taut and provide minimal flexibility to deter potential thieves from attempting to detach the laptop.
- Reposition if necessary: If you detect any issues or instability during the testing process, carefully reposition the laptop and the lock to ensure a more secure fit. Adjust the cable length or the anchor point if required, ensuring a taut and stable connection.
- Repeat the stability check: After making any adjustments, perform another stability check to confirm that the lock is properly secured and the laptop is held firmly in place. Repeat the testing process from different angles to ensure complete stability.
By thoroughly testing the stability of the Kensington lock, you can have confidence that your XPS 13 Ultrabook is well-protected against theft. A stable and secure lock ensures that your laptop remains safely attached to the anchor point, providing peace of mind when working in public spaces or shared environments.
Congratulations! You have successfully completed all the steps for installing and securing a Kensington lock on your XPS 13 Ultrabook. You can now rest assured that your valuable device is protected against theft and unauthorized access.
Conclusion
Securing your XPS 13 Ultrabook with a Kensington lock is a practical and effective way to protect it from theft. By following the steps outlined in this guide, you can confidently install and secure a Kensington lock on your laptop.
We started by understanding what a Kensington lock is and why it is essential for your XPS 13 Ultrabook. The Kensington lock provides peace of mind, prevents opportunistic theft, protects valuable data, and adds security in shared spaces.
We then walked through the steps necessary to choose the right Kensington lock for your XPS 13 Ultrabook. It’s important to consider compatibility, lock type, customer reviews, and additional security features before making a selection.
Next, we discussed how to locate the Kensington lock slot on your XPS 13 Ultrabook and prepare the lock for installation. Proper alignment and inspection ensure a smooth installation process.
Once the lock was prepared, we guided you through the steps of inserting it into the slot and securing it in place. Proper insertion and rotation of the lock barrel ensure a secure attachment to your XPS 13 Ultrabook.
Finally, we emphasized the importance of testing the lock for stability. Performing stability checks, ensuring a taut cable, and repositioning if necessary guarantee the effectiveness of the Kensington lock.
By completing these steps, you have successfully installed and secured a Kensington lock on your XPS 13 Ultrabook. Your laptop is now protected, allowing you to work, study, or relax with confidence in various environments.
Remember, while a Kensington lock provides an additional layer of security, it is important to remain vigilant and take other precautionary measures to safeguard your laptop and personal information. Never leave your XPS 13 Ultrabook unattended in public spaces for extended periods, regularly backup your data, and use a strong password or biometric authentication to prevent unauthorized access.
Thank you for following this guide on using a Kensington lock with your XPS 13 Ultrabook. Stay secure, and enjoy the peace of mind knowing that your laptop is protected from theft.