Introduction
Google Sheets is a powerful spreadsheet application that allows users to store, organize, and analyze data. One common task that users often need to perform in Google Sheets is inserting multiple rows. This can be useful when adding new data or rearranging existing information.
Inserting multiple rows in Google Sheets can be accomplished through various methods, including using the insert menu, keyboard shortcuts, the fill handle, formulas, and the Apps Script Editor. Each method has its own advantages and can make the task of inserting multiple rows faster and more efficient.
In this article, we will explore five different methods to insert multiple rows in Google Sheets. Whether you’re a beginner or an advanced user, you’ll find these methods easy to understand and implement.
Before we dive into the methods, it is important to note that Google Sheets requires a validated Google account to access and use the application. If you don’t have an account, you can sign up for free on the Google website.
Now, let’s get started and learn how to insert multiple rows in Google Sheets!
Method 1: Using the Insert Menu
The first method to insert multiple rows in Google Sheets is by using the built-in insert menu. This method is straightforward and very easy to use. Follow the steps below:
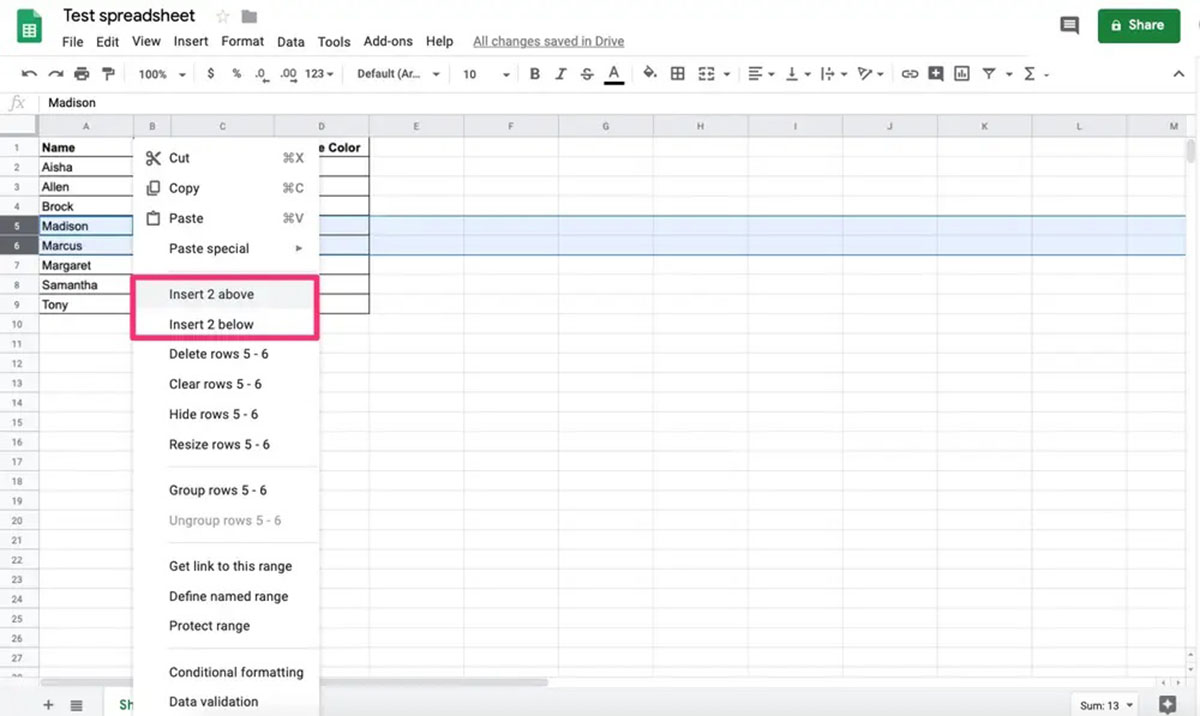
- Open your Google Sheets document and select the row below where you want to insert the new rows. For example, if you want to insert rows between row 3 and row 4, select row 4.
- Click on the “Insert” option in the top menu.
- Select the “Rows above” or “Rows below” option, depending on where you want to insert the new rows.
- Enter the number of rows you want to insert in the popup dialog box that appears.
- Click on the “OK” button to insert the rows.
By following these simple steps, you can easily insert multiple rows using the insert menu in Google Sheets. This method is suitable for users who prefer using the menu options rather than keyboard shortcuts or other methods.
It’s important to note that when you use the insert menu, any existing data below the inserted rows will be automatically shifted down to accommodate the new rows. This ensures that your data remains organized and intact.
Now that you know how to use the insert menu to insert multiple rows, let’s move on to the next method.
Method 2: Using a Keyboard Shortcut
If you prefer using keyboard shortcuts for faster navigation and execution, you can insert multiple rows in Google Sheets using a simple keyboard shortcut. Follow these steps:
- Open your Google Sheets document and select the row below where you want to insert the new rows.
- Press and hold the Shift key on your keyboard.
- While holding the Shift key, press and hold the Ctrl key (Windows) or the Command key (Mac).
- Still holding both keys, press the + key on your keyboard.
- Release all the keys.
By following these steps, you can quickly and easily insert multiple rows using the keyboard shortcut. This method is particularly useful when you need to add several rows at once, as it saves you the time and effort of navigating through the menus.
Similar to using the insert menu, this method will shift any existing data below the inserted rows to maintain the overall structure of your spreadsheet.
Now that you’re familiar with inserting multiple rows using a keyboard shortcut, let’s explore another method using the fill handle.
Method 3: Using the Fill Handle
Another efficient method to insert multiple rows in Google Sheets is by using the fill handle feature. The fill handle is a small square located in the bottom right corner of a selected cell. Follow these steps:
- Open your Google Sheets document and select the row below where you want to insert the new rows.
- Hover your mouse over the fill handle in the bottom right corner of the selected cell until it turns into a crosshair cursor.
- Click and drag the fill handle downwards to the number of rows you want to insert.
- Release the mouse button to insert the rows.
Using the fill handle is a quick and intuitive way to insert multiple rows. It allows you to duplicate and insert the same content or formulas across multiple rows easily.
When using the fill handle, the inserted rows will contain the same data or formulas as the row above. If you want to enter unique data in each inserted row, you will need to manually edit the values after inserting.
The fill handle is a versatile tool that can be used for various tasks, such as extending number patterns, copying formulas, or simply duplicating data. It saves time and effort, especially when you need to insert a large number of rows.
Now that you’re familiar with using the fill handle to insert multiple rows, let’s move on to another method that involves using a formula.
Method 4: Using a Formula
If you prefer a more dynamic approach to inserting multiple rows in Google Sheets, you can use a formula to achieve this. Follow these steps:
- Open your Google Sheets document and select the row below where you want to insert the new rows.
- In the first cell of the selected row, enter the formula
=ARRAYFORMULA(SPLIT(REPT(" ",n)), " "), replacing n with the number of rows you want to insert. - Press Enter on your keyboard to apply the formula.
This formula uses the ARRAYFORMULA, SPLIT, and REPT functions to generate the desired number of rows. The REPT function creates a string of spaces that corresponds to the number of rows specified. The SPLIT function then splits this string into individual cells, effectively creating the desired number of rows.
Using a formula to insert multiple rows can be especially useful when you need to insert a specific number of rows based on certain conditions or calculations. It provides flexibility and automation in managing your spreadsheet data.
Now that you’ve learned how to use a formula to insert multiple rows, let’s explore the final method using the Apps Script Editor.
Method 5: Using the Apps Script Editor
If you’re looking for advanced customization and automation when inserting multiple rows in Google Sheets, you can utilize the powerful Apps Script Editor. Follow these steps:
- Open your Google Sheets document and click on the “Extensions” tab in the top menu.
- Select “Apps Script” and then click on “Open editor.”
- In the Apps Script Editor window, enter the following code:
    function insertMultipleRows() {
      var sheet = SpreadsheetApp.getActiveSpreadsheet().getActiveSheet();
      var row = sheet.getActiveCell().getRow();
      var numRows = 5; // Change this value to the desired number of rows
      sheet.insertRowsAfter(row, numRows);
    }
-
Customize the
numRowsvariable in the code above to specify the number of rows you want to insert. - Click on the “Save” button to save the script.
- Close the Apps Script Editor.
- Go back to your Google Sheets document and select the row below where you want to insert the new rows.
- Click on the “Extensions” tab in the top menu and select “Apps Script.”
- Select the “insertMultipleRows” function from the dropdown menu.
- Click on the “Run” button to execute the script and insert the rows.
The Apps Script Editor provides a wide range of customizations and automation possibilities. In this method, we created a custom function called “insertMultipleRows” that inserts the specified number of rows after the currently selected row. You can modify the code to suit your specific needs.
Using the Apps Script Editor is ideal for users familiar with coding or for those who require advanced functionality not available through other methods. It allows you to create customized scripts to streamline your workflow and perform complex operations.
Now that you’ve explored all the methods to insert multiple rows in Google Sheets, you can choose the one that best suits your needs and preferences.
Conclusion
Inserting multiple rows in Google Sheets is a common task that can be easily achieved using various methods. By following the steps outlined in this article, you can insert multiple rows efficiently and effectively.
In Method 1, we explored how to use the insert menu to quickly add rows above or below the selected row. This method is straightforward and suitable for users who prefer using menu options.
In Method 2, we learned how to use a keyboard shortcut to insert multiple rows with ease. This method is ideal for users who prefer using shortcuts for faster navigation and execution.
Method 3 introduced the use of the fill handle, which is a versatile feature that allows for the duplication and insertion of rows. This method is great for quickly duplicating data or formulas across multiple rows.
For users seeking a more dynamic approach, Method 4 demonstrated how to use a formula to insert multiple rows. This method is useful when you need to insert a specific number of rows based on certain conditions or calculations.
Finally, Method 5 explored the use of the powerful Apps Script Editor for advanced customization and automation. This method is ideal for users familiar with coding or those who require complex operations and custom functionalities.
With these five methods at your disposal, you can choose the one that best suits your needs and preferences. Whether you prefer simplicity, speed, flexibility, or advanced automation, Google Sheets provides a range of options to fit your requirements.
So go ahead and start inserting multiple rows in Google Sheets using these methods. You’ll be able to organize and manipulate your data more efficiently, making your spreadsheet tasks a breeze!