Introduction
Welcome to the world of VMware Workstation, a powerful virtualization software that allows you to run multiple operating systems simultaneously on a single computer. Whether you are a software developer, a system administrator, or an avid tech enthusiast, VMware Workstation provides you with a flexible and efficient environment to build, test, and experiment with different operating systems and software configurations.
One common challenge that users face when working with VMware Workstation is adjusting the screen size to suit their needs. By default, VMware Workstation will display the virtual machine screen in a windowed mode, which may not utilize the entire screen real estate of your host computer. Fortunately, VMware Workstation offers several options and features to help you increase the screen size and make the most out of your virtual machine experience.
In this article, we will guide you through the process of adjusting the display settings, enabling full-screen mode, installing VMware Tools, and customizing the screen resolution. We will also troubleshoot common issues that you may encounter along the way. Whether you are a beginner or an experienced user, this guide will provide you with the necessary knowledge and tools to enhance your VMware Workstation experience and make the virtual machine screen fit your needs.
So, let’s dive in and explore the various methods to increase the screen size in VMware Workstation, allowing you to work more comfortably and efficiently within your virtual machines.
Understanding VMware Workstation
Before we delve into the specifics of increasing the screen size in VMware Workstation, it’s important to have a basic understanding of what VMware Workstation is and how it functions. VMware Workstation is a virtualization software that allows you to create and run virtual machines on your computer. With VMware Workstation, you can set up and run multiple operating systems simultaneously, such as Windows, Linux, macOS, and more, without the need for separate physical machines.
Virtualization software, like VMware Workstation, creates virtual machines by emulating the hardware components of a physical computer, such as the processor, memory, storage, and network interface. It provides a virtual environment where you can install and run an operating system just like you would on a physical machine. This virtual machine is isolated and independent from your host operating system, allowing for seamless multitasking and experimentation.
VMware Workstation offers a range of powerful features and capabilities, including snapshotting, which allows you to capture the current state of a virtual machine and revert back to it if necessary. Additionally, it provides networking options to connect your virtual machines to each other and to the outside world, enabling communication and collaboration.
One of the key aspects of VMware Workstation is its ability to adjust and customize the display settings of your virtual machine. By default, VMware Workstation uses a windowed mode to display the virtual machine screen, which may not take full advantage of your computer’s screen size. However, VMware Workstation offers several options to increase the screen size and improve your virtual machine experience.
In the following sections, we will explore these options in detail, including enabling full-screen mode, installing VMware Tools, adjusting screen resolution, and customizing the display settings. We will also address common issues that users may encounter and provide troubleshooting steps to overcome them.
Now that we have a solid understanding of VMware Workstation and its capabilities, let’s move on to the next section and learn how to adjust the display settings to increase the screen size in your virtual machines.
Adjusting the Display Settings
VMware Workstation allows you to adjust the display settings of your virtual machines, giving you control over the screen size and resolution. By customizing these settings, you can ensure that your virtual machine’s screen fits your needs and preferences. Let’s explore the different methods to adjust the display settings in VMware Workstation.
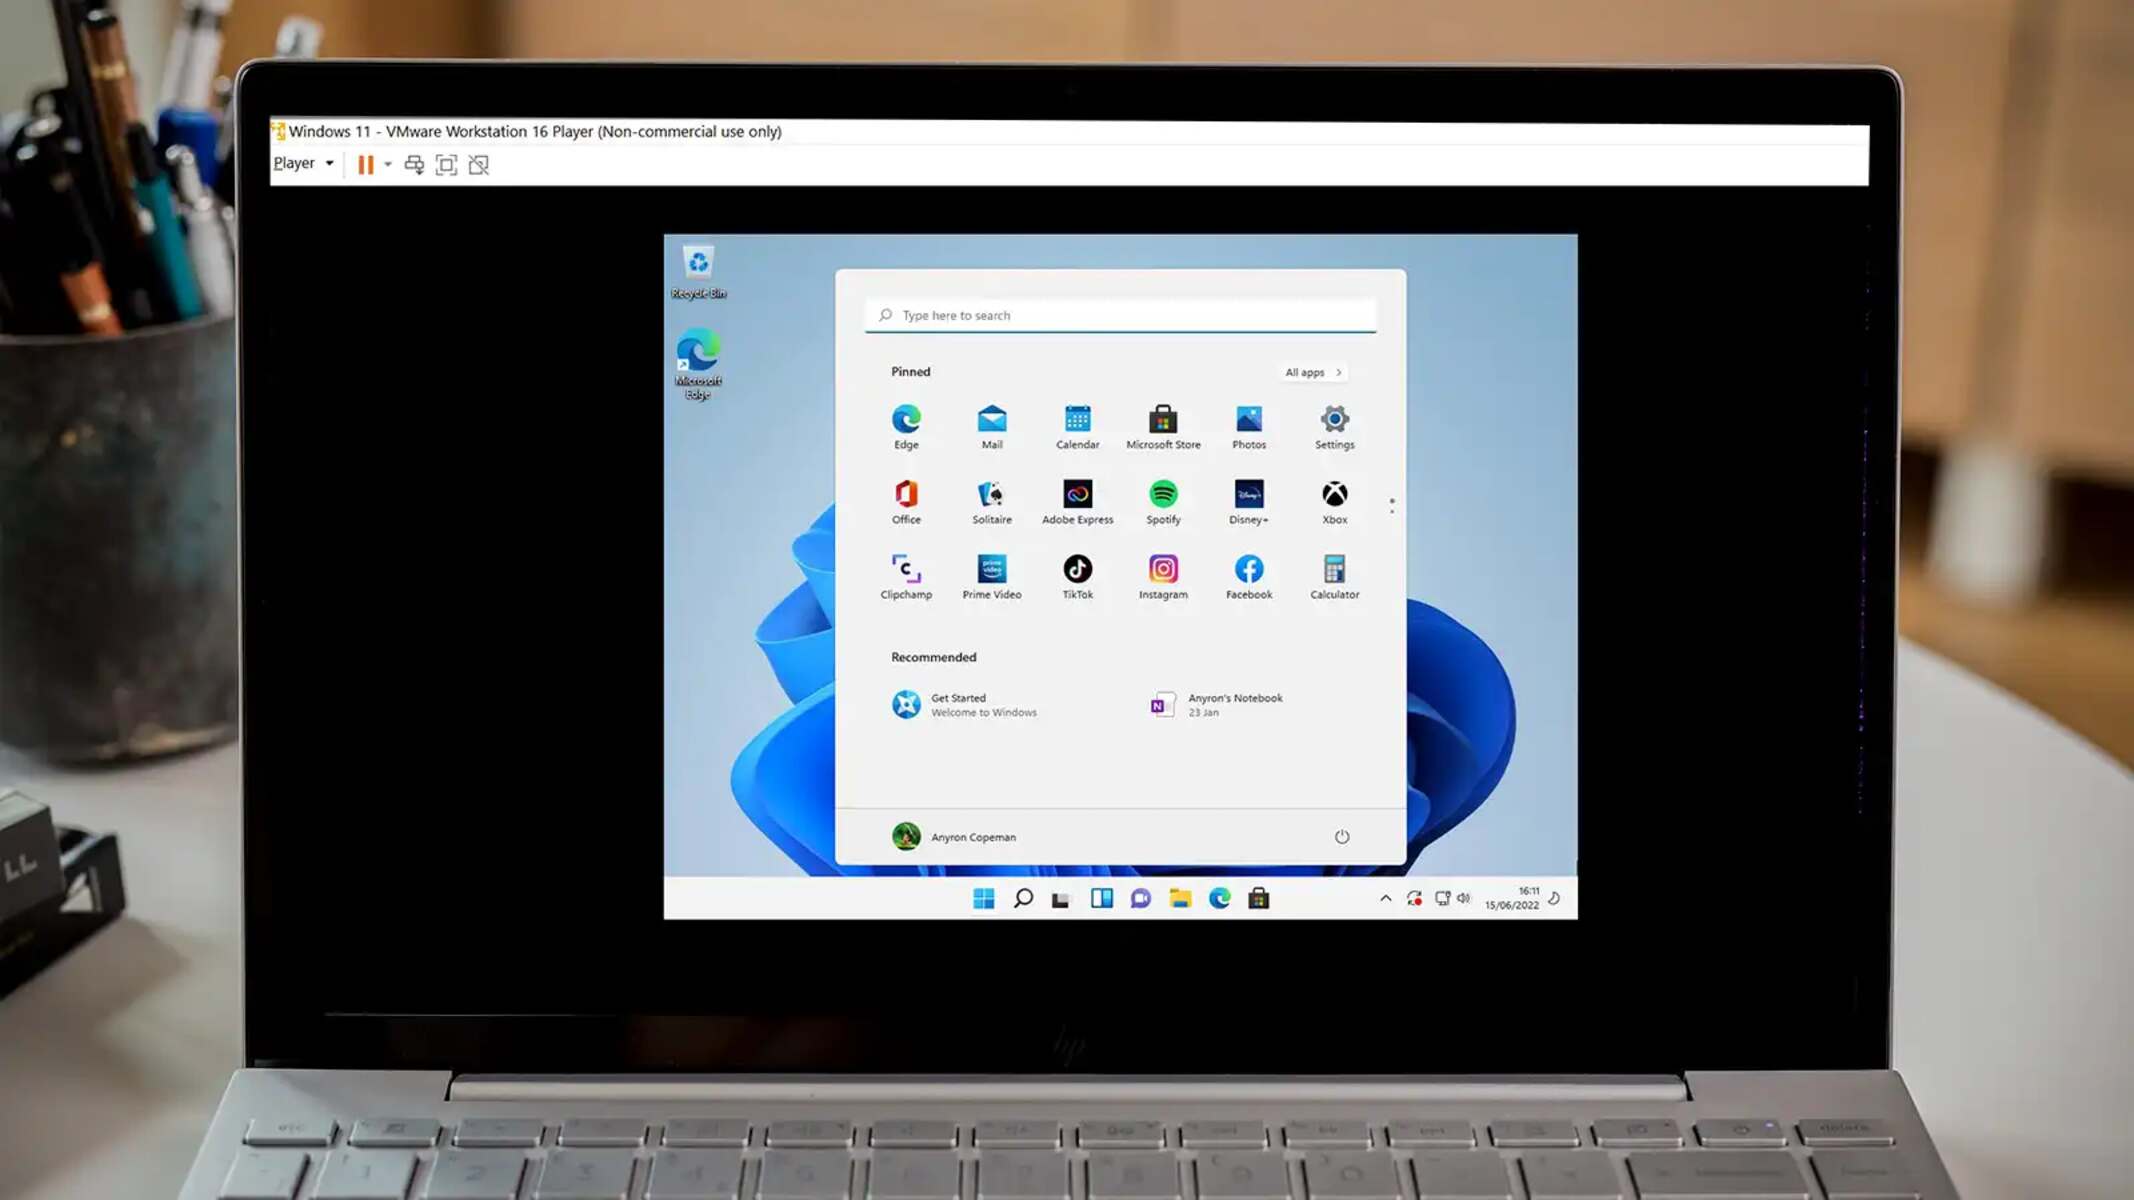
1. Windowed Mode: By default, VMware Workstation displays the virtual machine screen in a windowed mode. In this mode, the virtual machine’s screen is contained within a window on your host computer’s desktop. To resize the window and change the screen size, simply click and drag the edges of the window. This allows you to make the virtual machine screen larger or smaller to suit your requirements.
2. Full Screen Mode: If you prefer to have the virtual machine’s screen occupy the entire screen of your host computer, you can enable full-screen mode. To do this, go to the VMware Workstation menu at the top of the screen, select View, and then click on Full Screen. Alternatively, you can use the keyboard shortcut Ctrl + Alt + Enter to toggle between windowed mode and full-screen mode.
3. Unity Mode: VMware Workstation also offers a feature called Unity mode, which allows you to run applications from the virtual machine directly on your host computer’s desktop. In Unity mode, the virtual machine applications are integrated with your host operating system, eliminating the need to switch between the virtual machine and the host computer. To enable Unity mode, go to the VMware Workstation menu, select View, and then click on Unity.
4. AutoFit Guest: VMware Workstation includes an AutoFit Guest feature, which automatically adjusts the screen size of the virtual machine based on your host computer’s display. This ensures that the virtual machine’s screen is optimized for your current screen resolution. To enable AutoFit Guest, go to the VMware Workstation menu, select View, and then click on AutoFit Guest. You can also use the keyboard shortcut Ctrl + Alt + F to toggle AutoFit Guest on or off.
By using these display settings in VMware Workstation, you can easily adjust the screen size and resolution of your virtual machines to match your preferences and work more efficiently. In the next section, we will discuss the importance of installing VMware Tools and how it can further enhance your virtual machine’s display.
Enabling Full Screen Mode
Full screen mode in VMware Workstation allows you to maximize the virtual machine’s screen, utilizing the entire display of your host computer. Enabling full screen mode can provide a more immersive and focused experience when working with your virtual machines. Let’s explore how to enable full screen mode in VMware Workstation.
There are a couple of methods to enable full screen mode:
1. Using the VMware Workstation menu: Click on the VMware Workstation menu at the top of the screen. From the dropdown menu, select View and then click on Full Screen. This will immediately switch your virtual machine to full screen mode, effectively occupying the entire display of your host computer.
2. Using the keyboard shortcut: VMware Workstation provides a keyboard shortcut to quickly toggle between windowed mode and full screen mode. Simply press Ctrl + Alt + Enter on your keyboard, and the virtual machine will switch to full screen mode or exit full screen mode, depending on its current state.
Once you have enabled full screen mode, the virtual machine’s display will fill your entire screen, providing you with a larger workspace and an immersive environment to work in. This can be particularly useful when running applications or working with graphical interfaces within the virtual machine.
To exit full screen mode and return to the windowed mode, you can either click on the Restore button at the top-right corner of the screen or press the Ctrl + Alt + Enter shortcut again. This will instantly switch your virtual machine back to its original windowed mode, where you can adjust the window size and position as desired.
Enabling full screen mode in VMware Workstation allows you to make the most out of your virtual machine’s display and provides a seamless integration between the virtual machine and your host computer’s desktop. However, it’s important to note that some older operating systems or hardware configurations may have limitations when it comes to full screen mode. In such cases, you may need to explore alternative display settings and customization options to achieve the desired screen size and experience.
Now that you know how to enable full screen mode in VMware Workstation, let’s move on to the next section where we will discuss the importance of installing VMware Tools and how it can further enhance your virtual machine’s display.
Installing VMware Tools
VMware Tools is a suite of utilities and drivers that enhances the performance and functionality of your virtual machines running on VMware Workstation. In addition to providing improved graphics and sound support, VMware Tools includes specific drivers and services that optimize the interaction between the virtual machine and the host computer’s operating system. Installing VMware Tools is highly recommended to ensure a smooth and seamless experience within your virtual machines.
To install VMware Tools, follow these steps:
1. Start the virtual machine: Power on your virtual machine and let it fully boot into the operating system. Ensure that you are logged in as an administrator or have the necessary permissions to install software on the virtual machine.
2. Mount the VMware Tools installation media: In the VMware Workstation menu, click on VM and then select Install VMware Tools. This will mount the VMware Tools installation media to your virtual machine.
3. Open the installation media: A dialog box should appear within the virtual machine, showing the contents of the VMware Tools installation media. Open the disk image and locate the VMware Tools installer.
4. Run the installer: Double-click on the VMware Tools installer to start the installation process. Follow the on-screen instructions to proceed with the installation. In most cases, the installer will automatically detect the appropriate settings and install the necessary drivers and utilities.
5. Restart the virtual machine: Once the installation is complete, it is recommended to restart the virtual machine. This ensures that the changes made by VMware Tools take effect and are fully integrated into the operating system.
After installing VMware Tools, you will benefit from enhanced graphics capabilities, improved mouse and keyboard integration, faster file transfers between the host and the virtual machine, and better overall performance. VMware Tools also provides features like automatic resolution adjustment, which dynamically resizes the virtual machine’s display to fit the window or screen resolution of your host computer.
Keep in mind that each operating system may have specific requirements and considerations when it comes to installing VMware Tools. It is important to refer to the documentation provided by VMware to ensure a successful installation and optimal compatibility with your virtual machine.
By installing VMware Tools, you can further enhance the display and functionality of your virtual machines running on VMware Workstation. In the next section, we will explore how to adjust the screen resolution to ensure the best possible display within your virtual machines.
Adjusting Screen Resolution
The screen resolution of your virtual machine determines the clarity and amount of information that can be displayed on the screen. Adjusting the screen resolution can help optimize the display within your virtual machine and ensure a better visual experience. VMware Workstation provides options to customize the screen resolution, allowing you to match the resolution of your host computer or choose a specific resolution that suits your needs.
To adjust the screen resolution in VMware Workstation, follow these steps:
1. Power on the virtual machine: Start the virtual machine and allow it to fully boot into the operating system.
2. Access the display settings: In the VMware Workstation menu, click on VM and then select Settings. This will open the Virtual Machine Settings window.
3. Navigate to the display settings: In the Virtual Machine Settings window, click on the Hardware tab and then select Display.
4. Adjust the screen resolution: Within the Display settings, you can customize the screen resolution using the slider or by entering specific values in the Width and Height fields. VMware Workstation will display a range of available resolutions based on the capabilities of your virtual machine and the monitor settings of your host computer.
5. Apply the changes: After selecting the desired screen resolution, click on the Apply button to save the changes. The virtual machine’s screen resolution will be adjusted accordingly.
6. Restart the virtual machine: It may be necessary to restart the virtual machine for the changes to take effect and for the new screen resolution to be fully utilized.
By adjusting the screen resolution, you can optimize the display within your virtual machine and ensure that it fits your specific requirements. A higher resolution provides more screen real estate and allows for the simultaneous display of more information, while a lower resolution may result in larger text and icons for easier readability.
It’s important to note that the available screen resolutions may be limited based on the guest operating system’s capabilities and the hardware configuration of your virtual machine. Additionally, some operating systems may require the installation of specific display drivers to unlock additional screen resolutions or to enable features like automatic resolution adjustment.
Experimenting with different screen resolutions can help you find the perfect balance between screen real estate and clarity within your virtual machine. Take the time to adjust the screen resolution to your liking and optimize it for your specific workflow and usage patterns.
In the next section, we will explore how to further customize the display settings in VMware Workstation to enhance your virtual machine experience.
Customizing the Display Settings
In addition to adjusting the screen resolution, VMware Workstation provides various options to customize the display settings within your virtual machines. These settings allow you to personalize your virtual machine’s display and make it more comfortable and suitable for your individual preferences and requirements.
Let’s explore some of the display settings that you can customize in VMware Workstation:
1. Display Scaling: VMware Workstation offers display scaling options that allow you to adjust the size of the virtual machine’s screen content. This is especially useful when working with high-resolution displays where text and UI elements may appear too small. You can increase or decrease the display scaling to find the best balance between the size of the content and the available screen space.
2. Multiple Monitors: If you have multiple monitors connected to your host computer, you can utilize them within your virtual machine. VMware Workstation allows you to configure your virtual machine to use multiple monitors, extending your workspace and providing a more efficient multitasking experience. You can choose to use the multiple monitors in full-screen mode or span them across the virtual machine’s desktop.
3. Graphics Acceleration: VMware Workstation supports hardware accelerated 3D graphics, allowing you to enable graphics acceleration within your virtual machines. Enabling this feature can enhance the performance and visual quality of graphic-intensive applications, such as 3D modeling software or games, within the virtual machine.
4. Display Fidelity: You can choose the level of display fidelity in your virtual machine. The display fidelity determines the quality and performance of the virtual machine’s display. Lower display fidelity settings can improve the overall performance of the virtual machine, while higher settings provide a more visually appealing experience with smoother animations and transitions.
5. Mouse Integration: VMware Workstation offers seamless mouse integration between the virtual machine and your host computer’s desktop. By enabling mouse integration, you can seamlessly move the mouse cursor between the virtual machine and the host computer without the need to release or capture it. This simplifies the navigation and interaction between the virtual machine and other applications on your host computer.
6. Display Options: VMware Workstation provides various display options that allow you to customize specific aspects of the virtual machine’s display. For example, you can enable or disable the display of the virtual machine’s toolbar or adjust the visibility of the status bar and menu bar. These options help you tailor the display to your liking and streamline your virtual machine experience.
By customizing the display settings in VMware Workstation, you can fine-tune your virtual machine’s display to match your preferences and make it more convenient and appealing for your workflow. Play around with these settings to find the configuration that suits you best and enhances your overall virtual machine experience.
In the next section, we will address common issues that users may face when adjusting the screen size in VMware Workstation and provide troubleshooting steps to resolve them.
Troubleshooting Common Issues
While adjusting the screen size in VMware Workstation, you may encounter some common issues that can impact your virtual machine’s display. Fortunately, many of these issues can be resolved through simple troubleshooting steps. Let’s take a look at some common problems and their potential solutions.
1. Screen Resolution Unavailable: If you are unable to set the desired screen resolution in the display settings, it is likely due to the guest operating system not having the necessary display drivers installed. Ensure that you have installed VMware Tools, as it includes the required drivers. Restart the virtual machine after installing VMware Tools to see if the desired screen resolutions become available.
2. Flickering or Choppy Display: If you experience a flickering or choppy display, it could be due to incorrect or incompatible graphics settings. Try disabling hardware graphics acceleration in the virtual machine settings to see if it resolves the issue. You can also try reducing the display fidelity settings to improve performance.
3. Guest Operating System Doesn’t Match Host Resolution: If the guest operating system’s resolution doesn’t match the resolution of your host computer, the display may appear stretched or distorted. Ensure that you have set the screen resolution correctly in both the guest operating system and the VMware Workstation display settings to match the resolution of your host computer.
4. Mouse Not Capturing Correctly: If you are having trouble capturing the mouse within the virtual machine or the mouse cursor does not align properly with the virtual machine’s display, try toggling mouse integration on and off. You can also try restarting the virtual machine or reinstalling VMware Tools to ensure proper mouse functionality.
5. No Display on Secondary Monitors: If you are using multiple monitors and the virtual machine is not displaying on one or more of the secondary monitors, ensure that you have enabled multiple monitor support in the virtual machine settings. Verify that the monitors are correctly detected by the guest operating system and configured accordingly.
6. Other Display-related Issues: If you encounter any other display-related issues not mentioned above, it is worth checking for software updates for both VMware Workstation and your guest operating system. Updating to the latest versions can often resolve compatibility and display-related issues.
If the above troubleshooting steps do not resolve the display issues, it is recommended to consult the VMware Workstation documentation or seek assistance from the VMware Community Forums or support resources for further guidance and solutions.
By addressing these common issues and using the appropriate troubleshooting techniques, you can ensure a smooth and optimal display experience within your virtual machines running on VMware Workstation.
Now that we have discussed various troubleshooting methods, let’s summarize the key points in the concluding section.
Conclusion
Adjusting the screen size in VMware Workstation is essential for optimizing your virtual machine experience. By customizing the display settings, enabling full screen mode, installing VMware Tools, adjusting screen resolution, and troubleshooting common issues, you can ensure that the virtual machine’s screen suits your needs and preferences.
We explored the various methods to adjust the screen size, including windowed mode, full screen mode, Unity mode, and AutoFit Guest. Enabling full screen mode provides a more immersive experience, while Unity mode allows for seamless integration of virtual machine applications with the host computer’s desktop. AutoFit Guest dynamically adjusts the screen size based on your host computer’s display.
Additionally, we discussed the importance of installing VMware Tools, which enhances graphics, sound, and overall performance. VMware Tools also provides features like automatic resolution adjustment, improving compatibility and functionality with the host operating system.
You learned how to customize the screen resolution, display scaling, mouse integration, graphics acceleration, and other display settings in VMware Workstation. These customization options allow you to personalize your virtual machine’s display and optimize it for your specific workflow and preferences.
Finally, we explored common display-related issues and their troubleshooting steps. From screen resolution unavailability to flickering displays, we provided guidance on diagnosing and resolving these issues. Seeking assistance from VMware resources and communities can provide further support if needed.
By implementing the techniques and solutions discussed in this article, you can enhance your VMware Workstation experience and ensure that the virtual machine’s screen size and display settings are tailored to your requirements. Enjoy the flexibility and power of VMware Workstation as you successfully navigate your virtual environment.