How to Download Zoom on Mac
If you’re looking to download Zoom on your Mac, you’re in luck! This popular video conferencing platform is widely used for online meetings, webinars, and virtual social gatherings. In this section, we’ll guide you through the steps to download Zoom on your Mac and get started with virtual communication.
Follow the steps below to download Zoom on your Mac:
- Open your preferred web browser, such as Safari or Chrome, on your Mac.
- Go to the official Zoom website by typing in “zoom.us” in the address bar and pressing Enter.
- Once on the Zoom homepage, navigate to the top right corner and click on the “Sign In” button. If you don’t have a Zoom account, click on “Sign Up, It’s Free” to create a new account.
- Enter your Zoom login credentials or complete the sign-up process to access your Zoom account.
- After signing in or creating an account, you’ll be redirected to your Zoom dashboard. Here, locate the menu on the left side and click on “Resources” and then select “Download Zoom Client” from the dropdown menu.
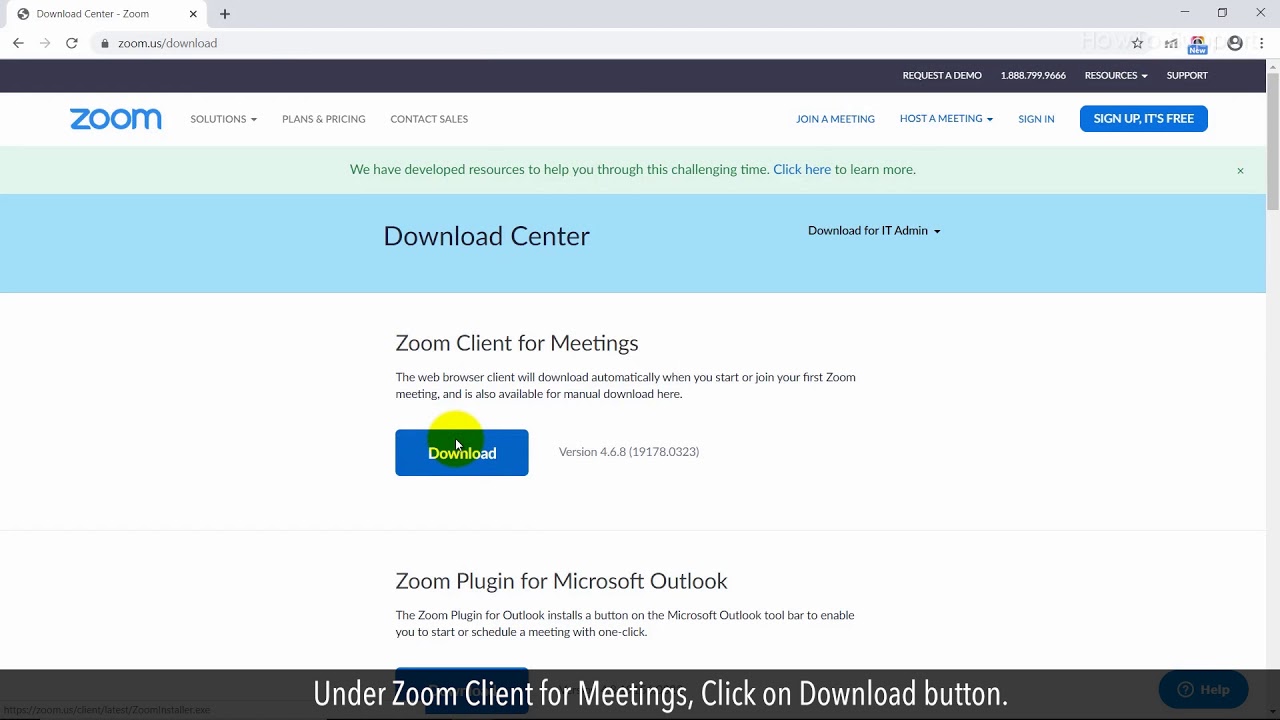
- On the download page, click on the “Download” button under the “Zoom Client for Meetings” section.
- A download prompt will appear asking you to save the installation file. Choose a location on your Mac where you want to save the file and click “Save.”
- Once the download is complete, locate the installation file in the chosen destination folder.
- Double-click on the file to start the installation process.
- Follow the on-screen instructions to complete the installation of Zoom on your Mac.
That’s it! You have successfully downloaded Zoom on your Mac. Now you’re ready to take advantage of Zoom’s powerful features and connect with people remotely. Keep in mind that you’ll need a stable internet connection to effectively use Zoom for online meetings and video conferences.
Note: Make sure to regularly update your Zoom application to access the latest features and security patches.
Now that you have Zoom installed on your Mac, let’s move on to the next section to learn how to install it.
How to Install Zoom on Mac
Now that you’ve downloaded Zoom on your Mac, it’s time to install it and get ready to join virtual meetings and conferences. Installing Zoom is a simple process, and this section will guide you through the steps.
Follow the instructions below to install Zoom on your Mac:
- Locate the Zoom installation file that you downloaded in the previous section.
- Double-click on the file to initiate the installation process.
- A security prompt may appear asking for your permission to open the file. Click “Open” or enter your administrator password if required.
- The Zoom installer window will appear on your screen. Click the “Continue” button.
- Review the terms of the license agreement and click the “Continue” button.
- Click the “Agree” button to accept the terms and proceed with the installation.
- Choose the destination where you want to install Zoom and click the “Install” button.
- During the installation process, you may be prompted to enter your administrator password again. Enter the password and click “Install Software” to continue.
- Wait for the installation to complete. The progress bar will indicate the installation status.
- Once the installation is finished, a confirmation message will appear. Click the “Close” button.
That’s it! You have successfully installed Zoom on your Mac. Now you can launch the Zoom application from your Applications folder or the Launchpad.
It’s important to keep your Zoom application up to date to ensure you have access to the latest features and security enhancements. Zoom will automatically check for updates, but you can also manually check for updates by clicking on the Zoom icon in your menu bar, selecting “Check for Updates,” and following the instructions.
Now that you have Zoom installed on your Mac, let’s move on to the next section to learn how to sign up for a Zoom account.
How to Sign Up for Zoom on Mac
If you’re new to Zoom and want to join online meetings or host your own virtual gatherings, you’ll need to sign up for a Zoom account. Signing up for Zoom is quick and easy, and this section will walk you through the steps to create your account on your Mac.
Follow the instructions below to sign up for Zoom on your Mac:
- Launch the Zoom application on your Mac by locating it in your Applications folder or the Launchpad.
- Click on the “Sign Up” button on the main screen.
- You’ll be presented with two sign-up options: “Sign Up with Google” or “Sign Up with Email.”
- If you choose to sign up with Google, click the “Sign in with Google” button and follow the prompts to sign in to your Google account. Once completed, you’ll be redirected back to Zoom.
- If you prefer to sign up with your email address, click the “Sign Up with Email” button. Enter your email address in the provided field and click “Sign Up.”
- On the next page, enter your first name, last name, and desired password for your Zoom account. You may also be asked to confirm your email address.
- Review Zoom’s terms of service and privacy policy, and check the box to indicate that you agree to them.
- Click the “Continue” or “Sign Up” button to create your Zoom account.
- You may be asked to verify your email address by clicking on a link sent to your email. Follow the instructions in the email to complete the verification process.
That’s it! You have successfully signed up for a Zoom account on your Mac. You can now log in to your account and start using Zoom’s features to join or host online meetings, webinars, and more.
Remember to keep your Zoom login credentials secure and confidential to protect your account.
Now that you have signed up for a Zoom account, let’s move on to the next section to learn how to join a meeting on Zoom using your Mac.
How to Join a Meeting on Zoom on Mac
Now that you have a Zoom account, you can easily join meetings and collaborate with others using your Mac. Whether it’s a business conference call or a virtual social gathering, joining a meeting on Zoom is a straightforward process. In this section, we’ll guide you through the steps to join a meeting on Zoom using your Mac.
Follow the instructions below to join a meeting on Zoom on your Mac:
- Open the Zoom application on your Mac by locating it in your Applications folder or the Launchpad.
- Click on the “Sign In” button at the lower-right corner of the Zoom window.
- Enter your Zoom email and password to log in to your account and click “Sign In.”
- Once signed in, you’ll see the Zoom home screen. Click on the “Join” button.
- In the “Meeting ID” field, enter the unique meeting ID provided by the meeting organizer. You can find the meeting ID in the invite link or email invitation.
- If required, enter a display name to use during the meeting. This name will be visible to others in the meeting.
- Choose the audio option you prefer: “Join with Computer Audio” or “Test Speaker and Microphone.” The former option allows you to use your computer’s built-in audio devices, while the latter option lets you test your audio settings beforehand.
- Toggle the camera on or off, depending on whether you want to share video during the meeting.
- Click the “Join” button to join the meeting.
That’s it! You have successfully joined a meeting on Zoom using your Mac. Now you can participate in discussions, share your screen, and collaborate with others seamlessly.
If the meeting you’re trying to join has a password set, you may be prompted to enter the password before joining. Simply enter the password provided by the meeting organizer to proceed.
Remember to be mindful of meeting etiquette, such as muting yourself when not speaking and using the raise hand feature if you want to contribute or ask a question.
Now that you know how to join a meeting on Zoom, let’s move on to the next section to learn how to schedule a meeting of your own using your Mac.
How to Schedule a Meeting on Zoom on Mac
Scheduling a meeting on Zoom is a convenient way to plan and organize virtual gatherings in advance. Whether it’s a team meeting, a client presentation, or a social event, scheduling a meeting on Zoom ensures that all participants have the necessary details and can join the meeting at the scheduled time. In this section, we’ll guide you through the steps to schedule a meeting on Zoom using your Mac.
Follow the instructions below to schedule a meeting on Zoom on your Mac:
- Open the Zoom application on your Mac by locating it in your Applications folder or the Launchpad.
- Click on the “Sign In” button at the lower-right corner of the Zoom window.
- Enter your Zoom email and password to log in to your account and click “Sign In.”
- Once signed in, you’ll see the Zoom home screen. Click on the “Schedule” button.
- In the “Topic” field, enter a descriptive title for your meeting.
- Choose the date and time for your meeting using the date and time pickers.
- Specify the duration of the meeting by selecting the start and end time.
- If necessary, enable the “Recurring meeting” option to schedule a meeting that repeats at the same time on a regular basis.
- Toggle the “Host video” and “Participant video” options based on your preferences. If enabled, participants will join the meeting with their video on.
- Choose the audio options for the meeting: “Computer Audio” or “Phone Call.” The former option allows participants to join with the audio from their computer, while the latter provides a phone number for participants to dial into the meeting.
- Specify additional meeting settings, such as enabling a waiting room, setting a password, or enabling a meeting registration.
- Click the “Schedule” button to save the meeting and generate a unique meeting ID and join link.
That’s it! You have successfully scheduled a meeting on Zoom using your Mac. You can now share the meeting details with the participants, including the meeting ID, date, time, and join link.
Remember to consider time zones when scheduling meetings with participants from different locations. It’s also a good practice to send out meeting reminders closer to the scheduled time.
Now that you know how to schedule a meeting on Zoom, let’s move on to the next section to learn how to share your screen during a Zoom meeting on your Mac.
How to Share Your Screen on Zoom on Mac
Sharing your screen during a Zoom meeting on your Mac can be incredibly useful for presentations, demonstrations, or collaborative work. Whether you want to share a document, a slideshow, or an application, Zoom makes it easy to showcase your screen to the meeting participants. In this section, we’ll guide you through the steps to share your screen on Zoom using your Mac.
Follow the instructions below to share your screen on Zoom on your Mac:
- Join a Zoom meeting on your Mac by following the steps we discussed earlier in the “How to Join a Meeting on Zoom” section.
- Once you’re in the meeting, locate the toolbar at the bottom of the Zoom window.
- Click on the “Share Screen” button in the toolbar. It looks like a computer monitor.
- A pop-up window will appear, displaying the available screens or applications that you can share.
- If you want to share your entire screen, click on the screen thumbnail and click the “Share” button at the bottom right of the pop-up window.
- If you want to share a specific application or a portion of your screen, select the corresponding option from the pop-up window and click “Share.”
- Once you start sharing, a green outline will appear around the area or application being shared, indicating that the participants can now see your screen.
- To stop sharing your screen, click on the “Stop Share” button in the floating toolbar or go back to the Zoom main window and click on the “Stop Share” button in the toolbar.
That’s it! You have successfully shared your screen on Zoom using your Mac. Whether you’re giving a presentation, demonstrating a process, or collaborating on a project, sharing your screen can enhance communication and collaboration during virtual meetings.
Remember to close any irrelevant or sensitive applications or documents before sharing your screen to protect your privacy.
Now that you know how to share your screen on Zoom, let’s move on to the next section to learn how to record a meeting on Zoom on your Mac.
How to Record a Meeting on Zoom on Mac
Recording a meeting on Zoom can be helpful for various purposes, such as capturing important discussions, preserving presentations, or reviewing meeting content at a later time. If you’re using Zoom on your Mac, you have the option to record meetings directly on your computer. In this section, we’ll guide you through the steps to record a meeting on Zoom using your Mac.
Follow the instructions below to record a meeting on Zoom on your Mac:
- Join a Zoom meeting on your Mac by following the steps outlined in the “How to Join a Meeting on Zoom on Mac” section.
- Once you’re in the meeting, locate the toolbar at the bottom of the Zoom window.
- Click on the “Record” button in the toolbar. It looks like a circle.
- A pop-up menu will appear with different recording options.
- To record the meeting on your computer, select the “Record on this Computer” option.
- The recording will start, and a red dot indicator will appear in the top-left corner of the Zoom window, indicating that the meeting is being recorded.
- You can navigate through different shared screens or applications during the meeting, and the recording will capture everything that is being displayed and said.
- To stop the recording, click on the “Stop Recording” button in the floating toolbar or go back to the Zoom main window and click on the “Stop Recording” button in the toolbar.
- Once you stop the recording, Zoom will convert the recorded meeting into a video file and save it on your Mac. The file location will be displayed in a pop-up window.
That’s it! You have successfully recorded a meeting on Zoom using your Mac. The recorded meeting can be useful for future reference, sharing with participants who couldn’t attend, or reviewing important details.
Remember to inform the meeting participants that the meeting is being recorded, especially if it is required by your organization’s policies or privacy regulations.
Now that you know how to record a meeting on Zoom, let’s move on to the next section to learn how to use Zoom’s virtual backgrounds on your Mac.
How to Use Zoom’s Virtual Backgrounds on Mac
Zoom’s virtual backgrounds feature allows you to customize your meeting environment and add a touch of creativity or professionalism to your video calls. With Zoom’s virtual backgrounds, you can replace your actual background with a virtual image or video. If you’re using Zoom on your Mac, you can easily use this feature to enhance your visual presence during meetings. In this section, we’ll guide you through the steps to use Zoom’s virtual backgrounds on your Mac.
Follow the instructions below to use Zoom’s virtual backgrounds on your Mac:
- Join a Zoom meeting on your Mac by following the steps outlined in the “How to Join a Meeting on Zoom on Mac” section.
- Once you’re in the meeting, locate the toolbar at the bottom of the Zoom window.
- Click on the “^” arrow next to the “Stop Video” button.
- From the drop-down menu, select “Choose Virtual Background.”
- A settings window will appear, displaying various background options.
- Choose a pre-loaded virtual background by clicking on it. You can select from the available options or click the “+” button to upload your own image or video as a background.
- You can preview how the virtual background will look in the preview panel.
- If you’re satisfied with the selected background, simply click the “Close” button to apply it.
- The virtual background will now be displayed during your meeting video.
That’s it! You have successfully used Zoom’s virtual backgrounds on your Mac. You can now enjoy a customized background during your video meetings and add a personal touch to your virtual presence.
Remember to choose an appropriate virtual background that suits the context of the meeting and reflects your professional image or desired ambiance.
Now that you know how to use Zoom’s virtual backgrounds, let’s move on to the next section to learn how to adjust Zoom settings on your Mac.
How to Adjust Zoom Settings on Mac
Customizing your Zoom settings on your Mac can enhance your overall meeting experience and tailor it to your specific preferences. With Zoom’s extensive settings options, you can optimize video and audio settings, manage notifications, and configure various other aspects of your Zoom meetings. In this section, we’ll guide you through the steps to adjust Zoom settings on your Mac.
Follow the instructions below to adjust Zoom settings on your Mac:
- Open the Zoom application on your Mac by locating it in your Applications folder or the Launchpad.
- Click on the “Sign In” button at the lower-right corner of the Zoom window.
- Enter your Zoom email and password to log in to your account and click “Sign In.”
- Once signed in, you’ll see the Zoom home screen. Click on your profile picture located at the top-right corner of the Zoom window.
- A drop-down menu will appear. Click on “Settings” to access the Zoom settings.
- In the settings window that opens, you’ll find a range of tabs on the left side, such as General, Video, Audio, and more. Click on each tab to explore and adjust the corresponding settings.
- Within each tab, you’ll find various options to customize your Zoom experience. For example, under the “General” tab, you can configure meeting notifications and automatic updates. Under the “Video” tab, you can set video preferences and enable/disable virtual backgrounds.
- Make the desired changes to the settings based on your preferences.
- Once you have adjusted the settings, click on the “X” button to close the settings window.
That’s it! You have successfully adjusted Zoom settings on your Mac. These settings allow you to personalize your Zoom meetings according to your specific needs and preferences.
Feel free to experiment with different settings to find the ones that work best for you and enhance your virtual meeting experience.
Now that you know how to adjust Zoom settings, let’s move on to the next section to discuss troubleshooting common Zoom issues on your Mac.
Troubleshooting Common Zoom Issues on Mac
While Zoom is a reliable video conferencing platform on Mac, you may encounter occasional issues that can disrupt your meeting experience. Fortunately, there are several troubleshooting steps you can take to resolve common Zoom issues and ensure smooth and reliable communication. In this section, we’ll explore some common Zoom issues on Mac and provide solutions to help you troubleshoot them.
1. Audio or Microphone Issues: If you’re experiencing audio or microphone problems, make sure the correct audio devices are selected in your Zoom settings. Check your computer’s volume and ensure your microphone is not muted. You can also try unplugging and reconnecting any external audio devices.
2. Video Issues: If your video isn’t working, ensure the correct camera is selected in Zoom’s video settings. Restart your camera or computer if necessary. If using an external camera, check the connection and ensure it’s functioning correctly.
3. Connection Issues: If you’re experiencing connectivity problems, ensure you have a stable internet connection. Use a wired connection if possible, or move closer to your Wi-Fi router for a stronger signal. Restarting your router or contacting your internet service provider (ISP) may also help resolve the issue.
4. Meeting ID or Password Errors: Double-check the meeting ID and password to ensure they were entered correctly. If the meeting is password-protected, make sure you’re using the correct password. Reach out to the meeting organizer for assistance if needed.
5. Application Not Opening: If the Zoom application fails to open, try restarting your computer and launching Zoom again. If the issue persists, uninstall and reinstall Zoom from the official website to ensure you have the latest version.
6. Poor Audio or Video Quality: If you’re experiencing low-quality audio or video, ensure you have sufficient bandwidth for a stable connection. Close any unnecessary applications or downloads that might consume bandwidth. If using video, consider reducing the video quality or disabling self-view to improve performance.
7. Echo or Feedback: Echo or feedback in a meeting can be caused by multiple audio sources. Ensure you have only one active microphone and speaker. Mute your microphone when you’re not speaking, and use headphones to prevent audio feedback.
8. Zoom Freezing or Crashing: If Zoom freezes or crashes frequently, ensure you have the latest version of Zoom installed. Close any unnecessary applications running in the background that may be interfering with Zoom. Restart your computer and try launching Zoom again.
If you encounter other issues not listed here, refer to Zoom’s troubleshooting resources, such as their support website or community forums, for further assistance. You can also reach out to Zoom’s customer support for personalized help.
By following these troubleshooting steps, you can address common Zoom issues on your Mac and ensure a smoother and more reliable Zoom meeting experience.


