Introduction
The integration of calendars has become increasingly important in our digital lives, allowing us to manage our schedules and appointments more efficiently. If you use both Outlook and Google Calendar, syncing them together can streamline your productivity and ensure that you never miss an important event.
In this article, we will guide you through the step-by-step process of getting your Outlook calendar onto your Google Calendar. By following these instructions, you will be able to view your Outlook events alongside your Google Calendar events, enabling you to access all your appointments in one centralized location.
Whether you want to keep your personal and professional events organized, or simply prefer the interface and features of Google Calendar, syncing your Outlook calendar with Google is a practical solution. This way, you can have all your events synchronized across multiple devices – from your computer to your smartphone – and easily manage your time and commitments.
Please note that while the following steps outline the process to get your Outlook calendar on Google Calendar, they may vary slightly depending on the version of Outlook and Google Calendar you are using. However, the general principles of exporting and importing your calendar remain the same.
So, if you’re ready to simplify your scheduling and ensure that you never miss an event, simply follow the steps below to get your Outlook calendar integrated into your Google Calendar seamlessly.
Step 1: Sign in to your Outlook account
The first step in getting your Outlook calendar on Google Calendar is signing in to your Outlook account. Open your preferred web browser and navigate to the Outlook website. If you don’t have an Outlook account, you can create one by clicking on the “Create Account” or “Sign Up” button and following the prompts.
Once you reach the Outlook sign-in page, enter your email address and password associated with your Outlook account. If you have multiple accounts, make sure you sign in using the one that contains the calendar you want to sync with Google. After entering your credentials, click on the “Sign In” or “Log In” button to proceed.
After successfully signing in, you will be redirected to your Outlook mailbox. Take a moment to verify that you can access your emails and other Outlook features. This step ensures that you are properly logged in and ready to access your Outlook calendar.
It’s important to note that if you use the desktop version of Outlook, you can skip this step as your calendar will automatically be available for export and syncing. However, for users who primarily access Outlook through the web interface, signing in is a necessary first step.
Now that you’re signed in to your Outlook account, you’re one step closer to integrating your Outlook calendar with Google Calendar. In the next step, we will guide you through accessing the Calendar section in Outlook.
Step 2: Access the Calendar section in Outlook
Once you have signed in to your Outlook account, the next step is to navigate to the Calendar section within the Outlook interface. To do this, look for the navigation menu usually located on the left-hand side of the page. You may have to click on the “App Launcher” or a similar icon to expand the menu.
Within the navigation menu, locate the “Calendar” or “Calendar App” option and click on it. This will take you to your Outlook calendar, where you can view and manage your events and appointments.
Upon accessing the Calendar section, take a moment to familiarize yourself with the various features and functions it offers. You will see your calendar displayed, showing any existing events that you have scheduled. You can switch between different calendar views, such as daily, weekly, or monthly, to get a comprehensive overview of your planned activities.
If you have multiple calendars within your Outlook account, you can also choose to view them individually or overlay them to see all your events in one consolidated view. This is particularly useful if you use separate calendars for personal and work-related activities.
Now that you have successfully accessed the Calendar section in Outlook, you’re ready to proceed to the next step: exporting your Outlook calendar. By following the steps outlined in the upcoming section, you will be able to export your calendar data in a format that can be easily imported into Google Calendar.
Step 3: Export your Outlook calendar
After accessing the Calendar section in Outlook, the next step is to export your Outlook calendar. This process involves saving your calendar data as a file that can be later imported into Google Calendar.
To begin, navigate to the settings or options menu within your Outlook calendar. Look for a gear icon or the word “Settings” typically located at the top-right corner of the page. Click on it to access the settings menu.
Within the settings menu, search for the “Import/Export” or “Calendar Settings” option. In some versions of Outlook, this option may be titled “Manage Calendars” or “Share Calendar”. Click on the appropriate option to proceed.
Once you are in the Import/Export or Calendar Settings section, select the option to export your calendar. This may be labeled as “Export Calendar”, “Save Calendar”, or something similar.
Next, you will be prompted to customize the export settings. Choose the desired date range for the events you want to include in the export file. You may have options to export specific categories or all events within a certain timeframe.
Additionally, select the format in which you want to export your Outlook calendar. The recommended format is usually “.ics” (iCalendar), as it is a widely supported format that can be easily imported into Google Calendar. However, some versions of Outlook may offer alternative formats like “.csv” or “.pst”.
After selecting the desired settings, click on the “Export” or “Save” button to initiate the export process. Choose a location on your computer where you want to save the exported calendar file, and give it a name that will be easy to identify later.
Once the export is complete, you have successfully exported your Outlook calendar. Now, it’s time to move on to the next step: importing the exported calendar file into Google Calendar.
Step 4: Import your Outlook calendar into Google Calendar
Now that you have exported your Outlook calendar, the next step is to import it into Google Calendar. By following these instructions, you will be able to seamlessly merge your Outlook events with your Google Calendar.
First, open Google Calendar in your web browser. If you don’t already have a Google account, you will need to create one before proceeding.
Once in Google Calendar, locate the settings menu, usually represented by a gear icon or the word “Settings” at the top-right corner of the page. Click on it to access the settings menu.
Within the settings menu, look for the option to import calendars. In some versions of Google Calendar, this may be labeled as “Import & Export”, “Settings for my calendars”, or something similar. Click on the appropriate option to proceed.
Next, you will be prompted to choose the file to import. Click on the “Select file from your computer” or similar button, and navigate to the location where you saved the exported Outlook calendar file. Select the file and click “Open” to continue.
After selecting the file, choose the calendar in Google Calendar where you want to import the events. You may have options to import the events into your primary calendar or select a different calendar. Choose the appropriate calendar and click on the “Import” or “Add” button to initiate the import process.
Google Calendar will now begin importing the events from the Outlook calendar file. Depending on the size of your calendar and the number of events, this process may take a few moments. Once the import is complete, you will receive a notification confirming the successful import of your Outlook calendar events.
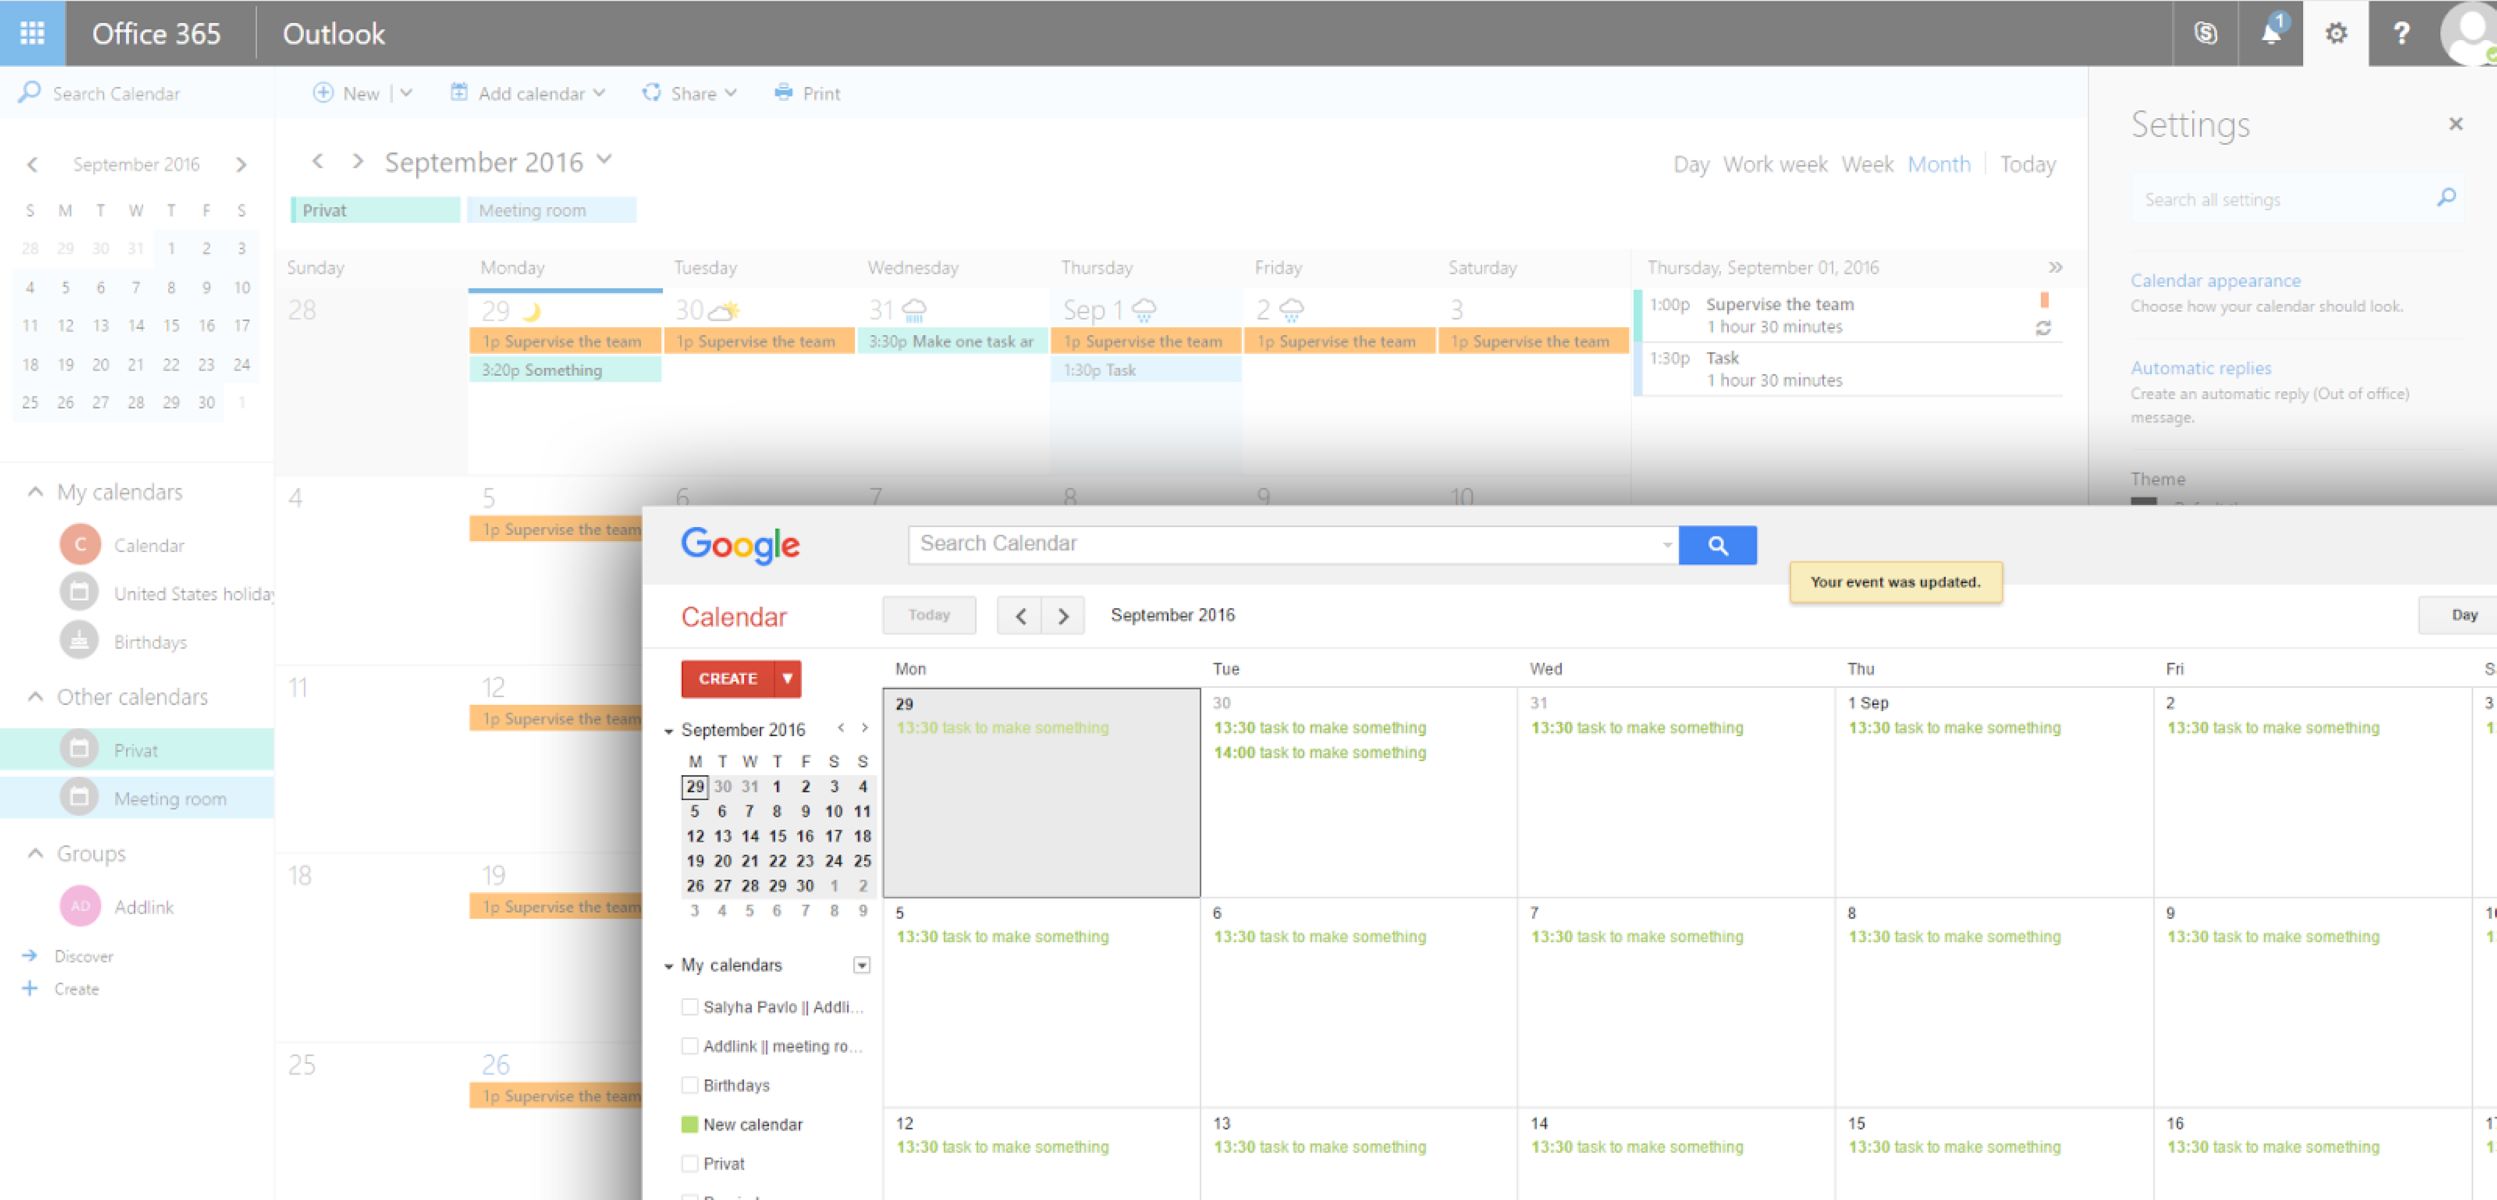
To view your imported Outlook events, switch to the appropriate calendar view in Google Calendar. You should now see your Outlook events merged with your Google Calendar events, providing you with a comprehensive view of all your appointments and commitments.
Congratulations! You have successfully imported your Outlook calendar into Google Calendar. In the next step, we will guide you through syncing your Google Calendar with Outlook to keep your events updated across both platforms.
Step 5: Sync your Google Calendar with Outlook
After successfully importing your Outlook calendar into Google Calendar, the next step is to sync your Google Calendar with Outlook. This synchronization ensures that any changes made in one calendar will be reflected in the other, keeping your events up-to-date across both platforms.
To begin, open Outlook on your computer. If you use the web version of Outlook, make sure you are signed in to your Outlook account. If you use the desktop version of Outlook, ensure that you are connected to the internet.
In Outlook, navigate to the calendar section. You should now see your Google Calendar events displayed alongside your Outlook events, following the import process in the previous steps.
To enable the sync between Google Calendar and Outlook, look for the “Sync” or “Connect” option within the calendar settings or options menu. Click on it to proceed with the synchronization setup.
Frequently, you will be prompted to sign in to your Google account and authorize the synchronization between the two calendars. Follow the on-screen instructions to login to your Google account and grant the necessary permissions to establish the connection.
Once you have successfully connected your Google Calendar with Outlook, you may be provided with additional options to customize the sync settings. For example, you might choose to sync only specific calendars or exclude certain event types from being synced.
Review and adjust the sync settings according to your preferences, and then click on the “Save” or “Apply” button to finalize the sync setup.
From this point forward, any changes or updates made in either Google Calendar or Outlook will automatically sync with the other calendar. This includes creating new events, modifying existing events, or deleting events.
Keep in mind that the sync process may take a few moments to update, especially if you have a large number of events or changes. It is advisable to periodically check both calendars to ensure that the sync is functioning correctly.
Congratulations! You have successfully synced your Google Calendar with Outlook. Now you can conveniently manage your events and appointments from either calendar.
In the next optional step, we will guide you through enabling automatic syncing to ensure that your calendars stay in sync without manual intervention.
Step 6: Enable automatic syncing (optional)
Enabling automatic syncing between Google Calendar and Outlook can save you time and effort by ensuring that your calendars stay in sync without manual intervention. By following these optional steps, you can set up automatic syncing and enjoy the convenience of real-time updates.
The process of enabling automatic syncing may vary depending on the version of Outlook and the specific syncing options available to you. However, the general principles remain the same.
To begin, open Outlook on your computer. If you use the web version of Outlook, make sure you are signed in to your Outlook account. If you use the desktop version of Outlook, ensure that you are connected to the internet.
In Outlook, navigate to the calendar section. Look for the settings or options menu, typically represented by a gear icon or the word “Settings”. Click on it to access the settings menu.
Within the settings menu, search for the option related to syncing or connection settings. This may be labeled as “Sync”, “Connect”, or something similar. Click on the appropriate option to proceed.
Next, you may be presented with a list of available integration options or connected accounts. Look for Google Calendar in the list and select it as the account you want to sync with Outlook.
Follow the on-screen instructions to authorize and establish the connection between Google Calendar and Outlook. You may be prompted to sign in to your Google account and grant the necessary permissions for the automatic syncing to occur.
Once you have completed the authorization process, you may have the option to customize additional settings such as the frequency of automatic syncing, which calendars to sync, or which types of events to include or exclude.
Review and adjust the settings according to your preferences, and then click on the “Save” or “Apply” button to finalize the automatic syncing setup.
With automatic syncing enabled, any changes or updates made in either Google Calendar or Outlook will be automatically reflected in the other calendar. This includes new events, modifications to existing events, or event deletions.
Please note that the automatic syncing process may vary depending on the specific configurations and preferences you choose. It is advisable to periodically check both calendars to ensure that the automatic syncing is functioning correctly.
Congratulations! You have successfully enabled automatic syncing between Google Calendar and Outlook. Enjoy the convenience of real-time updates and seamless calendar management.
In the next step, we will guide you through managing synced calendars on Google Calendar.
Step 7: Manage synced calendars on Google Calendar
Once you have successfully synced your Google Calendar with Outlook, it’s important to know how to manage your synced calendars on Google Calendar. By following these steps, you can stay organized and in control of your events and appointments.
To begin, open Google Calendar in your web browser and make sure you are signed in to your Google account.
In Google Calendar, navigate to the settings or options menu, typically located at the top-right corner of the page. Click on it to access the settings menu.
Within the settings menu, look for the option that allows you to manage your calendars. This may be labeled as “Settings for my calendars”, “Manage calendars”, or something similar. Click on the appropriate option to proceed.
Next, you will see a list of all your synced calendars, including the Outlook calendar you imported. Each calendar will have its own settings and customization options.
To customize the display of a specific calendar, click on its name or the corresponding settings icon. From there, you can modify the calendar’s name, color, visibility, notifications, and other preferences.
If you want to temporarily hide or show a synced calendar in Google Calendar, simply toggle the visibility option. This allows you to focus on specific calendars when viewing your events.
Additionally, you can create new events directly in your synced calendar on Google Calendar. These events will automatically sync with Outlook as well, ensuring that they appear in both calendars.
If you wish to make changes to an event that originated in your Outlook calendar, it is recommended to make those changes in your Outlook account. The changes will be automatically synced with Google Calendar.
Finally, if you ever want to stop the sync between Google Calendar and Outlook, you can do so by accessing the syncing options within the settings menu of Google Calendar. Follow the prompts to disconnect or disable the sync.
By effectively managing your synced calendars on Google Calendar, you can have full control over your events, customize their display, and ensure that any modifications are accurately reflected across both platforms.
With the completion of this step, you have successfully learned how to manage your synced calendars on Google Calendar. Now you can seamlessly integrate your Outlook events with Google Calendar and stay organized.
Now that you have completed all the necessary steps to get your Outlook calendar on Google Calendar and manage the sync, you are ready to fully utilize the benefits of having a unified and synchronized calendar system.
Conclusion
Integrating your Outlook calendar with Google Calendar allows for streamlined scheduling and efficient management of your events and appointments. By following the steps outlined in this guide, you can successfully sync your Outlook calendar with Google Calendar, ensuring that your calendars stay updated across both platforms.
We began by signing in to your Outlook account and accessing the Calendar section. From there, we exported your Outlook calendar and imported it into Google Calendar. The next step involved syncing your Google Calendar with Outlook to enable real-time updates.
If desired, you had the option to enable automatic syncing, which eliminates the need for manual syncing and ensures that any changes made in one calendar are automatically reflected in the other.
Lastly, we discussed how to manage your synced calendars on Google Calendar, including customizing display settings, creating events, and controlling visibility.
By integrating and synchronizing your Outlook calendar with Google Calendar, you can enjoy the convenience of a consolidated and up-to-date view of all your events and appointments. Whether you prefer the features of Google Calendar or need access to your events across different devices, this integration allows for improved productivity and organization.
Remember to periodically check both calendars to ensure that the sync is working correctly and that all your events are properly reflected.
We hope this guide has been helpful in assisting you in getting your Outlook calendar on Google Calendar. With these steps, you are now equipped to effectively manage your schedules and never miss an important event again.
So go ahead, integrate your Outlook calendar with Google Calendar, and enjoy seamless scheduling and better time management!