Introduction
Welcome to our guide on how to get a hard drive out of an Ultrabook. Whether you’re looking to upgrade your storage capacity, replace a faulty hard drive, or simply want to explore the internals of your Ultrabook, we’ve got you covered. Removing a hard drive from an Ultrabook may seem like a daunting task, but with the right tools and careful attention to detail, you’ll be able to successfully complete the process.
Before we dive into the step-by-step instructions, it’s important to note that removing the hard drive from your Ultrabook will void any warranty that may be in place. If your device is under warranty, it’s best to contact the manufacturer or authorized service center for assistance. Additionally, ensure you have a backup of any important data on the hard drive before proceeding with this procedure.
In this guide, we’ll walk you through the process of safely removing the hard drive from your Ultrabook. We’ll also cover the necessary tools you’ll need, general precautions to take, and provide tips for handling the hard drive properly throughout the process.
It’s important to approach this task with patience and caution, as Ultrabooks are delicate devices and mishandling can lead to damage or voiding the warranty. If you’re unsure about any step or uncomfortable with the process, it’s always best to seek professional assistance.
Now that we’ve got those important points covered, let’s get ready to dive into the exciting world of Ultrabook hardware as we learn how to remove a hard drive from your device.
Step 1: Prepare for Removal
Before we proceed with removing the hard drive from your Ultrabook, it’s essential to prepare the working area and gather the necessary tools. This step will help ensure a smooth and efficient process without any unnecessary delays or complications.
Firstly, find a clean, well-lit workspace where you can comfortably work on your Ultrabook. A clutter-free area with ample space will allow you to spread out the components and tools, reducing the risk of accidentally misplacing or damaging anything during the process.
Next, shut down your Ultrabook and disconnect it from any power source. This step is crucial to prevent any electrical mishaps and protect yourself and the device from potential harm. It’s recommended to remove the battery if it’s easily accessible, as an extra precautionary measure.
Before proceeding further, ground yourself by touching a metal object or using an anti-static wrist strap. This discharge any static electricity from your body, which can damage sensitive electronic components like the hard drive. Static electricity is often present in our environment and can unknowingly be transferred to the Ultrabook during handling.
Now that you’re prepared, gather the necessary tools for the hard drive removal process. The tools you’ll typically need include screwdrivers (often Phillips or Torx heads, depending on the Ultrabook model), an anti-static mat or workspace, and small containers or trays to hold the screws and other small components you’ll remove.
It’s important to have the correct screwdriver size and type to avoid damaging the screws or surrounding components. If you’re unsure, consult the Ultrabook’s manual or online resources to determine the specific tools required for your model. Investing in a quality screwdriver set with interchangeable heads will serve you well for various projects and future needs.
With your workspace prepared and tools at the ready, you’re now fully equipped to move on to the next step: disassembling the Ultrabook. Take your time, follow the instructions carefully, and remember to exercise caution throughout the process.
Step 2: Sourcing the Right Tools
When it comes to removing a hard drive from an Ultrabook, having the right tools is essential for a successful and efficient process. In this step, we’ll discuss the necessary tools and equipment you’ll need to safely and effectively accomplish the task.
The specific tools required may vary depending on the make and model of your Ultrabook. However, there are a few general tools that are commonly needed for most Ultrabook hard drive removals.
The primary tool you’ll need is a screwdriver set with interchangeable heads. This will allow you to access and remove the screws that hold the Ultrabook’s casing together. The size and type of screwdrivers required may vary, so it’s crucial to consult the Ultrabook’s manual or search online for specific information regarding your device. Typically, Phillips or Torx heads are commonly used for Ultrabook screws.
In addition to a screwdriver set, you may also need a prying tool, such as a plastic spudger or a thin guitar pick. These tools will come in handy for safely separating the Ultrabook’s casing without causing any damage to the internal components.
An anti-static mat or workspace is another important tool to consider. This mat provides a safe and grounded surface to work on, reducing the risk of static electricity damaging the vulnerable electronic components during the removal process. If you don’t have an anti-static mat, you can alternatively work on a non-static surface like a wooden table and make sure to ground yourself by touching a metal object or using an anti-static wrist strap.
When working with small screws and other components, it’s helpful to have small containers or trays to organize and store them. These containers will prevent any loss or confusion while disassembling the Ultrabook, especially if you encounter a substantial number of screws or connectors.
Lastly, it’s always a good idea to have a clean, soft cloth or microfiber cloth on hand. This cloth will come in handy for wiping away any dust or fingerprints that may accumulate during the removal process. Keeping the internal components clean ensures proper functioning and prevents any interference due to dirt or debris.
By ensuring you have the correct tools and equipment before starting the hard drive removal process, you’ll be well-prepared to tackle the task effectively and efficiently. Remember to double-check the specific tools required for your Ultrabook model, and always exercise caution while working with delicate components.
Step 3: Powering Off the Ultrabook
Before you begin disassembling your Ultrabook to remove the hard drive, it is crucial to power off the device properly. This step ensures the safety of both the hardware components and yourself as you work on the Ultrabook.
To power off the Ultrabook, start by saving any open files and closing all applications. This will prevent any data loss or potential damage to your work. If you are uncertain about any open files, it is always recommended to save and close them to avoid any issues.
Next, click on the “Start” menu and select the “Shutdown” or “Power Off” option. Depending on your operating system, the exact wording and location of this option may vary. Alternatively, you can press the power button and hold it until the Ultrabook shuts down.
It is important not to force the power off by unplugging the Ultrabook or removing the battery, as this can lead to data corruption or even hardware damage. Always follow the proper shutdown process to ensure a safe and smooth transition.
Once the Ultrabook is powered off, unplug it from any power sources. This includes disconnecting the charger or removing the power cord if it was plugged in. This step is crucial to eliminate any potential electrical hazards as you work on the hardware components.
If your Ultrabook has an integrated battery, make sure it is fully charged before proceeding with the removal process. A charged battery will prevent any interruptions during the disassembly and ensure that the Ultrabook remains powered off throughout the procedure.
By properly powering off the Ultrabook, you minimize the risk of accidental damage or data loss. This step also ensures the safety of the internal components and allows for a seamless disassembly process. Remember to double-check that the Ultrabook is completely powered off and unplugged before moving on to the next steps.
Step 4: Disassembling the Ultrabook
Now that you have prepared the workspace and powered off the Ultrabook, it’s time to begin the disassembly process. This step will involve removing the casing or cover of the Ultrabook to access the internal components, including the hard drive.
Start by flipping the Ultrabook over and examining the bottom panel. Look for any screws or fasteners that may be holding the casing in place. These screws are often located around the edges or in specific compartments labeled with symbols or icons.
Using the appropriate screwdriver, carefully remove the screws and set them aside in a safe place. Be sure to keep track of the screws and their locations to ensure easy reassembly later. It may be helpful to use small containers or trays to keep the screws organized.
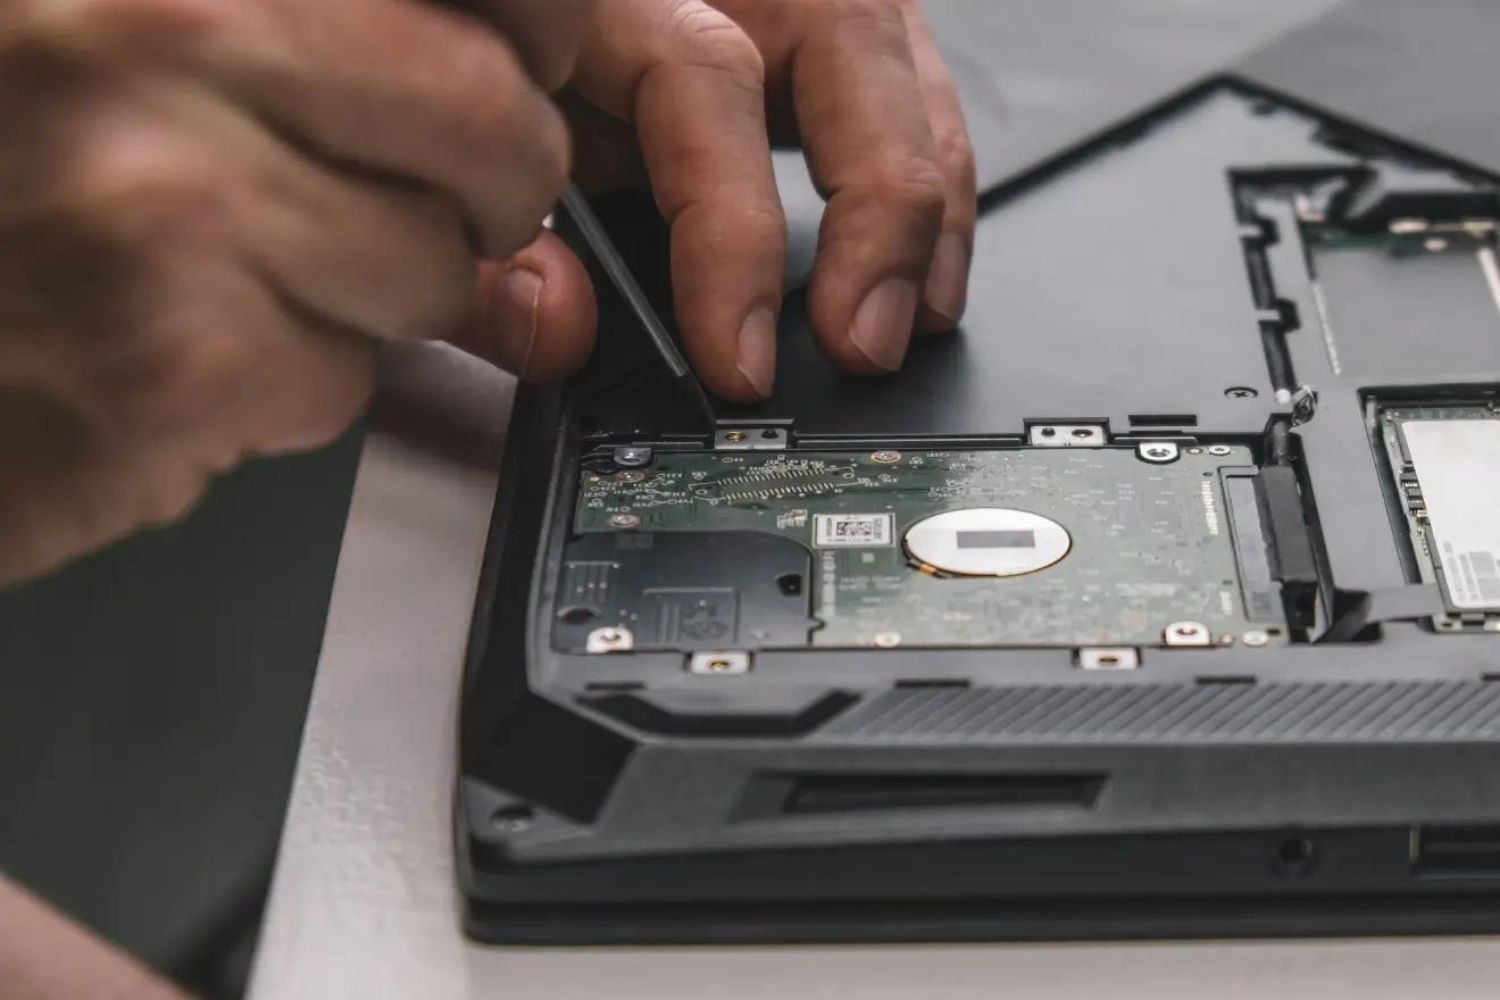
Once all the screws are removed, gently pry open the Ultrabook’s casing using a prying tool or plastic spudger. Start at one corner and work your way around the edges, being cautious not to apply too much force or damage any internal components.
As you separate the casing, you may encounter clips or tabs that hold it in place. Take your time and use the prying tool to carefully release these clips, ensuring a smooth and gradual disassembly process.
Once the casing is fully separated, set it aside in a safe area where it won’t be damaged or obstruct your workspace. You should now have a clear view of the internal components, including the hard drive.
Take a moment to observe the layout of the internals, making note of any other components or cables that may be connected to the hard drive. This will help you navigate the removal process and ensure you disconnect any necessary connections properly.
It’s crucial to handle the Ultrabook’s internal components with care, as they are sensitive and can be easily damaged. Avoid applying excessive force or bending any cables during the disassembly. If any components seem stuck or difficult to remove, double-check for any overlooked screws or connections.
With the Ultrabook disassembled, you’re now ready to move on to the next step: locating and disconnecting the cables and connections from the hard drive.
Step 5: Locating the Hard Drive
Now that you have successfully disassembled your Ultrabook, the next step is to locate the hard drive within the internal components. The exact location of the hard drive can vary depending on the specific Ultrabook model, so it’s important to approach this step with attention to detail.
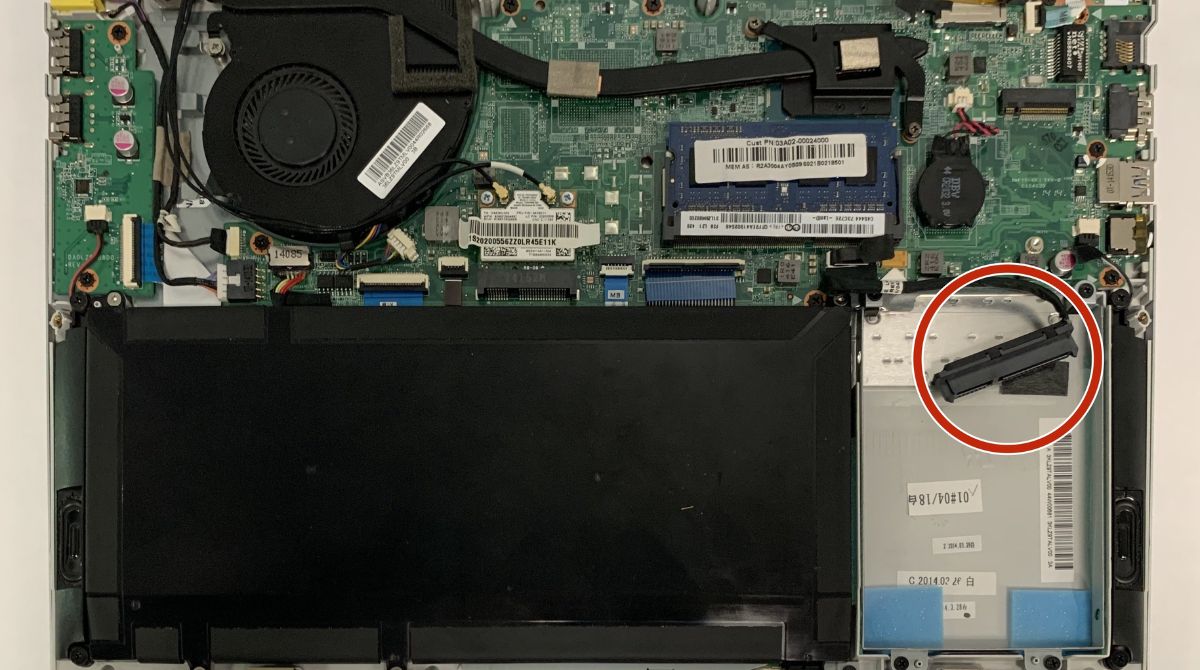
First, visually scan the internal components to identify the hard drive’s general location. In most Ultrabooks, the hard drive is situated near the center or towards one side of the device. It is often encased in a protective bracket or caddy.
If you’re having trouble locating the hard drive, consult the Ultrabook’s manual or search online for specific instructions or diagrams regarding your model. Many manufacturers provide detailed documentation that can help you identify the hard drive’s exact placement.
As you locate the hard drive, take note of any cables, connectors, or screws that may be attached to it. These connections will need to be disconnected in the following steps to remove the hard drive from the Ultrabook.
If you see any labels or markings on the hard drive or its surrounding components, make note of them for reference later. This information can be useful if you ever need to replace the hard drive or seek further assistance.
Take your time to familiarize yourself with the hard drive’s location and any other components surrounding it. This will help you navigate the disconnection process and ensure the safe removal of the hard drive.
Remember, every Ultrabook model can have its own unique layout and configuration, so don’t hesitate to seek additional resources or professional guidance if needed. Being thorough and attentive during this step will contribute to a successful hard drive removal process without any damage to other internal components.
Once you have identified the hard drive’s location and are confident in its placement, you’re now ready to proceed to the next step: disconnecting the cables and connections from the hard drive.
Step 6: Disconnecting Cables and Connections
Now that you have located the hard drive within your Ultrabook, it’s time to disconnect the necessary cables and connections in order to remove it. This step requires careful handling and attention to detail to prevent any damage to the hard drive or other internal components.
Start by identifying the cables and connectors attached to the hard drive. Commonly, there will be two main connections: the data cable and the power cable. The data cable is usually a thin, flat ribbon-like cable, while the power cable is a smaller, cylindrical cable with multiple wires.
Using your fingertips or a small tool, carefully disconnect the data cable from the hard drive. Gently pull on the connector, avoiding any excessive force, to release it from the hard drive. Take note of any clips or locking mechanisms that may be securing the cable, and release them if necessary.
Once the data cable is disconnected, move on to disconnecting the power cable from the hard drive. Again, apply gentle pressure to the connector while pulling it away from the hard drive. Sometimes a slight wiggle or side-to-side motion may be needed to loosen the connection.
During this process, it’s important to handle the cables and connectors delicately to avoid any bending or damage. Take your time and be cautious to prevent any accidental tugging or pulling that could cause harm to the connections or the hard drive itself.
Additionally, pay attention to any adhesive or tape securing the cables to the casing or other components. Carefully peel away or remove any adhesive to allow for the proper disconnection of the cables. Be sure to keep the adhesive or tape in a safe place if you plan on reusing it during the reassembly process.
With the cables and connections successfully disconnected, set them aside and out of the way. It’s important to prevent any accidental tangling or damage to the cables while continuing with the hard drive removal process.
If you notice any additional cables or connectors attached to the hard drive, such as thermal sensors or mounting brackets, carefully disconnect them following the specific instructions for your Ultrabook model. Taking note of how these components are attached will aid in the reassembly process later.
By following these steps and taking care while disconnecting the cables and connections from the hard drive, you’re now one step closer to physically removing the hard drive from your Ultrabook.
Step 7: Removing the Hard Drive
Now that you have successfully disconnected the cables and connections, it’s time to remove the hard drive from your Ultrabook. This step requires precision and careful handling to ensure a smooth removal process without causing any damage to the hard drive or other internal components.
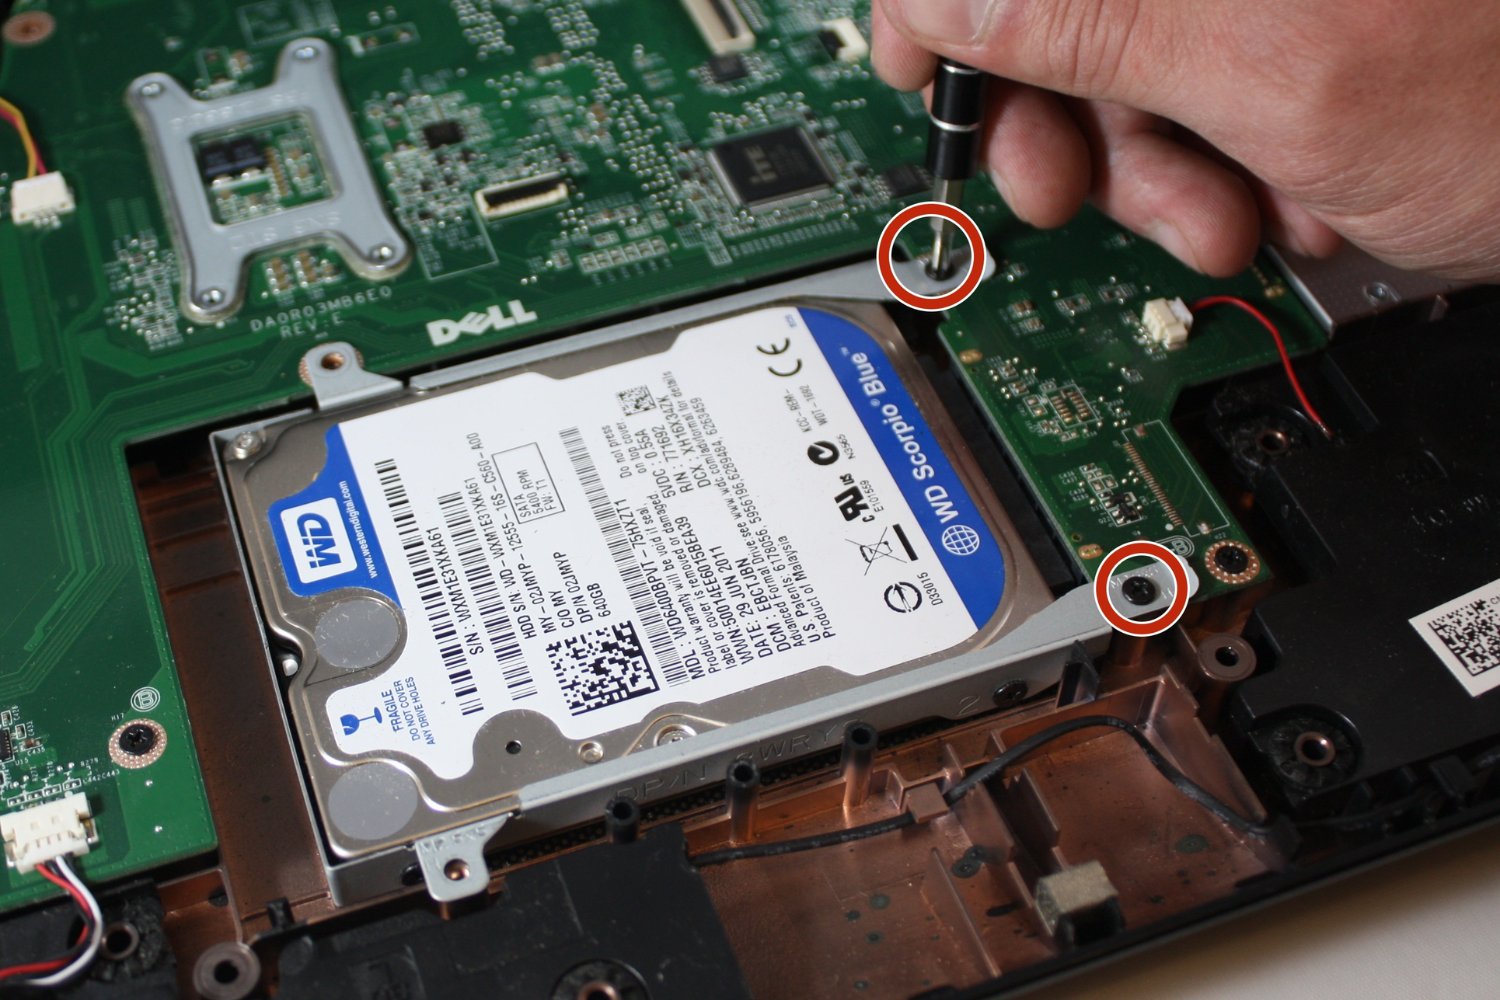
Begin by locating any screws or fasteners that secure the hard drive in place. These screws are typically found on the sides or bottom of the hard drive bracket or caddy. Use the appropriate screwdriver to carefully remove these screws and set them aside in a secure location.
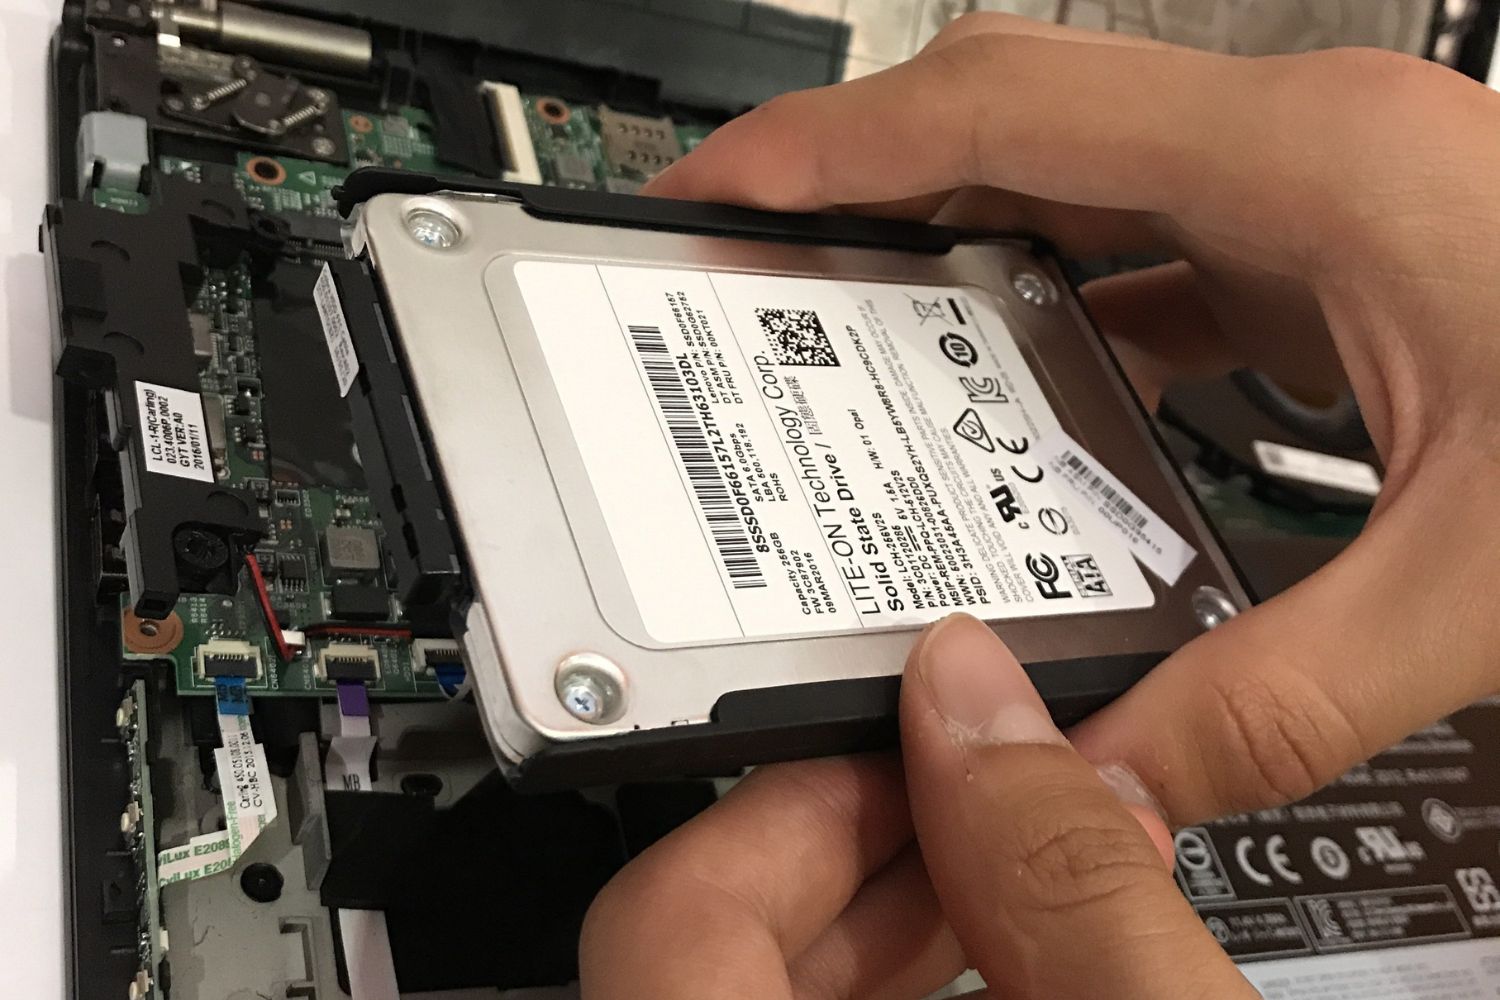
Once the screws are removed, hold the hard drive bracket or caddy firmly and gently slide the hard drive out of its slot. Be cautious not to pull or force the hard drive, as it may still be connected by other components or cables.
If you encounter any resistance while removing the hard drive, double-check for any additional screws or connectors that may still be attached. Refer to the Ultrabook’s manual or online resources for specific guidance on your model if necessary.
As you remove the hard drive, be mindful of any other internal components that may be in close proximity. Take care to avoid bumping or damaging these components as you slide the hard drive out.
Once the hard drive is free from its slot, set it aside in a safe and secure location to prevent any accidental damage. Place it on an anti-static mat or a soft, non-conductive surface to protect it from electrical hazards or physical harm.
Now is a good time to inspect the hard drive for any physical damage or signs of wear. Look for any noticeable dents, scratches, or loose components that may indicate the need for a replacement. If the hard drive appears to be damaged, consider consulting a professional or contacting the manufacturer for further assistance.
By successfully removing the hard drive from your Ultrabook, you have completed a significant step in the process. This allows you to either replace the hard drive with a new one or perform any necessary maintenance or repairs.
With the hard drive safely removed, you’re ready to proceed to the next step: handling the hard drive to ensure its protection and longevity.
Step 8: Handling the Hard Drive
Now that you have removed the hard drive from your Ultrabook, proper handling is crucial to ensure its protection and longevity. How you handle the hard drive during this step will play a significant role in its future performance and functionality.
Firstly, ensure that you are working in a clean and dust-free environment. It’s important to prevent any debris or particles from entering the hard drive, as they can cause damage to the sensitive internal components.
When handling the hard drive, it’s best to hold it by its edges or sides, avoiding touching the circuit board or any exposed connectors. Human touch can transfer oils and moisture, which can be detrimental to the hard drive’s delicate internal components.
Avoid placing the hard drive on any rough or abrasive surfaces, as this can cause scratches or damage. Instead, place it on an anti-static mat, a soft cloth, or in an anti-static bag to provide a cushioned and protective surface.
If you need to move or transport the hard drive, do so with care. Ensure it is secured in a padded container or anti-static bag to prevent any potential jostling or impact during transit.
Never shake or drop the hard drive, as this can lead to internal damage or misalignment of the internal components. Hard drives are delicate and sensitive devices that require proper handling to maintain optimal functionality.
Additionally, avoid exposing the hard drive to excessive temperature variations or humidity. These environmental factors can impact the performance and lifespan of the hard drive. Store it in a cool and dry location to protect it from any potential damage.
If you plan on replacing the hard drive with a new one, take extra precautions to ensure the safety of both the old and new drives. Store the old hard drive in a safe place in case you need to retrieve any data or return the Ultrabook to its original configuration in the future.
By handling the hard drive with utmost care and following these guidelines, you are taking important steps to protect its integrity and usability. This will contribute to a successful hard drive replacement or maintenance process and ensure the longevity of your Ultrabook’s storage solution.
Step 9: Installing a New Hard Drive (Optional)
If you have chosen to replace your old hard drive with a new one, this step will guide you through the process of installing the new hard drive into your Ultrabook. This optional step allows you to upgrade your storage capacity, improve performance, or address any issues you may have encountered with the previous hard drive.
Before starting the installation, ensure that you have purchased a compatible hard drive for your Ultrabook. Refer to the Ultrabook’s manual or specifications to determine the supported hard drive types, sizes, and interfaces. It’s important to choose a hard drive that meets these requirements to ensure compatibility and proper functioning.
Begin by preparing the new hard drive for installation. If the hard drive came with any packaging or protective covers, remove them carefully. Avoid touching the exposed circuit board or connectors to prevent static electricity discharge or oils from your fingers affecting the drive.
If necessary, attach any brackets or adapters that came with the new hard drive to ensure a proper fit within your Ultrabook. These accessories may differ depending on the specific model and design of your Ultrabook.
Now, position the new hard drive into the empty slot within the Ultrabook, aligning it with the mounting holes or guides. Gently slide the hard drive into place, making sure it is securely and snugly seated. Be careful not to apply excessive force or bend any cables or connectors during this process.
If there are any screws or fasteners required to secure the new hard drive in place, use the appropriate screwdriver to attach them. Ensure they are tightened enough to hold the hard drive firmly, but be cautious not to overtighten them, as this can damage the drive or surrounding components.
Next, reconnect any cables and connections to the new hard drive. Attach the data cable and power cable, following the reverse steps of the disconnection process. Take note of any clips or locking mechanisms that may secure the cables, ensuring they are properly engaged to provide a secure and stable connection.
Once the cables are connected, double-check all the connections to ensure they are secure and properly seated. This will prevent any issues or errors when you power on the Ultrabook later.
If necessary, reattach any thermal sensors, mounting brackets, or other components that were present on the original hard drive. Refer to the Ultrabook’s manual or online resources for specific instructions on your model, as these components can vary.
With the new hard drive installed and all connections checked, you’re ready to move on to the final step: reassembling the Ultrabook and restoring it to its fully functional state.
Step 10: Reassembling the Ultrabook
Now that you have completed the necessary tasks such as hard drive removal, handling, and (optional) installation of a new hard drive, it’s time to reassemble your Ultrabook. This final step brings all the components together and restores your device to its fully functional state.
Start by gathering the Ultrabook’s casing or cover that you set aside during the disassembly process. Ensure it is clean and free from any dust or debris before proceeding. If necessary, use a soft cloth or compressed air to remove any particles.
Align the casing with the Ultrabook’s chassis, ensuring that all the edges and corners match up. Take care not to force or bend the casing, as it should fit snugly and securely. If there are any clips or tabs, gently press them into place to secure the casing.
Before proceeding to tighten the screws, double-check that all the internal components and cables are properly positioned and aligned. Ensure that no cables are pinched or obstructed by the casing, as this can cause functionality issues later on.
Once you’re confident in the alignment of all the internal components, begin reattaching the screws to secure the casing. Start with one corner and work your way around, tightening the screws gradually to ensure an even and balanced fit. Be careful not to overtighten the screws, as this can damage the casing or strip the threads.
As you tighten each screw, take a moment to observe the alignment of the casing and the absence of any gaps or misalignment. This will ensure a secure and professional finish to the reassembly process.
Once all the screws are in place and the casing is securely attached, you have successfully reassembled your Ultrabook. Congratulations!
Now is the time to power on your Ultrabook and test its functionality. Connect the Ultrabook to a power source and turn it on. Listen for any unusual sounds or beeps, and check to see if the operating system loads properly.
Additionally, check the BIOS or system settings to ensure that the new hard drive, if you installed one, is recognized and properly configured. Follow the manufacturer’s instructions or consult online resources for specific guidance on updating settings or installing an operating system, if necessary.
If everything is functioning as expected, you can now enjoy your Ultrabook with its new hard drive or the resolved issues you set out to address. If you encounter any difficulties or inconsistencies, consult the manufacturer’s documentation or seek professional assistance to troubleshoot and resolve any issues.
With the reassembly complete, take a moment to appreciate the work you’ve done and the knowledge you’ve gained in this process. You can now confidently perform future maintenance, upgrades, or troubleshooting tasks on your Ultrabook.
Conclusion
Congratulations! You have successfully learned how to remove and handle the hard drive in an Ultrabook. We’ve covered the steps from preparing for the removal to reassembling the Ultrabook, allowing you to upgrade the hard drive, perform maintenance, or simply explore the internals of your device.
Throughout the process, we emphasized the importance of proper preparation, careful handling, and attention to detail. These guidelines ensure the safety of the internal components, prevent damage, and maintain the functionality and longevity of your Ultrabook.
Remember, always refer to the manufacturer’s documentation, online resources, and specific model instructions when performing any hardware-related procedures. This will ensure that you are following the correct process and avoiding any potential issues with your Ultrabook.
If you encountered any unexpected difficulties or feel unsure about any step, it is recommended to seek professional assistance. Professional technicians have the expertise and specialized tools to handle intricate procedures and address complex issues.
By following the steps in this guide and exercising caution, you have demonstrated your ability to handle the hard drive removal process effectively. Whether you were replacing the hard drive, troubleshooting, or simply satisfying your curiosity, you have expanded your knowledge and skills in maintaining and upgrading your Ultrabook.
Remember to take your time and work patiently when performing any hardware modifications. Proper precautions and attention to detail will ensure a successful outcome and minimize the risk of any accidental damage.
By mastering the removal and handling of the hard drive in your Ultrabook, you are now equipped with the skills to tackle future hardware maintenance, upgrades, or repairs. These skills will not only save you money but also empower you to take control of your Ultrabook’s performance and extend its lifespan.
Again, congratulations on your accomplishment and enjoy exploring the possibilities that come with a well-maintained and upgraded Ultrabook!