Introduction
Welcome to our step-by-step guide on how to clear a hard drive on your Thinkpad Ultrabook Yoga. Clearing your hard drive is an essential process to ensure that your personal data is completely erased and cannot be recovered. Whether you’re planning to sell your device, donate it, or simply want to start fresh, this guide will walk you through the different methods available.
When it comes to clearing a hard drive, there are several options available, ranging from built-in features to third-party software. The right method for you will depend on your specific goals and circumstances. In this guide, we’ll explore multiple approaches so that you can choose the one that best suits your needs.
Please note that clearing a hard drive will permanently delete all data stored on it. Therefore, it is crucial to back up any important files or documents before you proceed. Additionally, make sure to follow the instructions carefully to avoid any unintended consequences.
So, without further ado, let’s dive into the step-by-step process of clearing your hard drive on a Thinkpad Ultrabook Yoga!
Step 1: Backup Your Data
Before starting the process of clearing your hard drive, it’s essential to create a backup of all your important files and data. This ensures that you won’t lose any valuable information during the clearing process. Here’s how you can backup your data on a Thinkpad Ultrabook Yoga:
1. External Storage Device: Connect an external hard drive, USB flash drive, or any other storage device to your Thinkpad Ultrabook Yoga. Then, manually copy and paste your important files and folders onto the external device. Make sure to organize the backup in a way that is easy to navigate and restore later.
2. Cloud Storage Services: Another convenient option is to back up your data using cloud storage services such as Google Drive, Dropbox, or OneDrive. These services offer a certain amount of free storage, and you can upgrade to a premium plan if you require more space. Simply upload your files and folders to the cloud and ensure they are synced and accessible from other devices.
3. Network Backup: If you have multiple devices connected to the same network, you can use network backup options to transfer your data. This involves creating a shared folder on another device, such as a desktop computer or a network-attached storage (NAS) device, and copying your files to that location.
Remember to double-check that all your important files have been successfully backed up before proceeding to the next steps. Once you have confirmed the backup, you can proceed confidently with the hard drive clearing process, knowing that your data is safely stored elsewhere.
Step 2: Use the Built-in Reset Feature
If you are looking for a quick and hassle-free method to clear your Thinkpad Ultrabook Yoga’s hard drive, you can utilize the built-in reset feature. This feature allows you to restore your device to its default factory settings, effectively wiping all data from the hard drive. Here’s how you can use the built-in reset feature:
1. Go to the “Start” menu and open the “Settings” app.
2. In the Settings app, click on the “Update & Security” option.
3. From the left sidebar, select the “Recovery” tab.
4. Under the “Reset this PC” section, click on the “Get started” button.
5. You will be presented with two options: “Keep my files” and “Remove everything.” Select the second option, “Remove everything.” This will ensure that all the data on your hard drive is completely wiped.
6. Follow the on-screen prompts and confirm your selection to initiate the reset process. Your Thinkpad Ultrabook Yoga will restart, and the reset process will begin.
7. The reset process may take some time to complete, depending on the speed and specifications of your device. Once the process is finished, your Thinkpad Ultrabook Yoga will be restored to its original factory settings.
It is important to note that using the built-in reset feature only removes your personal files and applications from the device. It does not completely erase the data from the hard drive, making it potentially recoverable using specialized software. If you require a more secure method to clear your hard drive, proceed to the next step.
Step 3: Restore the Yoga to Factory Settings
If you want to go a step further and ensure that all data is completely erased from your Thinkpad Ultrabook Yoga’s hard drive, restoring it to factory settings is a reliable option. This process reinstalls the original operating system and removes any personal data or applications. Here’s how you can restore your Thinkpad Ultrabook Yoga to factory settings:
1. Ensure that you have backed up all your important files and data, as restoring to factory settings will delete everything on your hard drive.
2. Power on your Thinkpad Ultrabook Yoga and press the “Nova” button. This button is typically located on the side or the top of the device, depending on the model. The Nova button is used to access the BIOS or boot menu.
3. Once the Novo button is pressed, a menu will appear on the screen. Use the arrow keys to navigate to the “System Recovery” option and press “Enter”.
4. You will be presented with several recovery options. Choose the “Restore from initial backup” or “Restore from recovery drive” option, depending on the available choices.
5. Follow the on-screen instructions to initiate the restoration process. The process may take some time, so be patient and do not interrupt the process until it is completed.
6. Once the restoration process is finished, your Thinkpad Ultrabook Yoga will be restored to its factory settings. It will be as if you just purchased a new device.
Restoring your Thinkpad Ultrabook Yoga to factory settings ensures that all your personal data is completely erased from the hard drive. However, it is worth noting that this method will not securely erase your data, and it may still be recoverable by individuals with advanced technical knowledge. If you require a more secure method to clear your hard drive, proceed to the next step.
Step 4: Format the Hard Drive
If you’re looking for a more thorough method to clear your Thinkpad Ultrabook Yoga’s hard drive, formatting the drive can be an effective option. Formatting the hard drive will erase all data stored on it and prepare it for future use. Here’s how you can format the hard drive:
1. Backup any important files and data before proceeding with the formatting process. Formatting will permanently erase all data on the hard drive, so make sure to have a copy of any important files stored elsewhere.
2. Open the “File Explorer” by pressing the Windows key + E on your keyboard.
3. In the File Explorer, navigate to “This PC” or “My Computer,” depending on your Windows version. You should see the list of drives, including your Thinkpad Ultrabook Yoga’s hard drive.
4. Right-click on the hard drive and select “Format” from the context menu. A new window will appear, providing you with formatting options.
5. In the formatting window, select the desired file system for the hard drive. The recommended file system for Windows is NTFS. You can also choose a volume label for the drive.
6. Check the “Quick Format” option if you want a faster formatting process. However, if you prefer a more thorough and time-consuming process, leave the option unchecked.
7. Double-check all the formatting settings and ensure that you have selected the correct hard drive. Formatting will erase all data on the selected drive.
8. Click on the “Start” button to begin the formatting process. You may be prompted with a warning message notifying you that all data on the drive will be erased. Confirm the action if you’re certain about proceeding.
9. Once the formatting process is complete, you will receive a notification indicating that the format was successful. Your Thinkpad Ultrabook Yoga’s hard drive is now empty and ready for reuse.
Formatting the hard drive is an effective way to erase all data and prepare it for future use. However, it’s important to note that formatting does not provide a 100% secure erasure. Advanced data recovery techniques may still be able to retrieve some information. If you require a more secure method to clear your hard drive, proceed to the next step.
Step 5: Use Third-party Software to Wipe the Drive
If you’re concerned about the security of your data and want to ensure that it is completely and irreversibly erased from your Thinkpad Ultrabook Yoga’s hard drive, using third-party software to wipe the drive is a reliable option. These software tools are specifically designed to overwrite the entire drive with random data, making it extremely difficult or impossible to recover any information. Here’s how you can use third-party software to wipe your hard drive:
1. Research and choose a reputable data wiping software that is compatible with your Thinkpad Ultrabook Yoga. Examples of popular software include DBAN (Darik’s Boot and Nuke), CCleaner, and Eraser.
2. Download the selected software from the official website or a trusted source. Ensure that you are downloading the correct version for your operating system.
3. Create a bootable USB drive or CD/DVD using the downloaded software. Most data wiping tools provide instructions on how to create a bootable disk.
4. Insert the bootable USB drive or CD/DVD into your Thinkpad Ultrabook Yoga and restart the device.
5. Access the boot menu of your Thinkpad Ultrabook Yoga by pressing a designated key during startup. The key may vary depending on the model but is often F12 or ESC. Select the bootable disk you created in the previous step.
6. Follow the on-screen prompts provided by the data wiping software. You will typically have the option to select the hard drive you want to wipe and choose the wiping method. Select a thorough wiping method, such as “DoD 5220.22-M” or “Gutmann,” to ensure maximum security.
7. Confirm the wiping process and allow the software to perform the data wipe. This may take some time, depending on the size and speed of your hard drive.
8. Once the wiping process is complete, remove the bootable disk from your Thinkpad Ultrabook Yoga and restart the device.
Using third-party software to wipe your hard drive provides a more secure method of data erasure, making it nearly impossible to recover any information. This is especially important if you’re planning to sell or donate your device and want to ensure that your personal data remains confidential.
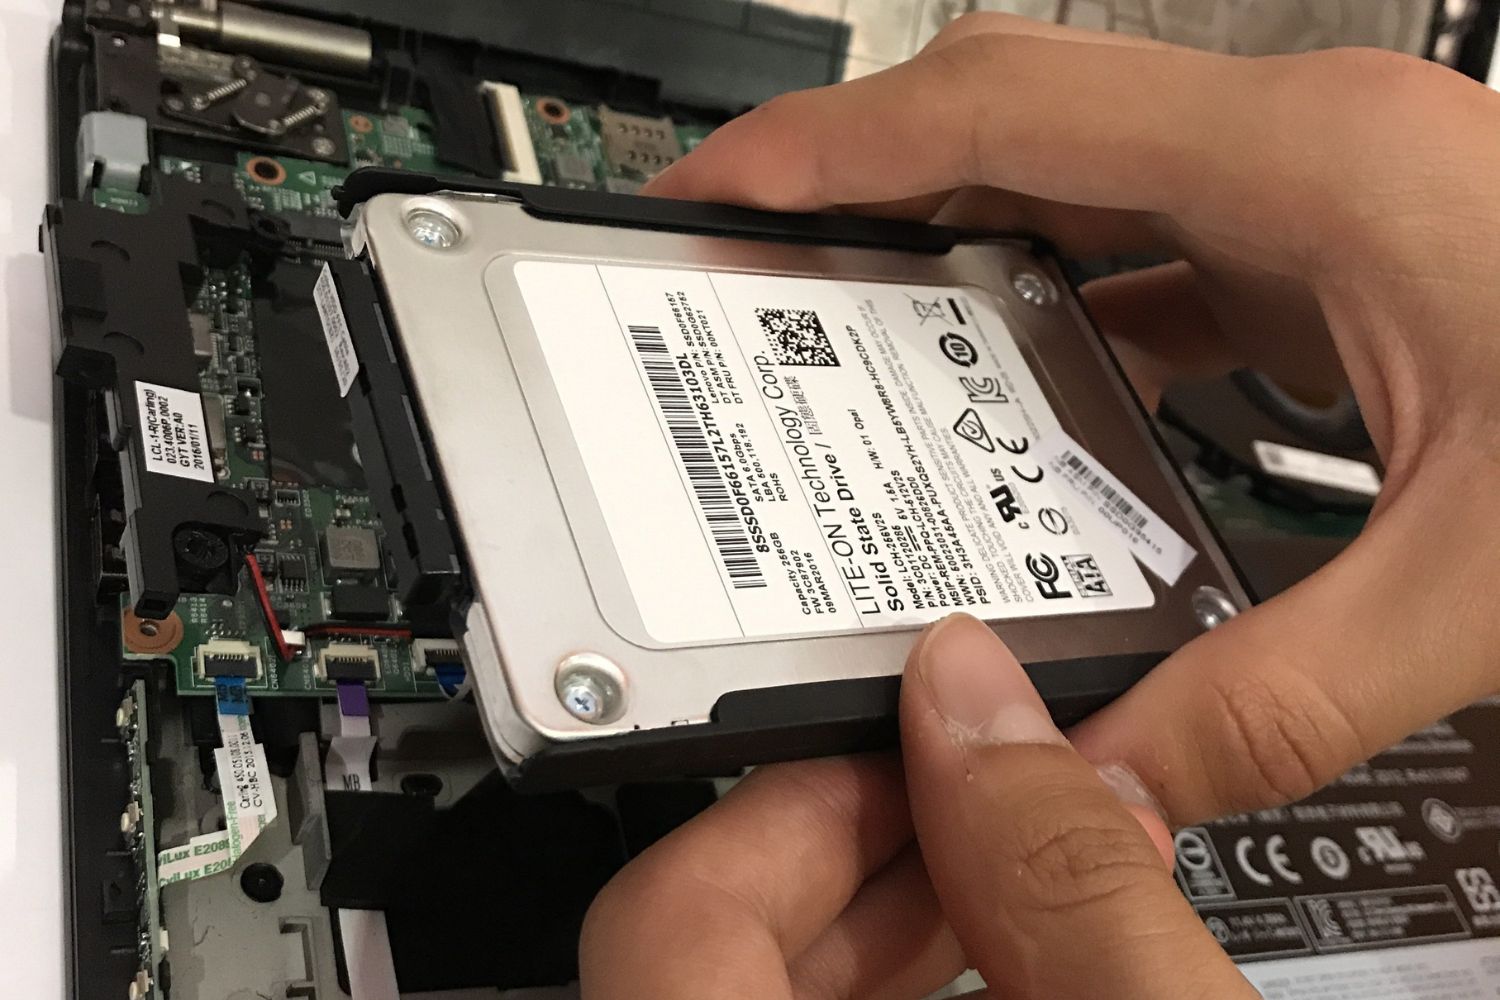
Step 6: Physically Remove the Hard Drive
If you want to take an extra precautionary step to ensure the complete destruction of your Thinkpad Ultrabook Yoga’s hard drive, physically removing the drive is a viable option. By physically removing the hard drive, you eliminate any possibility of data recovery. Here’s how you can physically remove the hard drive:
1. Shut down your Thinkpad Ultrabook Yoga and disconnect it from any power source.
2. Flip the device over so that the bottom panel is facing up.
3. Depending on the model of your Thinkpad Ultrabook Yoga, you may need a screwdriver or release latch to unlock and remove the bottom panel. Refer to your device’s manual or the manufacturer’s website for specific instructions.
4. Once the bottom panel is removed, locate the hard drive. It will typically be a small rectangular component, secured with screws or a latch.
5. Carefully unscrew or release the latch securing the hard drive in place.
6. Gently disconnect the connectors that attach the hard drive to the motherboard. Take note of how the connectors are attached so that you can reconnect them in the future if needed.
7. Once the connectors are disconnected, carefully lift the hard drive out from its bay.
8. Store the removed hard drive in a safe place or physically destroy it if you wish to prevent any possibility of data recovery.
By physically removing the hard drive from your Thinkpad Ultrabook Yoga, you can rest assured that your data is completely inaccessible and cannot be recovered. This method is especially useful if you plan to discard or recycle your device and want to ensure the complete security of your personal information.
Conclusion
Clearing a hard drive on your Thinkpad Ultrabook Yoga is a vital step to protect your personal data and maintain privacy. Whether you’re planning to sell, donate, or simply want to start fresh with your device, there are several methods available to ensure the complete erasure of your data.
If you’re looking for a quick and easy method, using the built-in reset feature or restoring the device to factory settings can be effective options. These methods are convenient and provide a fresh start for your device. However, keep in mind that they may not offer the highest level of data security.
For those concerned about data privacy, formatting the hard drive or using third-party software to wipe the drive provides more thorough and secure ways to clear your data. These methods overwrite the data on the hard drive, making it extremely difficult or impossible to recover any information. Additionally, physically removing the hard drive ensures a complete and irreversible erasure of your data.
Before proceeding with any method, always remember to back up your important files and data to avoid any accidental loss. Take the time to choose the method that best suits your needs and offers the level of data security you require.
By following these step-by-step instructions, you can confidently clear your Thinkpad Ultrabook Yoga’s hard drive and protect your personal information. Whether you’re preparing to sell your device or maintaining your privacy, ensuring the proper clearance of your hard drive is a crucial step in today’s digital world.