Introduction
Welcome to our guide on how to fix an unallocated external hard drive without losing any data. It can be frustrating and worrisome when you encounter issues with your external hard drive, especially if it suddenly becomes unallocated. But don’t panic! In this article, we will discuss the causes of an unallocated external hard drive and provide you with effective solutions to recover your data and get your drive working again.
An external hard drive is a convenient and portable storage device that allows you to expand your computer’s storage capacity or backup important files. However, sometimes these drives can encounter issues that render them unallocated. When a drive is unallocated, it means that the operating system recognizes the physical drive but cannot access the data stored on it.
There can be several reasons why your external hard drive becomes unallocated. It could be due to accidental formatting, partition table corruption, improper ejection, or even a virus attack. Regardless of the cause, the important thing is to act quickly and follow the right steps to recover your data without further damaging the drive.
Before we dive into the solutions, we strongly recommend making a backup of your data, if possible. While our methods are designed to minimize the risk of data loss, it is always a good practice to have a backup of your important files to avoid any unforeseen circumstances.
Now that you understand the significance of resolving the unallocated external hard drive issue, let’s move on to the solutions. Keep in mind that these methods can be applied to both Windows and Mac operating systems, although the steps may vary slightly between the two.
By following the solutions outlined in this guide, you have a high chance of recovering your data and fixing the unallocated external hard drive problem. So, let’s get started with the first solution: assigning a drive letter.
What is an Unallocated External Hard Drive?
An unallocated external hard drive is a storage device that is recognized by the operating system but lacks a partition or a file system. When a hard drive is unallocated, it means that the space on the drive is not assigned to a specific partition or volume, making the data on the drive inaccessible to the operating system and the user.
In simpler terms, imagine your external hard drive as a bookshelf and the partitions as different shelves on that bookshelf. Each shelf represents a different section or volume where you can store and organize your data. When a hard drive becomes unallocated, it’s like the shelves have been removed, leaving all your books scattered and disorganized.
The unallocated status of an external hard drive can occur due to various reasons. One common cause is accidental formatting, where the drive is improperly formatted or the wrong partition is selected during the formatting process. Another reason could be a partition table corruption, which is a critical database that contains information about the drive’s partitions and their locations.
Unallocated external hard drives can also result from improper ejection of the drive, power failures, or even virus attacks. Whatever the reason, the important thing to remember is that an unallocated drive does not mean your data is lost forever. Rather, it signifies that the operating system cannot recognize the file structure on the drive and needs assistance in restoring access to the data.
Restoring an unallocated external hard drive involves recovering or recreating the partition table and file system on the drive. Fortunately, there are various methods and tools available to help you fix the issue and retrieve your data without loss.
In the following sections, we will explore several solutions that can help you recover your data from an unallocated external hard drive. These methods include assigning a drive letter, initializing the drive, using partition recovery software, utilizing disk management tools, and seeking professional assistance.
Now that you understand what an unallocated external hard drive is and the possible causes, let’s delve into the solutions that will allow you to fix the issue and regain access to your valuable data.
Causes of Unallocated External Hard Drive
There are several reasons why an external hard drive becomes unallocated. Understanding these causes can help you identify the root of the problem and find an appropriate solution. Here are the most common causes of an unallocated external hard drive:
1. Accidental Formatting: One of the main causes of an unallocated external hard drive is accidental formatting. It can happen when you mistakenly format the wrong drive or accidentally click on the format option without realizing the consequences. This action erases the partition table and file system, leaving the drive unallocated.
2. Partition Table Corruption: The partition table is a crucial component that holds information about the partitions on the hard drive. When the partition table gets corrupted due to power failures, software issues, or other factors, the external hard drive can become unallocated. Without a functioning partition table, the operating system cannot recognize the drive’s partitions and file system.
3. Improper Ejection: Abruptly disconnecting the external hard drive from the computer without following the proper ejection process can lead to data corruption and an unallocated drive. The operating system may not have the chance to complete the necessary write operations, causing the file system to become damaged, resulting in an unallocated state.
4. Virus or Malware Attacks: Viruses and malware can infiltrate your computer system and corrupt the file system on your external hard drive. Once infected, the drive may become unallocated, rendering your data inaccessible. It is crucial to have reliable antivirus software installed and regularly scan your drives to protect against such threats.
5. Hardware Issues: Physical damage to the external hard drive, such as a faulty USB port, cable, or power supply, can cause the drive to become unallocated. It’s essential to handle the drive with care and ensure that the hardware components are properly functioning to avoid any potential issues.
6. Operating System Errors: Sometimes, errors within the operating system itself can cause an external hard drive to become unallocated. These errors can be due to software conflicts, outdated drivers, or compatibility issues. Keeping your operating system updated and resolving any known software conflicts can help prevent such problems.
Now that you understand the common causes of an unallocated external hard drive, you can proceed with the appropriate solutions to recover your data and resolve the issue. Remember, it’s essential to approach any recovery process with caution and backup your data whenever possible to minimize the risk of data loss.
Backup Your Data Before Proceeding
Before attempting any solutions to fix an unallocated external hard drive, it is crucial to emphasize the importance of backing up your data. While the methods we will discuss are designed to minimize the risk of data loss, there is always a possibility that something unexpected can occur during the recovery process.
Creating a backup ensures that even if something goes wrong, you will still have a copy of your important files and documents. It provides you with peace of mind knowing that your data is safe and can be easily restored in case of any unforeseen circumstances.
There are various ways to back up your data from an unallocated external hard drive:
1. Cloud Storage: Utilize online cloud storage services such as Google Drive, Dropbox, or OneDrive to upload your important files. These services offer a certain amount of free storage, with options to upgrade for additional space if needed.
2. External Storage: Use another external hard drive or USB drive to manually copy and store your files. This method allows you to have a physical backup that you can easily access whenever needed.
3. Network Backup: If you have a local network set up, you can use a network-attached storage (NAS) device or network-attached backup service to backup your data on a separate network drive.
Regardless of the method you choose, make sure to verify that your backup is complete and accessible before proceeding with any recovery attempts. Double-check that all your important files and folders have been successfully backed up and are readily available.
Remember that prevention is always better than cure. Regularly backing up your data is a good practice, not just for dealing with an unallocated external hard drive but also for safeguarding against other unforeseen data loss situations, such as hardware failures, accidental deletions, or software glitches.
Once you have safely backed up your important data, you can proceed with the various solutions we will provide to fix the unallocated external hard drive and retrieve your valuable files. By having a backup in place, you can approach the recovery process with confidence, knowing that your data is secured.
Now that you understand the importance of creating a backup and have taken the necessary steps to protect your data, let’s move on to the solutions to fix an unallocated external hard drive and recover your files.
Solution 1: Assign a Drive Letter
One of the simplest and most effective solutions to fix an unallocated external hard drive is to assign a drive letter. When a drive is unallocated, it lacks a drive letter, which is essential for the operating system to recognize and access the storage device. Assigning a drive letter can help the system identify the drive properly and make it accessible.
Here’s how you can assign a drive letter to an unallocated external hard drive:
- Connect the unallocated external hard drive to your computer.
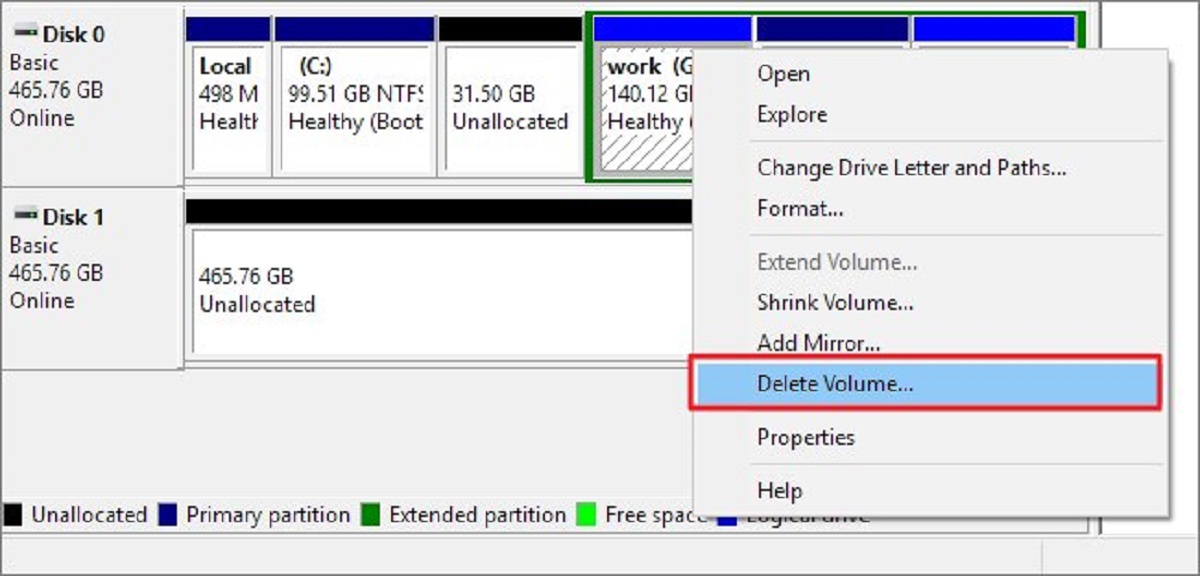
- Open “Disk Management” by right-clicking on “My Computer” or “This PC” and selecting “Manage”.
- In the “Disk Management” window, you will see a list of all the disks connected to your computer. Look for the unallocated drive, which will be labeled as “Unallocated” or “Unknown”.
- Right-click on the unallocated drive and select “Change Drive Letter and Paths”.
- In the new window, click on the “Add” button to assign a drive letter.
- Select the desired drive letter from the drop-down menu and click “OK”.
- Once the drive letter has been assigned, you should see the drive appear with the newly assigned letter in File Explorer or My Computer.
If the above steps do not resolve the issue, you can try assigning a different drive letter or using the “Change” option in the “Change Drive Letter and Paths” window to modify the drive letter assignment.
Assigning a drive letter is a straightforward solution that often resolves the unallocated external hard drive problem. Once you have successfully assigned a drive letter, you should be able to access your data and use the external hard drive as usual.
It’s important to note that assigning a drive letter only addresses the issue of the drive being unallocated. If the drive still appears as unallocated after assigning a drive letter, proceed to the next solution to explore alternative methods of recovering your data.
Now that you have learned how to assign a drive letter to an unallocated external hard drive, let’s move on to the next solution: initializing the drive.
Solution 2: Initialize the Drive
If assigning a drive letter did not resolve the unallocated external hard drive issue, the next step is to initialize the drive. Initializing a drive involves configuring it to be recognized by the operating system and setting up a partition on the drive. This process can help restore the drive’s functionality and make it accessible again.
Here’s how you can initialize the unallocated external hard drive:
- Connect the unallocated external hard drive to your computer.
- Open “Disk Management” by right-clicking on “My Computer” or “This PC” and selecting “Manage”.
- In the “Disk Management” window, you will see a list of all the disks connected to your computer. Look for the unallocated drive, which will be labeled as “Unallocated” or “Unknown”.
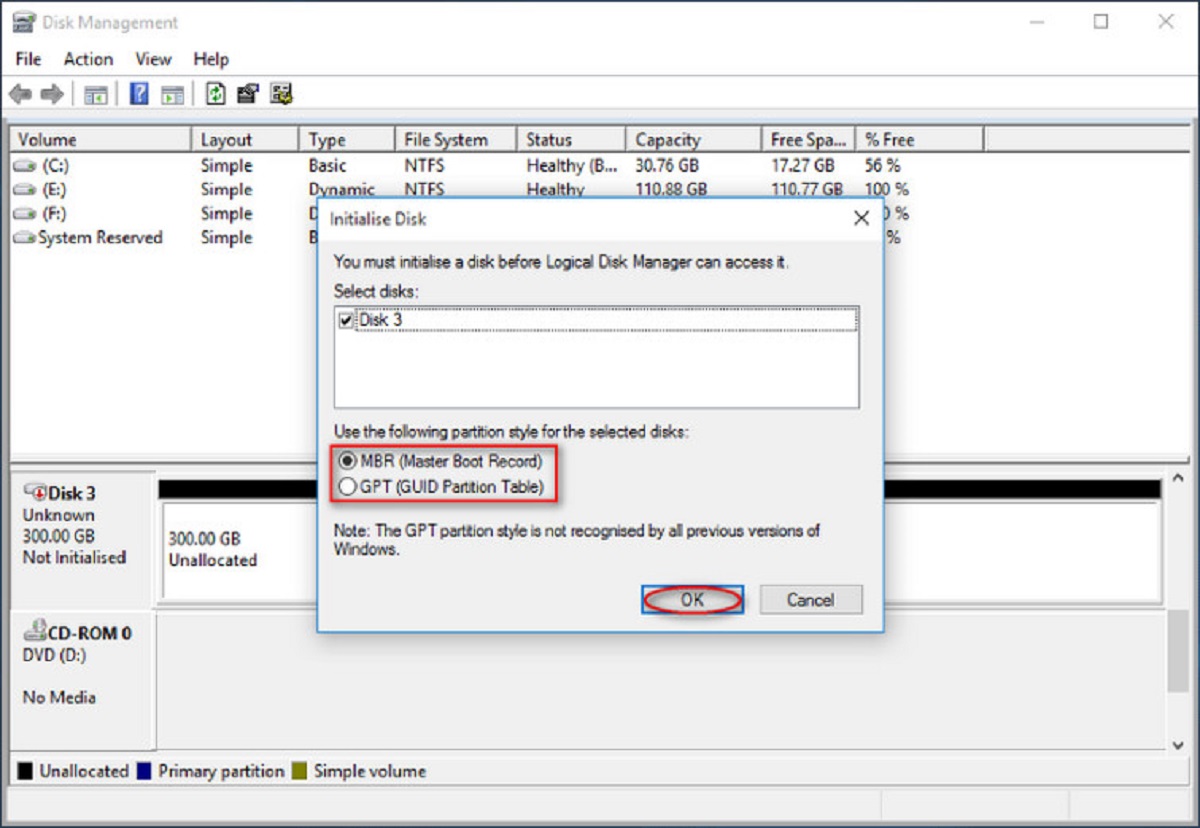
- Right-click on the unallocated drive and select “Initialize Disk”.
- In the “Initialize Disk” window, select the appropriate disk (usually the unallocated one) and choose the partition style (MBR or GPT).
- Click “OK” to confirm the initialization process.
- Once the drive is initialized, right-click on the unallocated space and select “New Simple Volume”.
- Follow the on-screen instructions and set the desired size for the partition, assign a drive letter, and format the partition (usually using NTFS file system).
- Click “Next” and then “Finish” to complete the process.
After initializing the drive and creating a new partition, the unallocated external hard drive should be recognized by the operating system, and you should be able to access your data and use the drive as usual.
It’s important to note that initializing the drive erases any existing data on the drive. If you have important files on the unallocated drive that you need to recover, it is recommended to use a data recovery tool or seek professional help before initializing the drive.
If initializing the drive does not resolve the issue or if you are unable to initialize the drive due to errors or limitations, proceed to the next solution to explore alternate methods of recovering your data.
Now that you have learned how to initialize an unallocated external hard drive, let’s move on to the next solution: using partition recovery software.
Solution 3: Use Partition Recovery Software
If assigning a drive letter or initializing the drive did not resolve the unallocated external hard drive issue and you have important data on the drive that you need to recover, using partition recovery software is worth considering. Partition recovery software is designed to scan for lost or deleted partitions and restore them, allowing you to recover your data.
Here’s how you can use partition recovery software to recover data from an unallocated external hard drive:
- Research and choose a reliable partition recovery software program. There are several options available, such as TestDisk, EaseUS Data Recovery Wizard, and MiniTool Partition Wizard, among others.
- Download and install the chosen partition recovery software onto your computer.
- Connect the unallocated external hard drive to your computer.
- Open the partition recovery software and select the drive or the unallocated space where the drive was previously located.
- Run a scan to search for lost or deleted partitions on the unallocated drive.
- Once the scan is complete, the software will display a list of partitions that can be recovered. Select the desired partitions and proceed with the recovery process.
- Choose a destination drive or folder to restore the recovered data. It is recommended to select a different drive than the one being recovered.
- Allow the software to recover the data and wait for the process to complete.
- Once the recovery is finished, you should have your recovered data available in the chosen destination drive or folder.
Partition recovery software can be a powerful tool to retrieve your data from an unallocated external hard drive. However, it’s important to note that the success of the recovery depends on various factors such as the extent of the damage, the effectiveness of the software, and the condition of the drive itself.
If the partition recovery software is unable to recover your data or if you are uncomfortable using such software on your own, it may be wise to seek professional assistance from a data recovery service. These professionals have the expertise and resources to recover data from unallocated drives, even in more complex scenarios.
Now that you have learned about using partition recovery software, let’s explore the next solution: utilizing disk management tools.
Solution 4: Use Disk Management Tools
If the previous solutions did not solve the issue with your unallocated external hard drive, utilizing disk management tools can help in diagnosing and resolving the problem. Disk management tools, such as CHKDSK (Check Disk) and SFC (System File Checker), can scan and repair disk-related errors, file system issues, and other problems that may be causing the drive to appear as unallocated.
Here’s how you can use disk management tools to fix an unallocated external hard drive:
- Connect the unallocated external hard drive to your computer.
- Open the Command Prompt as an administrator. You can do this by searching for “Command Prompt” in the Start menu, right-clicking on it, and selecting “Run as administrator”.
- Type “chkdsk /f X:” (replace “X” with the drive letter of the unallocated drive) and press Enter. This command will run a scan and attempt to fix any errors on the drive.
- Wait for the scan to complete. This may take some time depending on the size of the drive and the number of errors encountered.
- If the scan detects and fixes any errors, restart your computer and check if the unallocated drive is now accessible.
- If the drive still appears as unallocated, you can try running the System File Checker (SFC) scan. In the Command Prompt, type “sfc /scannow” and press Enter. This command will scan for and repair system file errors that may be affecting the drive.
- Wait for the scan to complete and follow any on-screen instructions if prompted.
- After the scan is finished, restart your computer and check if the unallocated external hard drive is now recognized by the operating system.
Using disk management tools can help resolve various disk-related issues and repair file system errors that may be causing the drive to appear as unallocated. However, it’s important to note that while these tools can be helpful in many cases, they may not always be able to fix the problem.
If the disk management tools do not resolve the issue, or if you are uncomfortable using them on your own, it may be necessary to seek professional assistance from a data recovery service or a computer technician who can provide advanced troubleshooting and recovery options.
Now that you have learned about using disk management tools, let’s move on to the final solution: seeking professional help.
Solution 5: Seek Professional Help
If none of the previously mentioned solutions have resolved the issue with your unallocated external hard drive, it may be time to seek professional help. Data recovery specialists or professional computer technicians have the expertise, tools, and resources to deal with complex data recovery situations and unallocated drives.
Here are the steps you can take when seeking professional help:
- Research and choose a reputable data recovery service or computer repair company that specializes in data recovery.
- Contact the selected service provider and explain the issue with your unallocated external hard drive.
- Discuss the specifics of your situation, such as the symptoms, any previous attempted solutions, and the importance of the data on the drive.
- Follow the instructions provided by the professionals, which may include shipping the drive to their facility or scheduling an appointment for an in-person evaluation.
- Once the drive is in their possession, the professionals will assess the situation, perform diagnostics, and determine the best course of action for data recovery.
- Based on their evaluation, they will provide a quote for the recovery process, including an estimated timeframe for completion.
- If you agree to proceed, the professionals will attempt to recover the data from your unallocated drive using specialized techniques and equipment.
- Once the data recovery process is complete, they will provide you with the recovered files and any necessary instructions for accessing the data.
Keep in mind that seeking professional help for data recovery can be costly, and the success of the recovery process depends on various factors such as the severity of the issue and the condition of the drive. However, if you have valuable or irreplaceable data on the unallocated drive, the investment in professional assistance may be worth considering.
Before contacting a data recovery service, it’s important to verify their credentials, reputation, and success rate in data recovery. Look for customer reviews and testimonials to ensure that you are entrusting your valuable data to a reliable and trustworthy provider.
Now that you have explored the various solutions, including seeking professional help, it’s time to determine which option best suits your needs and make a decision on how to proceed with recovering your data from the unallocated external hard drive.
Conclusion
Dealing with an unallocated external hard drive can be a frustrating and worrisome experience. However, with the right knowledge and solutions at hand, you have a good chance of recovering your data and resolving the issue.
In this guide, we discussed the causes of an unallocated external hard drive, including accidental formatting, partition table corruption, improper ejection, virus attacks, hardware issues, and operating system errors. We also explored various solutions to fix the issue, including assigning a drive letter, initializing the drive, using partition recovery software, utilizing disk management tools, and seeking professional help.
Assigning a drive letter is often a simple and effective solution for resolving the unallocated status of a drive. If that doesn’t work, initializing the drive can help restore its functionality and accessibility. Partition recovery software offers a great option for recovering your data from an unallocated drive if the previous solutions do not work. Disk management tools, such as CHKDSK and SFC scans, can be useful in diagnosing and repairing disk-related errors. Lastly, seeking professional help from data recovery specialists is recommended for complex cases or when valuable data is at stake.
Remember to always backup your data before attempting any recovery solutions to minimize the risk of data loss. Regardless of the solution you choose, approach the recovery process with caution and follow the instructions carefully to avoid any further damage to the drive or potential data loss.
If you are unable to recover your data on your own or if you are uncomfortable with the recovery process, it is always a wise decision to seek professional assistance. Data recovery experts have the necessary expertise and resources to handle complex data recovery scenarios and increase the chances of successful retrieval of your valuable files.
We hope that this guide has provided you with valuable insights and solutions to resolve the unallocated external hard drive issue. Remember, patience and perseverance are key when dealing with data recovery, and with the right approach, you can regain access to your important files and get your external hard drive up and running again.


