Introduction
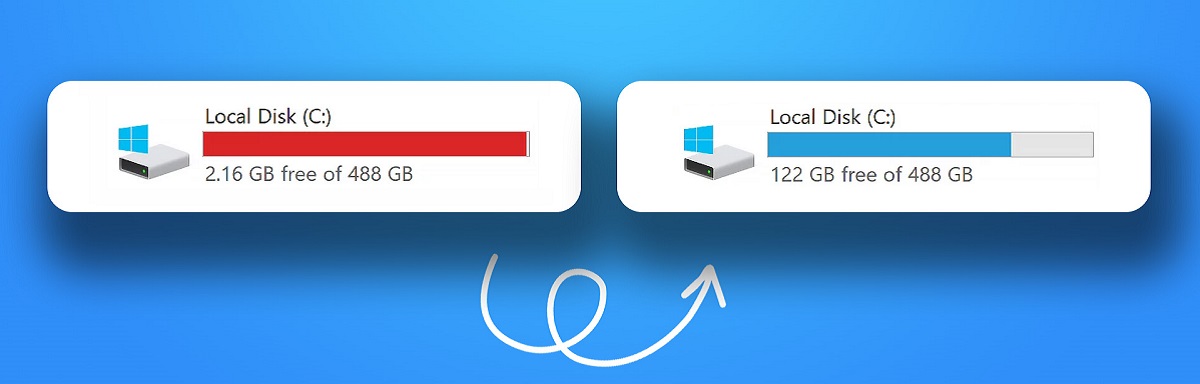
Managing storage space on your SSD (Solid State Drive) is crucial to keep your computer running smoothly and efficiently. Over time, your SSD may accumulate unnecessary files and folders, taking up valuable space and impacting system performance. To ensure optimal performance and maximize available storage on your SSD, it’s important to identify what is taking up space and take appropriate actions to manage it.
Fortunately, there are various methods and tools available to help you identify and manage the storage usage on your SSD. In this article, we will explore both built-in tools and third-party software that can assist you in finding out what is eating up your precious SSD space. By employing these techniques, you can gain a better understanding of your storage usage and make informed decisions on how to optimize it.
Whether you’re using a Windows, MacOS, Linux, or Android device, there are specific tools and features tailored to each operating system that can aid in analyzing your SSD’s storage usage. Additionally, we will discuss strategies for efficiently managing large files and folders to free up space on your SSD, such as sorting and deleting unnecessary files, compressing large files, and transferring files to external storage or cloud services.
By the end of this article, you will have a comprehensive understanding of how to effectively identify what is taking up space on your SSD and how to manage it efficiently, resulting in improved performance and increased available storage for your important files and applications.
Checking storage usage on SSD
Before diving into the tools and methods for identifying what is taking up space on your SSD, it’s important to have a clear understanding of how to check your storage usage. This will provide you with an overview of the current state of your SSD’s storage and help you determine the extent of the issue.
Fortunately, most operating systems provide built-in tools that allow you to easily check your storage usage. Let’s explore some of these tools based on the different operating systems.
1. Using the Storage Sense feature on Windows
Windows 10 comes equipped with a handy feature called Storage Sense. It allows you to view the storage usage on your SSD and provides options to free up space by automatically deleting temporary files and emptying the recycle bin. To access Storage Sense, go to Settings > System > Storage. Here, you can toggle on Storage Sense to enable it and view the storage usage breakdown by different file types.
2. Using the About This Mac feature on MacOS
If you’re using a Mac, you can use the About This Mac feature to check your storage usage. Simply click on the Apple logo in the top-left corner of your screen, select About This Mac, and then click on the Storage tab. This will display a visual representation of your storage usage, showing how much space is occupied by different file categories like Applications, Documents, and System.
3. Using the Disk Usage Analyzer on Linux
Linux distributions often come with a Disk Usage Analyzer tool, which allows you to check your SSD’s storage usage. The Disk Usage Analyzer provides a visual representation of your filesystem, showing the space taken up by different directories and files. You can access this tool through the system menu or by installing it using the relevant package manager for your Linux distribution.
4. Using the Android Storage settings on Android devices
For Android devices, you can check your storage usage by going to Settings > Storage. Here, you’ll find a breakdown of your device’s storage usage, showing how much space is allocated to different categories like Apps, Videos, Photos, and Downloads. This will give you an idea of what is using up the most space on your SSD.
By checking your storage usage using the built-in tools provided by your operating system, you can gather valuable insights into what is consuming space on your SSD. This information will serve as a starting point for further analysis and taking appropriate actions to manage your SSD storage efficiently.
Using built-in tools
When it comes to analyzing storage usage on your SSD, utilizing the built-in tools provided by your operating system can be a convenient and effective way to identify what is taking up space. These tools offer insights into file categories, sizes, and other relevant details to help you pinpoint areas where you can optimize storage usage. Let’s explore some of the built-in tools available:
1. Using the Storage Sense feature on Windows
As mentioned earlier, Windows 10 offers a built-in feature called Storage Sense. This tool not only provides an overview of your storage usage but also offers options to free up space automatically. You can configure Storage Sense to delete temporary files and empty the recycle bin regularly. This can help clear out unnecessary data and free up valuable SSD space.
2. Using the About This Mac feature on MacOS
MacOS provides the About This Mac feature, which not only allows you to check your storage usage but also provides specific recommendations for optimizing it. By clicking on the Storage tab, you can see a breakdown of different file categories, including Applications, Documents, and System. This information can guide you in identifying areas where you can reclaim storage space.
3. Using the Disk Usage Analyzer on Linux
For Linux users, the Disk Usage Analyzer is a powerful built-in tool for visualizing storage usage. You can access it through the system menu or install it using the relevant package manager. The Disk Usage Analyzer provides a graphical representation of your filesystem, allowing you to drill down into directories and identify the largest contributors to your SSD’s usage.
4. Using the Android Storage settings on Android devices
Android devices offer storage analysis through the Settings menu. By navigating to Settings > Storage, you can get an overview of the categories occupying space on your SSD, such as Apps, Videos, Photos, and Downloads. This information enables you to identify the major space-consuming areas and take necessary actions to optimize storage.
By leveraging the built-in tools provided by your operating system, you can gain valuable insights into your SSD’s storage usage. These tools offer a convenient and accessible way to discover what is taking up space and assist you in making informed decisions on how to manage your storage effectively.
Using the Storage Sense feature on Windows
Windows 10 comes equipped with a built-in feature called Storage Sense that can help you analyze your SSD’s storage usage and free up space. Here’s how you can use it:
To access Storage Sense, go to the Start Menu and click on the Settings icon. In the Settings menu, select System and then click on the Storage option.
On the Storage page, you will see an overview of your SSD’s storage usage. The page provides a breakdown of how much space is occupied by different file categories, such as Apps & Features, Temporary Files, Pictures, Documents, and more. This allows you to identify which categories are taking up the most space on your SSD.
Scrolling down, you will find a section called “Storage Sense” with a toggle button. By turning on Storage Sense, Windows will automatically free up space on your SSD by deleting temporary files and emptying the Recycle Bin. You can also customize the frequency at which Windows performs these cleanup actions.
Below the Storage Sense toggle, you will find options to manually free up space. Click on the “Free up space now” link to launch the Disk Cleanup utility. This utility allows you to choose specific file categories to clean, such as temporary files, system files, downloaded program files, and more. Select the categories you want to clean, and click on the “OK” button to start the cleanup process.
Additionally, Storage Sense also provides an option to automatically upload files to OneDrive, Microsoft’s cloud storage service, which can help free up space on your local SSD. Click on the “Change how we free up space automatically” link to access these settings.
By utilizing the Storage Sense feature, you can gain better control over your SSD’s storage usage and ensure that unnecessary files and clutter are regularly removed. This helps free up space and improves the overall performance of your Windows system.
Using the About This Mac feature on MacOS
MacOS provides a built-in feature called About This Mac that allows you to easily check your SSD’s storage usage and obtain recommendations on how to optimize it. Here’s how you can utilize this feature:
Click on the Apple logo in the top-left corner of your screen, and then select About This Mac from the dropdown menu.
In the About This Mac window, you will see a series of tabs at the top. Click on the Storage tab to access information about your SSD’s storage usage.
The Storage tab provides an overview of your SSD’s storage, displaying a visual representation of the different file categories that are taking up space. These categories include Applications, Documents, System, and more.
Beneath the visual representation, you will find specific recommendations on how to optimize your storage. MacOS may suggest actions such as deleting large and unused files, emptying the Trash, and offloading rarely used apps to free up space.
If you want more detailed information on your storage usage, click on the “Manage” button. This will open the Storage Management utility, which provides a comprehensive breakdown of your SSD’s storage, including large files, file types, and space-hogging applications.
This utility also offers features like “Store in iCloud” and “Optimize Storage” to help manage your storage more efficiently. The “Store in iCloud” feature enables you to store your files in iCloud Drive and access them whenever needed, freeing up space on your local SSD. The “Optimize Storage” feature automatically removes TV shows and movies you have already watched to conserve space.
By utilizing the About This Mac feature on MacOS, you can easily gain insights into your SSD’s storage usage and receive valuable recommendations to optimize it. This ensures that you can efficiently manage your storage and maintain the performance of your Mac system.
Using the Disk Usage Analyzer on Linux
Linux distributions often come with a built-in tool called Disk Usage Analyzer (also known as Baobab or KDirStat) that allows you to analyze your SSD’s storage usage in a visual and intuitive way. Here’s how you can use this tool:
To access the Disk Usage Analyzer, open your list of applications or use the search function to find the utility (its name may vary depending on your Linux distribution).
Once you have opened the Disk Usage Analyzer, you will be prompted to select the directory or partition that you want to analyze. Choose the SSD drive you want to examine from the list.
After selecting the SSD drive, the tool will scan the filesystem and generate a graphical representation of your storage usage. This representation is typically displayed as a treemap, where each directory and file is represented by a rectangle. The size of the rectangle corresponds to the size of the directory or file.
You can navigate through the treemap by expanding and collapsing directories, allowing you to drill down into specific areas and identify which directories or files are consuming the most space on your SSD.
By hovering over a rectangle, you can view additional details about the directory or file, such as its size and location, further aiding in understanding what is taking up space.
Additionally, the Disk Usage Analyzer often offers the option to sort directories and files by size, making it easier to identify the largest contributors to your SSD’s storage usage.
With this detailed overview of your SSD’s storage usage, you can identify specific directories or files that are consuming a significant amount of space. This knowledge enables you to directly manage and optimize your storage by deleting unnecessary files, moving large files to external storage, or organizing data more efficiently.
The Disk Usage Analyzer is a powerful tool for Linux users, providing a visual representation of storage usage that greatly simplifies the process of identifying and managing storage-hogging files and directories on your SSD.
Using the Android Storage settings on Android devices
Android devices offer built-in storage analysis features that allow you to easily check your SSD’s storage usage and take control of your device’s storage. Here’s how you can utilize the storage settings on Android:
Open the Settings app on your Android device and scroll down until you find the “Storage” or “Storage and USB” option. Tap on it to access the storage settings.
In the storage settings, you will find a detailed breakdown of your device’s storage usage. The categories may vary slightly depending on your device and Android version, but typically include Apps, Pictures, Videos, Audio, Downloads, and Cached data.
The storage analysis provides information on how much space each category is occupying on your SSD. This allows you to quickly identify which categories are using the most storage.
Tap on a specific category to see a detailed view of the files within that category. For example, if you tap on Apps, you will see a list of installed apps ordered by their size. This makes it easy to identify large apps that you may no longer need or rarely use.
Android also provides options for managing and optimizing storage within each category. For instance, you can clear the cache for specific apps by tapping on the app name within the storage settings.
Additionally, Android devices often offer handy features like Smart Storage or Automatic Storage Management. These features can automatically free up space by removing items such as backed-up photos and videos that have been safely stored in the cloud.
Android also allows you to manage your files and folders using a built-in file manager app, which further enhances your control over your SSD’s storage. You can access this file manager app through the storage settings or from your app drawer.
By utilizing the storage settings and file manager on your Android device, you can easily analyze your SSD’s storage usage, identify space-consuming categories and files, and take appropriate actions to optimize your storage and ensure efficient use of your device’s resources.
Using third-party tools
In addition to the built-in tools provided by your operating system, there are a variety of third-party tools available that can assist you in analyzing and managing storage usage on your SSD. These tools often offer more advanced features and customization options, allowing for a more comprehensive and tailored approach to storage management. Here are some popular third-party tools that you can consider:
1. TreeSize
TreeSize is a Windows-based tool that provides a detailed overview of your SSD’s storage usage. It offers a visual representation of your filesystem, showing the size of each directory and file. With TreeSize, you can analyze utilization patterns, identify space hogs, and easily navigate through your storage hierarchy. Additionally, it allows you to sort and filter files by size, making it easier to locate and manage large files.
2. WinDirStat
WinDirStat is another popular tool for analyzing storage usage on Windows. It provides a visual representation of your disk space utilization using colorful blocks that represent different file types and sizes. With WinDirStat, you can quickly identify which files and folders are taking up the most space on your SSD and take necessary actions to manage them effectively. It also offers various sorting and filtering options for a more detailed analysis.
3. DaisyDisk
DaisyDisk is a tool specifically designed for MacOS that offers a beautiful and intuitive disk usage visualization. It allows you to easily explore your SSD’s storage and identify space-consuming files and folders. DaisyDisk presents a sunburst diagram that visually represents your storage usage, making it easy to understand and make informed decisions about storage optimization. It also provides helpful features like file previews and the ability to quickly delete or compress files directly from the interface.
4. JDiskReport
JDiskReport is a cross-platform tool that provides comprehensive storage analysis for Windows, MacOS, and Linux. It scans your SSD and generates detailed reports and charts that display storage usage statistics, including file sizes, top file types, and largest folders. JDiskReport allows you to drill down into specific directories, filter results, and export reports for further analysis. With its rich visuals and detailed insights, JDiskReport is a powerful tool for managing storage on multiple operating systems.
These are just a few examples of the many third-party tools available for analyzing and managing storage usage on your SSD. These tools can offer advanced features and customization options that may not be available in built-in tools, allowing you to have greater control and awareness of your storage usage. Consider exploring these options to find the tool that best suits your needs and helps optimize your SSD’s storage efficiently.
TreeSize
TreeSize is a popular third-party tool designed for Windows users to analyze and manage storage usage on their SSD. With its intuitive interface and powerful features, TreeSize helps you gain a comprehensive understanding of your disk space utilization. Here’s how you can utilize TreeSize:
After installing TreeSize, launch the application and select the drive or folder you want to analyze. TreeSize will scan the selected location and generate a visual representation of your storage usage in the form of a tree structure.
The tree structure in TreeSize shows directories as branches and files as leaves. The size of each directory or file is displayed next to it, enabling you to quickly identify the largest contributors to your SSD’s storage usage.
TreeSize provides different views and sorting options to help you analyze your storage usage. You can sort files and folders by size, date, or other criteria to identify space-consuming items. Additionally, you can expand and collapse directories to navigate through your storage hierarchy effortlessly.
By right-clicking on a specific file, folder, or branch, you can access various management options. TreeSize allows you to delete, move, or archive files and folders directly from the application, making it easy to free up space on your SSD.
One noteworthy feature of TreeSize is the ability to identify redundant or duplicate files. The Duplicate File Search feature scans your SSD and helps you locate duplicates, which can be safely removed to recover valuable storage space.
Another useful feature of TreeSize is its ability to track changes in storage usage over time. You can perform periodic scans and compare the results to see how your storage usage is evolving, enabling you to identify trends and take timely actions to manage your SSD efficiently.
TreeSize is available in both free and paid versions, with the paid version offering additional features such as advanced filtering, reporting, and automation. Whether you choose the free or paid version, TreeSize provides valuable insights into your SSD’s storage usage and empowers you to take control of your disk space management.
WinDirStat
WinDirStat is a powerful third-party tool designed for Windows users to analyze and manage storage usage on their SSD. With its visually appealing interface and comprehensive features, WinDirStat allows you to gain insights into your disk space utilization and take proactive steps to optimize your storage. Here’s how you can make the most of WinDirStat:
Upon launching WinDirStat and selecting the drive or folder you want to analyze, the application starts scanning your SSD, mapping out the file structure and displaying it in a colored graphical representation.
The graphical representation in WinDirStat showcases different file types and sizes as blocks of varying colors. This visual representation makes it easy to identify which files and directories are consuming the most space on your SSD.
WinDirStat provides a directory tree view alongside the graphical interface, allowing you to explore your storage hierarchy and understand the storage usage of individual folders.
To obtain more detailed information about a particular file or folder, simply click on it in either the graphical or directory tree view. WinDirStat will provide specific details about the selected item, including its size, file extension, and location.
One of the key features of WinDirStat is its ability to sort files and folders by size. This helps you quickly identify the largest contributors to your SSD’s storage usage, making it easier to prioritize and manage your storage optimization efforts.
Another useful feature is the “Explorer” option, which allows you to directly open a selected folder in Windows Explorer, enabling you to easily navigate to and manage specific directories or files of interest.
WinDirStat also offers an option to delete or move files and directories directly from the application. By right-clicking on a specific item, you can choose to delete it or open it in Windows Explorer for further management.
The comprehensive features and user-friendly interface of WinDirStat make it an invaluable tool for managing storage usage on your SSD. Whether you want to identify large files, locate space-consuming folders, or simply get a detailed overview of your storage utilization, WinDirStat provides the tools and insights you need to optimize your SSD’s storage effectively.
DaisyDisk
DaisyDisk is a popular third-party tool designed specifically for MacOS users to analyze and manage storage usage on their SSD. With its visually stunning interface and intuitive features, DaisyDisk provides a unique and efficient way to explore your disk space and reclaim valuable storage. Here’s how you can utilize DaisyDisk:
After launching DaisyDisk, you will be presented with a clear overview of your SSD’s storage usage. The main interface displays a colorful, interactive disk map that represents your storage space, making it easy to visualize which files and folders are taking up the most space.
With a simple click, you can drill down into each segment of the disk map to reveal more detailed information about specific files and folders. DaisyDisk also provides a comprehensive sidebar that displays a hierarchical view of your storage, allowing you to explore your SSD’s contents with ease.
DaisyDisk offers a unique feature called QuickLook integration, which enables you to preview files directly within the application. By simply hovering your mouse over a file, you can get a sneak peek of its content without needing to open the file in another application.
In addition to the visual representation of your storage, DaisyDisk provides detailed information about each file and folder. You can view the size, file type, and location of specific items, allowing you to identify large and space-consuming files quickly.
One of the standout features of DaisyDisk is its ability to analyze hidden and redundant files. It can uncover system files, caches, and other types of hidden clutter that may be occupying valuable space on your SSD. DaisyDisk presents these files in a separate scanning mode, enabling you to easily identify and remove unnecessary items.
To simplify storage management, DaisyDisk offers built-in file deletion capabilities. With just a few clicks, you can delete unwanted files and folders directly from within the application, saving you the hassle of navigating through multiple windows or Finder dialogs.
DaisyDisk also provides a disk cleaning feature, allowing you to free up space by removing unwanted files such as caches, temporary items, and application-specific clutter. This feature helps you reclaim storage resources and optimize the performance of your MacOS system.
DaisyDisk’s elegant interface and powerful features make it an excellent tool for visualizing and managing storage usage on your SSD. Whether you want to identify large files, remove hidden clutter, or simply gain a better understanding of your storage hierarchy, DaisyDisk provides the tools and insights necessary to reclaim valuable space on your SSD.
JDiskReport
JDiskReport is a versatile third-party tool that offers comprehensive storage analysis for Windows, MacOS, and Linux systems. With its powerful features and user-friendly interface, JDiskReport allows you to gain detailed insights into your SSD’s storage usage and make informed decisions about storage optimization. Here’s how you can utilize JDiskReport:
Upon launching JDiskReport, you are prompted to select the drive or directory you want to analyze. After making the selection, JDiskReport begins scanning your SSD to gather information about its storage usage.
Once the scanning process is complete, JDiskReport generates detailed reports and charts that display your storage usage statistics. It provides a breakdown of your storage usage by file size, file type, and largest folders.
JDiskReport allows you to navigate through the generated reports to gain deeper insights into your SSD’s storage. You can explore different file categories, view usage statistics, and identify the areas that are consuming the most space.
One of the standout features of JDiskReport is its ability to identify and visualize the largest files on your SSD. With its graphical representation, JDiskReport enables you to pinpoint the specific files that are taking up the most storage, making it easier to prioritize actions for managing space.
JDiskReport also provides the option to export reports, allowing you to save and share the generated statistics and usage breakdowns. This can be especially useful for data analysis or for keeping track of changes in your SSD’s storage over time.
Another notable feature of JDiskReport is its built-in file explorer. This allows you to easily navigate through your storage hierarchy directly within the application. With the file explorer, you can interact with files and folders, view detailed properties, and even delete or move items to optimize your storage.
JDiskReport offers customization options to tailor the reports and charts to your preference. You can choose different visualization styles, filter results based on file types or sizes, and adjust settings to focus on specific areas of your storage.
Whether you are a Windows, MacOS, or Linux user, JDiskReport provides a comprehensive solution for analyzing and managing storage usage on your SSD. Its detailed reports, advanced visualization, and flexible customization options make it a powerful tool to understand your storage patterns and make informed decisions regarding space optimization.
Analyzing and managing large files and folders
When it comes to managing storage on your SSD, it’s important to identify and address large files and folders that may be consuming a significant amount of space. By analyzing and managing these space-hogging items, you can effectively optimize your SSD’s storage usage. Here are some strategies for analyzing and managing large files and folders:
1. Sorting files and folders by size
One of the first steps in managing large files and folders is to sort them by size. Most operating systems and third-party tools allow you to sort files and folders based on their size, from largest to smallest. By doing so, you can easily identify the files and folders that are occupying the most space on your SSD.
2. Deleting unnecessary files and folders
Once you have identified large files and folders that you no longer need, it’s time to delete them. Take a careful look at the files and folders and determine if they are still relevant to you. If not, simply delete them to free up space. Be cautious when deleting files, ensuring you do not accidentally remove important data.
3. Compressing large files
If you have large files that you want to keep but don’t require immediate access to, consider compressing them. Compression reduces the file size, allowing you to save storage space on your SSD. You can use built-in compression tools in your operating system or third-party compression software to compress the files. Note that compressed files need to be uncompressed before use.
4. Transferring files to external storage or cloud services
If you have files that are taking up significant space on your SSD but are not frequently accessed, consider transferring them to external storage devices or cloud services. External hard drives or USBs can store large files securely and conveniently, while cloud storage services allow you to store files online and access them from any device with an internet connection.
By applying these strategies, you can effectively analyze and manage large files and folders on your SSD. This allows you to reclaim valuable storage space and optimize your SSD’s performance, ensuring that you have enough room for important files and applications while maintaining efficient storage usage.
Sorting files and folders by size
Sorting files and folders by size is a crucial step in identifying and managing large files that may be occupying a significant amount of space on your SSD. Most operating systems and third-party tools provide options to sort files and folders based on their size, allowing you to quickly locate space-hogging items. Here’s how you can leverage the sorting feature:
Using the Operating System’s File Explorer:
In Windows, open File Explorer and navigate to the directory you want to analyze. Click on the “Size” or “Size” column heading in the File Explorer window to sort the files and folders by size. This will arrange them in descending order, with the largest files and folders displayed at the top of the list.
On MacOS, open Finder and navigate to the directory you want to analyze. Go to the “View” menu, select “Show View Options,” and then check the “Calculate all sizes” option. Afterward, click on the “Size” column heading in the Finder window to sort the files and folders by size.
Using Third-Party Tools:
In addition to the built-in functionality of the operating system, various third-party tools also offer advanced sorting options. Tools like TreeSize, WinDirStat, and JDiskReport provide sorting capabilities that allow you to arrange files and folders by size, making it easier to identify the largest contributors to your storage usage.
By sorting files and folders by size, you can quickly locate large files and folders that may be occupying a significant amount of space on your SSD. This allows you to prioritize your efforts in managing and optimizing your storage, whether it involves deleting unnecessary large files, compressing them, or transferring them to external storage or cloud services. Sorting by size provides a valuable starting point for effectively managing your storage and ensuring efficient usage of your SSD.
Deleting unnecessary files and folders
Deleting unnecessary files and folders is a crucial step in managing your SSD’s storage and freeing up valuable space. As you analyze your storage usage, you might come across files and folders that are no longer needed or have become obsolete. Here are some strategies for effectively deleting unnecessary files and folders:
Identify redundant and outdated files:
Start by identifying files and folders that are redundant or outdated. These may include duplicate files, old backups, temporary files, or files from applications you no longer use. Consider if these files have any value or if they can be safely deleted to free up space on your SSD.
Review your Downloads and Temporary folders:
Check your Downloads and Temporary folders, as these are common locations where unnecessary files accumulate. Delete files that are no longer needed, such as installation packages, media files, or temporary files created by software and browsing activities.
Empty the Recycle Bin or Trash:
Remember to empty the Recycle Bin or Trash regularly. When you delete files, they often get moved to these locations, occupying storage space until they are permanently erased. Clearing the Recycle Bin or Trash can recover a significant amount of space on your SSD.
Be cautious when deleting system files:
Exercise caution when deleting system files, as removing essential system files can cause your operating system to malfunction. It’s best to focus on personal files rather than system files. If you are unsure about a file or folder, research its purpose or consult with an expert before deleting it.
Use specialized tools:
If you have large numbers of files or folders to delete, consider using specialized tools that can help automate the process. These tools can identify and delete files and folders based on specific criteria, such as file type, date created, or size range. This can save time and make the deletion process more efficient.
Backup important files:
Prior to deleting any files or folders, it’s crucial to back up important data. This ensures that you have a copy of essential files in case of accidental deletion or data loss. Backing up your files to an external storage device or a cloud service adds an extra layer of protection.
By effectively deleting unnecessary files and folders, you can free up valuable space on your SSD and optimize your storage. Regularly reviewing and removing redundant or outdated files is a proactive approach to managing your SSD’s storage and ensuring that it is utilized efficiently.
Compressing large files
Compressing large files is an effective strategy to save storage space on your SSD while retaining access to the files when needed. Compression reduces the size of files by encoding them in a compressed format, allowing you to save significant amounts of space. Here are some approaches to compressing large files:
Using built-in compression tools:
Most operating systems provide built-in compression tools that allow you to compress files or folders. For example, on Windows, you can right-click on a file or folder, select “Send to,” and choose “Compressed (zipped) folder” to create a compressed zip file. Similarly, on MacOS, you can right-click on a file or folder, select “Compress,” and create a compressed zip file.
Using third-party compression software:
Third-party compression software offers more advanced features and options for compression. Programs like WinRAR, 7-Zip, and WinZip provide additional compression formats and customization options. These tools often support various compression algorithms, allowing you to choose the level of compression that suits your needs.
Consider file compatibility:
When compressing files, consider the compatibility requirements of the files and their intended use. Ensure that the recipient or the software that will interact with the compressed file can handle the compression format you choose. The most widely supported format is the ZIP format, which is readable on both Windows and MacOS.
Beware of compressed file limitations:
Keep in mind that some file types may already be compressed or may not compress significantly. Files that are already in a compressed format, such as JPEG or MP3 files, may not see much reduction in size when further compressed. Additionally, certain file formats, such as executables or encrypted files, may not be easily compressed.
Document compressed files:
When compressing files, it’s important to keep track of the compressed files and their contents. Consider keeping a record or a text file that documents the compressed files and their corresponding original locations. This will help you quickly locate and access files when needed.
Compressing large files is an effective method for saving storage space on your SSD. By reducing the size of files while retaining their content, you can optimize your storage and ensure that your important files are still accessible. Whether you use built-in compression tools or third-party software, compression is a valuable strategy for managing your SSD’s storage efficiently.
Transferring files to external storage or cloud services
Transferring files from your SSD to external storage or cloud services is a practical approach to managing your storage space while ensuring access to your files. By moving files to external devices or cloud storage, you can free up valuable space on your SSD. Here are some strategies for transferring files to external storage or cloud services:
External Hard Drives or USB Drives:
One option is to transfer files to external hard drives or USB drives. These devices provide additional storage space that is separate from your SSD. Simply connect the external device to your computer, copy the files you want to transfer, and safely disconnect it when done.
Network Attached Storage (NAS):
If you have a home network, you can consider using Network Attached Storage (NAS) devices. NAS devices allow multiple computers to access a shared storage system over a network. Transferring files to a NAS device provides a centralized storage solution that can be accessed by various devices within your network.
Cloud Storage Services:
Cloud storage services, such as Dropbox, Google Drive, Microsoft OneDrive, or iCloud, offer remote storage space accessible from any device with an internet connection. Transferring files to the cloud allows you to store files off-site, saving space on your SSD while ensuring accessibility from multiple devices. Simply upload files to your cloud storage account using the service’s designated software or web interface.
Consider File Synchronization:
File synchronization services like Dropbox, Google Drive, or OneDrive can automatically sync files between your local computer and the cloud storage. This provides a seamless approach to moving files to the cloud while keeping local copies for offline access. Any changes made to synchronized files will be automatically updated across all devices.
Organize and Manage Files:
Prior to transferring files to external storage or cloud services, it’s a good idea to organize and manage your files. Delete unnecessary files, merge redundant folders, and ensure your files are properly labeled and organized. This will make it easier to locate specific files and maintain a well-structured storage system even after transferring files.
Transferring files to external storage or cloud services offers flexibility, scalability, and peace of mind by freeing up space on your SSD and ensuring the availability of your files. Whether you choose to use external devices, network storage, or cloud storage services, these solutions expand your storage options and provide a convenient way to manage your files efficiently.
Conclusion
Managing the storage usage on your SSD is essential for maintaining optimal performance and maximizing available space for your important files and applications. By utilizing the built-in tools and third-party software mentioned in this article, you can gain valuable insights into what is taking up space on your SSD and take appropriate actions to manage it efficiently.
Checking your storage usage using built-in tools provided by your operating system allows you to gather an overview of your SSD’s storage and identify areas that require attention. Features like Storage Sense on Windows, About This Mac on MacOS, Disk Usage Analyzer on Linux, and Android Storage settings on Android devices offer convenient ways to analyze your storage usage and gain insights into file categories and sizes.
Additionally, using third-party tools such as TreeSize, WinDirStat, DaisyDisk, and JDiskReport provides more advanced features and visualization options for in-depth analysis of your SSD’s storage. These tools help you identify large files, redundant data, and other areas that can be optimized to free up space.
Analyzing and managing large files and folders is a vital part of storage management. Sorting files by size, deleting unnecessary files and folders, compressing large files, and transferring files to external storage or cloud services are effective strategies for optimizing storage and reclaiming valuable space on your SSD.
By implementing these strategies and utilizing the tools available, you can efficiently manage your SSD’s storage usage, improve system performance, and ensure you have enough space for your important files and applications. Regularly monitoring and managing your storage will help you maintain a well-organized and optimized SSD, ultimately enhancing your overall computing experience.