Introduction
Is your SSD (Solid State Drive) running out of space? Running out of storage on your computer can be frustrating, especially if you’re constantly juggling files and struggling to find enough room for new software or media. Fortunately, there are several simple and effective ways to clear up space on your SSD and regain that much-needed storage.
In this article, we’ll explore various methods to free up space on your SSD. We’ll cover everything from deleting unnecessary files and folders to optimizing system settings. So, let’s dive in and discover how you can create more space on your SSD!
Before we dive into the specifics, it’s important to assess your existing storage space. Understanding how much space you have available and how much is already being used is crucial in determining the best approach to manage your storage. This way, you can make informed decisions about which files or applications to remove or transfer to external storage devices.
Once you’ve assessed your storage situation, you can start removing unnecessary files and folders. Deleting these unused files not only frees up space but also helps in organizing your SSD more effectively. Additionally, it’s a good practice to uninstall any applications that you no longer use to further reclaim precious storage space.
Another effective way to clear up space on your SSD is to remove cache and temporary files. These files are generated by various programs and applications and can accumulate over time, taking up valuable storage space. By clearing them regularly, you can free up a significant amount of storage.
Compressing files and folders is another strategy that can help you optimize your storage space. Compressed files take up less space without compromising the content. This is particularly useful for larger files such as videos or archived documents.
In recent years, the popularity of cloud storage services has soared. By utilizing cloud storage, you can store your files and data online, freeing up space on your SSD. This not only provides an additional backup but also allows you to access your files from anywhere, as long as you have an internet connection.
Furthermore, optimizing your system settings can contribute to freeing up space on your SSD. Adjusting settings such as virtual memory allocation and hibernation options can minimize the storage footprint of your system.
Lastly, it’s important to identify and delete duplicate files. Duplicate files can consume a considerable amount of storage space, resulting in unnecessary clutter. Advanced software tools can assist you in finding and removing these duplicates quickly and efficiently.
By implementing these strategies, you can effectively create more space on your SSD. So, let’s get started with the process of clearing out unnecessary clutter and ensuring that your SSD is optimized for storage!
Assessing your storage space
Before you begin clearing up space on your SSD, it is crucial to assess your current storage situation. Understanding how much space you have available and how much is already being used will help you determine the best approach to managing your storage.
To assess your storage space on a Windows computer, you can follow these steps:
- Open File Explorer by pressing the Windows key and E on your keyboard.
- In the left-hand sidebar, right-click on “This PC” or “My Computer” and select “Properties” from the dropdown menu.
- A new window will appear, displaying information about your computer. Look for the “Total size” and “Used space” sections to see the overall capacity of your SSD and how much space is currently occupied.
On a Mac, you can assess your storage space by following these steps:
- Click on the Apple menu in the top-left corner of your screen and select “About This Mac.”
- In the window that appears, click on the “Storage” tab.
- You will see a visualization of your storage space, including categories such as “Applications,” “Documents,” and “System.”
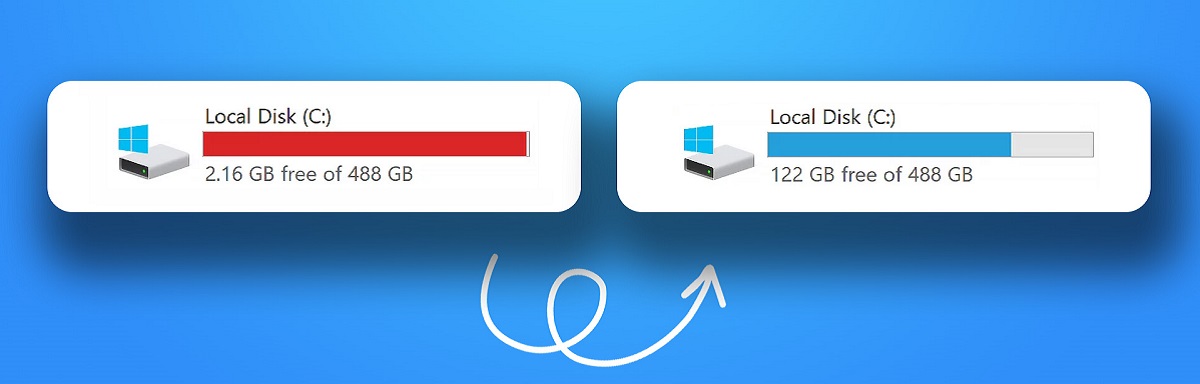
Once you have determined how much space you have available and how much is being used, you can strategize accordingly. It is recommended to keep at least 10-15% of your SSD space free for optimal performance.
If you find your SSD’s storage is nearly full, it’s important to identify where the majority of the space is being utilized. You can use built-in tools like “Disk Cleanup” on Windows or “Storage Management” on Mac to get a detailed breakdown of the files and folders taking up the most space.
By understanding your storage usage, you can make informed decisions about which files or applications to remove or transfer to external storage devices. This will enable you to clear up space on your SSD and ensure it is fully optimized for your needs.
Assessing your storage space is the first step in effectively managing your SSD’s storage. So, take the time to evaluate how much space you have and determine your best course of action moving forward.
Deleting unnecessary files and folders
One of the most effective ways to clear up space on your SSD is by deleting unnecessary files and folders. Over time, your computer can accumulate a lot of clutter, including old documents, downloads, and temporary files that you no longer need.
Here are some steps you can take to identify and delete unnecessary files and folders:
- Start by going through your Documents, Downloads, and Desktop folders. Sort the files by date or size and delete any files that you no longer need. Be sure to review each file before deleting to avoid accidentally removing something important.
- Check your browser’s downloads folder. Browsers often save files that you download, and if you forget to clean out this folder, it can quickly take up valuable storage space. Delete any files that you have already installed or no longer need.
- Empty the Recycle Bin (Windows) or Trash (Mac). When you delete files, they are often moved into the Recycle Bin or Trash rather than completely removed from your system. Emptying these bins will permanently delete the files and free up space on your SSD.
In addition to deleting files, it’s a good idea to remove unnecessary folders as well. Look for folders that are taking up significant space but contain files that you no longer need. Examples may include old projects, software installations, or system backups.
When deleting files or folders, be cautious not to remove anything important. It’s a good practice to create a backup of your important files before performing any deleting operations.
Regularly clearing out unnecessary files and folders not only frees up space on your SSD but also helps organize your data and improve system performance. By maintaining a clean and clutter-free system, you’ll have more storage space available for the files and applications you truly need.
Make it a habit to examine your computer regularly and delete any files and folders that are no longer necessary. This simple step can go a long way in ensuring that your SSD remains optimized and efficient.
Moving files to an external storage device
If you find that your SSD is running out of space, you can create more room by moving files to an external storage device. External storage devices, such as USB flash drives or external hard drives, provide a convenient solution for storing files that you don’t need immediate access to.
Here are some steps to help you move files to an external storage device:
- Connect your external storage device to your computer using the appropriate cable or port.
- Open File Explorer or Finder and navigate to the files or folders that you want to move.
- Select the files or folders by clicking and dragging your mouse cursor, or by holding the Ctrl (Windows) or Command (Mac) key while selecting multiple items.
- Right-click on the selected files or folders and choose “Cut” (Windows) or “Move to Trash” (Mac).
- Navigate to your external storage device in File Explorer or Finder.
- Right-click on an empty space in the device’s folder and choose “Paste” (Windows) or “Move” (Mac).
Alternatively, you can also drag and drop files directly from your computer to the external storage device.
When moving files to an external storage device, it’s a good practice to organize them in a logical manner. Create folders on the external device to categorize your files and make them easier to locate in the future.
By offloading less frequently accessed files, such as old photos, videos, or large documents, to an external storage device, you can free up space on your SSD while still having the option to access them whenever needed.
Remember to keep your external storage device in a safe place and consider creating backups of important files stored on the device. This ensures that your data remains protected and easily accessible.
Moving files to an external storage device is an effective way to clear up space on your SSD without permanently deleting files. By utilizing external storage, you can strike a balance between keeping essential files on your SSD while archiving less frequently accessed ones on external devices.
Uninstalling unused applications
If you’re running out of space on your SSD, one of the simplest and most effective ways to free up storage is by uninstalling unused applications. Over time, you may have installed various software that you no longer use or need, which can take up valuable space on your SSD.
Here are the steps to uninstall applications on both Windows and Mac:
Windows:
- Open the “Start” menu and navigate to “Settings.”
- Click on “Apps” or “Apps & features.”
- You will see a list of all the applications installed on your computer. Scroll through the list and identify the applications you want to uninstall.
- Click on the application and then click on the “Uninstall” button.
- Follow the on-screen prompts to complete the uninstallation process.
Mac:
- Open the “Finder” and navigate to the “Applications” folder.
- Scroll through the list of applications and find the ones you want to uninstall.
- Click and drag the application to the Trash Bin located in the Dock. Alternatively, you can right-click on the application and select “Move to Trash.”
- Once you’ve moved the application to the Trash, right-click on the Trash Bin and select “Empty Trash” to permanently delete the application.
When uninstalling applications, it’s essential to double-check that you’re removing the right programs and not any critical system files. Some applications may be necessary for your computer to function correctly, so exercise caution when deciding which applications to uninstall.
By regularly uninstalling unused applications, you can significantly free up space on your SSD and improve system performance. Take the time to assess which applications you no longer need and remove them to optimize your storage.
It’s important to note that some applications may leave behind residual files even after being uninstalled. In such cases, consider using a third-party uninstaller tool that can completely remove all associated files and registry entries to maximize the space reclaimed.
Uninstalling unused applications not only clears up space on your SSD but also helps streamline your computer’s performance. By removing unnecessary software, you’ll have a more efficient and clutter-free system, allowing you to utilize your valuable storage space for essentials.
Clearing cache and temporary files
If you want to free up valuable storage space on your SSD, it’s important to regularly clear out cache and temporary files. These files are generated by various programs and applications and can quickly accumulate, taking up significant space on your drive.
Here are the steps to clear cache and temporary files on both Windows and Mac:
Windows:
- Open the “Start” menu and type “Disk Cleanup” in the search bar.
- Select “Disk Cleanup” from the search results to launch the Disk Cleanup utility.
- Choose the drive you want to clean (usually the C: drive which represents your SSD).
- Click on “OK” to proceed.
- In the Disk Cleanup window, select the file types you want to delete, such as temporary files, cache files, and thumbnails.
- Click on “OK” and then choose “Delete Files” to confirm the deletion.
Mac:
- Open the “Finder” and click on the “Go” menu in the top menu bar.
- Hold down the “Option” key, and “Library” will appear in the drop-down menu. Click on “Library.”
- Navigate to the “Caches” folder and delete the contents inside.
- Go back to the “Library” folder and navigate to the “Logs” folder. Delete any unnecessary log files.
- Finally, go to the “Preferences” folder and remove any preferences associated with redundant or uninstalled applications.
Clearing cache and temporary files not only helps free up space on your SSD but can also improve system performance. By removing these files, you’ll be able to reclaim valuable storage and ensure your computer runs more efficiently.
In addition to using built-in methods, you can also utilize third-party software that is specifically designed to clean the cache and temporary files on your computer. These tools often offer more advanced features and the ability to perform a more thorough cleanup.
Make it a practice to regularly clear cache and temporary files on your SSD to prevent them from accumulating and taking up unnecessary space. By doing so, you’ll maintain a clean and optimized storage system, ensuring that your SSD has ample space for the files you truly need.
Compressing files and folders
When it comes to optimizing storage space on your SSD, one effective strategy is to compress files and folders. Compression reduces the size of files by creating a smaller version that still contains all the original data. This method can be particularly helpful for larger files, such as videos, archived documents, or folders with numerous files.
Here are the steps to compress files and folders:
- Locate the files or folders you want to compress on your computer.
- Right-click on the selected file or folder and choose “Send to” or “Compress” (Windows) or “Compress” (Mac).
- A compressed file will be created in the same location, typically with a .zip extension on Windows or .zip or .cpgz extension on Mac.
- If desired, you can rename the compressed file for easier identification.
While compressing files reduces their size, it’s important to note that accessing the content within the compressed file requires extracting or unzipping it. This process is straightforward – simply double-click on the compressed file, and it will be automatically uncompressed and accessible for use.
Compressing files and folders not only saves storage space on your SSD but also makes file sharing and transferring more convenient. Compressed files are easier to upload, download, and send via email or other methods.
Keep in mind that not all file types can be significantly compressed since they may already be highly compressed. For example, image files in formats like JPEG or PNG are already optimized, so compressing them won’t result in significant space savings. However, files like text documents, spreadsheets, or presentations can often be compressed without any loss in quality.
Before compressing files and folders, it’s always a good idea to create a backup of your important files, just to be safe. This ensures that you have a secondary copy in case anything goes wrong during the compression process.
By utilizing compression techniques, you can optimize your storage space on the SSD and accommodate more files while maintaining the ability to access and use them efficiently.
Utilizing cloud storage
Running out of space on your SSD can be solved by utilizing cloud storage. Cloud storage services allow you to store files and data online, freeing up space on your SSD while providing convenient access to your files from anywhere with an internet connection.
Here are the steps to utilize cloud storage:
- Choose a cloud storage provider that suits your needs. Popular options include Dropbox, Google Drive, Microsoft OneDrive, and iCloud.
- Create an account with the chosen provider and follow the setup instructions.
- Install the cloud storage application on your computer or use the online portal provided by the service.
- Once connected, you can upload files and folders to your cloud storage by dragging and dropping or using the upload button.
- Organize your files into folders within your cloud storage for easy accessibility and organization.
- Files stored in the cloud can be accessed from any device with internet access, be it a computer, smartphone, or tablet.
Cloud storage offers several advantages. Firstly, it provides an additional backup for your files, protecting them from hardware failure or theft. If anything happens to your SSD or computer, your files are safely stored in the cloud.
Additionally, cloud storage allows for easy file sharing. You can share files or folders with others by generating shareable links or inviting collaborators directly. This makes it simple to collaborate on projects or share large files without worrying about email attachment limitations.
Cloud storage services typically offer a certain amount of free storage, with options to upgrade for more space if needed. You can choose a storage plan based on your requirements and budget.
Keep in mind that while cloud storage provides flexibility and convenience, it does rely on an internet connection for access. Ensure you have a reliable internet connection when working with cloud-stored files.
It’s important to maintain the security of your cloud storage account. Use strong, unique passwords and enable two-factor authentication for added protection. Be mindful of the privacy settings when sharing files and limit access to sensitive information.
By utilizing cloud storage, you can free up space on your SSD and have the flexibility to access your files from anywhere. This solution not only provides additional backup but also streamlines your storage management and ensures your important files are easily accessible at any time.
Optimizing system settings
Optimizing system settings can play a significant role in clearing up space on your SSD and improving overall performance. By adjusting certain settings, you can minimize the storage footprint of your system and utilize your SSD more efficiently.
Here are some key system settings to consider optimizing:
- Virtual memory: Virtual memory, also known as the page file, is a space on your SSD that the computer uses when it runs out of physical RAM. By default, Windows automatically manages virtual memory. However, you can manually adjust the virtual memory settings to optimize SSD space. To do this, go to the Advanced System Settings in Windows, click on Performance Settings, navigate to the Advanced tab, and click on “Change” in the Virtual Memory section. Select “Custom size” and set a specific Initial and Maximum size that suits your needs.
- Hibernation: Hibernation is a feature that saves the current system state to the hard drive when your computer goes into a deep sleep mode. This can take up a significant amount of space on your SSD. Disabling hibernation can free up several gigabytes of storage. In Windows, you can disable hibernation by opening Command Prompt as an administrator and entering the command “powercfg /hibernate off”.
- System Restore: System Restore points are snapshots of your computer’s settings and system files. They can take up considerable space on your SSD. You can adjust the amount of space allocated for System Restore or disable it altogether. To do this, right-click on “This PC” or “My Computer”, select “Properties”, click on “System Protection”, and adjust the settings for the available drives.
- Temporary internet files: Your web browser stores temporary internet files, such as cached images and website data, to improve browsing speed. However, these files can accumulate over time and take up space. You can regularly clear these files in your browser settings or by using disk cleanup tools.
- Temporary files: Your operating system generates temporary files during normal operation. These files can accumulate and waste valuable storage space. Disk cleanup tools, such as the built-in Disk Cleanup utility on Windows, can help remove these temporary files and recover space on your SSD.
By optimizing these system settings, you can reclaim storage space on your SSD and ensure that your system operates efficiently. However, it’s important to exercise caution when adjusting system settings and make backups of your important files before making any changes.
Regularly assessing and adjusting system settings can have a significant impact on the performance and storage optimization of your SSD. Take the time to review these settings periodically and customize them according to your needs.
Deleting duplicate files
Duplicate files can take up a significant amount of storage space on your SSD, leading to unnecessary clutter and reduced storage optimization. Deleting duplicate files is an effective way to free up space and ensure that your SSD is used efficiently.
Here are some steps to help you identify and delete duplicate files:
- Start by organizing your files and folders. This will make it easier to identify duplicates. Ensure that your files are stored in well-organized directories and subdirectories.
- Use built-in search functions within your operating system to search for duplicate files. For example, on Windows, you can use the search bar in File Explorer and specify the file type, name, or size to find potential duplicates. On Mac, you can use the “Find” function in Finder with similar search criteria.
- Consider using third-party duplicate file finder software. There are many reliable applications available that can scan your SSD and identify duplicate files based on various criteria like file name, size, and content. Some popular options include CCleaner (Windows), Gemini 2 (Mac), and Duplicate Cleaner (Windows and Mac).
- Once you’ve identified the duplicate files, carefully review them. Be cautious not to delete any files that are essential and may have different versions or are required by specific applications.
- Select the duplicate files that you want to remove and delete them. You can either select them manually or use the built-in functionalities of the duplicate file finder software to delete duplicates.
Deleting duplicate files not only helps to free up storage space on your SSD but can also improve system performance by reducing unnecessary file clutter. Moreover, it promotes a clutter-free file organization, allowing for better file retrieval and management.
It’s important to note that regularly performing duplicate file cleanups can help prevent duplicates from accumulating over time. You may also want to consider implementing organized file-naming conventions and maintaining a streamlined folder structure to minimize the chances of file duplication in the future.
Take the time to periodically scan and remove duplicate files from your SSD. By doing so, you’ll maximize your available storage space, improve system performance, and maintain a clean and organized digital environment.
Conclusion
Managing storage space on your SSD is crucial for maintaining optimal performance and ensuring you have enough room for your files and applications. By implementing the strategies discussed in this article, you can effectively clear up space on your SSD and maximize its storage capacity.
First, assess your storage space to understand how much is available and how much is being used. This will help you determine the best approach for managing your storage.
Next, delete unnecessary files and folders to free up space and organize your data effectively. Uninstalling unused applications is another effective way to reclaim storage space on your SSD.
Clearing cache and temporary files helps to remove unnecessary clutter and recover valuable storage space. Additionally, compressing files and folders can significantly reduce their size while still maintaining their content.
Utilizing cloud storage offers a convenient solution to store files online and free up space on your SSD. It also provides an additional backup and allows for easy access to files from anywhere.
Optimizing system settings, such as virtual memory allocation and hibernation options, can help minimize the storage footprint and improve the efficiency of your SSD.
Lastly, removing duplicate files ensures that you have a clutter-free storage environment and maximizes available space on your SSD.
By incorporating these strategies into your storage management routine, you can keep your SSD optimized and ensure that you have ample space for the files and applications that matter most.