Introduction
Welcome to this guide on how to find the MAC address on an ASUS Ultrabook. If you’re unfamiliar with what a MAC address is or why you need to find it, don’t worry – we’ll cover all the basics here.
A MAC address, which stands for Media Access Control address, is a unique identifier assigned to the network interface of a device. Every network-enabled device, including computers, smartphones, and printers, has its own MAC address. It consists of a series of alphanumeric characters, usually formatted as six pairs of two digits and/or letters separated by colons or dashes. For example, 00:1A:2B:3C:4D:5E.
Now, you might be wondering why you would need to find the MAC address on an ASUS Ultrabook. Well, there are a few reasons why this might be necessary:
- Network Troubleshooting: If you’re experiencing connectivity issues with your Ultrabook, providing the MAC address to your network administrator can help identify and resolve the problem.
- Network Access Control: Some networks, particularly in an enterprise or public setting, require registration of MAC addresses for security purposes. Knowing your Ultrabook’s MAC address ensures that you can connect to these networks.
- Device Identification: In a network with multiple devices, such as a shared office or home network, finding the MAC address can help you distinguish your Ultrabook from other devices.
Now that you understand the importance of finding the MAC address on your ASUS Ultrabook, let’s dive into the various methods you can use to retrieve this information.
What is a MAC Address?
A MAC address, short for Media Access Control address, is a unique identifier assigned to the network interface of a device. It is a combination of numbers and letters, usually displayed in the format of six pairs of two digits or characters, separated by colons or dashes. For example, 00:1A:2B:3C:4D:5E.
The purpose of a MAC address is to provide a globally unique identifier for each network-enabled device. This means that no two devices should have the same MAC address. It is important to note that a MAC address is assigned by the manufacturer and cannot be changed by the user.
When devices communicate with each other on a local area network (LAN), they use the MAC address to identify the source and destination of the data packets being transmitted. This helps ensure that the data reaches the intended recipient and that devices on the network can communicate effectively.
The MAC address is different from an IP address, which is used for routing data across different networks. While an IP address can change depending on the network a device is connected to, the MAC address remains constant.
MAC addresses are typically associated with the device’s network interface card (NIC) or wireless interface. These interfaces can be found in devices such as computers, smartphones, tablets, routers, and printers.
Overall, the MAC address plays a crucial role in network communication by uniquely identifying each device on a network. It ensures efficient and effective data transmission, allowing devices to connect and communicate seamlessly.
Why do you need to find the MAC Address on an ASUS Ultrabook?
There are several reasons why you might need to find the MAC address on your ASUS Ultrabook. Let’s explore some of the key reasons below:
- Network Troubleshooting: If you’re experiencing connectivity issues with your Ultrabook, knowing the MAC address can be helpful for troubleshooting purposes. Network administrators can use this information to identify and diagnose any problems that may be affecting your device’s connection to the network.
- Network Access Control: In certain network environments, like enterprise or public networks, MAC address filtering may be implemented as a security measure. By registering the MAC address of your Ultrabook with the network administrator, you can ensure that your device is granted permission to connect to the network. So, finding the MAC address is essential in these cases to gain network access.
- Device Identification: If you’re in a network with multiple devices, such as an office or a shared home network, having the MAC address of your ASUS Ultrabook can help you differentiate it from other devices. This is particularly useful when managing network resources, assigning security privileges, or troubleshooting any conflicts that may arise.
- MAC Address Cloning: In some situations, you might want to clone the MAC address from your Ultrabook to another device. This can be necessary when setting up a new network device like a router or when replacing a device that used the same MAC address.
- Device Registration: Some internet service providers (ISPs) require the MAC address of your Ultrabook to register your device on their network. By providing this information, they can ensure that only authorized devices have access to their services.
In summary, finding the MAC address on your ASUS Ultrabook is crucial for network troubleshooting, network access control, device identification, MAC address cloning, and device registration purposes. It enables network administrators and service providers to manage and secure network connections effectively. Plus, having this information on hand can help you resolve any connectivity issues and stay connected to the networks you need.
Method 1: Using Command Prompt
One of the ways to find the MAC address on your ASUS Ultrabook is by using the Command Prompt utility. Follow the step-by-step instructions below to retrieve the MAC address:
- Press the Windows key + R on your keyboard to open the Run dialog box.
- Type “cmd” and press Enter. This will open the Command Prompt.
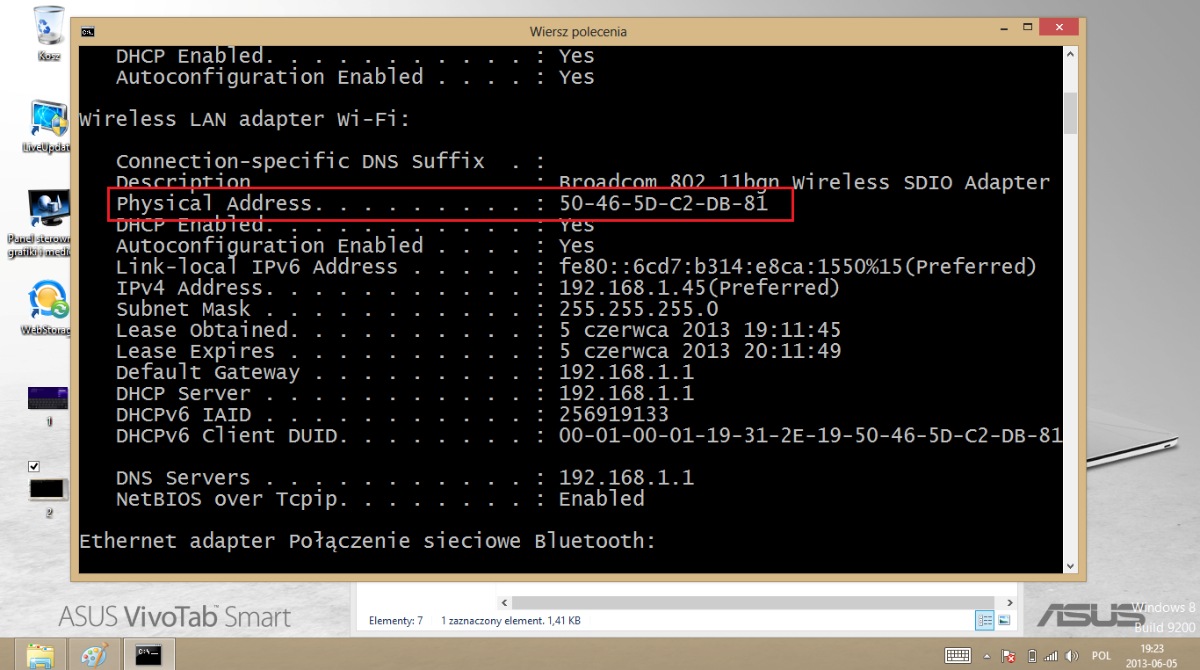
- In the Command Prompt window, type “ipconfig /all” and press Enter.
- A list of information will be displayed. Look for the network adapter you wish to find the MAC address for. You will see a line labeled “Physical Address” or “MAC Address” followed by a series of alphanumeric characters. This is the MAC address of your Ultrabook.
- You can either take note of the MAC address or copy it to your clipboard for future reference.
- Close the Command Prompt window once you have obtained the MAC address.
Using the Command Prompt is a straightforward method to quickly find the MAC address on your ASUS Ultrabook. It provides you with the necessary information without the need for any additional software or settings.
Note that the specific labels used in the Command Prompt may vary slightly depending on your version of Windows. However, the “Physical Address” or “MAC Address” line will always indicate the MAC address of your Ultrabook’s network adapter.
Now that you’ve successfully retrieved the MAC address using the Command Prompt, you can proceed with any necessary network troubleshooting, device registration, or network access control processes.
Method 2: Using Network and Sharing Center
Another method to find the MAC address on your ASUS Ultrabook is by using the Network and Sharing Center feature in Windows. Follow the steps below to locate the MAC address using this method:
- Click on the network icon in the system tray, typically located in the bottom-right corner of the screen. This will open the network menu.
- Click on “Open Network & Internet settings” or “Network & Internet settings.”
- In the Network & Internet settings window, click on “Status.”
- Scroll down and click on “Network and Sharing Center.”
- In the Network and Sharing Center window, locate the active network connection. This is typically indicated by a connection name such as “Wi-Fi” if you’re using a wireless network.
- Click on the name of your active network connection.
- In the new window that opens, click on the “Details” button.
- A window will appear displaying various details about your network connection. Look for the “Physical Address” or “MAC Address” field, which will show the MAC address of your Ultrabook’s network adapter.
- Note down the MAC address or copy it to your clipboard for future reference.
- Close all open windows once you have obtained the MAC address.
Using the Network and Sharing Center provides a user-friendly interface to quickly find the MAC address on your ASUS Ultrabook. This method is especially helpful if you prefer a visual approach rather than using the Command Prompt.
Remember that the labels may vary slightly depending on your version of Windows. However, the “Physical Address” or “MAC Address” field will always indicate the MAC address of your Ultrabook’s network adapter.
With the MAC address now retrieved using the Network and Sharing Center, you can proceed with network troubleshooting, device registration, or network access control tasks as needed.
Method 3: Using Device Manager
If you prefer a method that involves the Device Manager utility in Windows, you can also find the MAC address on your ASUS Ultrabook using this approach. Follow the steps below to locate the MAC address:
- Right-click on the Start button or press the Windows key + X on your keyboard to open the WinX menu.
- From the menu, select “Device Manager” to launch the Device Manager.
- In the Device Manager window, expand the “Network Adapters” category by clicking on the arrow icon next to it.
- You will see a list of network adapters installed on your Ultrabook. Look for the network adapter you want to find the MAC address for.
- Right-click on the network adapter and select “Properties” from the context menu.
- A new window will appear showing the properties of the selected network adapter.
- In the properties window, navigate to the “Advanced” tab.
- Locate and select the property named “Network Address,” “Locally Administered Address,” or something similar.
- In the “Value” or “Setting” field, you will find the MAC address of your Ultrabook’s network adapter.
- Take note of the MAC address or copy it to your clipboard for future reference.
- Close all open windows once you have obtained the MAC address.
The Device Manager method provides a detailed view of the network adapters installed on your ASUS Ultrabook. By accessing the properties of a specific adapter, you can easily retrieve the MAC address associated with it.
Please note that the labels and available options in Device Manager may vary slightly depending on your version of Windows. However, you will always be able to locate the MAC address by looking for properties related to network addresses or administration.
Now that you have successfully obtained the MAC address using the Device Manager, you can proceed with any necessary network troubleshooting, device registration, or network access control procedures.
Conclusion
Discovering the MAC address on your ASUS Ultrabook is a straightforward process that can be accomplished through different methods. By knowing your device’s MAC address, you can troubleshoot network issues, register your device on specific networks, and differentiate it from other devices on a shared network.
In this guide, we covered three methods to find the MAC address:
- Using Command Prompt: This method involves using the Command Prompt utility to retrieve the MAC address by running the “ipconfig /all” command.
- Using Network and Sharing Center: The Network and Sharing Center feature in Windows provides an intuitive interface to locate the MAC address by accessing the network connection details.
- Using Device Manager: By navigating to the Device Manager, you can find the MAC address by accessing the properties of the network adapter.
Each method has its own benefits and may be more suitable depending on your preferences or familiarity with the tools involved.
Regardless of the method you choose, finding the MAC address on your ASUS Ultrabook is a valuable skill that can empower you to troubleshoot network issues, connect to secure networks, and manage devices on shared networks effectively.
We hope this guide has provided you with the necessary knowledge to locate the MAC address on your ASUS Ultrabook. Now, you can confidently navigate network settings and solve any connectivity challenges that may arise.