Introduction
Video has become one of the most powerful and engaging forms of content in today’s digital world. Whether you’re a marketer, a business owner, or simply someone who wants to connect with others, incorporating videos into your email marketing strategy can make a significant impact. In this article, we will explore the concept of embedding videos into emails and guide you through the process of doing so effectively.
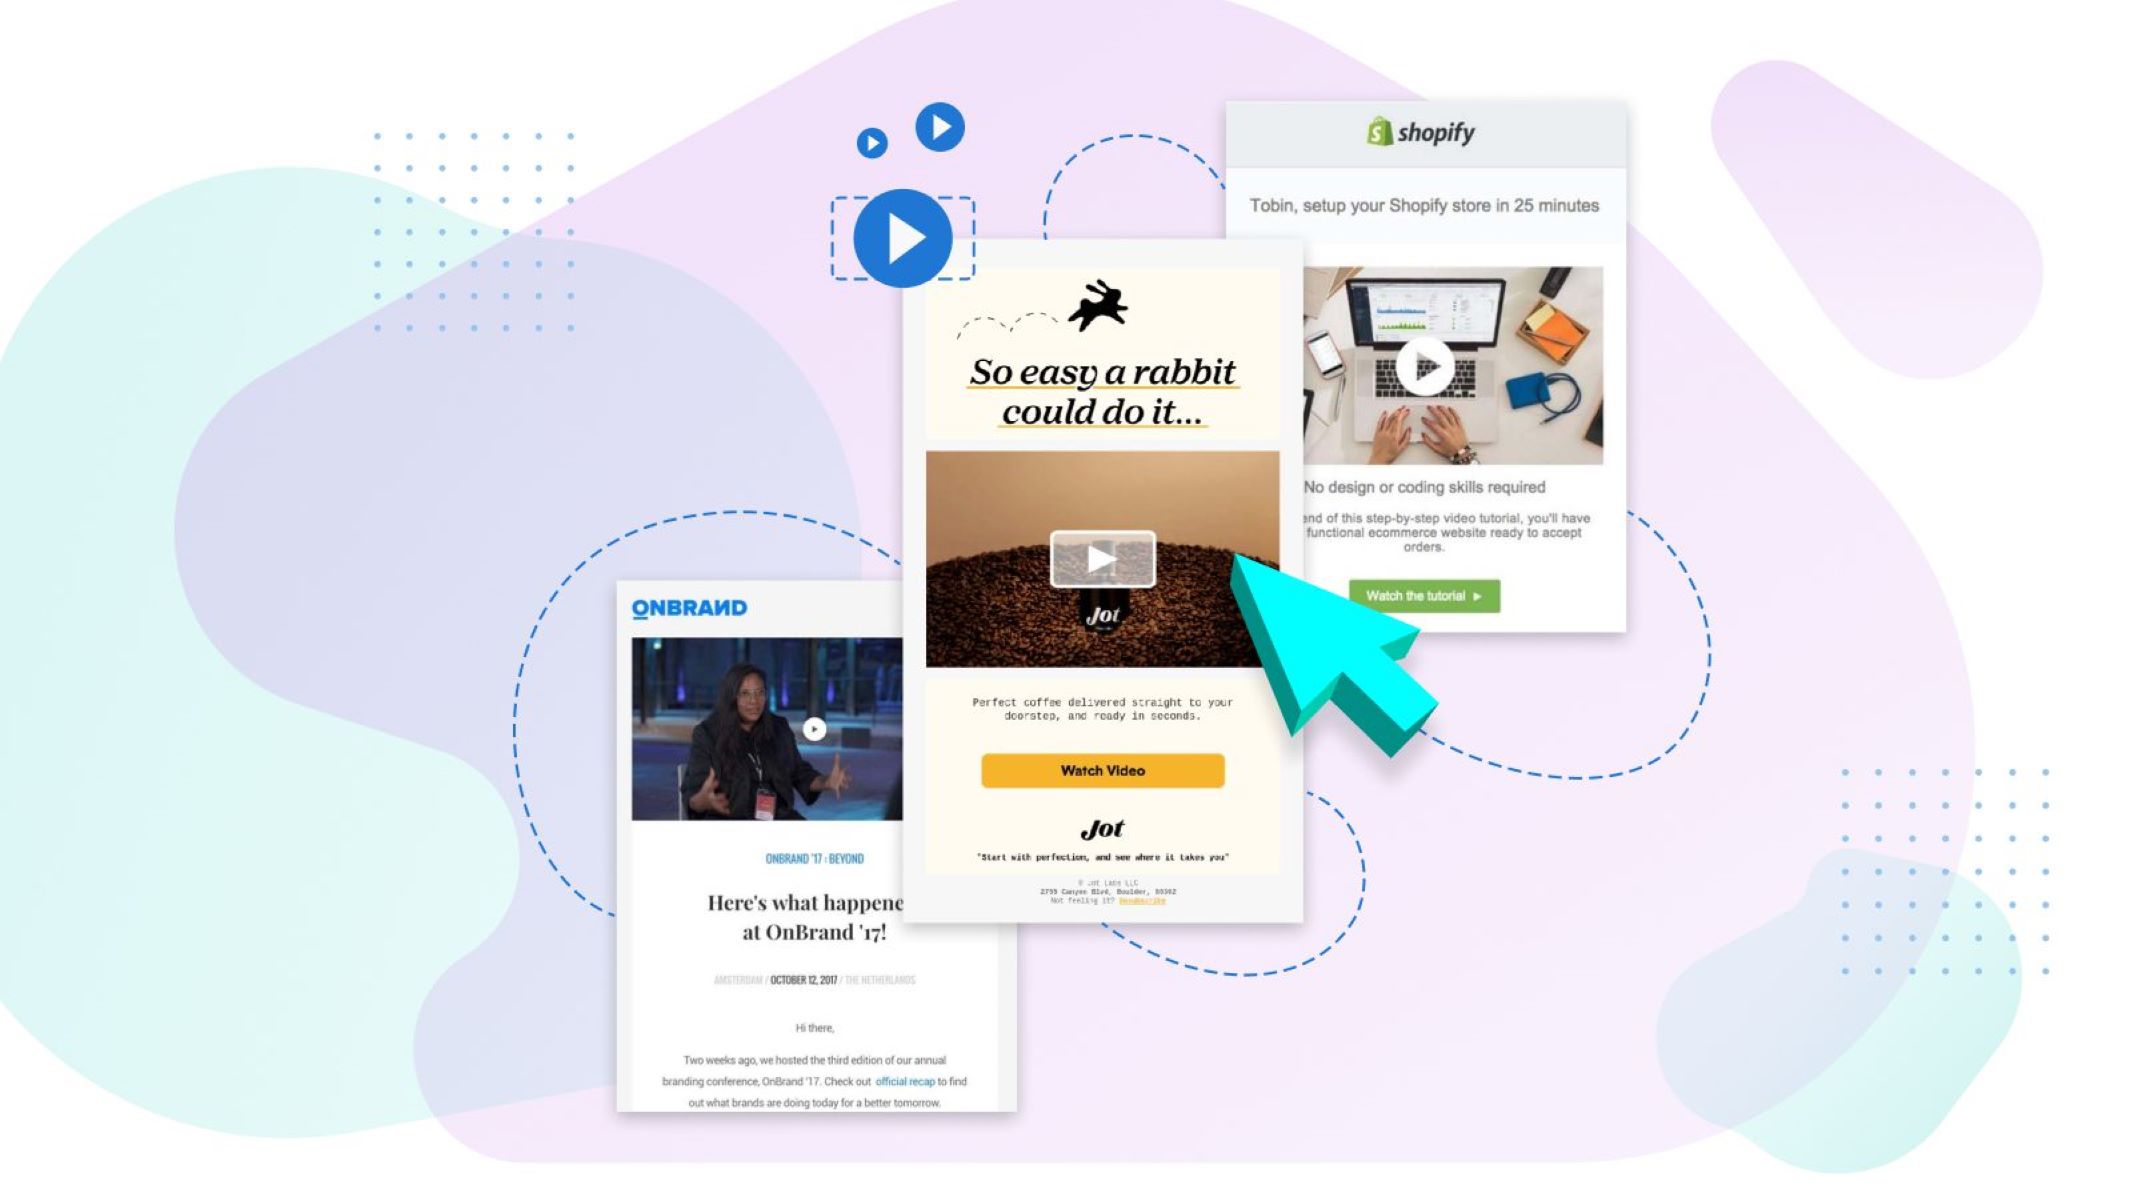
So, what exactly is video email? It refers to the practice of including videos directly within the body of an email. Instead of attaching a video file, you can embed it, allowing recipients to watch the video without leaving their inbox. This approach offers a seamless and interactive experience, capturing the viewer’s attention and increasing engagement.
Now, you might be wondering why you should bother with video email when you can simply include a link to a video. Well, there are several compelling reasons to consider:
- Increased engagement: Videos have the power to grab viewers’ attention and evoke emotions like no other form of content. By incorporating videos into your emails, you can captivate your audience and encourage them to take action.
- Better storytelling: Videos allow you to convey your message in a visually compelling way. You can tell stories, showcase products or services, or provide tutorials in a more engaging and memorable manner.
- Improved click-through rates: Including a video in your email can significantly increase click-through rates. According to research, emails with videos have a higher likelihood of being opened and clicked compared to those without.
- Enhanced brand awareness: Videos offer a unique opportunity to showcase your brand’s personality, values, and style. By consistently incorporating videos into your emails, you can reinforce your brand’s identity and create a memorable impression.
- Greater accessibility: Videos provide a way to communicate visually, making your messages more accessible to a broader audience. People who prefer watching rather than reading can still engage with your content.
Now that you understand the benefits of embedding videos in emails, let’s dive into the step-by-step process of how to do it successfully.
What is video email?
Video email is the practice of incorporating videos directly within the body of an email. Rather than attaching a video file or simply including a link, you can embed the video itself, allowing recipients to watch it without leaving their inbox. This approach offers a more engaging and interactive experience, capturing the viewer’s attention and increasing the chances of them taking action.
Video email can take various forms, depending on your goals and the content you want to share. It can be a promotional video showcasing your products or services, a tutorial demonstrating how to use a specific feature, or even a personalized message from your team. The possibilities are endless.
One important consideration when using video email is deliverability. While many email clients and platforms support embedded videos, some may not display them correctly, resulting in broken links or missing content. To ensure the best possible experience for your recipients, it’s essential to choose a reliable video hosting platform that offers video email integration and provides a fallback image or link for clients that don’t support embedded videos.
Another factor to consider is the size of the video. Large video files can increase the loading time of the email and cause deliverability issues. It’s recommended to compress your videos before uploading them to a hosting platform to reduce their file size without compromising quality.
Furthermore, it’s important to keep in mind that not all recipients may have the same internet connection speed, so optimizing your videos for different bandwidths is crucial. This can be achieved by offering multiple video quality options or providing a transcript or summary of the video content for those who may prefer to read instead.
Overall, video email is a powerful tool for enhancing your email marketing strategy. It allows you to communicate your message in a more engaging, memorable, and accessible way. By leveraging the benefits of video content, you can captivate your audience, increase engagement, and drive your desired actions.
Why should you embed videos in emails?
Incorporating videos into your email marketing strategy can have a significant impact on the success of your campaigns. Here are several compelling reasons why you should consider embedding videos in your emails:
- Increased engagement: Videos have the power to grab viewers’ attention and evoke emotions like no other form of content. By including videos in your emails, you can instantly captivate your audience and encourage them to take action. Engaged viewers are more likely to click on links, visit your website, or make a purchase.
- Better storytelling: Videos allow you to tell stories in a visually compelling way. Whether you want to showcase your brand’s journey, demonstrate the benefits of your products, or share customer success stories, video can convey your message in a more engaging and memorable manner. Using a combination of visuals, audio, and storytelling techniques, you can create a powerful narrative that resonates with your audience.
- Improved click-through rates: Including a video in your email can significantly increase click-through rates. According to research, emails with videos have a higher likelihood of being opened and clicked compared to those without. Video thumbnails or GIF previews can grab attention and entice readers to click on the video to watch more.
- Enhanced brand awareness: Videos offer a unique opportunity to showcase your brand’s personality, values, and style. By consistently including videos in your emails, you can reinforce your brand’s identity and create a memorable impression on your audience. They will associate your brand with the emotions and experiences portrayed in your videos.
- Greater accessibility: Videos provide a way to communicate visually, making your messages more accessible to a broader audience. People who prefer watching rather than reading can still engage with your content. Additionally, videos can include closed captions or transcripts, ensuring that individuals with hearing impairments can still understand your message. Making your emails more inclusive and accessible reflects positively on your brand’s values.
By incorporating videos into your email marketing strategy, you can take your campaigns to the next level. Videos captivate, educate, and inspire your audience, leading to increased engagement, better click-through rates, and improved brand recognition. Whether you’re aiming to promote a new product, share industry insights, or simply connect with your subscribers on a deeper level, video email can be a powerful tool in achieving your marketing goals.
How to embed a video into an email
Embedding a video into an email may seem like a complex task, but with the right approach, it can be relatively straightforward. Follow these steps to successfully embed a video in your email:
- Choose a video hosting platform: Start by selecting a reliable video hosting platform that supports embedding videos in email. Popular options include YouTube, Vimeo, Wistia, and Vidyard. Ensure that the platform offers the necessary embedding options and provides a fallback image or link for email clients that don’t support embedded videos.
- Upload your video to the hosting platform: Once you’ve chosen a hosting platform, upload your video to the platform’s server. Make sure to follow any guidelines provided by the platform regarding video formats, sizes, and quality.
- Generate an embed code for your video: After your video is uploaded, generate an embed code provided by the hosting platform. This code will allow you to insert the video into your email.
- Open your email editor: Access your email marketing platform or email editor of choice. Create a new email or open an existing one to begin the embedding process.
- Insert the embed code into your email: In the email editor, locate the section where you want to place the video. Depending on the editor, you may have the option to directly insert HTML code or use a video embedding feature. Paste the embed code you generated from the hosting platform into the appropriate section.
- Customize and preview the video: Once the embed code is in place, you can customize the appearance and settings of the video within the email editor. This may include options such as video size, autoplay, loop, and thumbnail image. Take the time to preview the video within the email editor to ensure it looks and functions as intended.
- Send your video email: Once you’re satisfied with the video placement and customization, it’s time to send your email. Address it to your desired recipients, include a compelling subject line, and any necessary text or call-to-action alongside the video.
Remember to test the email across different email clients and devices to ensure that the embedded video displays correctly and functions as expected. This will help you identify and address any potential compatibility issues before sending the email to your entire subscriber list.
By following these steps, you can successfully embed a video into your email and take advantage of the powerful and engaging medium of video to captivate your audience and boost your email marketing efforts.
Step 1: Choose a video hosting platform
When embedding a video into your email, the first step is to select a reliable video hosting platform. This platform will host your video file and provide you with the necessary embed code to insert into your email. Consider the following factors when choosing a video hosting platform:
- Embedding compatibility: Ensure that the platform supports embedding videos in emails. Some hosting platforms offer specific features or integrations designed for video email embeds. Look for platforms that provide a fallback image or link for email clients that don’t support embedded videos, ensuring a consistent viewing experience for all recipients.
- Video quality and size: Check if the hosting platform allows you to upload videos in the desired quality without compromising on file size. Compressing your videos before uploading them can help reduce loading times and improve deliverability.
- Customization options: Consider whether the platform offers customization options for your embedded video. This can include specifying the video player size, choosing autoplay settings, adding captions, or selecting a thumbnail image. The ability to tailor the appearance and functionality of your embedded video can enhance the overall user experience.
- Analytics and tracking: Look for platforms that provide detailed analytics and tracking capabilities. This allows you to measure the performance of your video email campaigns and gain insights into viewer engagement. Metrics such as play rate, click-through rate, and watch time can help you refine your future video content and optimize your email strategy.
- Integration with email marketing software: If you use an email marketing platform, check if the video hosting platform integrates smoothly with your email software. This integration can streamline the embedding process and provide additional features, such as video thumbnail selection or video-specific email templates.
- Platform reputation and reliability: Research the reputation and reliability of the video hosting platform. Look for reviews, testimonials, and case studies from other users to ensure that the platform can meet your needs effectively.
Popular video hosting platforms that support video email embeds include YouTube, Vimeo, Wistia, and Vidyard. Each platform has its own unique features and pricing plans, so take the time to evaluate and choose the one that aligns best with your specific requirements.
Consider your budget, goals, and the technical capabilities of the hosting platform when making your decision. Remember that a reliable and feature-rich video hosting platform can significantly enhance the effectiveness of your video email campaigns and boost audience engagement.
Step 2: Upload your video to the hosting platform
Once you have chosen a video hosting platform for embedding your video into an email, the next step is to upload your video file to the platform’s server. Here’s how to upload your video:
- Sign in to your chosen video hosting platform: Access your account by signing in to the video hosting platform. If you don’t have an account, create one by following the platform’s registration process.
- Locate the upload option: Once you’re signed in, navigate to the upload section of the platform. This is usually accessible from the platform’s main dashboard or menu.
- Select your video file: Choose the video file you want to upload from your computer or storage device. Make sure your video file meets the platform’s specifications regarding format, size, and length.
- Start the upload process: Initiate the upload process by clicking on the appropriate button or option provided by the hosting platform. The time required to upload your video will depend on the file size and your internet connection speed.
- Monitor the upload progress: While your video is uploading, the hosting platform will display the progress. You may see a progress bar, percentage, or other indicator showing how much of the upload is completed.
- Wait for the upload to complete: Once the upload is finished, the hosting platform will notify you that your video is ready for use. You can now proceed to the next steps in the embedding process.
- Manage your uploaded videos: Explore the hosting platform’s features for managing your uploaded videos. This may include options to organize videos into folders, add descriptions or tags, and set privacy or accessibility settings.
It’s important to note that different hosting platforms may have slightly different upload processes and options. Some platforms may offer advanced features, such as video optimization, thumbnail selection, or editing tools. Take the time to explore the platform’s documentation or support resources if you need assistance with the upload process or additional functionality.
By successfully uploading your video to the hosting platform, you’ve now completed an essential step in embedding your video into an email. Now, let’s move on to the next steps to generate the embed code and integrate it into your email.
Step 3: Generate an embed code for your video
After uploading your video to the chosen hosting platform, the next step in embedding a video into your email is to generate an embed code. This code will allow you to insert the video into your email seamlessly. Follow these steps to generate the embed code:
- Access your video on the hosting platform: Sign in to your account on the video hosting platform and locate the video you uploaded. Navigate to the video’s page or dashboard, where you can manage its settings and information.
- Look for the embed code option: On the video’s page, search for the embed code option or a similar feature. Hosting platforms typically provide an embed code specifically designed to be inserted into websites, emails, or other content.
- Generate the embed code: Click on the embed code option to generate the code for your video. The platform will usually provide a pre-generated code that you can copy to your clipboard.
- Customize the embed code settings (optional): Depending on the hosting platform, you may have the option to customize certain settings of the embed code. This can include adjusting the video player size, enabling autoplay, or specifying the video’s start and end time. Take advantage of these options to tailor the video appearance and functionality within your email.
- Copy the embed code: Once you’ve customized the embed code settings (if applicable), copy the entire embed code provided by the hosting platform. You can usually do this by right-clicking on the code and selecting “Copy” or by using the copy button or shortcut provided by the platform.
When copying the embed code, ensure that you get the entire code, including any necessary HTML tags. Missing or incomplete code can lead to issues when embedding the video into your email.
Remember that each hosting platform may have a slightly different process for generating the embed code. Some platforms may offer additional customization options, such as choosing a specific player skin or including subtitles. Familiarize yourself with the specific features and options of your chosen hosting platform to make the most of your video embeds.
With the embed code generated and copied, you’re now ready to proceed to the next step: opening your email editor and inserting the code into your email.
Step 4: Open your email editor
With the video uploaded and the embed code generated, the next step in embedding a video into your email is to open your email editor. The email editor is the platform or software you use to create and design your emails. This could be an email marketing platform, a web-based email editor, or a locally installed email client. Follow these steps to open your email editor:
- Access your email marketing platform or email editor: Sign in to your email marketing platform or open your preferred email editor program. If you’re using an email marketing platform, navigate to the section where you can create or edit emails.
- Create a new email or open an existing email: In the email editor, you have the option to create a new email from scratch or open an existing email template that you want to modify. Choose the appropriate option based on your requirements.
- Locate the section where you want to insert the video: Determine the placement of the video within your email. This can be anywhere within the body of the email, depending on your email design and content structure. Keep in mind that the placement should be visually appealing and relevant to the surrounding content.
- Access the HTML editor or video embedding feature: In the email editor, find the option to insert the HTML code or the video embedding feature. The specific location of this option will vary depending on the email editor you’re using. Look for buttons, icons, or menus related to inserting or editing HTML code or embedding multimedia content.
- Paste the embed code into the email editor: Once you’ve accessed the HTML editor or video embedding feature, paste the embed code you generated from the video hosting platform into the appropriate section. Depending on the email editor, you may need to switch to the HTML editing mode to insert the code.
Be careful not to modify or delete any other existing HTML code in the email editor while inserting the video embed code. Changes to the HTML structure could affect the overall email layout and functionality.
Remember that different email editors may have varying degrees of support for embedded videos. Some editors may provide a more streamlined integration, allowing you to directly select the video hosting platform and paste the embed code with minimal manual modifications. Others may require additional adjustments or HTML coding to ensure proper video rendering.
With the video embed code successfully inserted into your email editor, you can now move on to the next step: customizing and previewing the video within the email.
Step 5: Insert the embed code into your email
After opening your email editor, the next step in embedding a video into your email is to insert the embed code you generated into the appropriate section of your email. Follow these steps to insert the embed code:
- Locate the section where you want to insert the video: Determine the position within your email where you want the video to appear. This could be in the main body of the email or within a specific section or layout.
- Access the HTML editing mode: In your email editor, find the option to switch to the HTML editing mode or insert custom HTML code. This mode allows you to directly manipulate the email’s HTML structure.
- Paste the embed code: Once in the HTML editing mode, identify the appropriate location within the HTML code where you want to insert the video. This will typically be within the `` tags or within a designated content block. Paste the embed code into the desired location.
- Preview the video: After inserting the embed code, switch back from HTML editing mode to the visual editing mode or preview mode within your email editor. This allows you to see how the video will appear to your recipients.
- Adjust the video’s position or size (if necessary): If the video is not positioned or sized as desired, you may need to modify the surrounding HTML code or apply CSS styling to achieve the desired appearance. Ensure that the video fits seamlessly within the email’s layout and matches the overall design.
- Test the video’s functionality: Once you are satisfied with the video’s placement and appearance, test its functionality within the email editor. Verify that the video plays correctly, and any additional features, such as autoplay or looping, behave as intended.
Remember that some email editors may have limitations or compatibility issues with embedded videos. It’s crucial to test the email across different email clients and devices to ensure that the video displays and functions properly. This will help you identify and address any issues before sending the email to your recipients.
By successfully inserting the embed code into your email, you have accomplished a crucial step in embedding a video. Now, let’s move on to the next step: customizing and previewing the video to ensure it enhances your email’s visual appeal and engages your recipients effectively.
Step 6: Customize and preview the video
After inserting the embed code for your video into your email, the next step is to customize the video’s appearance and preview how it will look to your recipients. Follow these steps to customize and preview the video:
- Access the video settings: In your email editor, locate the options or settings related to the embedded video. This could include options for video size, autoplay settings, loop settings, or thumbnail image selection.
- Adjust the video size: Depending on the available options, you may be able to customize the dimensions of the video. Ensure that the video fits well within your email’s layout and doesn’t overwhelm or overshadow other content.
- Configure autoplay and loop settings: Consider whether you want the video to automatically play when the email is opened. Depending on the email client and recipient preferences, autoplaying videos may be well-received or seen as intrusive. Additionally, you can choose whether the video should loop continuously or play only once.
- Select the thumbnail image: Some email editors allow you to specify a thumbnail image that will be displayed before the video starts playing. Choose an engaging thumbnail that entices recipients to click and watch the video.
- Preview the email: Before finalizing the customization, preview the email within your email editor to see how the video appears in context. Check for any visual inconsistencies, formatting issues, or playback problems that may need to be addressed.
- Test across email clients and devices: Since different email clients and devices may render emails differently, it’s essential to test the video’s display and functionality across various platforms. This ensures a consistent and enjoyable experience for all recipients.
During the customization and preview process, consider the overall design and flow of your email. The video should seamlessly integrate into the email’s content, align with your branding, and enhance the overall user experience.
Keep in mind that some email clients or devices may not support embedded videos, or they may require the recipient to take additional steps to view the video. In such cases, it’s a good practice to provide a fallback option, such as a static image or a clickable link to the video hosted on a webpage.
By customizing and previewing the video, you can ensure that it complements your email’s design and engages your recipients effectively. Now, let’s move on to the final step: sending your video email.
Step 7: Send your video email
After customizing and previewing your video email, you’re now ready to send it to your recipients. Follow these steps to successfully send your video email:
- Review your email content: Before sending, review the entire email to ensure that the video is aligned with your message and any accompanying text or call-to-action. Check for any spelling or grammar errors, broken links, or formatting issues that may affect the overall effectiveness of your email.
- Specify your email recipients: Identify the recipients for your video email. This could be your entire subscriber list, a segment of your audience, or specific individuals you want to target. Use email marketing software or your chosen email service provider to select and specify the recipient list.
- Compose an engaging subject line: Craft a compelling subject line that entices recipients to open your email and watch the video. Make sure the subject line accurately reflects the content of the email and creates a sense of curiosity or interest.
- Add a clear call-to-action: Include a clear call-to-action (CTA) within the email that guides recipients to take the desired action after watching the video. This could be downloading a resource, making a purchase, signing up for a webinar, or any other action relevant to your campaign’s goals.
- Test the email across different email clients: Before sending the email to your entire recipient list, test it across various email clients and devices. This allows you to identify and address any rendering or functional issues that may arise due to different email client specifications.
- Send a test email: Send a test email to yourself or a colleague to verify the email’s appearance and functionality. Pay attention to the video playback, loading times, and responsiveness of any interactive elements.
- Monitor email metrics: After sending the video email, monitor the email metrics provided by your email marketing software or service provider. Look for indicators such as open rates, click-through rates, and video play rates. These metrics can help you measure the success of your video email campaign and make informed decisions for future campaigns.
Remember that successful video emails not only rely on the video itself but also on the supporting elements of your email, such as the subject line, context, and accompanying content. Ensure that everything works harmoniously to provide a compelling email experience for your recipients.
By following these steps and sending your video email, you’re leveraging the power of video to connect with your audience, boost engagement, and achieve your marketing objectives.
Best practices for video email embeds
While embedding videos in emails can be a highly effective marketing strategy, it’s important to follow best practices to ensure optimal results. Here are some best practices to consider when using video email embeds:
- Keep your videos concise: Attention spans are limited, so aim to keep your video length between 30 seconds to a few minutes. Concise videos are more likely to be fully watched and can effectively convey your message.
- Use a compelling thumbnail: The thumbnail image is the first thing recipients see before they decide to play the video. Choose an engaging and relevant thumbnail that entices viewers to click and watch.
- Optimize video loading times: Compress your videos without compromising quality to reduce loading times. Faster loading videos provide a better user experience and minimize the risk of recipients abandoning the email before the video plays.
- Ensure mobile responsiveness: Many recipients view emails on mobile devices. Ensure that your video and email layout are responsive and adapt well to different screen sizes to provide a seamless viewing experience on mobile.
- Provide a clear call-to-action: Clearly communicate the desired next step or action you want recipients to take after watching the video. Use a prominent and well-designed call-to-action button that stands out within the email.
- Include a fallback option: Some email clients may not support embedded videos. Include a text link or a static image that links to the video hosted on a webpage. This ensures that all recipients can access the video content, even if they cannot view it directly in the email.
- Personalize your videos: Whenever possible, personalize your videos by addressing recipients by their names or incorporating relevant details. Personalization creates a stronger connection and increases engagement.
- Test across various platforms: Different email clients and devices may render videos differently. Test your video email on various platforms to ensure it displays correctly and functions smoothly for all recipients.
- Analyze and optimize: Monitor your email metrics and analyze the performance of your video emails. Use this data to refine your approach, experiment with different strategies, and continually improve the effectiveness of your video email campaigns.
Remember that successful video email embeds require a balance of captivating content, strategic placement, and thoughtful optimization. By following these best practices, you can maximize the impact of your video email campaigns and achieve better audience engagement.
Conclusion
Embedding videos into emails is a powerful way to enhance your email marketing strategy and engage your audience. The captivating nature of videos can grab attention, convey your message effectively, and encourage recipients to take action. By following the step-by-step process outlined in this article, you can successfully embed videos into your emails:
- Choose a reliable video hosting platform that supports video email embeds.
- Upload your video to the hosting platform and generate the embed code.
- Open your email editor and insert the embed code into your email.
- Customize and preview the video to ensure it aligns with your email’s design.
- Send your video email to your recipients, monitoring the performance and analyzing the results.
Throughout the process, it’s important to follow best practices such as keeping your videos concise, optimizing loading times, providing clear calls-to-action, and testing across different platforms. These practices can ensure that your video emails deliver the desired impact and engagement.
Remember, video email embeds are most effective when they seamlessly integrate with your email’s content, purpose, and design. Be mindful of your audience’s preferences and ensure that your videos add value and enhance their overall email experience. Regularly analyze the performance of your video email campaigns and make data-driven optimizations as needed.
By utilizing the power of video in your email marketing, you can captivate your audience, increase engagement, and drive the desired actions. Embrace video email embeds as a valuable addition to your marketing toolbox and leverage this dynamic medium to connect with your audience in a compelling and memorable way.


