Introduction
Welcome to the world of video editing on Android! With the rise of smartphones and their ever-improving camera capabilities, more and more people are turning to their devices to capture and edit their videos. Whether you’re a vlogger, a social media enthusiast, or simply want to create professional-looking videos, having a reliable video editing app on your Android device is essential.
In this article, we’ll guide you through the process of editing videos on your Android device, step by step. We’ll cover everything from choosing the right video editing app to sharing your final masterpiece with the world. So, if you’re ready to unleash your creativity and take your videos to the next level, let’s dive in!
Before we begin, it’s important to note that there are numerous video editing apps available on the Google Play Store, each with its own set of features and user interfaces. The techniques we’ll discuss can be applied to most popular video editing apps, such as Adobe Premiere Rush, Kinemaster, or PowerDirector, among others.
Now, let’s get started on the exciting journey of transforming your raw footage into captivating videos that will leave a lasting impression on your audience!
Choosing a Video Editing App
When it comes to choosing a video editing app for your Android device, you’ll want to consider factors like features, user-friendliness, and compatibility with your device. Here are some key points to consider:
- Features: Look for apps that offer a wide range of editing features such as trimming, splitting, adding audio, applying filters and effects, and more. The more tools and effects available, the more creative freedom you’ll have in editing your videos.
- User-Friendliness: A good video editing app should have an intuitive and user-friendly interface that makes it easy for you to navigate and understand the editing process. Look for apps with clear icons, easy-to-use controls, and a well-organized timeline.
- Compatibility: Make sure the app you choose is compatible with your Android device. Some apps may require specific versions of Android or have hardware requirements, so check the app’s specifications before downloading.
- Support and Updates: Consider apps that offer regular updates and have a responsive support team. This ensures that you’ll have access to the latest features and bug fixes, and any issues you encounter can be addressed promptly.
- Reviews and Ratings: Take the time to read user reviews and ratings of different video editing apps. This can give you insight into the app’s performance, stability, and overall user satisfaction.
- Free vs. Paid: Decide whether you’re willing to invest in a paid video editing app or prefer to use a free one. Free apps often have limitations, such as watermarked videos or limited access to advanced features, while paid apps typically offer more robust functionality.
Consider these factors and do some research to find the video editing app that best suits your needs and preferences. Don’t be afraid to try out different apps to determine which one feels most comfortable and provides the features you require.
Now that you have an idea of what to look for in a video editing app, let’s move on to the next step: importing and organizing your footage.
Importing and Organizing Your Footage
Once you have chosen the video editing app that best suits your needs, it’s time to import and organize your footage. The process may vary slightly depending on the app you’re using, but the fundamental steps remain the same:
- Locate and Transfer your Footage: Find the videos you want to edit on your Android device or transfer them from another device. This can be done through USB connections, cloud storage, or file transfer apps.
- Create a New Project: Open your chosen video editing app and create a new project. Give it an appropriate name to help you easily identify it.
- Import Footage: Within the app, look for the option to import media or add clips to your project. Browse through your device’s storage to locate the videos you want to include in your project. Select and import them.
- Organize Clips: Once imported, organize your clips in a logical order. You can drag and drop them on the app’s timeline or arrange them in a separate media library. This step is crucial for maintaining a clear and organized workflow.
- Trim and Delete Unwanted Footage: If there are parts of the video clips that you don’t want to include in your final edit, use the trimming tool to remove them. This will help streamline your editing process and ensure that only the best moments are included.
Some video editing apps also offer features for organizing and categorizing your clips into folders or bins, making it easier to locate specific footage during the editing process. Take advantage of these organizational tools to keep your project neat and easily accessible.
Now that you have successfully imported and organized your footage, it’s time to dive into the editing process. In the next sections, we’ll cover various editing techniques, such as trimming and splitting video clips, adding and editing audio, applying filters and effects, adjusting video speed, adding text and captions, and much more.
So, let’s move on to the exciting part and start transforming your raw footage into an impressive video!
Trimming and Splitting Video Clips
One of the fundamental editing techniques is trimming and splitting video clips. This allows you to remove unwanted parts and create a seamless flow in your edited video. Here’s how you can trim and split video clips using most video editing apps on Android:
- Select a Clip: In your video editing app, locate the clip you want to trim or split. This can be done by clicking on the clip in the timeline or selecting it from the media library.
- Trimming: To trim a clip, look for the trim tool or option. It is usually represented by two brackets or handles on the edges of the clip. Drag these handles inward to remove the unwanted parts of the clip. This allows you to cut down the length of the clip and focus only on the desired segment.
- Splitting: If you want to separate a clip into multiple segments, locate the split tool or option. It is often represented by a scissor icon. Position the playhead (the marker indicating the current playback position) where you want to split the clip and click the split tool. This will create two separate clips at that point.
- Adjusting the Trim and Split: After trimming or splitting a clip, you can always go back and make further adjustments. Most video editing apps allow you to move the trim handles or reposition the split point until you achieve the desired result.
- Transitions: When joining two split clips together, you may want to add transitions for a smooth and seamless transition between the two segments. Video editing apps usually offer a variety of transition effects that you can apply between clips to create a visually appealing and professional look.
Remember to preview your edited clips to ensure that the trim and split points are aligned correctly and create a cohesive narrative. This technique is particularly useful when you want to create a highlight reel, remove unwanted footage, or rearrange the sequence of scenes in your video.
Now that you’ve mastered the art of trimming and splitting video clips, it’s time to add audio to enhance your video even further. In the next section, we’ll explore the process of adding and editing audio in your edited videos.
Adding and Editing Audio
Adding and editing audio is a crucial step in enhancing your edited videos and creating an immersive viewing experience. Whether it’s background music, voiceovers, or sound effects, here’s how you can incorporate and manipulate audio in most video editing apps on Android:
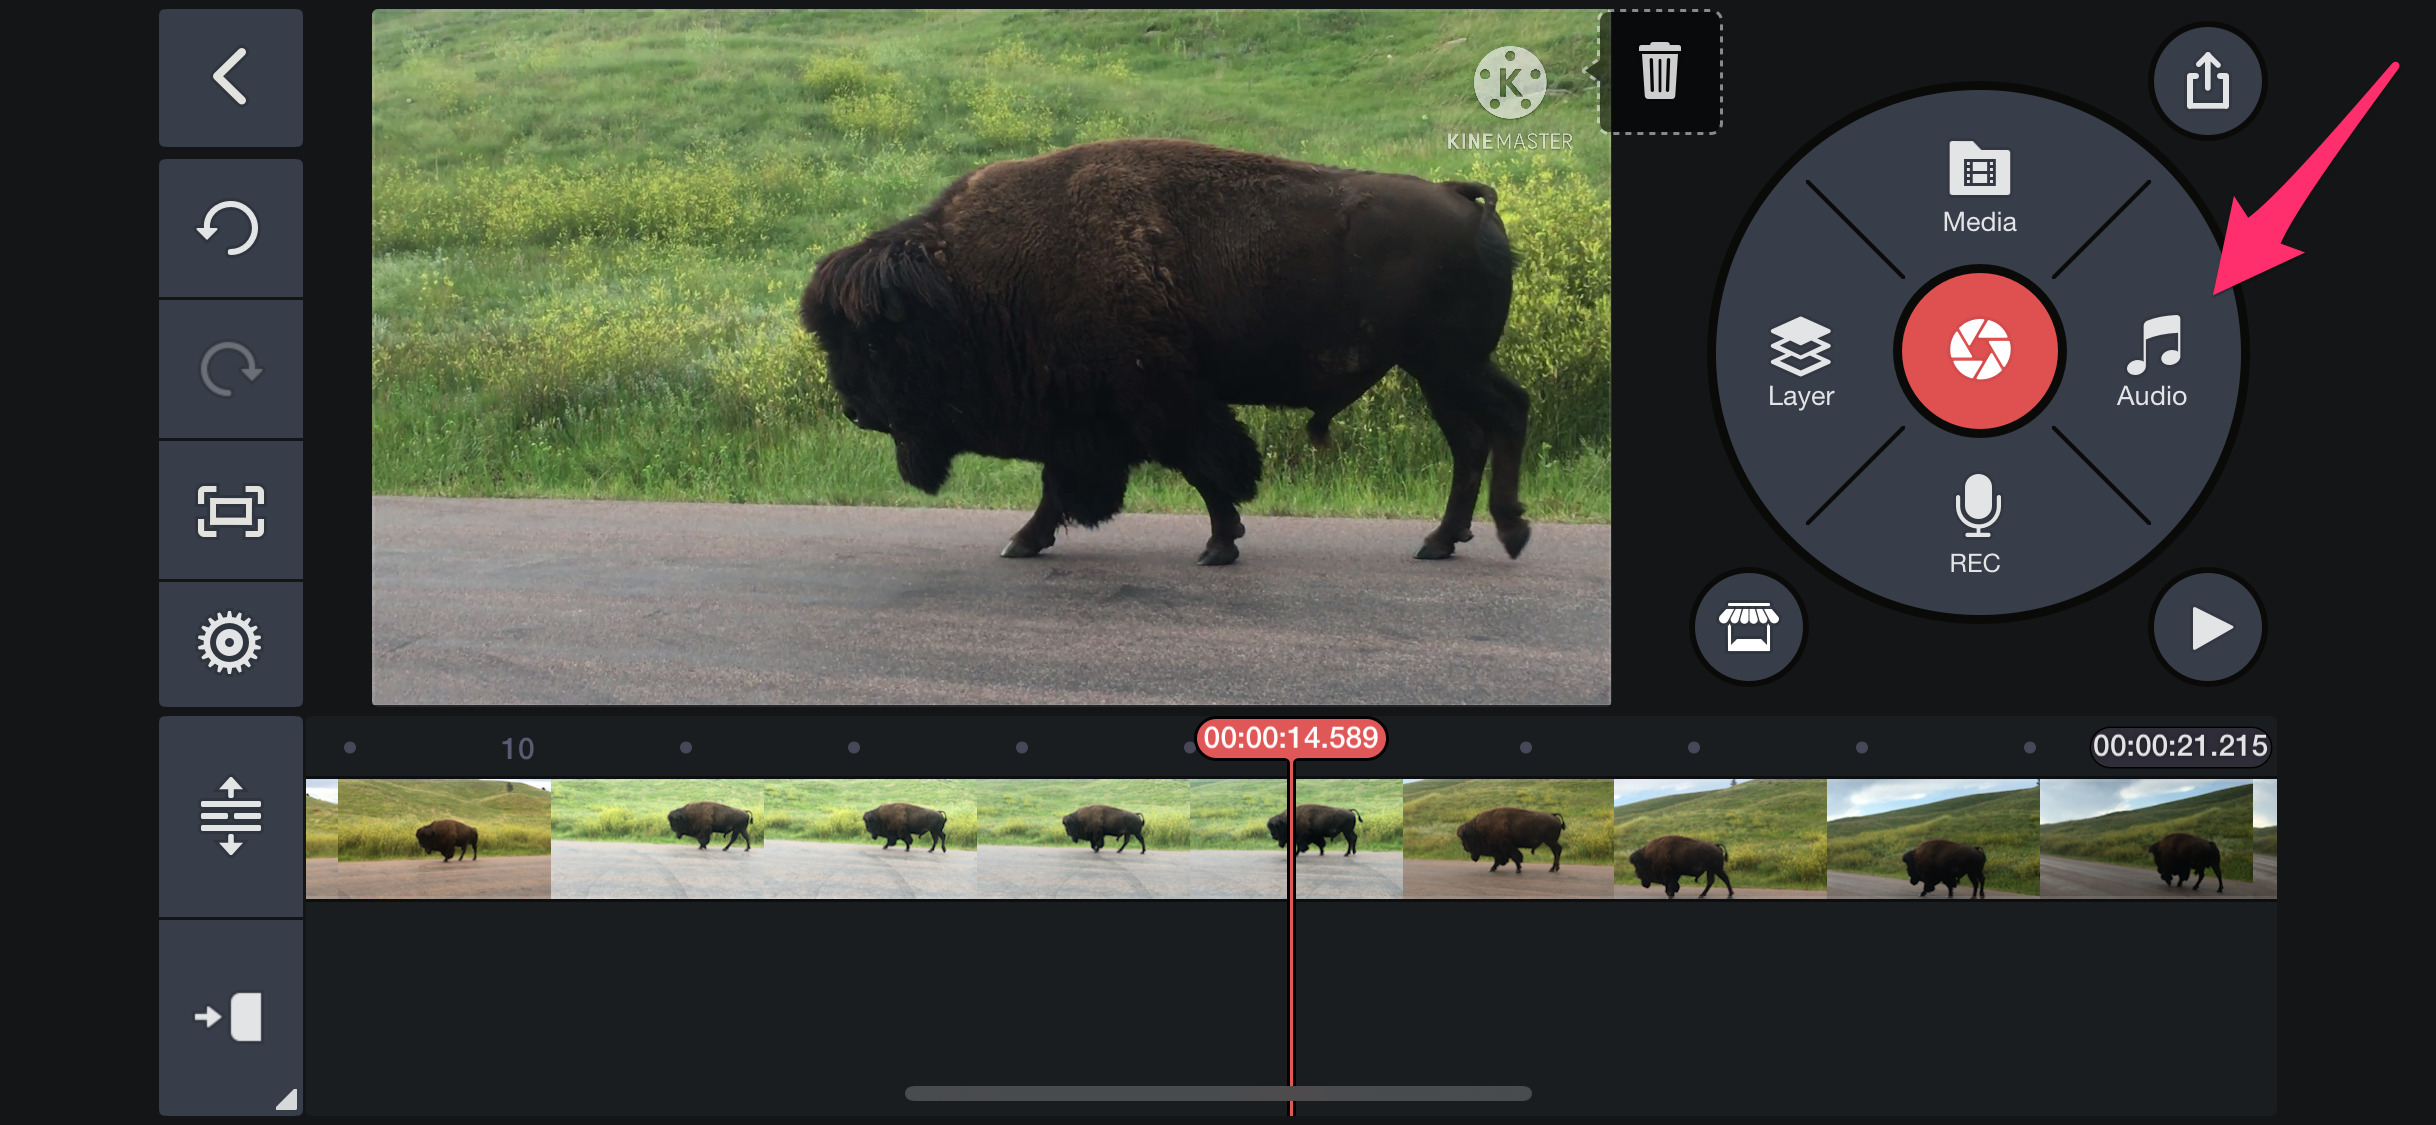
- Importing Audio: Just like importing video clips, you can import audio files into your project. This can be done by accessing your device’s storage and selecting the audio files you want to include. Some video editing apps also provide built-in libraries of royalty-free music that you can utilize.
- Placing Audio on the Timeline: Drag the imported audio file onto the timeline, placing it below the video clips. This will align the audio with the corresponding visuals.
- Adjusting Audio Levels: To achieve the perfect balance between the audio and video, you can adjust the volume levels of the audio. Most video editing apps allow you to change the audio volume either for the entire clip or specific sections.
- Applying Audio Effects: Add depth and creativity to your audio by experimenting with various effects. You can apply audio effects such as echo, reverb, or equalization to enhance the overall sound quality and match the mood of your video.
- Adding Voiceovers: If you want to include a voiceover narration or commentary in your video, most video editing apps enable you to record a voiceover directly within the app. This way, you can provide additional context or explanations to enhance the viewer’s understanding.
- Syncing Audio and Video: If you’ve recorded audio separately from the video, you can utilize the syncing feature of the video editing app. This allows you to synchronize the audio and video tracks to ensure perfect alignment during playback.
By adding and editing audio, you can greatly enhance the storytelling aspect of your video. Use background music to set the mood, incorporate sound effects to emphasize certain moments, and include voiceovers to provide insights or narration.
Now that you’ve mastered the art of incorporating audio into your edited video, let’s move on to exploring the creative world of filters and effects in the next section.
Applying Filters and Effects
Filters and effects are powerful tools in video editing that can transform the look and feel of your footage. They help to enhance colors, add visual flair, and create a specific mood for your videos. Here’s how you can apply filters and effects to your video clips in most video editing apps on Android:
- Select a Clip: Choose the clip or clips you want to apply filters or effects to. This can be done by clicking on the clip in the timeline or selecting it from the media library.
- Browse Filter/Effect Library: Look for the filter or effect library within the video editing app. This is where you’ll find a range of options to choose from, such as color grading filters, vintage effects, cinematic looks, and more.
- Apply Filters and Effects: Preview the different filters or effects available, and select the one that best suits the style and mood you want to achieve. Apply it to the selected clip by clicking on it or dragging and dropping it onto the clip in the timeline.
- Adjust Filter/Effect Settings: Once applied, you can often adjust the settings of the filter or effect to fine-tune its appearance. Depending on the app, you may have control over parameters such as intensity, saturation, contrast, and more, allowing you to customize the look to your preference.
- Layering Multiple Effects: For a more unique and personalized look, you can layer multiple filters or effects on a clip. Experiment by combining different effects and adjusting their settings until you achieve the desired result.
- Real-Time Preview: Most video editing apps offer a real-time preview of the applied filters or effects. This allows you to see the changes immediately and make further adjustments if needed.
Filters and effects can significantly enhance the visual appeal of your videos, making them more engaging and captivating to watch. Take your time to explore the various options available and experiment with different combinations to find the perfect look for each clip.
Now that you’ve learned how to apply filters and effects, let’s dive into the next exciting aspect of video editing: adjusting the speed of your clips. This technique can add a whole new dimension to your videos, so let’s explore it in the next section.
Adjusting Video Speed
Adjusting the speed of your video clips can dramatically change the overall mood and impact of your edited videos. Whether you want to create slow-motion effects or speed up the pace for a timelapse effect, here’s how you can adjust video speed in most video editing apps on Android:
- Select a Clip: Choose the clip or clips that you want to adjust the speed of. This can be done by clicking on the clip in the timeline or selecting it from the media library.
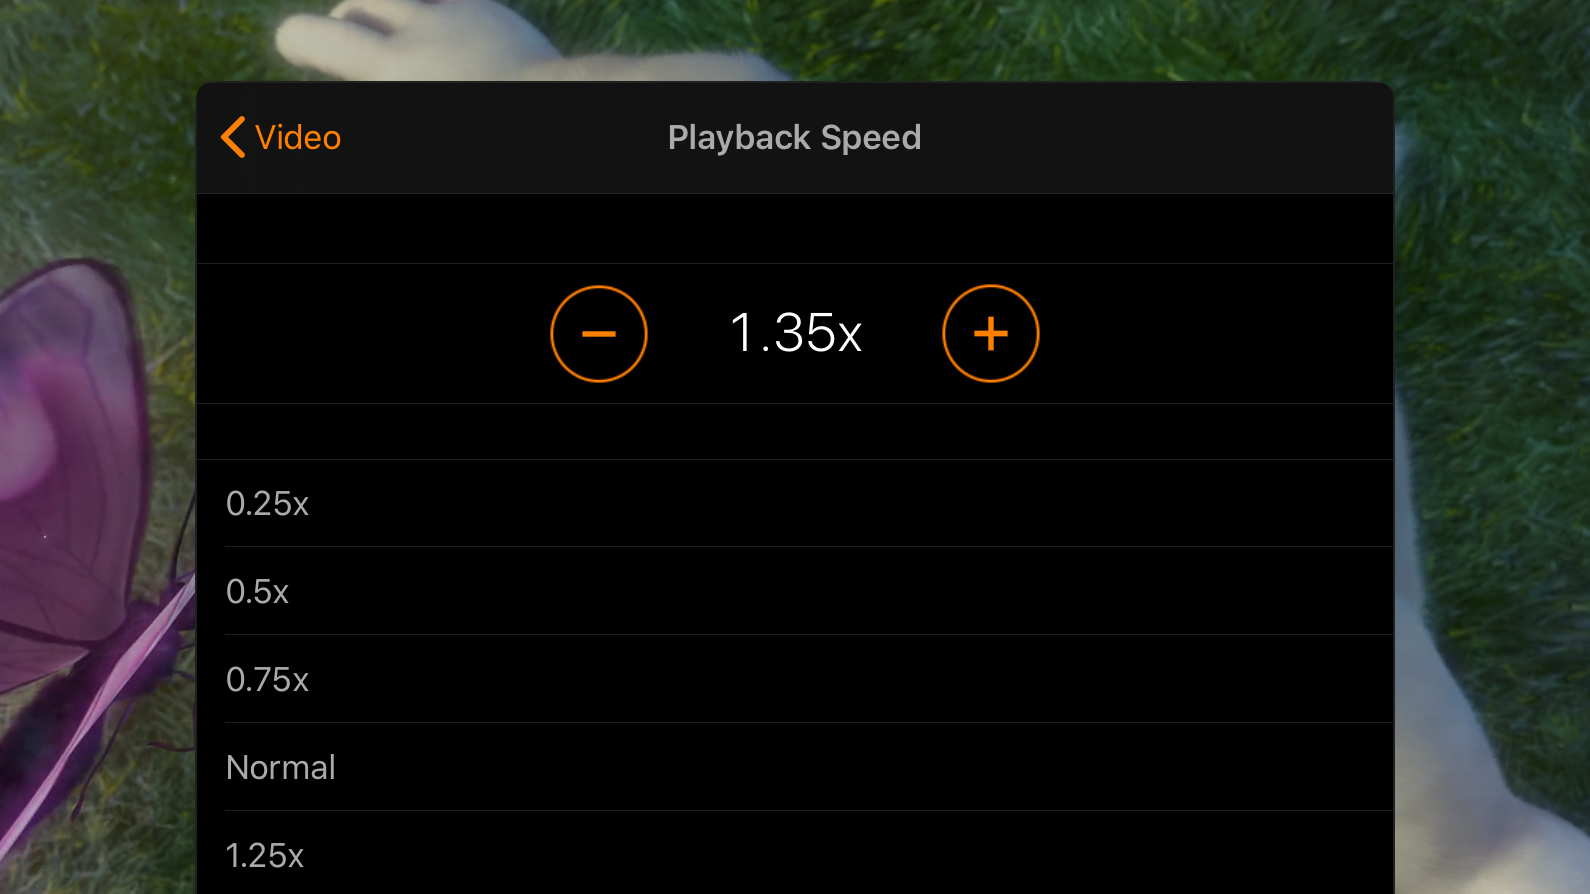
- Access Speed Settings: Look for the speed settings within the video editing app. These settings may be represented by a speedometer icon or a percentage value.
- Speed Up or Slow Down: Adjust the speed of the selected clip by increasing or decreasing the speed value. Speeding up the clip will make the action appear faster, while slowing it down will create a slow-motion effect.
- Precise Adjustments: Some video editing apps allow for more precise adjustments by offering a keyframe-based approach. With this method, you can define specific points in the clip where the speed changes, enabling smoother transitions between different speeds within the same clip.
- Frame Blending: To maintain smoothness and visual integrity when adjusting the speed, video editing apps often offer frame blending options. This blends frames together, ensuring smooth playback when the speed is altered.
- Preview and Fine-tune: After adjusting the speed, preview the clip to see the impact of the changes. Fine-tune the speed settings if necessary until you achieve the desired effect.
Adjusting the speed of your video clips allows you to add creative elements to your edited videos. Slow-motion effects can accentuate details and create a sense of drama, while sped-up clips can create a fast-paced and energetic atmosphere.
Now that you’ve mastered the art of adjusting video speed, let’s move on to adding text and captions to further enhance the storytelling aspect of your videos in the next section.
Adding Text and Captions
Text and captions are powerful tools for conveying information, adding context, and engaging your audience in your edited videos. Whether you want to include titles, subtitles, or informative captions, here’s how you can add text and captions to your video clips in most video editing apps on Android:
- Select a Clip: Choose the clip or clips where you want to add text or captions. This can be done by clicking on the clip in the timeline or selecting it from the media library.
- Access Text/Caption Tool: Look for the text or caption tool within the video editing app. This tool may be represented by a “T” icon or a button labeled “Text” or “Titles”.
- Choose Text Style: Explore the available text styles, fonts, sizes, and colors within the app. Select the style that best matches the overall aesthetic and mood of your video.
- Position the Text: Position the text or caption on the screen by dragging and dropping it to the desired location. You can typically adjust the placement, size, and orientation of the text as well.
- Enter Text Content: Enter the text or caption content you want to include. This can be a title, subtitle, explanatory text, or any other text that adds value and enhances the viewer’s experience.
- Customize Text Appearance: Many apps offer customization options for text appearance. You can apply effects like shadows or outlines, adjust the transparency, or add animation to make the text more visually engaging.
- Duration and Timing: Set the duration and timing of the text or caption, specifying when it should appear and how long it should remain on the screen. This allows you to synchronize the text with the visuals or audio in your video.
Adding text and captions provides vital information, emphasizes key points, and improves the overall storytelling of your videos. Use it to provide context, illustrate dialogue, highlight important details, or deliver a powerful message.
Now that you’ve learned how to add text and captions, let’s explore the next aspect of video editing: transitions and overlays. These elements can enhance the visual continuity and creativity in your videos, so let’s dive into it in the next section.
Transitions and Overlays
Transitions and overlays are creative elements that can add a professional touch and visual interest to your edited videos. They help to smooth the cuts between clips, create seamless transitions, and add extra visual layers. Here’s how you can use transitions and overlays in most video editing apps on Android:
- Select a Clip: Choose the clips where you want to apply transitions or overlays. This can be done by clicking on the clips in the timeline or selecting them from the media library.
- Access Transitions and Overlays: Look for the transitions and overlays library within the video editing app. These options are typically available in a dedicated section or through a button or menu.
- Browse Available Options: Explore the variety of transitions and overlays available to you. These may include fades, dissolves, wipes, split screens, animated graphics, text animations, and more.
- Apply the Transition/Overlay: Select a transition or overlay from the library and apply it between two clips or on top of a clip. Drag and drop the transition/overlay to the desired location on the timeline.
- Adjust Settings: Some video editing apps allow you to customize the settings of transitions or overlays. You may be able to adjust the duration, intensity, direction, or other parameters to match your desired aesthetic.
- Preview and Fine-tune: Preview the transitions and overlays to see how they enhance the visual continuity of your video. Make any necessary adjustments to ensure a smooth and appealing transition.
- Layer Multiple Effects: For added creativity, consider layering multiple transitions, overlays, or effects. Experiment with different combinations to create unique visual experiences.
Transitions and overlays provide a professional touch and can make your edited videos more visually engaging. They create a seamless flow between clips, add visual interest, and help convey a specific tone or message.
With the knowledge of transitions and overlays, you’re now equipped to add that extra flair to your videos. In the next section, we’ll discuss how to export and share your edited video masterpieces with the world.
Exporting and Sharing Your Edited Video
Once you’ve finished editing your video, it’s time to share it with the world. Exporting and sharing your edited video is an important step in showcasing your work and reaching your audience. Here’s how you can export and share your edited video in most video editing apps on Android:
- Preview Your Final Edit: Before exporting, take the time to preview your final edited video. Check for any errors, ensure the visuals and audio are synchronized, and verify that all the elements are in place.
- Choose the Export Settings: Look for the export or share options within the video editing app. This is where you can specify the settings for the output file, such as the format, resolution, quality, and file size.
- Name and Save Your File: Give your exported video a meaningful name that helps identify its content. Choose a location on your device to save the file.
- Export the Video: Initiate the export process and wait for the app to process and render your edited video. The length of time will vary depending on the complexity and duration of your video.
- Choose Sharing Options: Once the video is exported, you have multiple ways to share it. Most video editing apps offer options to share directly to social media platforms like YouTube, Instagram, or TikTok. You can also save the video to your device’s gallery or share it via messaging apps or email.
- Optimize for Platform Requirements: If you plan to share your video on specific platforms, consider optimizing it for their requirements. Some platforms have specific aspect ratios, file size limits, or video length limitations that you may need to adhere to in order to ensure the best viewing experience.
- Create Thumbnails or Previews: To attract viewers, consider creating an eye-catching thumbnail or preview image for your video. This will entice people to click or watch your video when they come across it on social media or video platforms.
- Promote and Engage: Take advantage of social media and other platforms to promote your video. Engage with your audience by responding to comments, sharing insights about your editing process, and encouraging people to share the video with others.
Exporting and sharing your edited video is the final step in the video editing process. By making your video available to others, you can showcase your creativity and storytelling skills while connecting with your audience.
Congratulations on completing your video editing journey! Now, it’s time to apply what you’ve learned, unleash your creativity, and make your videos stand out.
Conclusion
Editing videos on Android has never been easier, thanks to the wide range of video editing apps available. Whether you’re a beginner or an experienced videographer, these apps offer powerful tools to transform your footage into stunning masterpieces.
In this article, we have explored the essential steps in the video editing process on Android devices. We discussed the importance of choosing the right video editing app, importing and organizing your footage, trimming and splitting video clips, adding and editing audio, applying filters and effects, adjusting video speed, adding text and captions, and utilizing transitions and overlays to enhance your videos. We also learned how to export and share your edited video with the world.
Remember, the key to successful video editing is to unlock your creativity and experiment with different techniques. Each video editing app has unique features and interfaces, so don’t be afraid to explore and discover the possibilities they offer.
As with any skill, practice makes perfect. The more you edit videos, the more you’ll refine your techniques and develop your own style. Take inspiration from videos you admire, stay updated with the latest trends and techniques, and continue to improve your editing skills.
Now it’s time to start crafting your own videos. So grab your Android device, choose a video editing app that suits your needs, and let your imagination run wild. Whether you’re creating content for personal enjoyment, social media, or professional purposes, video editing on Android opens up a world of creativity and possibilities.
So go ahead, tell your story, captivate your audience, and bring your videos to life with the power of Android video editing!