Introduction
Changing the language on your Android device can be a helpful feature, especially if you prefer to use your device in a language other than the default. Whether you are learning a new language, living abroad, or simply want to explore different language options, adjusting the language settings on your Android device is relatively straightforward. In this guide, we will walk you through the steps to change the language on your Android device, allowing you to personalize your experience and better connect with your device.
Android devices come with a wide range of languages to choose from, making it accessible for users from all around the world. By changing the language on your Android device, you can customize the system language, as well as the language used for apps, keyboards, and more. This can greatly enhance your user experience and ensure that you can navigate through your device comfortably.
Keep in mind that changing the language on your Android device will alter the language across all installed apps and system interfaces. Therefore, it is important to choose a language that you are comfortable with, as it will impact your interaction with the device as a whole. Now, let’s dive into the step-by-step instructions on how to change the language on your Android device.
Step 1: Open the Settings app
The first step to changing the language on your Android device is to open the Settings app. The Settings app is where you can access and modify various settings and preferences on your device. To locate the Settings app, tap on the app drawer icon, usually represented by a gear or cogwheel icon, on your home screen or in the bottom navigation bar.
Once you have opened the Settings app, you will be presented with a list of available settings and options to customize your device. The layout and organization of the Settings app may vary slightly depending on the Android version and device manufacturer, but the general steps to change the language remain the same.
Scroll through the list of options until you find the “Settings” entry. It is typically located towards the top of the list and may have an icon resembling a gear or cogwheel. Tap on the “Settings” option to proceed.
Alternatively, some Android devices have a quick settings panel accessible by swiping down from the top of the screen with two fingers. In this panel, you may find a gear or cogwheel icon labeled as “Settings”. Tap on this icon to directly access the Settings app.
Once you have successfully opened the Settings app, you are now ready to proceed to the next step and change the language setting of your Android device.
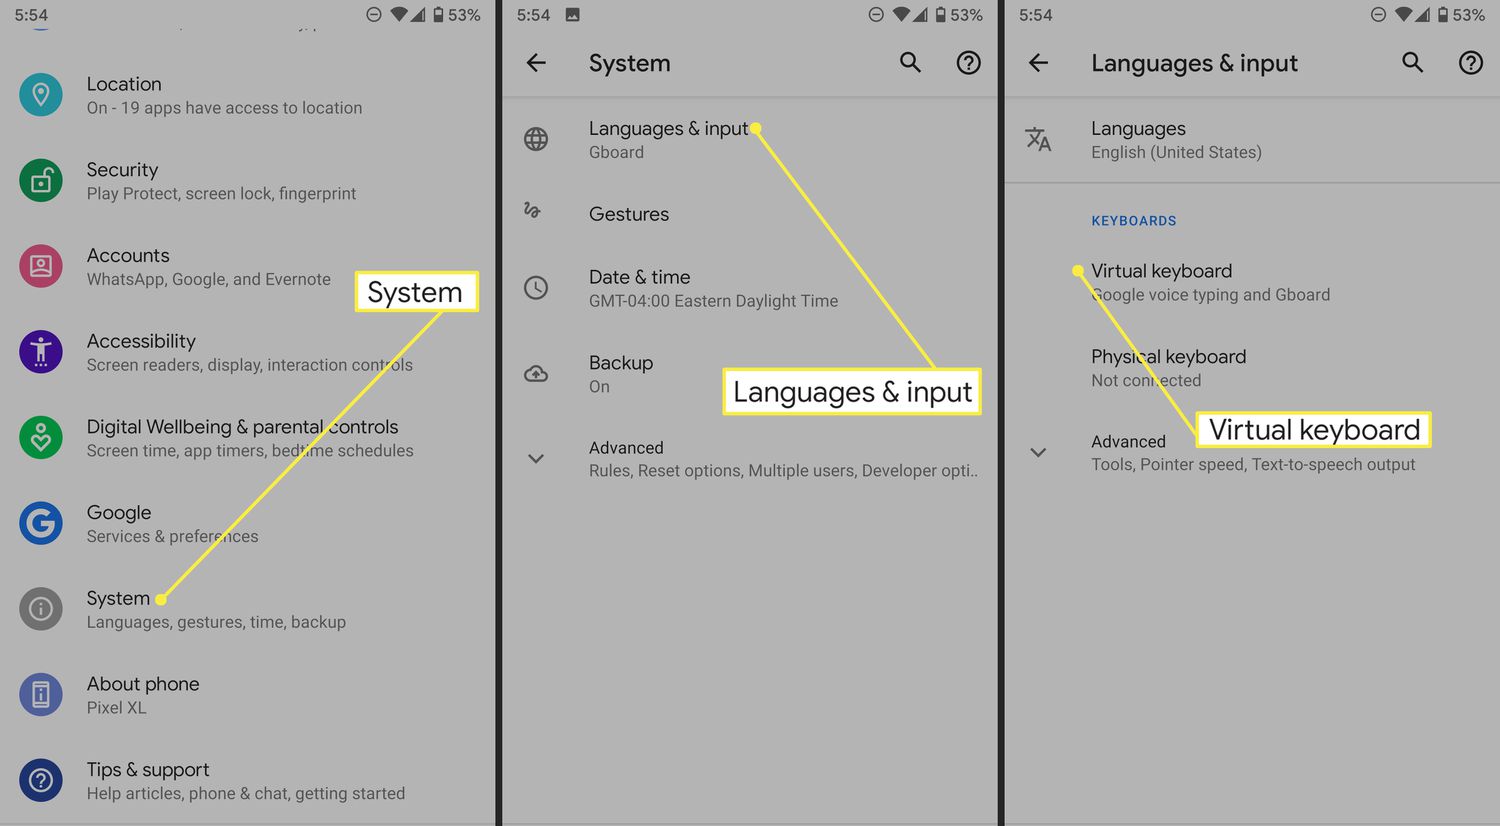
Step 2: Select “System” or “System & updates”
After opening the Settings app on your Android device, the next step is to select the appropriate option that allows you to access the language settings. Depending on your specific device and Android version, the option may be labeled as “System” or “System & updates”. Let’s explore how to find and select this option.
Scroll through the list of settings categories in the Settings app until you locate the option labeled “System”. This option is typically found towards the top of the list. Tap on “System” to proceed.
If you cannot find a separate “System” category, look for the option labeled “System & updates”. Some Android devices combine system-related settings under this category. Tap on “System & updates” to continue.
Upon selecting the “System” or “System & updates” option, you will be presented with a range of system-related settings and preferences that you can modify. These settings allow you to personalize various aspects of your Android device’s functionality and behavior.
Take a moment to explore the different options available under the “System” or “System & updates” category. Depending on your device and Android version, you may find settings related to software updates, gestures, accessibility features, and more. However, for our purpose of changing the language, we will focus on accessing the language settings.
Now that you have successfully navigated to the “System” or “System & updates” category, you are ready to proceed to the next step and access the language settings menu on your Android device.
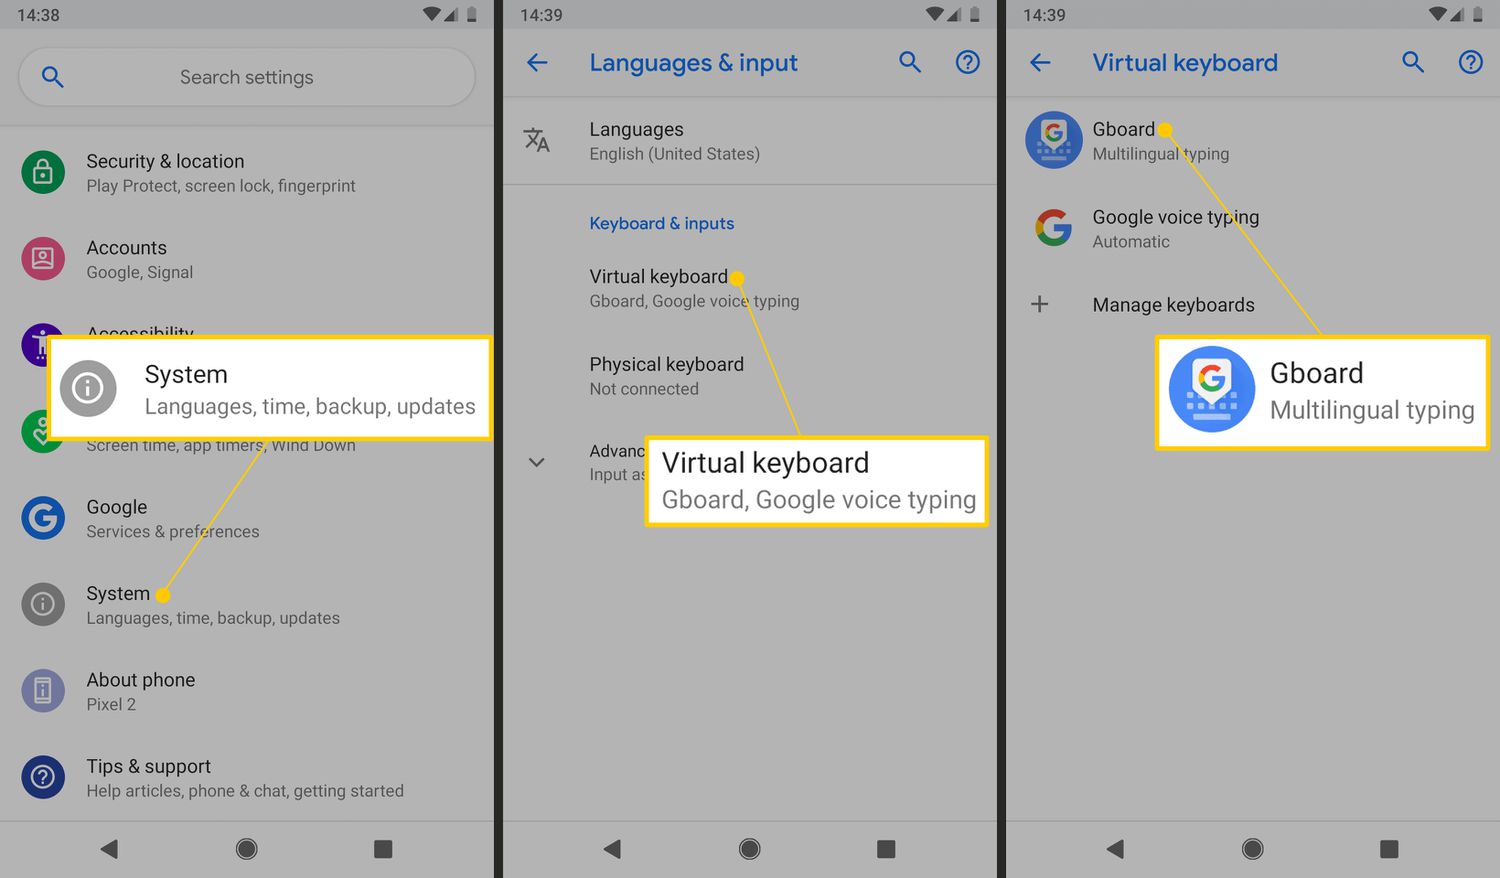
Step 3: Tap on “Languages & input” or “Languages & keyboard”
Once you have accessed the “System” or “System & updates” category in the Settings app, the next step is to locate and tap on the option labeled “Languages & input” or “Languages & keyboard”. This option is where you can manage the language settings for your Android device, including adding or removing languages and customizing input methods.
Scroll through the list of settings options under the “System” or “System & updates” category until you find the option labeled “Languages & input” or “Languages & keyboard”. The exact wording may vary depending on your Android version and device manufacturer. When you find the appropriate option, tap on it to proceed.
Upon tapping on “Languages & input” or “Languages & keyboard”, you will be presented with a list of language and input-related settings that you can modify. This menu allows you to customize the language settings to suit your preferences and needs.
Take a moment to explore the different options available under the “Languages & input” or “Languages & keyboard” category. You may find settings related to the display language, keyboard layout, input methods, and more. However, for our purpose of changing the language, we will focus on accessing the language settings specifically.
Now that you have successfully accessed the “Languages & input” or “Languages & keyboard” menu, you are ready to proceed to the next step and choose the desired language for your Android device.
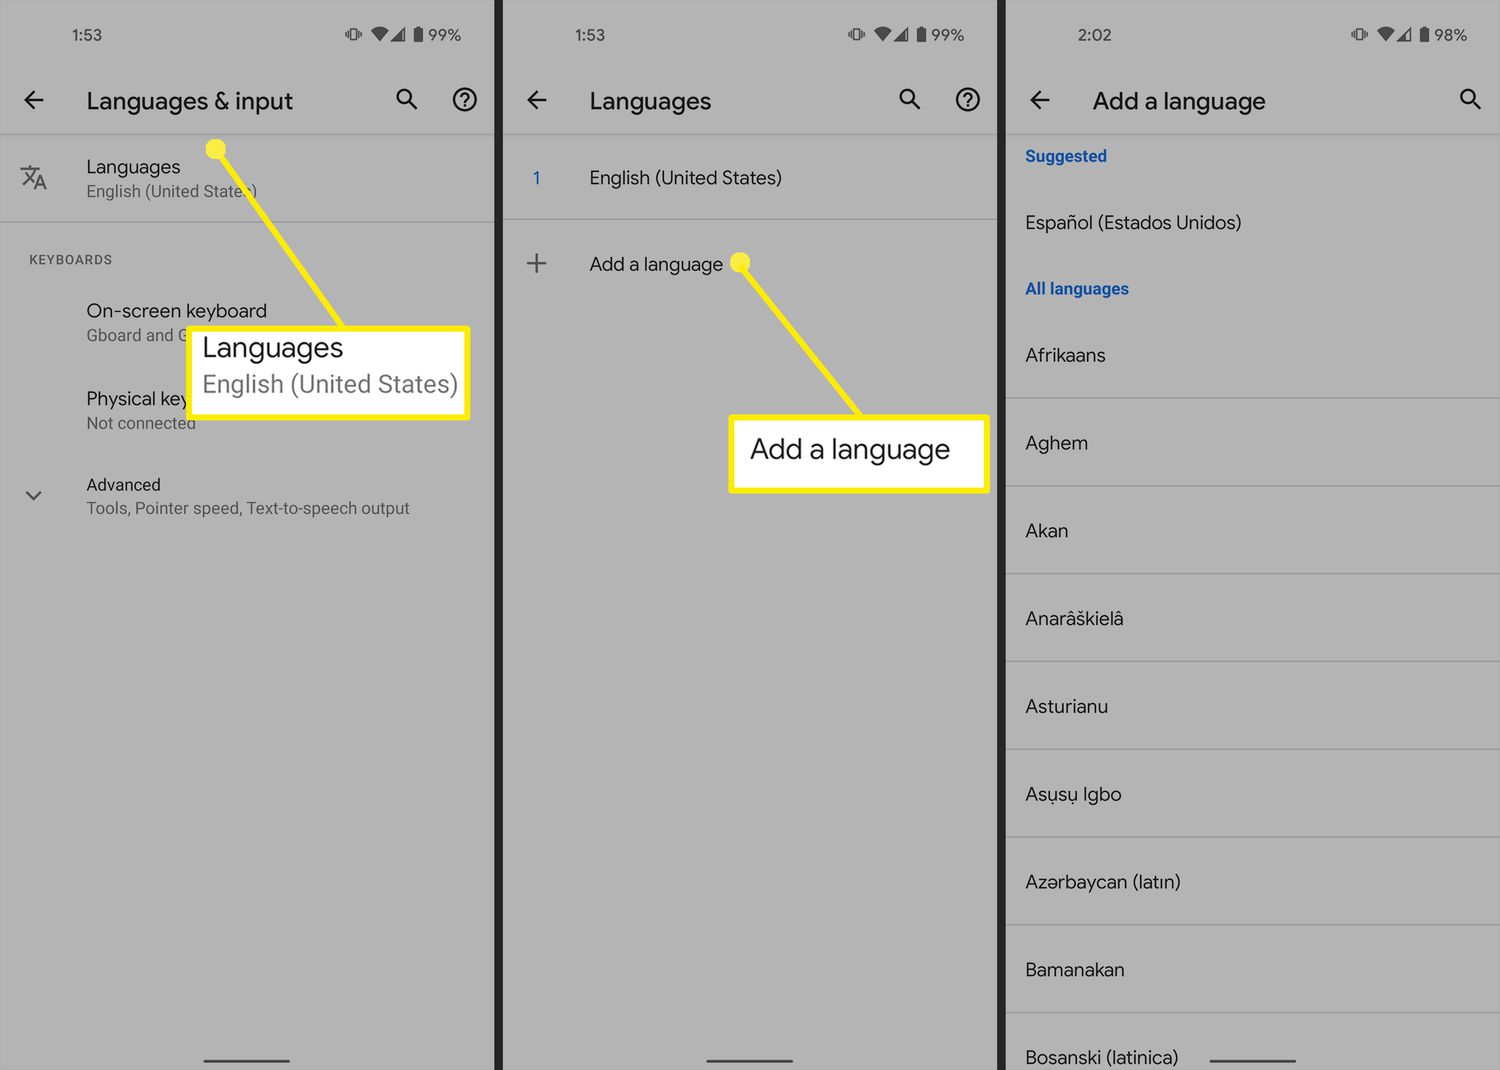
Step 4: Choose “Languages” or “Language”
After tapping on the “Languages & input” or “Languages & keyboard” option in the Settings app, you will be presented with a menu that contains various language and input-related settings. In this step, we will guide you through the process of selecting the “Languages” or “Language” option, which will allow you to modify the language settings on your Android device.
Scroll through the settings options within the “Languages & input” or “Languages & keyboard” menu until you locate the option labeled “Languages” or “Language”. The wording may vary depending on your Android version and device manufacturer. When you find the appropriate option, tap on it to proceed.
Tapping on the “Languages” or “Language” option will open a new menu that displays the language settings for your Android device. This menu allows you to add, remove, and prioritize languages, as well as set a default language for your device.
Take a moment to familiarize yourself with the language menu. You may see a list of already installed languages, an option to add new languages, and the ability to prioritize the order in which languages are used in certain situations. This gives you flexibility in customizing the language settings to your liking.
Now that you have successfully accessed the “Languages” or “Language” menu, you are ready to proceed to the next step and select your preferred language from the available options.
Step 5: Select your preferred language from the list
Once you have accessed the “Languages” or “Language” menu in the Settings app on your Android device, you will be presented with a list of available languages. In this step, we will guide you through the process of selecting your preferred language from this list.
Scroll through the list of languages until you find the one you want to set as the default language for your Android device. You will typically see the language names displayed in their respective languages, such as “English,” “Español,” or “中文.” This allows you to easily identify and select the desired language.
When you find your preferred language, tap on it to select it. Once selected, you may see a confirmation prompt asking if you want to change the language. Confirm your selection by tapping “OK” or a similar option to proceed.
After confirming your language selection, your Android device will begin the process of setting the chosen language as the default for the system and apps. This may take a few moments, so please be patient.
It is important to note that some languages may have different regional variations available. For example, if you select English, you may have the option to choose between “English (United States)” and “English (United Kingdom).” This allows you to further customize the language settings to match your specific preferences.
Now that you have successfully selected your preferred language from the available options, you are ready to proceed to the final step and set the new language as the default on your Android device.
Step 6: Set the new language as default
After selecting your preferred language from the list in the “Languages” or “Language” menu, the next step is to set the chosen language as the default on your Android device. In this step, we will guide you through the process of making the new language your device’s default language.
Within the language menu, look for an option that allows you to set the chosen language as the default. This option may be labeled as “Set as default” or “Make default” and is usually represented by a checkbox or similar indicator. Tap on this option to proceed.
Upon tapping on the “Set as default” or “Make default” option, a confirmation prompt may appear to confirm your decision. This prompt will typically ask if you want to change the default language. Confirm your choice by tapping “OK” or a similar option to proceed.
Once you have successfully set the new language as the default, your Android device will apply the changes and make the selected language the default for both the system and apps. This means that the overall device interface, system notifications, and app content will be displayed in your chosen language.
It is important to note that certain apps may have their own language settings independent of the device’s default language. In such cases, you may need to adjust the language settings within individual apps to ensure consistency with the system language.
Congratulations! You have successfully changed the language on your Android device and set the new language as the default. Now, you can enjoy using your device in your preferred language and explore the various features and functionalities it has to offer.
Conclusion
Changing the language on your Android device allows you to customize your user experience and interact with your device in a language that is comfortable and familiar to you. By following the step-by-step guide outlined in this article, you can easily change the language on your Android device and set your preferred language as the default.
The process begins by accessing the Settings app on your device, then navigating to the appropriate options such as “System” or “System & updates”. From there, you will find the “Languages & input” or “Languages & keyboard” menu, where you can select the “Languages” or “Language” option. In this menu, you can choose your preferred language from the list provided and set it as the default. Finally, confirm the changes and enjoy using your Android device in the language of your choice.
Remember that changing the language on your Android device will impact the system language, as well as the language used for apps, keyboards, and more. It may take a few moments for the changes to take effect, but once applied, you will be able to navigate and interact with your device in your preferred language.
Whether you want to explore a new language, communicate better while traveling, or simply enjoy a personalized user experience, changing the language on your Android device is a simple and effective way to enhance your device’s functionality. Take advantage of the available language options and make your Android device truly feel like your own.
Now that you have successfully changed the language on your Android device, go ahead and explore all the possibilities that a new language can bring. Enjoy browsing, texting, and using your favorite apps in the language that best suits you!