Introduction
Welcome to the world of ASUS gaming monitors, where immersive visuals and optimal performance come together to enhance your gaming experience. Playing games on a high-quality monitor is essential for enjoying stunning graphics, smooth motion, and accurate color reproduction. However, to truly make the most of your ASUS gaming monitor, it’s important to customize its visual settings according to your preferences.
In this article, we will guide you through the process of editing the visual settings on your ASUS gaming monitor. By following these steps, you can enhance the image quality, adjust color accuracy, and optimize various features that will give you a competitive edge in your gaming sessions.
Whether you’re a professional gamer or a casual player, taking the time to fine-tune your monitor’s visual settings can make a significant difference in your overall gaming experience. From adjusting brightness and contrast levels to tweaking color settings and activating specific gaming modes, our comprehensive guide will walk you through every step.
With ASUS gaming monitors offering a wide range of features and settings, this tutorial will help you navigate the on-screen display (OSD) menu and make the necessary adjustments to achieve the best possible visuals for your gaming sessions. So, without further ado, let’s dive into the exciting world of ASUS gaming monitors and explore the steps to optimize their visual settings.
Step 1: Accessing the OSD Menu
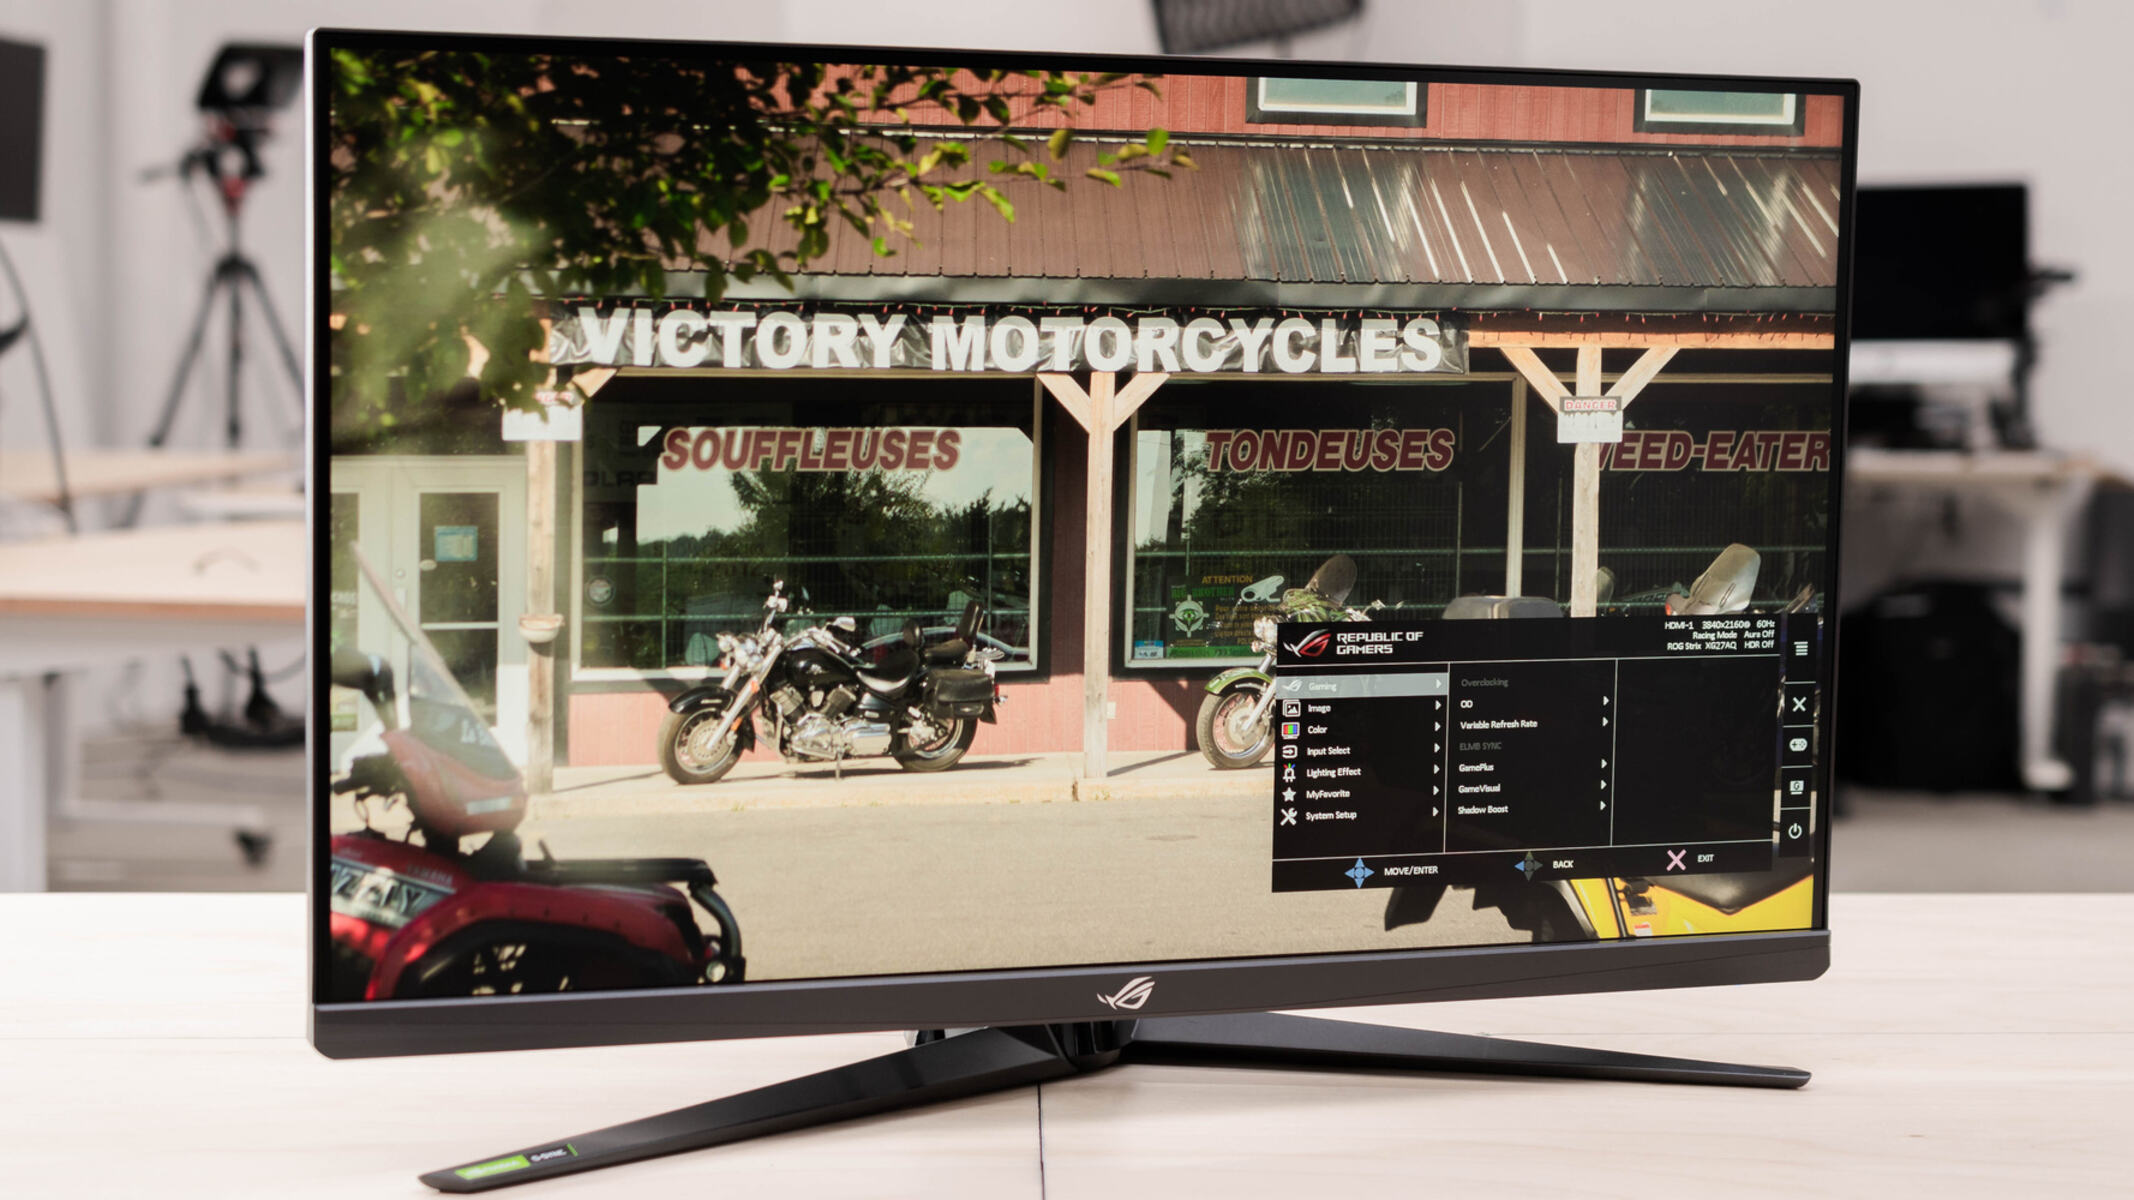
Before you can start customizing the visual settings on your ASUS gaming monitor, you need to access the on-screen display (OSD) menu. This menu provides you with a range of options for adjusting various display parameters.
To access the OSD menu, locate the control buttons on your monitor. These buttons are usually located on the bottom bezel, on the front or side panel. The exact button arrangement may vary depending on the model of your ASUS gaming monitor, but commonly, you will find buttons labeled as Menu, or with directional arrows (Up, Down, Left, Right), and an Enter button.
Once you have identified the control buttons, follow these steps:
- Turn on your ASUS gaming monitor and ensure that it is connected to your computer or gaming console.
- Press the Menu button on the monitor to open the OSD menu.
- Use the directional arrows to navigate through the menu options.
- Press the Enter button to select a menu option or submenu.
By following these steps, you will gain access to the comprehensive OSD menu on your ASUS gaming monitor. In the next steps, we will explore how to adjust various visual settings to improve your gaming experience. So, let’s move on to the next step and start fine-tuning your monitor’s brightness and contrast levels.
Step 2: Adjusting Brightness and Contrast
Ensuring the optimal brightness and contrast levels on your ASUS gaming monitor is crucial for a visually pleasing and comfortable gaming experience. These settings can greatly affect the overall clarity and depth of the displayed images on your screen.
To adjust the brightness and contrast levels, follow these steps:
- Access the OSD menu by pressing the Menu button on your monitor.
- Navigate to the “Picture” or “Display” settings using the directional arrows and select it by pressing the Enter button.
- Look for the options labeled “Brightness” and “Contrast” within the picture settings menu.
- Adjust the brightness level by using the directional arrows and confirm your selection by pressing the Enter button. Increasing the brightness will make the image appear brighter, while decreasing it will make the image darker. Experiment with different settings until you find the ideal brightness level for your preference.
- Next, adjust the contrast level by following the same process. Increasing the contrast will enhance the difference between dark and light areas, while decreasing it will soften the contrast. Find the balance that provides clear details without losing the richness of colors.
- Once you are satisfied with your adjustments, navigate to the “Exit” or “Apply” option and press the Enter button to save the changes and exit the OSD menu.
Keep in mind that the optimal brightness and contrast levels may vary depending on the ambient lighting conditions in your gaming environment. Therefore, it’s important to periodically reassess and readjust these settings to ensure an optimal gaming experience.
Now that you have personalized the brightness and contrast levels on your ASUS gaming monitor, let’s move on to the next step and explore how to tweak the color settings.
Step 3: Tweaking Color Settings
Adjusting the color settings on your ASUS gaming monitor is essential for achieving accurate and vibrant visuals that enhance your gaming experience. By fine-tuning the color saturation, hue, and temperature, you can ensure that the images displayed on your screen are both visually appealing and true to life.
To tweak the color settings, follow these steps:
- Access the OSD menu by pressing the Menu button on your monitor.
- Navigate to the “Color” or “Color Settings” option using the directional arrows and select it by pressing the Enter button.
- Within the color settings, you will find options such as “Saturation,” “Hue,” and “Color Temperature.”
- Adjust the saturation level to control the intensity of colors displayed on the screen. Increase the saturation for a more vibrant and vivid look, or decrease it for a more subtle and muted appearance.
- Use the hue adjustment to modify the overall color tone. Move the hue slider to warmer tones (red and orange) for a cozy and immersive feel, or towards cooler tones (blue and purple) for a more refreshing and futuristic ambiance.
- Lastly, adjust the color temperature to fine-tune the balance between warm and cool colors. Experiment with different temperature presets (such as “Warm,” “Cool,” or “Standard”) to find the color temperature that suits your preference.
- Once you are satisfied with your color adjustments, navigate to the “Exit” or “Apply” option and press the Enter button to save the changes and exit the OSD menu.
Customizing the color settings on your ASUS gaming monitor allows you to create an immersive gaming experience that matches your personal taste and enhances the realism of the visuals. Play around with different combinations until you find the perfect balance that brings your games to life.
Now that you have perfected the color settings on your monitor, it’s time to explore the GameVisual modes in the next step and take your gaming experience to the next level.
Step 4: Configuring GameVisual Modes
ASUS gaming monitors come equipped with GameVisual modes, which are pre-configured display settings designed specifically for different types of games and content. These modes optimize the image quality and visual parameters to enhance the gaming experience in various scenarios.
To configure the GameVisual modes on your ASUS gaming monitor, follow these steps:
- Access the OSD menu by pressing the Menu button on your monitor.
- Navigate to the “GameVisual” option using the directional arrows and select it by pressing the Enter button.
- You will find a list of different GameVisual modes, such as “Racing,” “FPS,” “Cinema,” and more.
- Select the mode that corresponds to the type of game or content you are currently engaging with. For example, choose the “Racing” mode for racing games or the “Cinema” mode for watching movies.
- Each GameVisual mode is specifically calibrated to enhance certain visual aspects, such as color vibrancy, contrast, and sharpness. Feel free to explore these modes and select the one that best suits your preferences.
- If desired, you can further fine-tune individual settings within each GameVisual mode, such as brightness, contrast, and color saturation. Experiment with these settings to achieve a personalized and optimized visual experience.
- Once you are satisfied with your GameVisual mode selection and any additional adjustments, navigate to the “Exit” or “Apply” option and press the Enter button to save the changes and exit the OSD menu.
The GameVisual modes on your ASUS gaming monitor are tailored to provide you with the optimal visual settings for different gaming scenarios. They allow you to enhance specific aspects of the image quality and immerse yourself more deeply in the game or content you are enjoying.
Now that you have configured the GameVisual modes, let’s move on to the next step and explore how to further enhance motion and image quality using Trace Free and VividPixel settings.
Step 5: Enhancing Motion and Image Quality with Trace Free and VividPixel
To fully optimize your gaming experience, ASUS gaming monitors offer additional settings to enhance motion clarity and image sharpness. With the Trace Free and VividPixel features, you can achieve smoother motion and fine details on your screen.
Follow these steps to enhance motion and image quality using Trace Free and VividPixel:
- Access the OSD menu by pressing the Menu button on your monitor.
- Find the “Image” or “Display” settings using the directional arrows and select it by pressing the Enter button.
- Locate the options for Trace Free and VividPixel within the image settings menu.
- Adjust the Trace Free setting to control the monitor’s response time. Higher Trace Free values can reduce motion blur, making fast-paced action smoother, while lower values may be suitable for slower-paced games or reduced input lag.
- Next, adjust the VividPixel setting to enhance image sharpness and clarity. Increasing the VividPixel value can make details appear crisper, but be cautious not to set it too high as it may introduce artifacts and exaggerate image noise.
- Experiment with various Trace Free and VividPixel settings to find the balance that suits your preference and the demands of the content you’re experiencing.
- Once you are satisfied with your adjustments, navigate to the “Exit” or “Apply” option and press Enter to save the changes and exit the OSD menu.
By optimizing the Trace Free and VividPixel settings on your ASUS gaming monitor, you can enhance motion clarity, reduce blur, and improve overall image sharpness. These features help ensure that you have a smooth and visually captivating gaming experience.
With your motion and image settings fine-tuned, let’s move on to the next step and explore how to adjust sharpness and gamma for better visual clarity.
Step 6: Fine-tuning Sharpness and Gamma
To achieve optimal visual clarity on your ASUS gaming monitor, it’s essential to fine-tune settings such as sharpness and gamma. These adjustments can significantly enhance the level of detail and image quality in your gaming experience.
Follow these steps to fine-tune the sharpness and gamma settings:
- Access the OSD menu by pressing the Menu button on your monitor.
- Navigate to the “Image” or “Display” settings using the directional arrows and select it by pressing the Enter button.
- Look for the options labeled “Sharpness” and “Gamma” within the image settings menu.
- Adjust the sharpness level to define the clarity of edges and details on the screen. Increase the sharpness for a more defined look, but be cautious not to set it too high, as it can introduce artifacts and exaggerate noise. Decrease the sharpness if you prefer a softer and more natural appearance.
- Next, adjust the gamma level to fine-tune the overall brightness and contrast of the image. Increasing the gamma value can enhance details in darker areas at the expense of some highlights, while decreasing it can brighten the overall image.
- Experiment with different sharpness and gamma settings, finding the balance between crispness and naturalness that suits your preference and enhances the detail and image quality in your games.
- Once you are satisfied with your adjustments, navigate to the “Exit” or “Apply” option and press the Enter button to save the changes and exit the OSD menu.
By fine-tuning the sharpness and gamma settings on your ASUS gaming monitor, you can sharpen image details and achieve a more accurate brightness and contrast balance. These adjustments will bring out the intricacies of your games and enhance your overall gaming experience.
Now that you have fine-tuned the sharpness and gamma settings, let’s move on to the final step and explore how to modify the Blue Light Filter settings for comfortable and strain-free gaming sessions.
Step 7: Modifying Blue Light Filter Settings
Modifying the Blue Light Filter settings on your ASUS gaming monitor can help reduce eye strain and promote more comfortable gaming sessions. Blue light emitted by electronic devices can disrupt your sleep patterns and cause eye fatigue, making it essential to adjust these settings for a healthier and more enjoyable gaming experience.
Follow these steps to modify the Blue Light Filter settings:
- Access the OSD menu by pressing the Menu button on your monitor.
- Navigate to the “Color” or “Color Settings” option using the directional arrows and select it by pressing the Enter button.
- Look for the option labeled “Blue Light Filter” within the color settings menu.
- Adjust the intensity of the Blue Light Filter by using the directional arrows. Increasing the filter level will reduce the amount of blue light emitted by your monitor, while decreasing it will have a minimal impact.
- Experiment with different levels of the Blue Light Filter to find the setting that provides a comfortable balance between reducing eye strain and maintaining the desired color accuracy.
- Once you are satisfied with your adjustments, navigate to the “Exit” or “Apply” option and press the Enter button to save the changes and exit the OSD menu.
By modifying the Blue Light Filter settings on your ASUS gaming monitor, you can effectively reduce the harmful effects of blue light on your eyes. This adjustment can lead to more comfortable gaming sessions and help alleviate eyestrain, allowing you to focus on the gameplay without compromising on visual quality.
Congratulations! You have successfully learned how to modify the Blue Light Filter settings on your ASUS gaming monitor. Now you can enjoy gaming sessions with reduced eye strain and improved comfort.
Conclusion
Congratulations on successfully customizing the visual settings of your ASUS gaming monitor! By following the steps outlined in this guide, you have learned how to access the OSD menu and make adjustments to various aspects of your monitor’s display.
From adjusting brightness and contrast to fine-tuning color settings and configuring GameVisual modes, you have discovered how to optimize your monitor to suit your personal preferences and enhance your gaming experience.
Fine-tuning the motion and image quality with Trace Free and VividPixel settings, as well as adjusting sharpness and gamma, has allowed you to achieve clearer and more detailed visuals in your games. Additionally, modifying the Blue Light Filter settings ensures a more comfortable gaming experience, reducing eye strain and promoting healthier screen time.
Remember to periodically reassess and readjust these settings as your preferences and gaming environments may change over time. Experimenting with different configurations and finding the perfect balance will allow you to fully appreciate the immersive and vibrant visuals that your ASUS gaming monitor can deliver.
Now that you have mastered the art of customizing the visual settings of your ASUS gaming monitor, it’s time to dive into your favorite games and experience them in a whole new light. Enjoy your gaming sessions with stunning visuals and optimal performance!