Introduction
Editing an Instagram post allows you to refine and enhance your content, ensuring it resonates with your audience. Whether you need to make minor tweaks or completely transform your post, Instagram provides a simple and intuitive editing feature. In this guide, we will take you through the step-by-step process of editing a post on Instagram, enabling you to effortlessly update your captions, tags, location, and more.
Instagram has become one of the most prominent social media platforms, with millions of users sharing their photos and videos every day. It offers a range of editing options to help you personalize your posts and effectively convey your message.
Whether you made a typo in your caption, forgot to add an important tag, or want to adjust the location, editing your post can help you maintain a cohesive and professional presence on Instagram. By following a few simple steps, you can ensure your content is optimized and reflective of your brand identity.
Editing your Instagram post is particularly crucial if you are using the platform for business purposes. It allows you to refine your content strategy and ensure your posts align with your marketing goals. With the ability to update captions, add tags, and adjust the location, you can optimize your posts for discoverability and engagement.
This guide will walk you through the process of editing your Instagram posts, providing you with the necessary knowledge and skills to make the most out of your content. So, let’s dive in and explore the steps required to edit a post on Instagram!
Step 1: Accessing the Edit Feature
Before you can begin editing your Instagram post, you need to access the Edit feature. Here’s how to do it:
- Launch the Instagram app on your mobile device and log in to your account if you haven’t already.
- Navigate to your profile by tapping on the profile icon at the bottom right corner of the screen.
- Scroll through your profile feed until you find the post you want to edit. Tap on the post to open it.
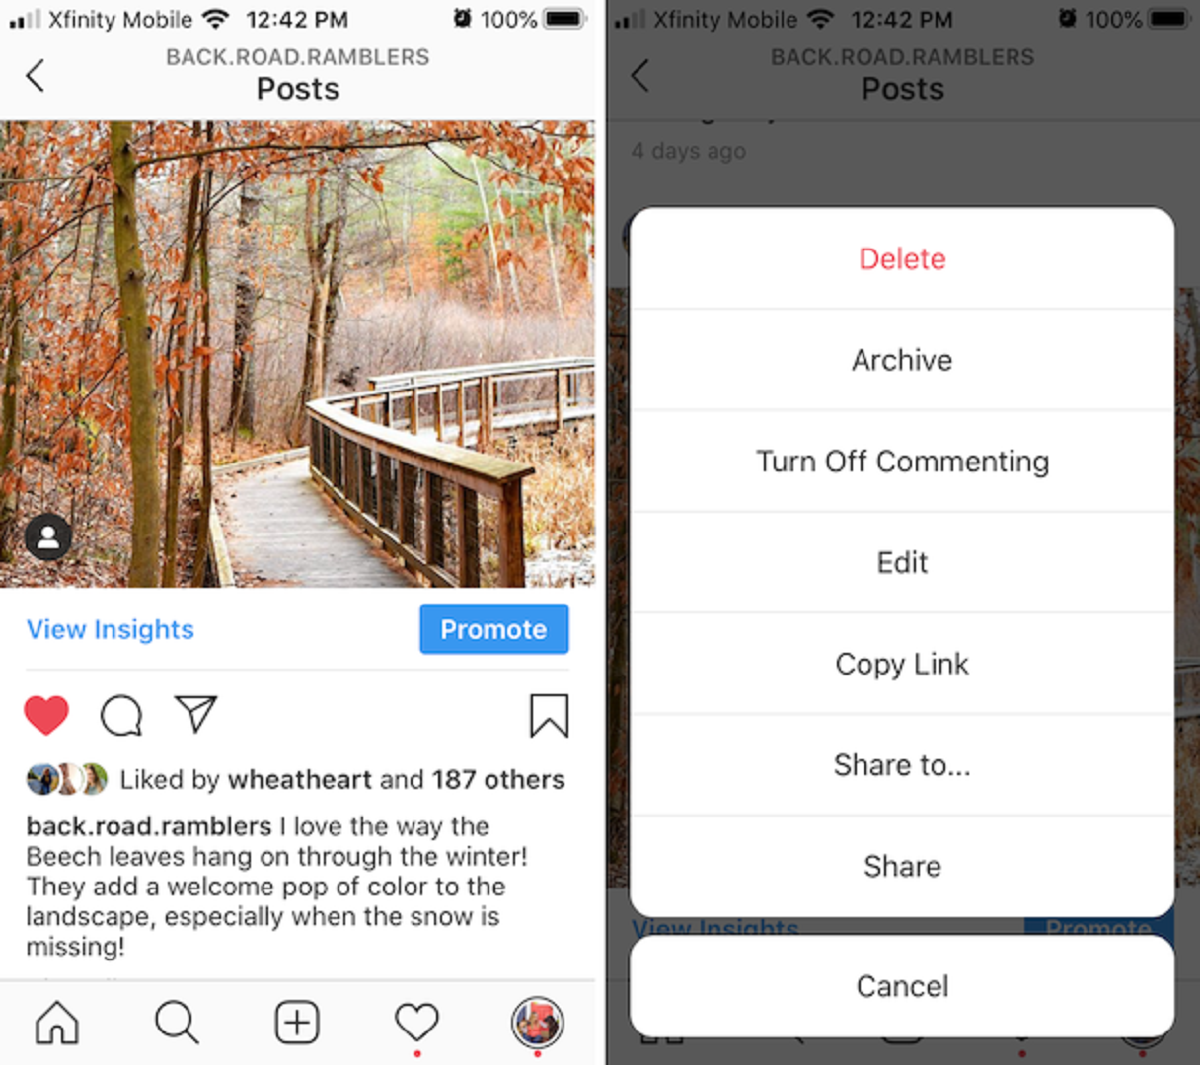
- Once the post is open, you will see three small dots in the top right corner of the screen. Tap on these dots to open the post options menu.
- In the post options menu, you will find various options such as Archive, Delete, and Turn Off Commenting. Depending on the type of post, you may see additional options. Look for the option that says Edit and tap on it.
By following these steps, you will be able to access the Edit feature for the specific post you want to modify. Once you tap on the Edit option, you will be taken to a screen where you can make the desired changes to your post.
It’s important to note that you can only edit posts that you have originally created. You cannot edit posts made by other users, even if you are tagged in them. Additionally, certain elements of a post, such as the number of likes and comments, cannot be edited. However, you can modify the caption, tags, location, and other relevant details to improve the appearance and impact of your post.
Now that you know how to access the Edit feature, let’s move on to the next step: changing the caption of your Instagram post.
Step 2: Changing the Caption
The caption is an essential component of your Instagram post, providing context, explaining the content, and engaging your audience. If you need to make changes to the caption, follow these simple steps:
- After accessing the Edit feature for your post (as explained in Step 1), you will be taken to the editing screen.
- Locate the caption section, which is usually displayed below the image or video of your post.
- Delete the existing caption by tapping on the text and clearing it.
- Type in the new caption, making sure to check for any spelling or grammatical errors.
- You can also incorporate emojis, hashtags, and other formatting options to make your caption more visually appealing and engaging.
Remember to keep your caption concise, informative, and reflective of your brand or personal style. It’s an opportunity to captivate your audience and convey the message you want to communicate.
If you want to add line breaks or paragraphs in your caption, you can’t simply press the Enter key. Instagram doesn’t recognize line breaks in captions. Instead, you can use external apps or websites to format your caption with line breaks and paragraphs, then copy and paste the formatted text into the caption field on Instagram.
Once you are satisfied with the changes you’ve made to the caption, proceed to the next step to learn how to add or remove tags from your Instagram post.
Step 3: Adding or Removing Tags
Tags are a powerful tool on Instagram as they help increase visibility and reach a wider audience. Whether you forgot to add tags initially or want to update them, here’s how you can easily add or remove tags from your Instagram post:
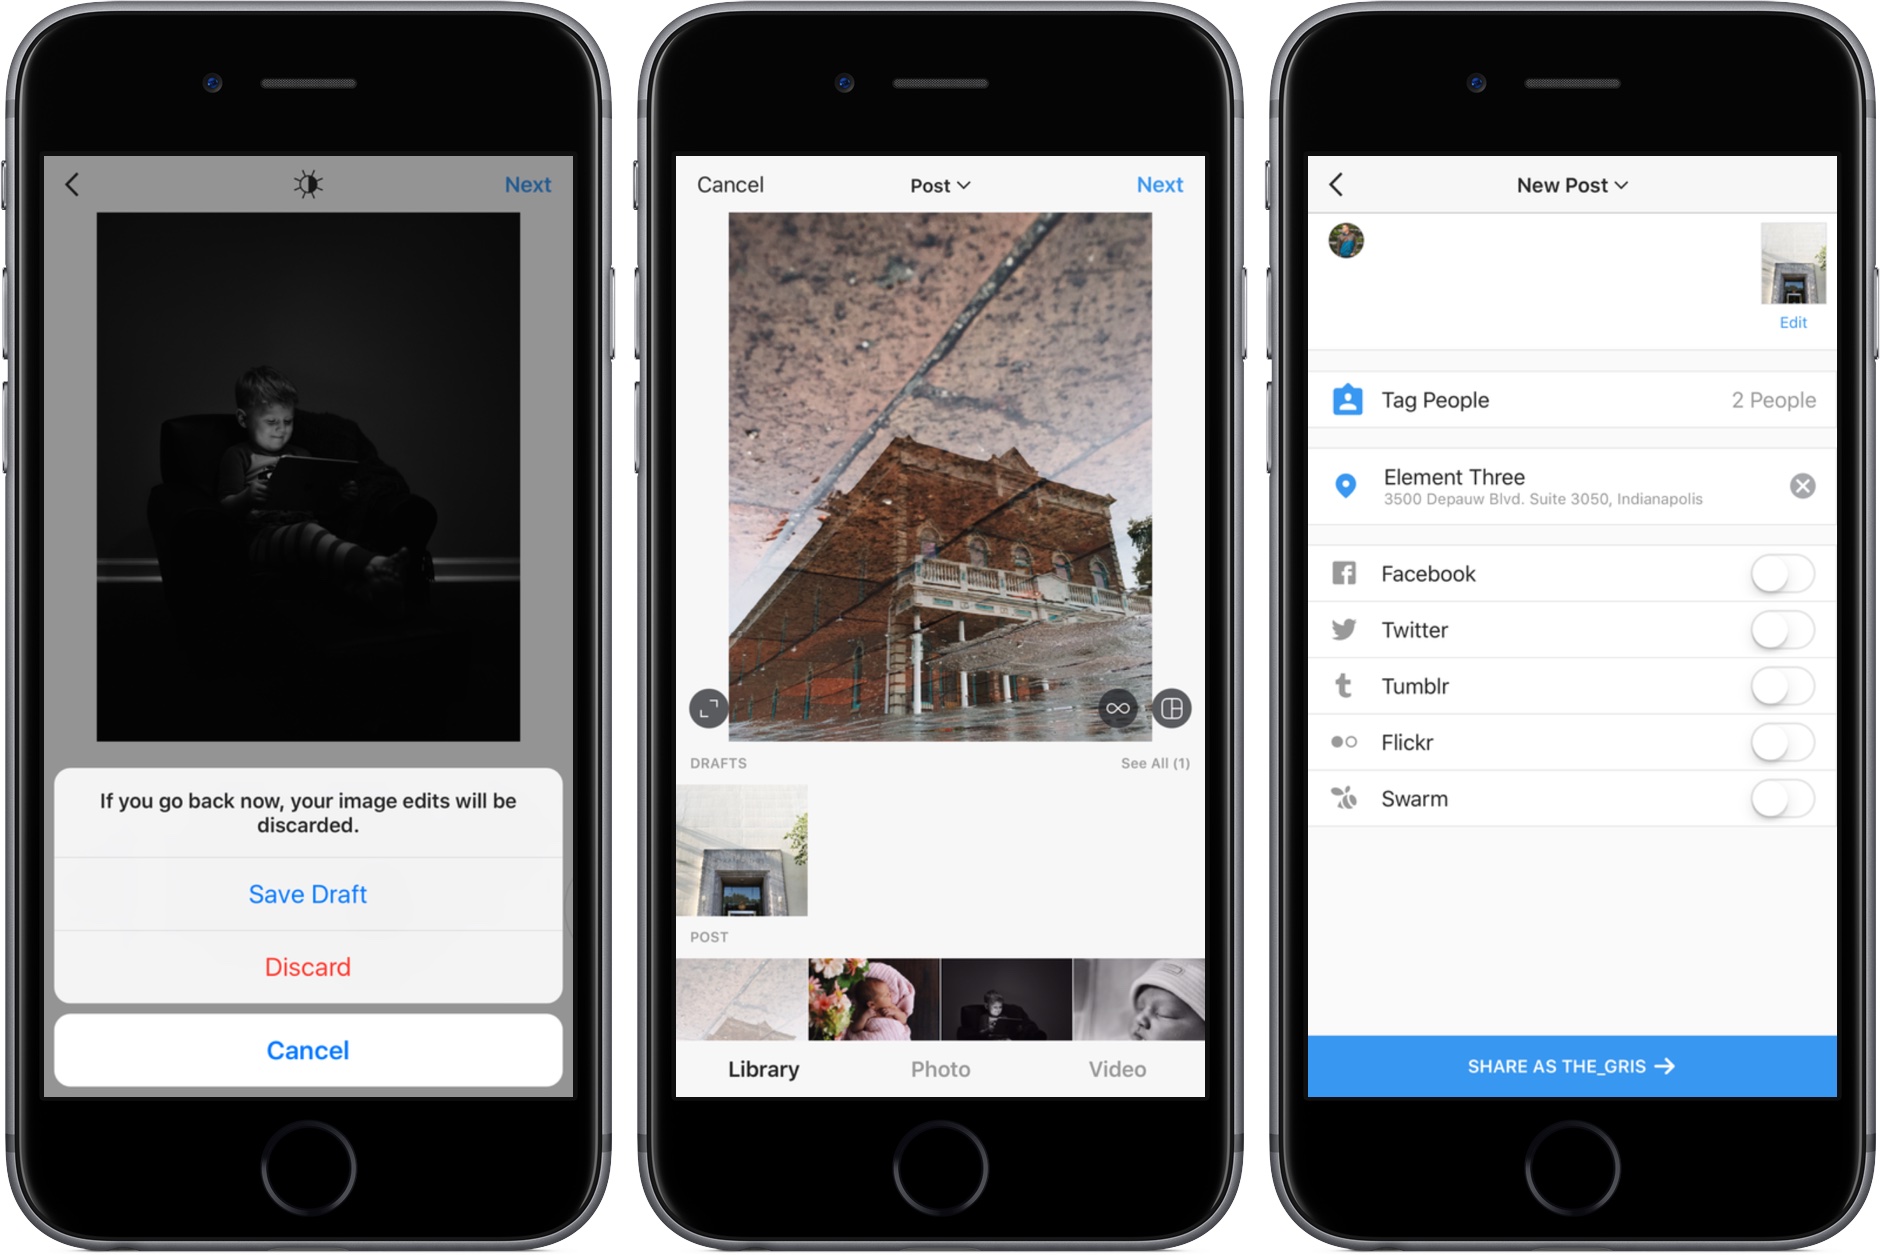
- Once you are on the editing screen of your post, scroll down until you find the section labeled “Tag People.”
- To add tags, simply start typing the username of the person or account you want to tag. Instagram will provide suggestions as you type. Select the correct account from the suggestions.
- If you want to remove tags that are already added, tap on the “x” next to the username.
- You can also tag people in the photo by tapping on the image and selecting the specific area where the person appears. This is particularly useful when there are multiple people in the photo.
Adding relevant tags can significantly increase the visibility of your post. Consider using hashtags that are popular within your niche or industry to reach the right audience. However, avoid overusing tags, as it may appear spammy and diminish the quality of your post. Focus on using a few targeted and relevant tags that align with the content of your post.
If you are promoting a product, collaborating with another account, or participating in a particular campaign, make sure to tag the respective accounts or use campaign-specific tags to maximize exposure.
Once you have added or removed the tags as desired, let’s move on to the next step: editing the location of your Instagram post.
Step 4: Editing the Location
The location tag on Instagram allows you to provide additional context to your post by indicating where it was taken. If you need to edit the location of your post, follow these simple steps:
- While on the editing screen of your post, scroll down until you find the section labeled “Add Location.”
- Tap on the current location tag to open the location search bar.
- Start typing the name of the desired location. Instagram will provide suggestions based on your input.
- Select the correct location from the suggestions. Alternatively, you can create a custom location by tapping on “Add Custom Location” and entering the name of the location manually.
Editing the location tag is particularly useful if you accidentally tagged the wrong location or if you want to provide more accurate information to your audience. For example, if you initially posted a photo without a location but later want to indicate the specific landmark or city where it was taken, editing the location tag allows you to do so.
Keep in mind that if your post does not have a location tagged, it will not appear in location-based searches or on location-based Explore pages. Adding a relevant location can increase the visibility of your post to users who are interested in that specific area.
Once you have edited the location, the next step is to review and adjust the image or video of your post, ensuring it looks its best on your Instagram feed.
Step 5: Adjusting the Image or Video
To make your Instagram post visually appealing, it’s essential to adjust the image or video to ensure it looks its best. Follow these steps to adjust the visual elements of your post:
- While on the editing screen of your post, look for the section that allows you to adjust the image or video. This section may vary depending on the type of post and the version of the Instagram app you are using.
- Here, you’ll find various options to enhance your image or video, such as brightness, contrast, saturation, and more. Explore these options and experiment with different settings to find the desired effect.
- Drag the sliders or adjust the values to increase or decrease the specific visual elements of your post. This allows you to make your image or video brighter, more vibrant, or apply other modifications based on your preference.
- Take your time to assess the changes and ensure the image or video aligns with your intended aesthetic and message.
It’s important to note that the options available for adjusting the image or video may vary depending on the version of the Instagram app you are using. Some versions may offer additional features like cropping, rotating, or applying filters.
While making adjustments, be mindful not to go overboard and alter the essence of your content. Your goal should be to enhance the visual quality without sacrificing the authenticity or integrity of the original image or video.
Once you are satisfied with the adjustments made to the image or video, the next step is to explore the options for applying filters or effects to further enhance the overall appearance of your post.
Step 6: Applying Filters or Effects
Filters and effects are a popular feature on Instagram, allowing you to instantly transform the look and feel of your photos and videos. Follow these steps to apply filters or effects to your Instagram post:
- While on the editing screen of your post, look for the section that allows you to apply filters or effects. This section is usually located below the image or video adjustments.
- Tap on the different filter options available to preview how they will alter the appearance of your post. Instagram offers a wide range of filters, from vintage and moody to light and vibrant.
- Select the filter that best complements your content and aligns with the aesthetic you want to convey.
- Depending on the filter you choose, you may have additional options to adjust the intensity or strength of the filter. Use these options to fine-tune the effect and achieve the desired look.
- Once you are satisfied with the filter and any additional adjustments, take a moment to reevaluate the overall aesthetic and coherence of your post. Ensure that the filter enhances the visual appeal and reinforces the message or mood you wish to convey.
Remember, filters and effects are subjective and will vary depending on personal preferences and the style you want to achieve. Experiment with different filters and settings until you find the one that best suits your content.
Applying filters and effects can help create a consistent and visually stunning Instagram feed. Consistency in filter selection can also establish a recognizable and cohesive brand identity, making your posts stand out and resonate with your audience.
Once you have applied the desired filter or effect, the next step is to tag people in your post, if applicable.
Step 7: Tagging People
Tagging people in your Instagram posts is a great way to give credit, highlight collaborations, and connect with others. If you want to tag someone in your post, follow these steps:
- While on the editing screen of your post, locate the section that allows you to tag people. This section is typically found below the caption.
- Tap on the “Tag People” option, and then tap on the location in the photo where the person you want to tag is situated.
- Start typing the username of the person or account you want to tag. As you type, Instagram will provide suggestions based on your input.
- Select the appropriate account from the suggestions. You can tag up to 20 accounts in a single post. If needed, repeat the process to tag additional people.
- Once you have finished tagging people, review the placement of the tags in the photo. You can adjust the positioning by tapping on the tag and dragging it to the desired location.
Tagging people in your posts not only acknowledges their presence but also increases the likelihood of engagement and provides an opportunity for others to discover their accounts. It fosters connections, collaborations, and community building on the Instagram platform.
When tagging someone, ensure that the person in the photo has given permission to be tagged. It is also courteous to tag people accurately and responsibly, ensuring that you are tagging the correct accounts.
Once you have successfully tagged the relevant people, the next step is to add alt text for accessibility purposes. This ensures that people with visual impairments can engage with your content.
Step 8: Adding Alt Text for Accessibility
Adding alt text to your Instagram posts is an important accessibility feature that provides a description of your image or video for people with visual impairments. To add alt text to your post, follow these steps:
- While on the editing screen of your post, look for the option labeled “Alt Text.”
- Tap on the “Alt Text” option, which will open a text box where you can input the description.
- Write a concise and descriptive alternative text that accurately represents the content of your image or video. Focus on conveying the essential details, such as the subject, context, and any relevant information that a visually impaired person would need to understand the content.
- Keep the alt text clear, straightforward, and free from unnecessary details or personal opinions.
- Once you have added the alt text, review it to ensure its accuracy and relevance to the media file you are posting.
By providing alt text, you enable individuals with visual impairments to engage with and understand the content you are sharing on Instagram. It allows screen readers and other assistive technologies to describe the image or video, providing a more inclusive experience for all users.
When writing alt text, consider the importance of being descriptive without being overly verbose. Ensure that your alt text is both concise and informative, allowing individuals to form a mental image of the content without being overwhelmed by excessive detail.
Adding alt text is not only an accessibility best practice but also contributes to a more inclusive and diverse online community. It allows people with visual impairments to participate in and appreciate the visual nature of the Instagram platform.
Once you have added the necessary alt text, the final step is to update your post with the changes you have made.
Step 9: Updating the Post
After making all the desired changes to your Instagram post, it’s time to update it and ensure that your modifications are saved and published. Follow these steps to update your post:
- While on the editing screen of your post, review all the adjustments, such as the caption, tags, location, image/video enhancements, filters, tagged people, and alt text.
- Take a moment to double-check for any errors, typos, or inconsistencies.
- Once you are satisfied with the changes, look for the option to save or update the post. This button is typically labeled “Done” or “Save” and is commonly located in the top right corner of the screen.
- Tap on the “Done” or “Save” button to apply the changes to your post.
- Instagram will usually display a notification confirming that your post has been updated successfully.
It’s important to note that once you update your post, the modifications will be reflected for all users who view your post, including those who have previously commented on or interacted with it. Be mindful of this if you are making significant changes that may alter the context or meaning of the original content.
After updating your post, it’s a good practice to review it once more to ensure that everything is as intended. Take the opportunity to engage with your audience by responding to comments, answering questions, and being an active participant in the Instagram community.
Updating your post is crucial for maintaining a polished and professional presence on Instagram. By regularly reviewing and modifying your content, you can refine your messaging, optimize your posts, and adapt to the evolving needs and interests of your audience.
Now that you have successfully updated your post, you can continue sharing captivating and engaging content with your followers on Instagram.
Conclusion
Editing your Instagram posts is a valuable skill that allows you to refine your content, enhance its visual appeal, and ensure it aligns with your brand or personal style. By following the steps outlined in this guide, you can easily make changes to your captions, tags, location, image or video adjustments, filters, tagged people, alt text, and more.
Taking the time to edit your posts demonstrates your commitment to presenting high-quality content to your audience. It allows you to correct any mistakes, optimize your posts for discoverability, and maintain a cohesive and professional presence on Instagram.
Remember to consider the accessibility aspect of your posts by adding alt text. By providing accurate descriptions, you enable individuals with visual impairments to engage with your content and participate in the Instagram community.
Keep in mind that editing your posts should be done thoughtfully and with intention. Avoid making unnecessary changes that may confuse or mislead your audience. Instead, focus on refining your message, improving the visual aspects, and staying true to your brand or personal identity.
As an Instagram user, embracing the editing feature empowers you to continuously evolve and improve your content strategy. Regularly reviewing and updating your posts reflects your dedication to delivering engaging and meaningful content to your followers.
So, go ahead and explore the editing capabilities of Instagram, elevate your posts, and make a lasting impression on your audience!