Introduction
Welcome to the world of dual booting on your ultrabook! If you want to explore different operating systems or need to use specific software that is not available on your current OS, dual booting can be a great solution. With dual booting, you can have multiple operating systems installed on the same device and select the one you want to use at startup.
But before diving into the process, it’s important to understand what dual booting entails. In simple terms, dual booting allows you to have two or more operating systems coexist on your ultrabook. This means you can have Windows and Linux, macOS and Windows, or even all three on the same device. Each operating system will have its own dedicated partition, ensuring that they don’t interfere with each other.
Dual booting can come in handy for various reasons. You might want to explore the features of a different operating system or test software compatibility before fully committing to a switch. It can also be useful for developers who need to work with different platforms or individuals who rely on specific software that is only available on a particular OS.
While dual booting provides flexibility and expands your options, it does require careful planning and execution. It’s essential to have a clear understanding of the process and follow the necessary steps to avoid any issues or data loss. In this guide, we will walk you through the steps to successfully dual boot your ultrabook.
Before we begin, it’s important to note that the steps provided here may vary slightly depending on the make and model of your ultrabook, as well as the operating systems you want to install. It’s always a good idea to consult your ultrabook’s documentation or the manufacturer’s website for specific instructions.
Step 1: Choose the Right Ultrabook
The first step in dual booting your ultrabook is to ensure that it is compatible with multiple operating systems and has the necessary specifications. While most modern ultrabooks support dual booting, it’s still important to check for any specific requirements or limitations.
Start by checking the system requirements of the operating systems you wish to install. Make sure that your ultrabook meets or exceeds these requirements. Pay attention to factors such as processor speed, RAM, and hard drive space.
Another important consideration is the BIOS or UEFI firmware on your ultrabook. Some ultrabooks use UEFI instead of traditional BIOS, and this can affect the installation and setup process. Ensure that your ultrabook supports UEFI and has the necessary options in the firmware settings to enable dual booting.
It’s also worth noting that some ultrabooks come pre-installed with specific operating systems, such as Windows, and may have certain limitations or restrictions on dual booting. Check if your ultrabook has any such restrictions and if there are any recommended steps or guidelines provided by the manufacturer.
Additionally, consider the storage capacity of your ultrabook. Dual booting requires dedicated partitions for each operating system, so make sure there is enough space available on your hard drive to accommodate the additional operating system(s). If your storage is limited, you may need to free up space or consider upgrading to a larger storage capacity.
Lastly, it’s important to keep in mind that while dual booting allows you to have multiple operating systems on your ultrabook, it may also affect the overall performance and battery life. Switching between operating systems requires resources and can have an impact on the performance of your ultrabook. Consider these factors and ensure that dual booting aligns with your specific needs and usage patterns.
By choosing the right ultrabook that meets the requirements for dual booting, you set yourself up for a smooth and successful experience. Take the time to research and ensure compatibility before proceeding to the next steps.
Step 2: Back Up Your Data
Before you embark on the dual booting process, it’s crucial to back up all your important data. While the dual booting process itself is generally safe, there is always a small risk of data loss or unintended consequences. Taking the time to back up your data ensures that you have a safety net in case anything goes wrong.
Start by identifying the files and folders that are essential to you. This includes documents, photos, videos, music, and any other personal or work-related files. Consider using an external hard drive, cloud storage, or a combination of both for your backups.
If you’re using cloud storage, make sure that all your files are synced and up to date. Verify that you have enough storage space to accommodate your backups. If not, consider upgrading your cloud storage plan or selectively backing up only the most critical files.
For an external hard drive backup, connect the drive to your ultrabook and create a new folder to store the backup files. You can either manually copy and paste the files or use backup software to automate the process. Make sure to label the folder clearly and keep track of where you’ve stored the backup drive.
It’s also a good idea to create a system image of your ultrabook’s current operating system. This is a snapshot of the entire operating system, including the installed applications and settings. In case something goes wrong during the dual booting process, you can restore your ultrabook to its previous state using the system image.
Depending on your operating system, you can use built-in backup tools or third-party software to create a system image. Follow the instructions provided by your operating system or refer to online guides for step-by-step instructions.
Remember to double-check that all your valuable data is backed up properly before proceeding with the dual booting process. Once you have verified that your backup is complete, you can have peace of mind knowing that your files are safe, even if something unexpected occurs.
Step 3: Create a Bootable USB Drive
In order to install the new operating system for dual booting, you’ll need to create a bootable USB drive. This USB drive will contain the necessary installation files and act as a boot medium for the new operating system.
Start by selecting the operating system you want to install as the second one for dual booting. Visit the official website of the operating system and download the installation image or ISO file. Make sure to choose the correct version and edition for your ultrabook.
Once you have the ISO file downloaded, you’ll need to create a bootable USB drive. There are several methods to do this, but the most common and straightforward method is by using a tool such as Rufus or UNetbootin.
First, insert the USB drive into your ultrabook. Make sure it is empty or that you have backed up any important files on it, as the process will erase all data on the drive.
Next, open the Rufus or UNetbootin tool on your computer. Select the USB drive you inserted as the destination drive. Then, browse for the ISO file you downloaded and select it as the source file for creating the bootable drive.
Check and confirm the settings, such as the file system format and partition scheme, recommended by the tool. Click “Start” or “Create” to begin the process. It may take a few minutes to complete, depending on the size of the ISO file and the speed of your USB drive.
Once the bootable USB drive is created successfully, safely eject it from your ultrabook. Now, you have a USB drive ready with the installation files for the second operating system.
Creating a bootable USB drive is a crucial step in the dual booting process, as it allows for the seamless installation of the new operating system. Ensure that you follow the instructions carefully and verify that the USB drive is created successfully before proceeding to the next step.
Step 4: Disable Secure Boot and Fast Boot
In order to successfully dual boot your ultrabook, you need to disable two features in your ultrabook’s firmware settings: Secure Boot and Fast Boot. These features are designed to enhance the security and speed of your operating system, but they can hinder the installation and booting of a second operating system.
The process of disabling Secure Boot and Fast Boot varies depending on the make and model of your ultrabook. However, the general steps remain similar. Here’s how you can disable them:
- Start by restarting your ultrabook and accessing the BIOS or UEFI settings. The key to access these settings varies depending on your ultrabook; it’s typically one of the function keys (F1, F2, F10, etc.) or the Delete key. Consult your ultrabook’s manual or manufacturer’s website for the specific key to press.
- Once you’re in the BIOS or UEFI settings, navigate to the “Security” or “Boot” section. Look for options related to Secure Boot or Boot Security.
- Disable the Secure Boot option by selecting it and changing the setting to “Disabled”. This will allow the installation of unsigned operating system components or bootloaders.
- Next, navigate to the “Boot” or “Boot Options” section and look for the Fast Boot setting. Disable Fast Boot by changing the setting to “Disabled”. This ensures that your ultrabook performs a full boot process and allows the dual boot menu to appear.
- Save the changes you made in the BIOS or UEFI settings and exit. The key to save and exit varies but is typically the F10 key.
After disabling Secure Boot and Fast Boot, your ultrabook is now ready for the dual booting process. These settings allow for the installation and booting of a second operating system without any restrictions or conflicts.
Note that some ultrabooks might have additional settings or features related to booting. It’s important to explore the BIOS or UEFI settings thoroughly and consult the documentation or manufacturer’s website if you encounter any difficulties.
By disabling Secure Boot and Fast Boot, you ensure that the dual booting process goes smoothly and that the new operating system can be installed and accessed without any issues.
Step 5: Allocate Partition for New Operating System
Once you have prepared your ultrabook by disabling Secure Boot and Fast Boot, the next step in the dual booting process is to allocate a new partition for the installation of the new operating system. This partition will serve as the dedicated space for the second operating system.
Before proceeding, it’s important to note that partitioning a hard drive can result in data loss if not done correctly. Therefore, it’s strongly recommended that you back up all your important data before starting this step.
Here’s how you can allocate a partition for the new operating system:
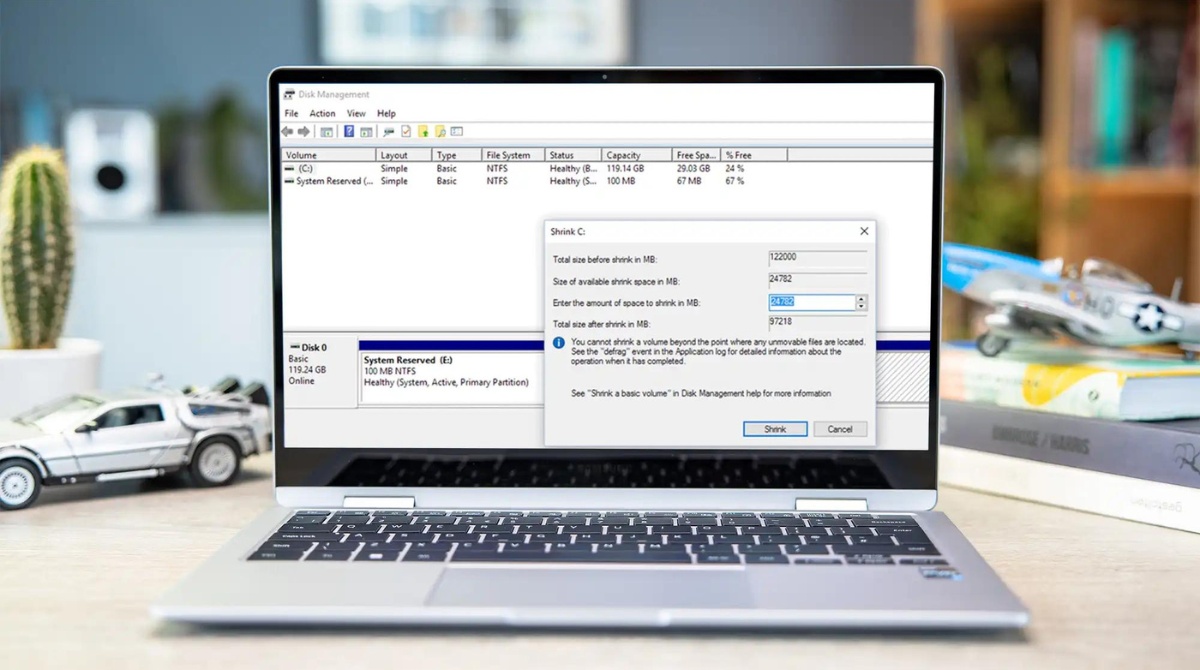
- Open the Disk Management utility on your ultrabook. You can access it by right-clicking on the Start button and selecting “Disk Management” from the menu that appears.
- Once the Disk Management window is open, locate your ultrabook’s main hard drive. It is usually labeled as “Disk 0” or “C:” and may have additional partitions already present.
- Right-click on the main hard drive and select “Shrink Volume” from the context menu. This will initiate the process of resizing the partition to create free space for the new operating system.
- In the “Shrink” window, specify the amount of space you want to allocate for the new operating system. Make sure to leave enough space for the operating system and any additional software or files you plan to install.
- Click “Shrink” to start the process. The partition will be resized, and the allocated space will appear as “Unallocated”.
- Right-click on the “Unallocated” space and select “New Simple Volume” from the context menu. Follow the on-screen prompts to set the file system, assign a drive letter, and format the partition.
By following these steps, you have successfully allocated a partition for the new operating system. This partition will serve as the dedicated space for the second operating system’s installation files, system files, and data.
It’s important to note that the partitioning process may vary slightly depending on the version of Windows or the disk management tool you are using. Make sure to read the on-screen instructions and consult the documentation or online guides if you encounter any difficulties.
Once you have allocated the partition, you are now ready to proceed with the installation of the new operating system in the next step.
Step 6: Install the New Operating System
Now that you have allocated a partition for the new operating system, it’s time to proceed with the installation. This step involves booting your ultrabook from the bootable USB drive you created in Step 3 and following the installation prompts for the new operating system.
Here’s a step-by-step guide to help you install the new operating system:
- Insert the bootable USB drive into your ultrabook.
- Restart your ultrabook and access the BIOS or UEFI settings. The key to enter these settings might be different for each ultrabook, so refer to your device’s documentation or manufacturer’s website to find the correct key.
- In the BIOS or UEFI settings, navigate to the “Boot” or “Boot Order” section and change the boot priority so that the USB drive is the first boot option. Save the changes and exit the settings.
- Your ultrabook will now boot from the USB drive. Follow the on-screen prompts to start the installation process for the new operating system.
- During the installation process, you will have the option to choose the installation location. Select the partition you allocated in Step 5 as the installation destination. Be cautious not to format or install on any other partitions, as this may lead to data loss.
- Continue following the installation prompts, including setting up any necessary user accounts, network connections, and additional settings specific to the new operating system.
- Once the installation is complete, your ultrabook will restart.
After the restart, you will be presented with the dual boot menu, allowing you to choose which operating system to boot into. Use the arrow keys to select the desired operating system and press enter to boot into it.
Congratulations! You have successfully installed the new operating system on your ultrabook for dual booting.
Remember to complete any post-installation setup, update drivers, and install necessary software and updates for the new operating system to ensure smooth and optimal performance.
If you encounter any issues during the installation, refer to the documentation or online guides specific to the new operating system or consult the manufacturer’s website for troubleshooting steps.
With the new operating system installed, you can now enjoy the benefits of dual booting on your ultrabook and seamlessly switch between operating systems based on your needs.
Step 7: Set Up Dual Boot Menu
Setting up a dual boot menu is essential to easily switch between your installed operating systems. Without a dual boot menu, you would need to manually change the boot settings each time you want to switch between operating systems. Fortunately, most operating systems provide built-in tools to manage the dual boot menu.
Here’s how you can set up a dual boot menu:
- Boot into your newly installed operating system.
- Access the settings or control panel of the operating system and look for the “Advanced Startup” or “Startup and Recovery” options.
- Select the option to configure the startup settings or manage the boot menu.
- Within the boot menu settings, you will see an option to add another operating system. Select this option.
- The system will search for other installed operating systems and display them. Choose the operating system that you want to add to the dual boot menu.
- Confirm your selection and save the changes.
Once the changes are saved, the dual boot menu will be configured, and you will see the option to choose between the installed operating systems during startup.
It’s worth noting that the process of setting up the dual boot menu can vary depending on the operating systems you have installed. Some operating systems, like Windows, have more user-friendly interfaces for managing the boot menu, while others might require manual configuration through configuration files.
If you encounter any difficulties or issues during the setup of the dual boot menu, refer to the documentation or online guides specific to the operating systems you have installed. You can also consult the operating system’s support forums or the manufacturer’s website for assistance.
With the dual boot menu set up, you can now easily switch between your installed operating systems at startup, enjoying the flexibility and convenience of having multiple operating systems on your ultrabook.
Step 8: Troubleshooting Common Issues
While the dual booting process is generally straightforward, there can be occasional issues that may arise. It’s important to be prepared to troubleshoot and resolve any potential problems that you may encounter. Here are some common issues and their possible solutions:
- Dual boot menu not appearing: If the dual boot menu does not appear during startup, it’s possible that the boot order in your BIOS or UEFI settings may need adjustment. Make sure that the operating system installed last is set as the default boot option. Additionally, check if the boot menu settings in your operating system are correctly configured.
- OS not booting after selection: If you select an operating system from the dual boot menu, but it fails to boot or displays an error message, there may be an issue with the installation. Try repairing the operating system by using installation media or booting into recovery mode. You can also check for any recent updates or changes that may be causing the issue.
- Issues with drivers and hardware compatibility: It’s possible that certain hardware components in your ultrabook may not have the necessary drivers installed for the secondary operating system. Visit the manufacturer’s website for each operating system and download the appropriate drivers for your hardware. Ensure that the drivers are installed correctly, and check for any compatibility issues or known bugs.
- Data loss or data inaccessibility: If you encounter data loss or an inability to access files on a specific partition, avoid making any changes to the affected partition. Use data recovery software to attempt to retrieve the lost or inaccessible data. It’s also crucial to regularly back up your data to prevent such issues in the future.
- Unstable or slow performance: If you experience performance issues, such as slow boot times or sluggishness in one of the operating systems, it may be helpful to update drivers, optimize system settings, and ensure you have adequate hardware resources allocated to each operating system.
Remember, troubleshooting steps may vary depending on the specific issue and the operating systems involved. Consult the documentation, online guides, and support forums for each operating system to find the appropriate solutions for your situation.
If you are unable to resolve the issues on your own, consider seeking assistance from a technical expert or reaching out to the support channels provided by the operating system manufacturers.
By being proactive in troubleshooting and resolving any issues that may arise, you can ensure a smooth and reliable dual booting experience on your ultrabook.
Conclusion
Congratulations! You have successfully learned how to dual boot your ultrabook and install multiple operating systems. Dual booting opens up a world of possibilities, allowing you to explore different operating systems, use specific software, or simply have a backup option available. It provides the flexibility and convenience to switch between operating systems based on your needs and preferences.
Throughout this guide, you have learned the step-by-step process of dual booting, starting from choosing the right ultrabook and backing up your data to creating a bootable USB drive, disabling secure boot and fast boot, allocating a partition, installing the new operating system, setting up a dual boot menu, and troubleshooting common issues.
Remember, while dual booting offers numerous benefits, it also comes with considerations and potential challenges. Always back up your data to prevent any accidental loss, and ensure that your ultrabook meets the system requirements for the operating systems you plan to install. Additionally, be cautious when making changes to your partitions and follow the steps carefully to avoid any data corruption.
If you encounter any difficulties or have questions along the way, consult the documentation, online guides, and support resources provided by the operating system manufacturers and your ultrabook’s manufacturer. Their expertise and guidance can help you overcome any hurdles and ensure a smooth dual booting experience.
With dual booting successfully set up on your ultrabook, you can now enjoy the best of both worlds, using different operating systems for different tasks or preferences. Take advantage of the flexibility and explore the unique features and benefits offered by each operating system. Whether you’re a developer, a power user, or someone who simply wants to explore different options, dual booting gives you the freedom to tailor your ultrabook’s capabilities to your specific needs.
Now that you have the knowledge and skills to dual boot your ultrabook, it’s time to put it into action. Embrace the power of choice and embark on a journey of exploration and productivity with your dual-booted ultrabook.