Introduction
Instagram highlights have become a popular feature for users to showcase their favorite moments and stories on their profiles. They allow you to curate and organize content into specific categories, making it easier for your followers to browse through and engage with your posts. While highlights can be a great addition to your profile, there may come a time when you want to delete a highlight for various reasons.
In this article, we will guide you through the process of deleting an Instagram highlight. Whether you want to remove a highlight that is no longer relevant or simply want to make changes to your profile, we’ve got you covered. With just a few simple steps, you’ll be able to remove any unwanted highlights from your Instagram profile.
Before we dive into the steps, let’s discuss some of the reasons why you might want to delete an Instagram highlight:
- Rebranding: If you have repositioned your brand or have changed the focus of your content, you might want to remove highlights that no longer align with your new direction.
- Mistakenly added: Sometimes, in the excitement of creating highlights, you might accidentally add the wrong content or create a duplicate. Deleting the unwanted highlight can help keep your profile clean and organized.
- Privacy concerns: If you have shared personal or sensitive information in a highlight and later decide that you no longer want it to be visible, removing the highlight is the best course of action.
- Outdated content: Over time, some of your highlights may become outdated or no longer relevant. Deleting them will ensure that your profile reflects your most current and engaging content.
Now that we understand the reasons why you might want to delete an Instagram highlight, let’s get started with the step-by-step guide on how to do it.
Reasons to Delete an Instagram Highlight
There are several reasons why you might want to delete an Instagram highlight from your profile. Here are a few common scenarios:
1. Relevance: Over time, the content in your highlights may become outdated or no longer relevant to your brand or personal image. Deleting irrelevant highlights allows you to keep your profile fresh and aligned with your current messaging.
2. Branding Changes: If you have recently rebranded your business or changed your niche, you may want to remove highlights that no longer reflect your new branding or content focus. This helps ensure consistency across your profile and avoids confusing your followers.
3. Privacy Concerns: Some highlights may contain personal or sensitive information that you no longer wish to share, such as specific locations, private events, or sensitive topics. Deleting these highlights helps protect your privacy and maintain control over the content on your profile.
4. Content Quality: As you regularly post new content, you may find that some older highlights no longer meet your desired quality standards. Removing these highlights allows you to showcase your best posts and maintain a visually appealing profile.
5. Accidental Additions: It’s easy to accidentally add the wrong content to a highlight or create duplicates. In such cases, deleting the unwanted highlights helps maintain a clean and organized profile.
6. Changing Themes: If you have been following a specific theme or aesthetic for your highlights but decide to shift to a different style, you may want to delete the existing highlights and create new ones that align with your new theme. This creates consistency and cohesion in your profile’s visual appeal.
By being aware of these reasons, you can confidently decide when it’s time to delete an Instagram highlight and maintain a profile that accurately represents your brand or personal image. Now, let’s move on to the step-by-step guide to deleting an Instagram highlight.
Step 1: Open the Instagram App
The first step to deleting an Instagram highlight is to open the Instagram app on your mobile device. Make sure you have logged in to your account before proceeding with the following steps.
If you don’t have the Instagram app installed on your device, you can download it for free from the App Store (for iOS users) or Google Play Store (for Android users).
Once the app is installed, locate the Instagram icon on your home screen or app drawer and tap on it to open the app.
If you are already logged into your account, the app will open directly to your home feed. If not, enter your login credentials – your username and password – to access your Instagram account.
After successfully logging in, you will be redirected to your Instagram home feed, where you can view posts from accounts you follow.
Ensure that you have a stable internet connection to avoid any interruptions while performing the following steps to delete an Instagram highlight.
Now that you have opened the Instagram app, let’s move on to the next step, where you will navigate to your profile to access your highlights.
Step 2: Go to Your Profile
Once you have successfully opened the Instagram app and logged into your account, the next step is to navigate to your profile. Your profile is where you can view and manage all your posts, highlights, followers, and other account settings.
To access your profile, locate the profile icon in the bottom right corner of the app. It resembles a silhouette or a small circular image that represents your profile picture. Tap on the profile icon to proceed.
After tapping on the profile icon, you will be redirected to your profile page. Here, you can see your profile picture, username, bio, and a grid of your recent posts. You will also find various buttons and options to edit your profile, change settings, and manage your highlights.
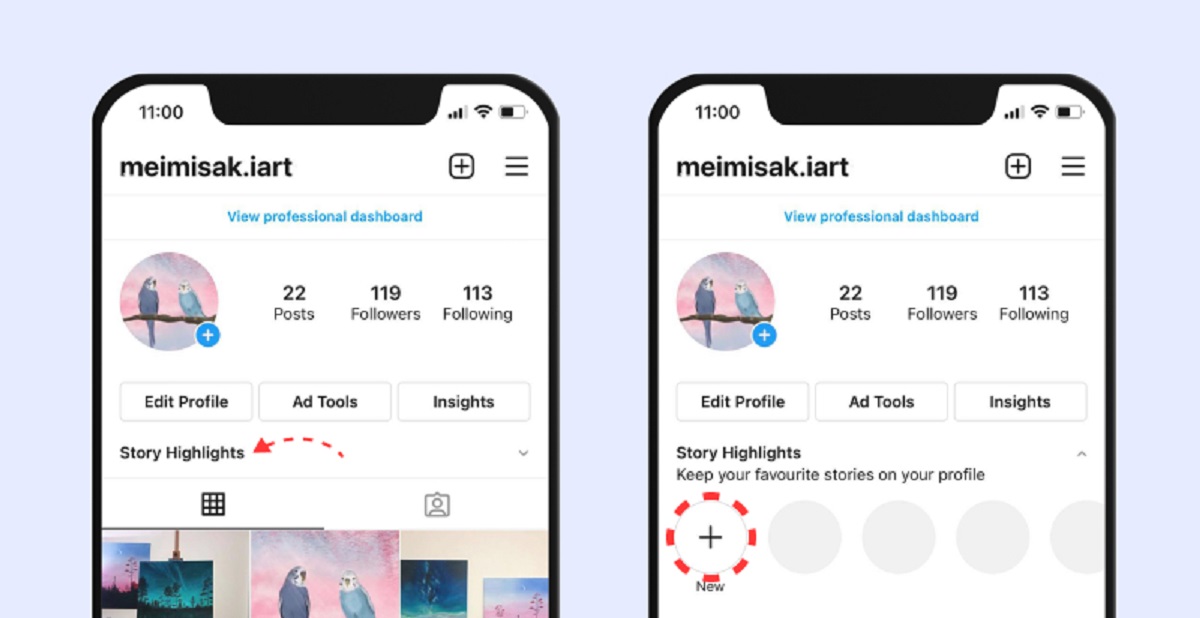
At the top of your profile page, you will see several tabs such as Posts, IGTV, and Tagged. Swipe or scroll to the right to view the “Highlights” tab. This is where all your created highlights are displayed.
If you haven’t created any highlights yet, the tab may appear empty or display a message prompting you to create highlights. If you have already created highlights, they will be listed here, showcasing the cover photo you chose for each highlight.
Once you have successfully reached your profile page and located the highlights tab, you’re ready to move on to the next step and access your highlights for deletion.
Step 3: Access Your Highlights
After reaching your profile page on Instagram, the next step is to access your highlights. These highlights are a collection of your curated stories that you have chosen to showcase on your profile.
To access your highlights, look for the “Highlights” tab located at the top of your profile page. Tap on the tab to view all the highlights you have created. Each highlight will be represented by a cover photo that you selected when creating the highlight.
Scroll through the list of highlights to find the specific one that you want to delete. If you have a large number of highlights, you can swipe left or right to navigate through them.
As you browse through your highlights, take note of the content and cover photos associated with each one. This visual reference will help you choose the correct highlight to delete if you have multiple highlights or similar-sounding titles.
If you cannot find the highlight you wish to delete, double-check that you are in the correct Instagram account. Sometimes, users might have multiple accounts logged in, and the highlights may be associated with a different account.
Once you have located the highlight you want to delete, you are ready to proceed to the next step, where you will find the options to delete the highlight.
Step 4: Select the Highlight to Delete
After accessing your Instagram highlights, the next step is to choose the specific highlight that you want to delete. This step is crucial to ensure that you do not accidentally delete the wrong highlight.
Scroll through the list of highlights until you find the one you wish to delete. Take your time to review the cover photo, title, and content of the highlight to confirm that you have selected the correct one.
If you have a large number of highlights or similar-sounding titles, it can be helpful to tap on each highlight to preview its content before proceeding with the deletion. This will provide a visual reference and ensure that you are confident in your choice.
Remember, once you delete a highlight, it cannot be restored. If you have any doubts about deleting a particular highlight, you may want to consider archiving it instead. Archiving allows you to temporarily remove a highlight from your profile without permanently deleting it.
Once you have identified the correct highlight to delete, you are ready to move on to the next step, where you will find the option to delete the highlight.
Step 5: Tap on the “More” Option
After selecting the specific highlight you want to delete, the next step is to tap on the “More” option. This option contains additional settings and actions for the selected highlight, including the option to delete it.
Look for three dots (usually arranged vertically) or an ellipsis icon, typically located in the top right corner of the highlight. These dots indicate that there are more options available for that particular highlight.
Tap on the “More” option to access the additional settings and actions menu for the selected highlight. It will trigger a drop-down menu or a pop-up window with various options.
Take a moment to review the options presented in the menu. Since you want to delete the highlight, look for any mention of “Delete,” “Remove,” or similar terms. The exact phrasing may vary based on the version of the Instagram app you are using.
If you don’t see an option to delete the highlight, double-check that you have selected the correct one and that you are accessing the settings and actions menu for that specific highlight. Sometimes, users may accidentally tap on the wrong highlight, leading to confusion.
Once you have successfully accessed the “More” option and confirmed the availability of the delete option, you are ready to proceed to the next step, where you will delete the highlight.
Step 6: Delete the Highlight
Now that you have accessed the settings and actions menu for the selected highlight, it’s time to delete it. Deleting the highlight will permanently remove it from your profile, so be sure that you have chosen the correct one.
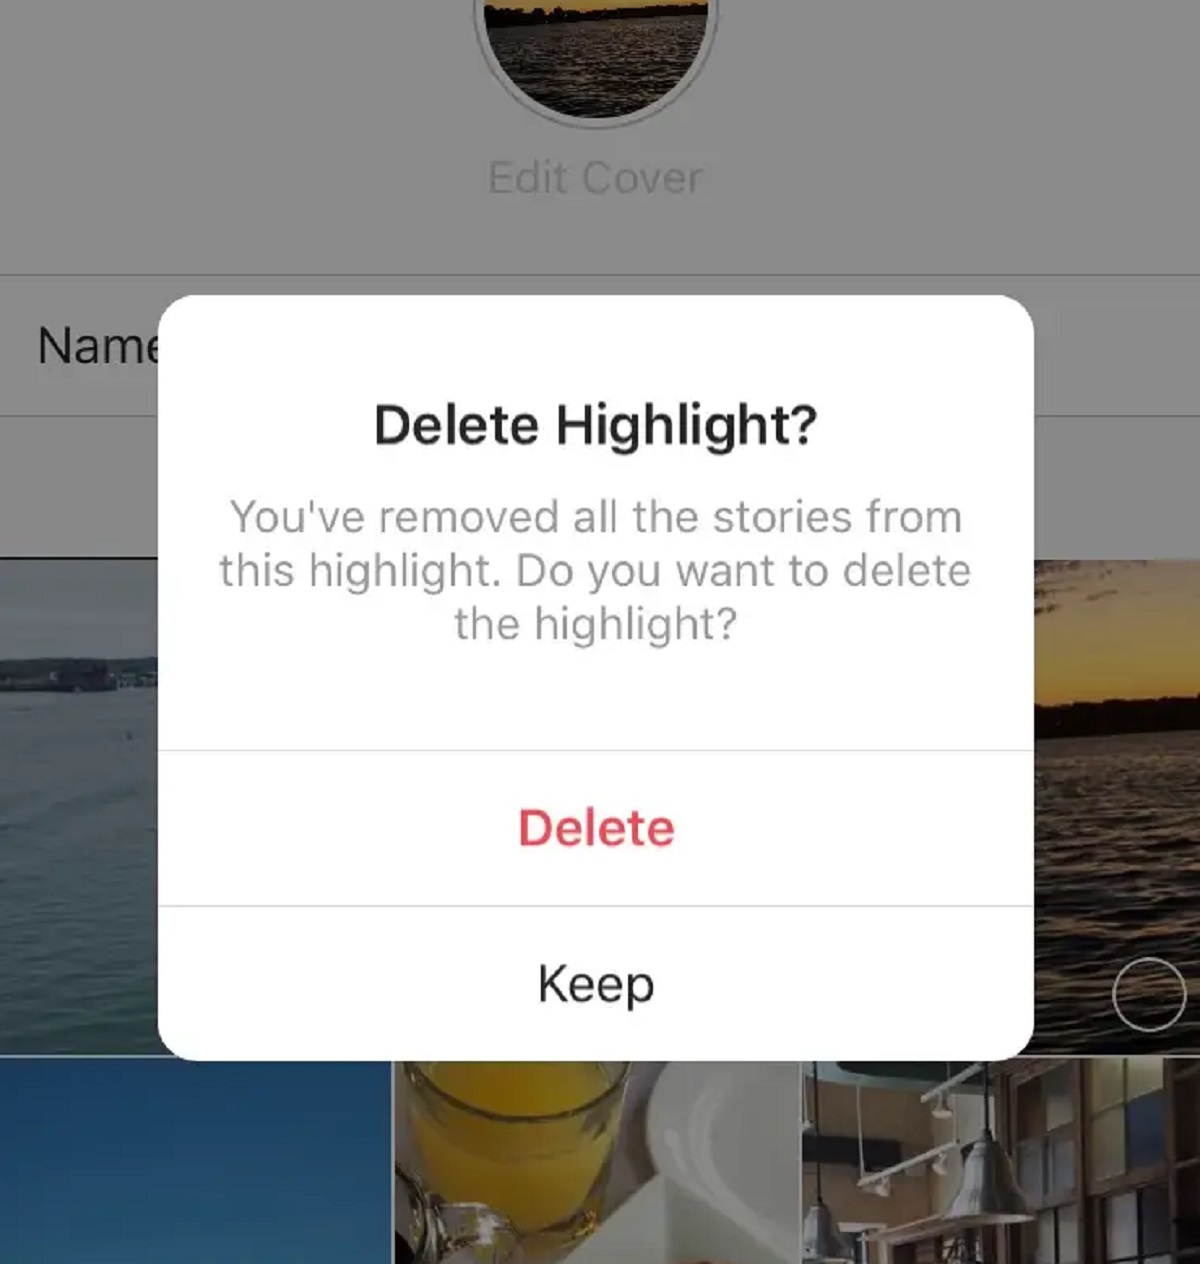
In the settings and actions menu, look for the option that specifically mentions deleting or removing the highlight. It is usually labeled as “Delete Highlight” or “Remove Highlight.” Tap on this option to proceed with the deletion.
After tapping on the delete or remove option, Instagram will ask for confirmation to ensure that you genuinely want to delete the highlight. This confirmation step is crucial to prevent accidental deletions.
Review the confirmation message carefully to ensure that you are deleting the correct highlight. If you have any doubts, you can tap on the “Cancel” or “No” option to go back and revisit your selection.
If you are certain about deleting the highlight, tap on the “Delete” or “Yes” option to confirm. Instagram will then remove the selected highlight from your profile.
Keep in mind that once you delete a highlight, it is not recoverable. If you change your mind or wish to keep the content, consider archiving the highlight instead. Archiving allows you to temporarily remove the highlight from your profile while preserving all the content within it.
Congratulations! You have successfully deleted the Instagram highlight. You can now proceed to the final step, where Instagram will ask for one last confirmation before completing the deletion process.
Step 7: Confirm the Deletion
After you have selected the option to delete the highlight, Instagram will prompt you to confirm the deletion. This final step ensures that you are intentionally deleting the highlight and prevents any accidental removals.
On the confirmation screen, Instagram may provide additional information about the consequences of deleting the highlight. Read through this information carefully to fully comprehend the impact of your action.
Double-check that the highlight displayed on the confirmation screen matches the one you intended to delete. If you have any doubts, you can still go back and cancel the deletion process by tapping on the “Cancel” or “No” option.
If you are certain about deleting the highlight, tap on the “Delete” or “Yes” option to confirm. Instagram will then proceed with removing the selected highlight from your profile.
Depending on your device and internet connection, it may take a few moments for Instagram to complete the deletion process. During this time, avoid closing the app or navigating away from the page to ensure that the deletion is successful.
Once the deletion is complete, the selected highlight will no longer be visible on your profile. However, keep in mind that the individual stories or posts that were part of the highlight will still be available in their respective locations on your profile or in the Instagram feed.
That’s it! You have successfully confirmed the deletion of the Instagram highlight. Your profile will now reflect the changes, and the deleted highlight will no longer be accessible to your followers or visitors to your profile.
Remember, deleting a highlight is permanent, and you will not be able to recover it. If you change your mind or wish to showcase the content again, you will need to recreate the highlight from scratch.
Now that you have completed all the steps to delete an Instagram highlight, you can confidently manage and customize your profile to align with your evolving content and branding needs.
Conclusion
Deleting an Instagram highlight can be a simple process that allows you to maintain a current and organized profile. Whether you want to remove outdated content, rebrand your profile, or protect your privacy, following the step-by-step guide outlined in this article will help you achieve your goal.
Remember to carefully select the highlight you wish to delete and confirm your choice before proceeding with the deletion. Take the necessary time to review the content, cover photo, and relevance of the highlight to avoid any accidental removals.
Additionally, it’s essential to understand that once you delete a highlight, it cannot be recovered. If you have any doubts or want to preserve the content, consider archiving the highlight instead of deleting it.
Lastly, regularly assess your highlights to ensure they accurately represent your brand, align with your evolving content, and maintain a visually appealing profile. Deleting outdated or irrelevant highlights can help keep your profile fresh and engaging for your followers.
Now that you have the knowledge and guidance to delete an Instagram highlight, feel free to manage and customize your profile with confidence. Enjoy the process of curating your best moments and stories, creating a visually stunning profile that truly reflects your brand or personal image.