Introduction
Are you looking to delete your Instagram account but don’t have the password? Maybe you’ve forgotten your password or simply can’t access it for some reason. Well, you’re in luck! In this guide, we’ll walk you through the step-by-step process of deleting your Instagram account without needing the password.
Instagram has become one of the most popular social media platforms, allowing users to share photos, videos, and connect with friends and followers. However, there may come a time when you decide that you no longer want to be a part of the platform or need a break from social media altogether. Deleting your Instagram account can be a liberating decision, but it can also be a bit confusing, especially if you don’t have access to your password.
The good news is that Instagram offers an option to temporarily disable your account, which essentially hides your profile and content from other users. This can be a great option if you’re unsure about permanently deleting your account or if you just want to take a break for a while. However, if you’re certain that you want to delete your Instagram account permanently, we’ll guide you through the process as well.
Before we dive into the steps, it’s important to note that deleting your Instagram account is a permanent action. Once you delete your account, you won’t be able to recover it or the content you’ve shared. Therefore, it’s crucial to think carefully before proceeding with the deletion process.
Now that you have an overview of what to expect, let’s get started on how to delete your Instagram account without a password.
Step 1: Access the Instagram website
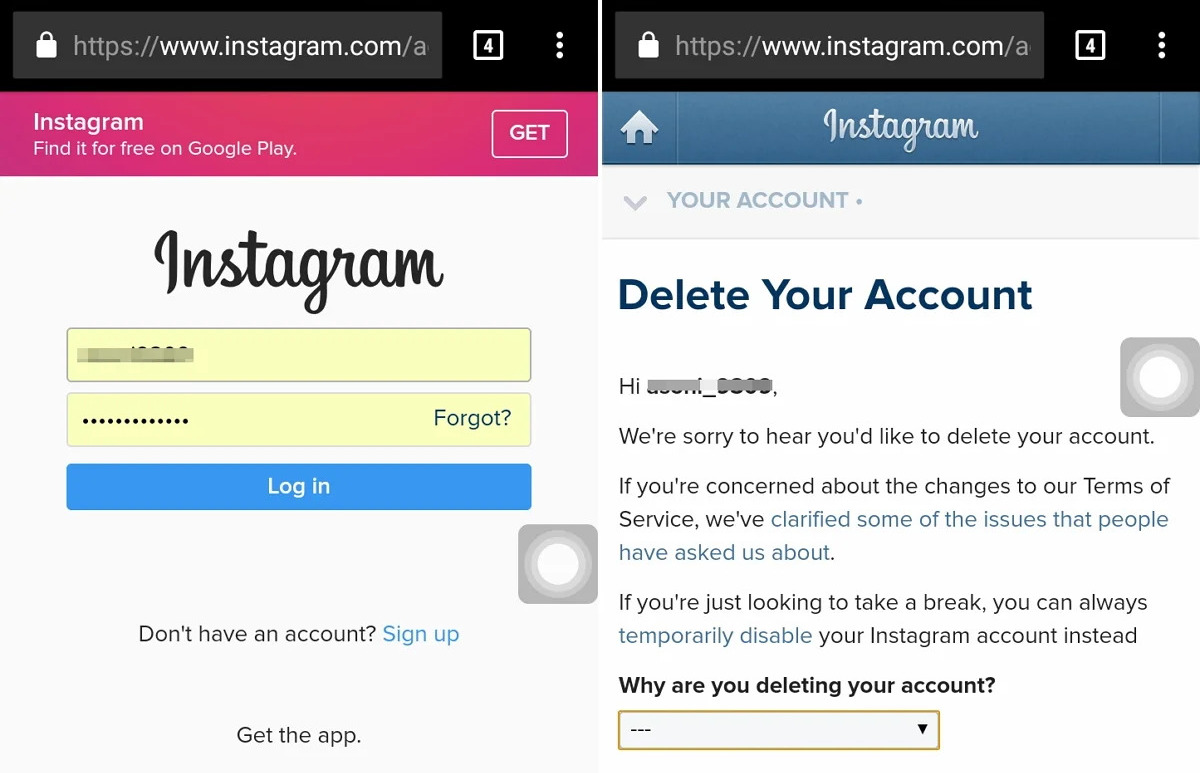
The first step in deleting your Instagram account without a password is to access the Instagram website. You can do this by opening a web browser on your computer or mobile device and navigating to www.instagram.com.
If you’re using a computer, simply type the web address into the address bar of your preferred web browser and hit Enter. If you’re using a mobile device, you can either type the web address in the browser’s address bar or open the Instagram app and navigate to the profile page.
Once you’re on the Instagram website or app, you’ll be able to see the login page. Don’t worry if you don’t have your password – we’ll be guiding you through a different method to delete your account without it. Look for the “Log In” option on the website or the “Log In” button on the app and proceed to the next step.
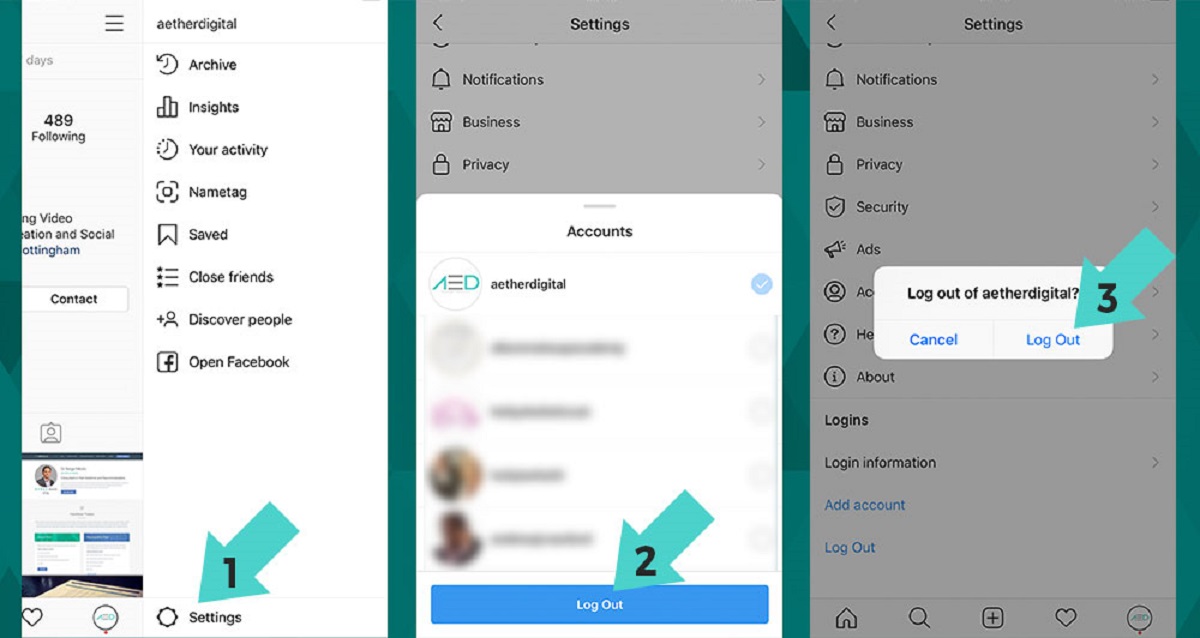
If you’re already logged in to another Instagram account, you’ll need to log out before proceeding. On the website, you can do this by clicking on the profile icon in the top right corner and selecting “Log Out” from the dropdown menu. On the mobile app, tap on the profile icon at the bottom right, then tap the three horizontal lines at the top right to access the menu. Scroll down and tap “Log Out” to log out of the current account.
Now that you’re on the login page and ready to move forward, let’s continue to the next step where we’ll guide you through the process of recovering your account without a password.
Step 2: Enter your username or email address
After accessing the Instagram website or app and reaching the login page, it’s time to enter your username or email address. Since you don’t have access to your password, this step becomes crucial in the account recovery process.
On the login page, you’ll notice two fields provided for you to enter your login credentials. The first field requires either your username or the email address associated with your Instagram account. If you have your username, enter it in this field. If you don’t remember your username, don’t worry – you can also enter the email address associated with your account.
If you choose to use your email address, ensure that it is the one you used when creating your Instagram account. Make sure you enter the complete email address correctly to avoid any errors. Double-check the spelling and ensure that there are no typos in the email address field.
Once you’ve entered your username or email address, ensure that there are no trailing spaces or extra characters in the field. It’s important to be accurate and precise in this step to increase the chances of successfully recovering your account.
If you’re unsure about the username or email address associated with your Instagram account, you can try different combinations or check your emails for any Instagram-related correspondence. Instagram might have sent you emails regarding account updates or notifications, and they could contain the username or email address associated with your account.
If you’ve successfully entered your username or email address, you’re one step closer to recovering your account. In the next step, we’ll guide you through the process of resetting your password using the “Forgot password?” option.
Step 3: Click on “Forgot password?”
Once you have entered your username or email address in the login page, the next step is to click on the “Forgot password?” option. This will initiate the process of resetting your password and regaining access to your Instagram account.
On the login page, look for the “Forgot password?” link located below the username and password fields. It usually appears as a clickable link or a button. Clicking on this link will redirect you to the password reset page, where you can create a new password for your account.
By clicking on “Forgot password?”, you’re essentially informing Instagram that you don’t have access to your current password and need to reset it. This is a crucial step as it allows you to regain control of your account without having to remember or retrieve the original password.
Make sure you click on the “Forgot password?” option. It may be tempting to search for other solutions or workarounds, but this official method provided by Instagram is the most secure and reliable way to recover your account without the password.
Once you have clicked on “Forgot password?”, the next steps will involve receiving a password reset link and creating a new password. These steps will be covered in the upcoming sections of this guide, so stay tuned to continue the process of deleting your Instagram account without a password.
It’s worth noting that if you don’t see the “Forgot password?” option on the login page, make sure you have entered your username or email address correctly. Double-check the spelling and format to ensure accuracy. If the option still doesn’t appear, try accessing the Instagram website or app from a different device or browser, as there might be technical issues preventing the display of the option.
Step 4: Receive the password reset link
After clicking on the “Forgot password?” option, the next step in the process of deleting your Instagram account without a password is to wait for the password reset link to be sent to your email address. This link will allow you to create a new password and regain access to your account.
Once you initiate the password reset process, Instagram will send an email to the email address associated with your account. It may take a few minutes for the email to arrive, so be patient. While waiting, make sure to check your spam or junk folders as well, as the email might end up there.
When you receive the email, it should contain the subject line “Reset Your Instagram Password.” Open the email and locate the password reset link provided. Click on the link to proceed with the account recovery process.
It’s important to note that the password reset link is time-sensitive and expires after a certain period. Be sure to click on the link within the specified timeframe to avoid any issues. If the link expires, you’ll need to repeat the previous steps and request another password reset email.
In case you haven’t received the password reset email within a reasonable amount of time, double-check that you entered the correct email address or username in step 2. Also, check your email account settings to ensure that messages from Instagram are not being blocked or filtered.
Once you’ve successfully received the password reset email and located the password reset link, you’re now ready to move on to the next step: creating a new password. We’ll guide you through this process in the upcoming section, so stay tuned to continue the process of deleting your Instagram account without needing the original password.
Step 5: Access your email and open the reset link
Once you’ve received the password reset email from Instagram, it’s time to access your email account and open the reset link. This link will allow you to create a new password for your Instagram account and regain access to it.
Open your preferred email application or access your email account through a web browser. Look for the email sent by Instagram with the subject line “Reset Your Instagram Password.” If you can’t find the email in your inbox, check your spam or junk folder as it may have been mistakenly filtered.
Once you’ve located the email, open it to view its contents. Inside the email, you should find a button or clickable link that says “Reset Password” or something similar. Click on this link to proceed with the password reset process.
Make sure to click on the reset link within the specified timeframe as it is time-sensitive and will expire. If the link has expired, you’ll need to go back to Step 3 and initiate the password reset process again to receive a new link.
By clicking on the reset link, you will be redirected to a webpage where you can enter your new password. The webpage will typically ask you to enter the new password twice to ensure accuracy.
When creating your new password, make sure to choose a strong and unique combination that you haven’t used for any other online accounts. Consider using a mix of uppercase and lowercase letters, numbers, and special characters to increase the security of your account.
Once you’ve entered your new password and confirmed it, click on the “Save” or “Reset Password” button to finalize the password change. Congratulations, you’ve successfully created a new password for your Instagram account!
In the next step, we’ll guide you on how to log in to your Instagram account using the newly created password. Stay tuned to continue the process of deleting your Instagram account without the original password.
Step 6: Create a new password
After clicking on the password reset link from the email you received, you will be redirected to a webpage where you can create a new password for your Instagram account. It’s crucial to choose a strong and unique password to enhance the security of your account.
On the password reset webpage, you will typically see two fields where you can enter your new password. The first field is where you will enter the new password, and the second field is for confirming the password by entering it again.
When choosing a new password, keep the following tips in mind:
- Make it unique: Avoid using the same password you’ve used for any other online accounts. Creating a unique password will ensure that your Instagram account is secure.
- Use a mix of characters: Include a combination of uppercase and lowercase letters, numbers, and special characters. This will make the password more complex and harder to guess or crack.
- Length matters: The longer the password, the more secure it is. Aim for a minimum of 8 characters, but consider using even longer passwords to increase the security level.
- Avoid personal information: Don’t include any personal information like your name, birthdate, or phone number in your password. This information can be easily guessed or obtained by others.
Once you have chosen a strong and unique password, enter it in the first field on the webpage. Then, re-enter the same password in the second field to confirm it. Make sure that the passwords match exactly to avoid any errors.
Once you’re satisfied with your new password, click on the “Save” or “Reset Password” button on the webpage to finalize the password change. Congratulations, you have successfully created a new password for your Instagram account!
In the next step, we will guide you on how to log in to your Instagram account using the freshly created password. Stay tuned to continue the process of deleting your Instagram account without the original password.
Step 7: Log in to your Instagram account
Now that you have created a new password for your Instagram account, it’s time to log in using the updated credentials. Logging in will allow you to regain access to your account and proceed with the process of deleting it without the original password.
Return to the Instagram website or app and navigate to the login page. Enter your username or email address in the appropriate field, just like you did in Step 2. This time, however, instead of clicking on “Forgot password?”, you will enter the new password you created in Step 6.
Make sure that you enter the new password accurately, paying attention to uppercase and lowercase letters, numbers, and special characters. Double-check for any typos or mistakes to ensure a successful login.
Once you have entered your new password, click on the “Log In” button to proceed. If the password is correct, you will be logged in to your Instagram account and have full access to your profile and settings.
If you encounter any issues logging in, double-check that you have entered the correct username or email address and password. If you are still unable to log in, go back to Step 3 and follow the password reset process again to create a new password. Remember, it’s crucial to use a unique and strong password to secure your account.
Congratulations on successfully logging in to your Instagram account with the new password! Your account is now ready to be deactivated and eventually deleted. In the following steps, we will guide you through the process of temporarily disabling your Instagram account and then permanently deleting it without the need for the original password.
Step 8: Go to your profile settings
Once you have successfully logged in to your Instagram account, it’s time to navigate to your profile settings. This is where you can find the options to temporarily disable or permanently delete your account without the need for the original password.
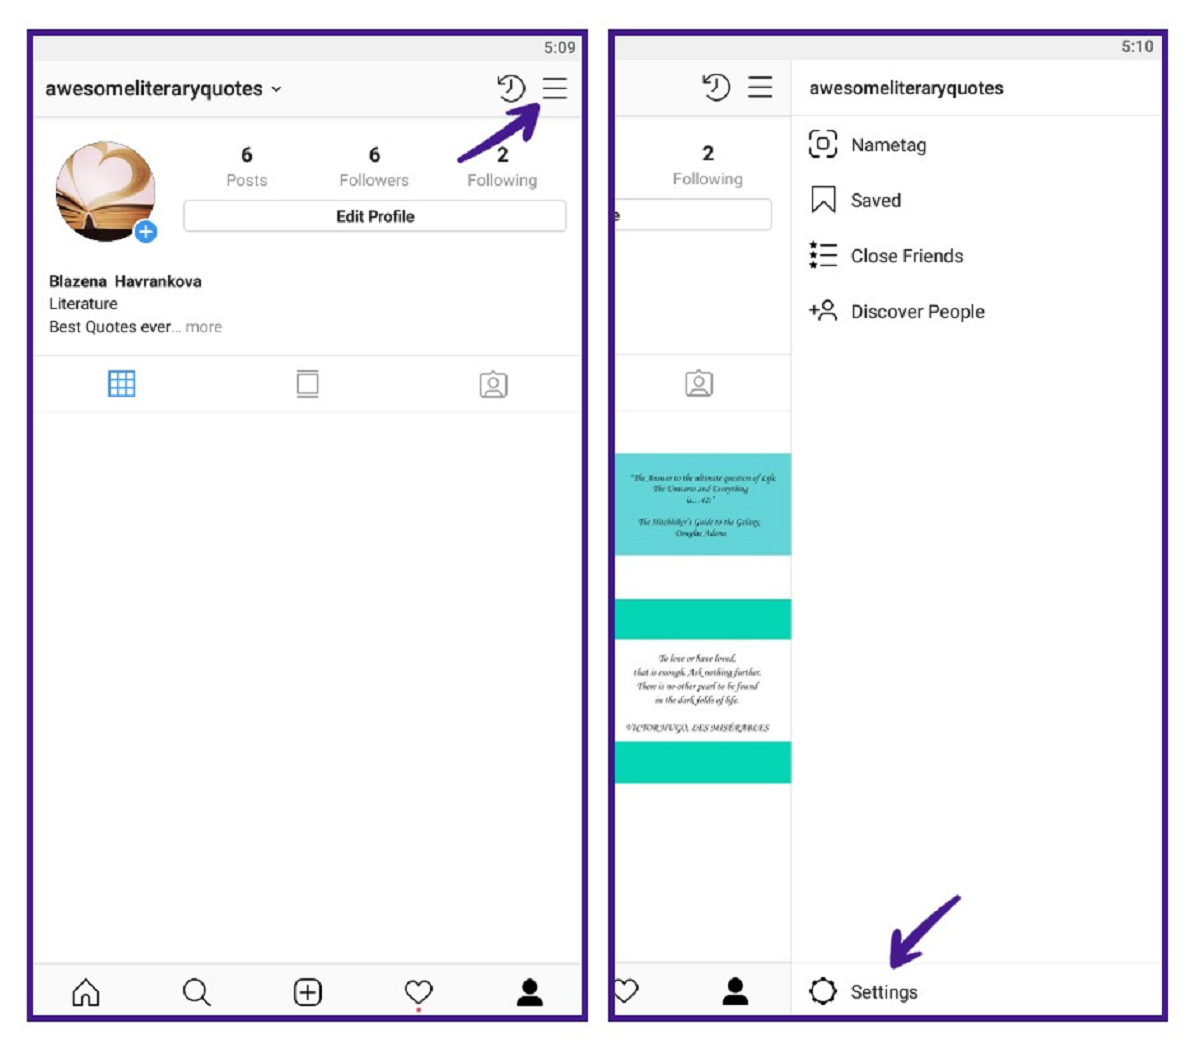
To access your profile settings, locate and click on your profile icon. This is usually located in the upper right-hand corner of the screen. On the Instagram website, the profile icon looks like a small thumbnail image, while on the app, it may appear as your profile picture or a silhouette icon.
Clicking on your profile icon will open a dropdown menu or take you directly to your profile page, depending on the device and platform you’re using. Once you’re on your profile page, look for the settings or options icon. This is represented by three horizontal lines or a gear icon, usually located in the top right-hand corner of the screen.
Click on the settings or options icon to open the menu containing various settings and account management options. On the Instagram website, the menu may appear as a dropdown from the settings icon, while on the app, it may open as a separate window or overlay.
In the settings menu, you will find a range of options related to your Instagram profile and account. Take a moment to familiarize yourself with the various settings, as they may offer customization features and privacy controls.
Scroll through the settings menu until you find the option that allows you to manage your account status. This may be labeled as “Account,” “Privacy and Security,” or it could be a dedicated section for account management.
Click on the account management option to access further settings related to your Instagram account. Here, you will find options for temporarily disabling your account or permanently deleting it. These options will be covered in the upcoming steps of this guide, so stay tuned to continue the process of deleting your Instagram account without the original password.
Take your time to ensure that you’re making the right decision for your account. If you’re unsure about permanently deleting your account, the temporary disable option allows you to take a break from Instagram while keeping your account and data intact. If you’re certain about deleting your account permanently, we’ll guide you through the process as well.
Step 9: Navigate to the “Temporary Disable Account” option
In order to temporarily disable your Instagram account, you need to locate the “Temporary Disable Account” option within your profile settings. This option will allow you to hide your profile, posts, and activities from other users without permanently deleting your account.
After accessing your profile settings (as mentioned in Step 8), proceed to scroll through the options until you find the section related to your account management. This section may be labeled as “Account,” “Privacy and Security,” or something similar.
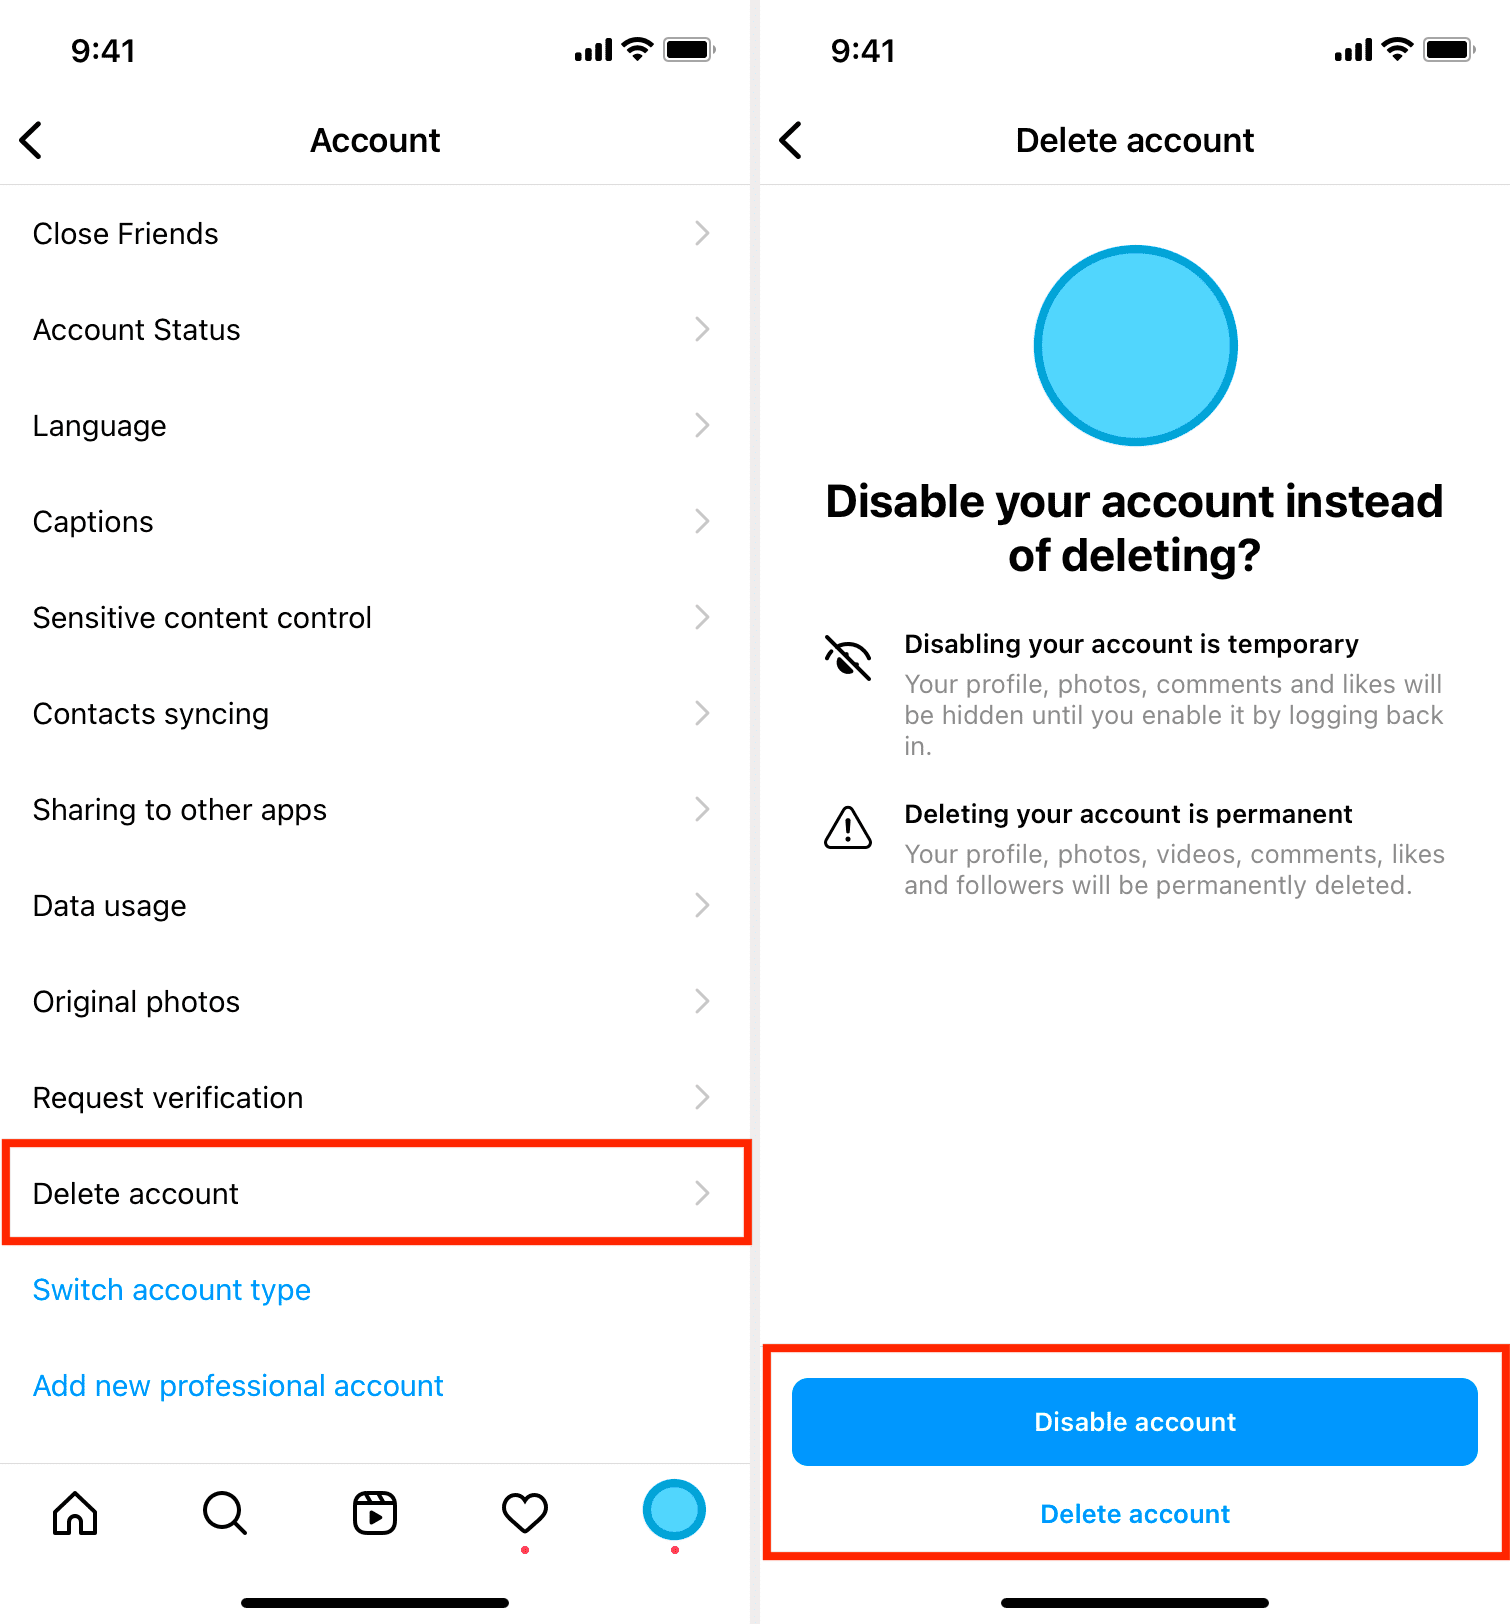
Once you’ve found the account management section, carefully read through the options available. Look for the specific option that allows you to disable your account temporarily. The wording may vary, but it should mention “temporary” or “disable account.”
Click on the “Temporary Disable Account” option to proceed. This will typically open a new window or page with further instructions and prompts to confirm your decision.
Instagram may provide additional information about what happens when you disable your account temporarily. Take the time to read through this information to have a clear understanding of the consequences and effects of disabling your account.
Keep in mind that when you temporarily disable your account, your profile, posts, likes, comments, and other activities will be hidden from other users. However, your data will not be deleted, and you can reactivate your account at any time by logging back in.
Instagram may also prompt you to provide a reason for disabling your account temporarily. This is optional, and you can choose to skip this step if you prefer. Providing a reason can help Instagram improve their services, but it’s not mandatory.
Once you’ve reviewed the information and made your decision, follow the prompts or instructions provided by Instagram to confirm the temporary disablement of your account. In the next step, we’ll guide you through the final steps of the process, whether you decide to reactivate your account or proceed with permanently deleting it.
Step 10: Confirm the account deactivation
After selecting the “Temporary Disable Account” option (as described in Step 9), the next step is to confirm the deactivation of your Instagram account. This confirmation step ensures that you’re aware of the consequences of temporarily disabling your account and allows you to proceed with the necessary actions.
Once you have chosen to temporarily disable your account, Instagram will provide you with a confirmation prompt. This prompt will typically include information about what happens when you disable your account temporarily and any actions or limitations that will be imposed.
Read through the confirmation message carefully to ensure that you understand the implications of deactivating your account temporarily. Take note of any specific details, such as the duration of the temporary disablement and the impact it will have on your profile, posts, and activities.
If you are fully aware of the consequences and still wish to proceed with temporarily disabling your account, click on the appropriate confirmation button or follow the instructions provided by Instagram. This action will initiate the disablement process and hide your profile and content from other users.
Keep in mind that once you confirm the account deactivation, your Instagram profile, posts, comments, and likes will no longer be visible to other users. However, your data will not be deleted, and you can reactivate your account at any time by logging back in.
It’s important to note that the duration of the temporary account disablement is determined by Instagram and cannot be customized. During this period, you will not be able to access your account or perform any actions on Instagram, including posting, liking, or commenting on content.
If you decide to reactivate your account before the designated end of the disablement period, simply log back in to Instagram using your username or email address and the password you created earlier. Your account will be restored, and your profile, posts, and activities will once again be visible to other users.
In the next step, we’ll guide you through the process of permanently deleting your Instagram account, should you decide to proceed with it. Stay tuned to continue the process of deleting your Instagram account without the need for the original password.
Step 11: Provide a reason for deleting the account
When opting to permanently delete your Instagram account, Instagram may ask you to provide a reason for your decision. This step allows Instagram to gather valuable feedback and understand the motivations behind users’ account deletions. While providing a reason is optional, it can help Instagram improve their platform and services.
After navigating to the account management section in your profile settings (as described in Step 8), scroll through the options until you find the section related to permanently deleting your account. This section may be labeled as “Account,” “Privacy and Security,” or similar terms.
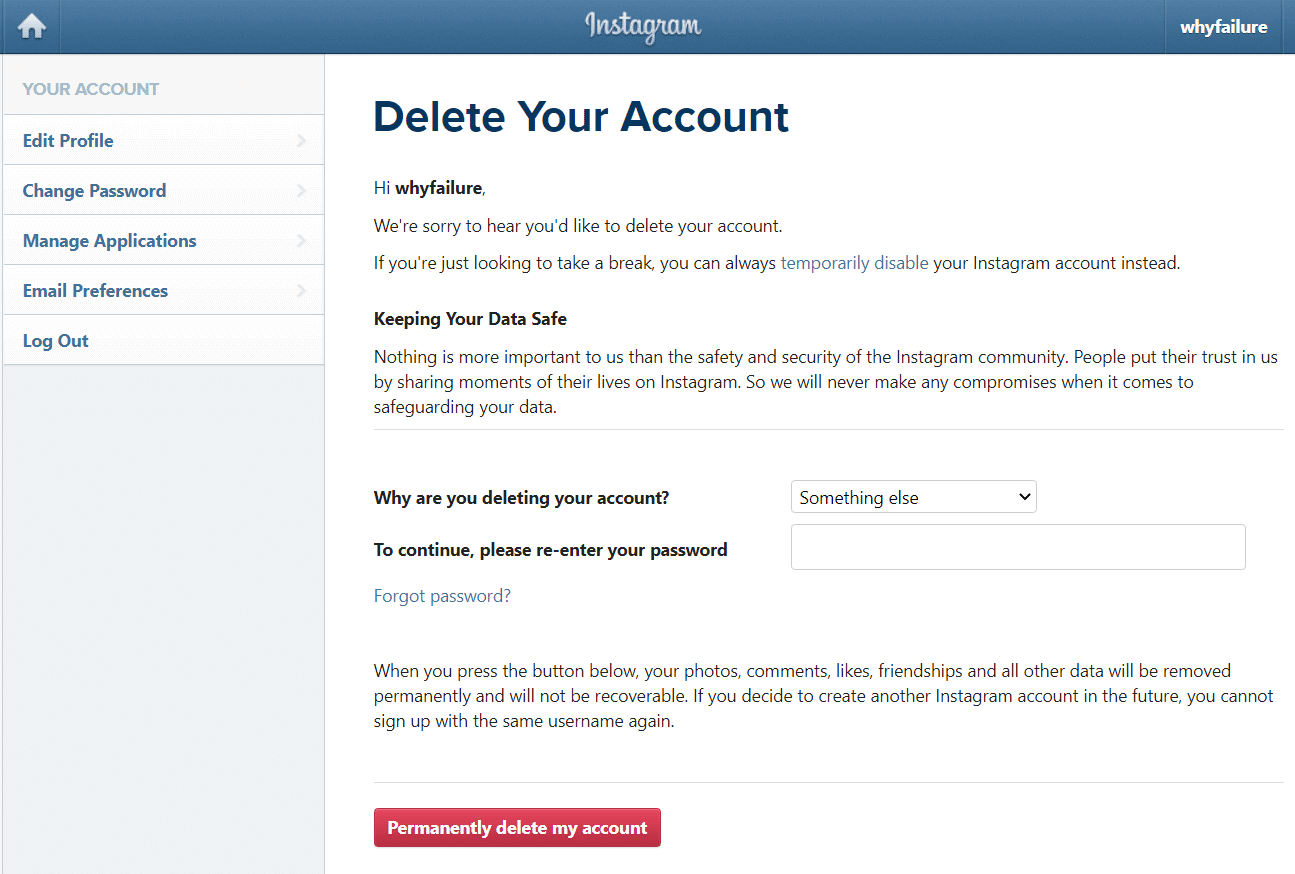
Click on the option that allows you to permanently delete your account. Instagram may provide additional information about the consequences of deleting your account, so take the time to read through it if needed.
Once you’ve selected the account deletion option, Instagram may prompt you to provide a reason for deleting your account. This could be in the form of a dropdown menu, a list of predefined options, or an open-text field where you can type your own reason.
If you wish to provide a reason for deleting the account, carefully consider your motivations. These reasons can vary from concerns about privacy and data security to spending too much time on social media. Choose the reason that best aligns with your decision and enter it as directed by Instagram.
Remember that providing a reason is optional, and you can choose to skip this step if you prefer not to provide any specific explanation. Your decision to delete your account is personal, and you have the right to keep those reasons private.
Once you have provided a reason (if desired) or decided to skip this step, follow the prompts or instructions provided by Instagram to proceed with the permanent deletion process. In the next step, we will guide you through the final steps of permanently deleting your Instagram account without the need for the original password.
Step 12: Re-enter your password to confirm the deletion
After providing a reason (if desired) for deleting your Instagram account, the next step is to re-enter your password to confirm the deletion. This added security measure ensures that only the account holder can initiate the permanent deletion process.
Instagram requires you to re-enter your password as a final confirmation before proceeding with the account deletion. This step is crucial to prevent accidental or unauthorized deletions. It also serves as a security measure to verify the account owner’s identity.
Once you have provided a reason for deleting your account (if desired), you will be prompted to re-enter your password. This will typically be in the form of a text field where you can type your password.
Double-check that you are entering the correct password. Pay careful attention to the uppercase and lowercase letters, numbers, and any special characters. Ensure that there are no typos or mistakes to avoid any issues during the confirmation process.
Take a moment to reflect on your decision before proceeding. Permanently deleting your Instagram account will remove all your profile information, posts, likes, comments, and followers. This process is irreversible, and you won’t be able to recover your account and its content once the deletion is completed.
After re-entering your password, click on the appropriate confirmation button or follow the instructions provided by Instagram to proceed with the permanent deletion process. This action will initiate the account deletion and permanently remove your Instagram account from the platform.
It’s worth noting that the deletion process may take some time to complete. During this time, your account and its content may still be visible to other users. However, rest assured that the deletion will be finalized, and your account will be permanently removed from the platform.
Congratulations on taking the final steps to permanently delete your Instagram account! In the next step, we’ll provide additional information for those who have temporarily disabled their account and wish to reactivate it. Stay tuned to complete the process of deleting your Instagram account without the original password.
Step 13: Permanently delete your Instagram account
After successfully confirming the deletion by re-entering your password, you are now ready to permanently delete your Instagram account. This step will erase your profile, posts, comments, likes, followers, and all associated data from the platform.
Once you have completed the password confirmation (as described in Step 12), Instagram will begin the process of permanently deleting your account. This deletion process may take a short period of time, so be patient during this waiting period.
It’s important to note that there is no way to cancel or reverse the permanent deletion once it has been initiated. Therefore, ensure that you are absolutely certain about deleting your account before proceeding with this final step.
During the deletion process, your account and its content may still be visible to other users. However, rest assured that all your data will be completely removed from Instagram’s servers. This includes your profile information, photos, videos, comments, and any other content associated with your account.
Additionally, your username will become available for others to use, but they will not have access to any of your previous account information or content. If you ever decide to join Instagram again, you will need to create a new account with a different username.
Once the permanent deletion process is complete, you will no longer have access to your Instagram account. This means you won’t be able to log in, view your profile, or retrieve any of your data. Your account will be completely removed from the platform.
Congratulations on successfully deleting your Instagram account! You have taken the final step in the process of deleting your account without the need for the original password. If you ever change your mind and decide to rejoin Instagram, you will need to create a new account from scratch.
Please note that deleting your Instagram account does not impact third-party applications or services that you may have linked to your account. If you have used your Instagram account to log in or connect to other platforms, be sure to review and manage those connections separately.
Thank you for following this guide on how to delete your Instagram account without a password. We hope this has been helpful to you. If you have any questions or need further assistance, feel free to reach out to Instagram’s support team for additional guidance.