Introduction
Welcome to our guide on how to remove an account on Instagram. Whether you’re looking to take a break from social media or simply want to delete your account for personal reasons, we’ve got you covered. Instagram has become one of the most popular social networking platforms, allowing individuals to share photos and connect with friends and followers. However, there may come a time when you feel the need to part ways with your account. In this step-by-step tutorial, we will walk you through the process of deleting your Instagram account permanently.
Before we begin, it’s essential to note that deleting your account is a irreversible action. Once you delete your account, all your photos, videos, comments, likes, and followers will be permanently removed from the platform. It is recommended that you backup any important data or content before proceeding with the deletion process. Additionally, keep in mind that you cannot delete your Instagram account directly from the mobile app. You will need to access the account settings from a web browser to complete the deletion process.
Deleting your account is a personal decision, and everyone has their reasons for doing so. It could be related to privacy concerns, social media overload, or a desire to disconnect from digital platforms. Whatever your reason may be, follow the steps in this guide, and you’ll be well on your way to removing your Instagram account from existence.
Step 1: Open the Instagram app
The first step to remove an account on Instagram is to open the Instagram app on your mobile device. Ensure that you have the latest version of the app installed to access all the necessary features and settings. Once you have opened the app, you will be greeted by the Instagram login screen.
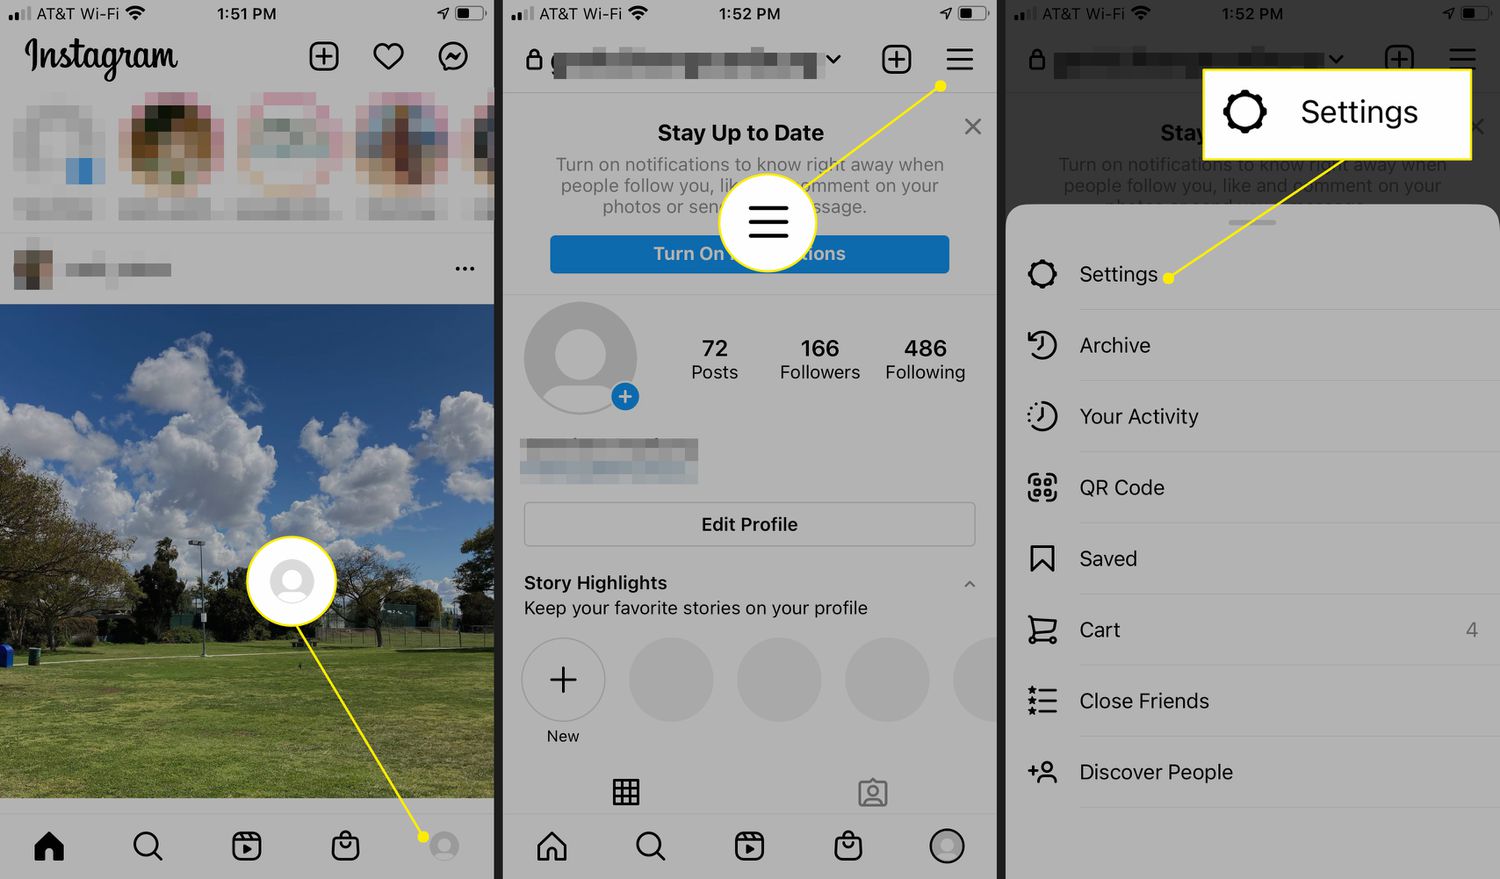
If you are already logged into your account, you will be taken directly to your Instagram home feed. In this case, tap on the profile icon located at the bottom right corner of the screen. This will take you to your profile page, where you can access your account settings.
If you are not currently logged into your account, enter your login credentials (username and password) to access your account. Once you are logged in, tap on the profile icon to proceed to your profile page.
It’s important to note that if you have multiple Instagram accounts linked to the app, you will need to select the account that you wish to delete. To switch accounts, tap on the username displayed at the top of your profile page, and a dropdown menu will appear. Simply select the desired account from the list.
By following this first step, you have successfully opened the Instagram app and accessed your account. Now, let’s proceed to the next step to learn how to navigate to the account settings.
Step 2: Go to your profile page
Once you have opened the Instagram app and logged into your account, the next step is to navigate to your profile page. The profile page is where you can view and manage your account information, including your posts, followers, and settings.
To go to your profile page, tap on the profile icon at the bottom right corner of the screen. This icon resembles a person’s silhouette and is typically located next to the home feed icon. When you tap on the profile icon, you will be instantly redirected to your profile page.
On your profile page, you will see your profile picture, username, bio, and the number of followers and following you have. This page serves as a centralized hub for all your account activities and settings. From here, you can customize your profile, view your posts, and manage various aspects of your account.
It’s important to familiarize yourself with the layout of your profile page, as it will be the starting point for many account-related actions. Take a moment to explore the different sections of your profile, such as your posts, tagged photos, and saved posts. Additionally, you can access other account settings, such as privacy options and linked social media accounts, from your profile page.
By following this second step, you have successfully reached your profile page on Instagram. Now, let’s proceed to the next step to learn how to access the account settings.
Step 3: Access account settings
Once you have reached your profile page on Instagram, the next step is to access the account settings. Account settings allow you to customize various aspects of your account, including privacy, security, notifications, and more. It is from the account settings that you will be able to delete your Instagram account.
To access the account settings, look for the settings icon on your profile page. This icon typically resembles a gear or three horizontal lines, and it is usually located in the top right corner of the screen. Tap on the settings icon to proceed.
When you tap on the settings icon, a menu will appear with various options related to your account settings. This menu may differ slightly depending on the version of the Instagram app that you are using. Look for options such as “Settings,” “Options,” or “Preferences” to access the account settings.
Once you have selected the appropriate option, you will be directed to the account settings page. On this page, you will find a variety of settings that you can customize to suit your preferences. Take some time to explore the different sections and familiarize yourself with the available options.
It’s important to note that in the account settings, you will find options related to privacy, security, notifications, and other account-related features. To delete your Instagram account, you will need to navigate to the specific section that handles account deletion.
By following this third step, you have successfully accessed the account settings on Instagram. Now, let’s proceed to the next step to learn how to find and select the “Delete Your Account” option.
Step 4: Tap on “Settings”
Now that you have accessed the account settings on Instagram, the next step is to locate and tap on the option for “Settings.” This will allow you to further customize your account and access specific features and preferences.
On the account settings page, look for the section that contains options related to your account configurations. This section is typically labeled as “Settings,” “Options,” or “Preferences.” Tap on this section to expand it and reveal additional settings choices.
Once you have tapped on the “Settings” section, you will see a list of various settings options that you can modify. These settings can range from general account preferences to more specific options like privacy, security, and notifications.
It’s important to take your time and navigate through the various settings options to get a better understanding of what each one controls. This will help you tailor your Instagram experience to your preferences and ensure that you have the desired account settings.
By tapping on “Settings,” you are now one step closer to deleting your Instagram account. In the next step, we will guide you on how to select the “Privacy and Security” option, where you will find the necessary settings for deleting your account.
Step 5: Select “Privacy and Security”
After tapping on the “Settings” option in your Instagram account, the next step is to locate and select the “Privacy and Security” section. This section contains settings related to your account’s privacy, as well as additional security measures.
On the settings page, scroll down until you find the “Privacy and Security” option. It is usually located towards the middle or bottom of the settings menu. Tap on this option to access the privacy and security settings for your account.
By selecting the “Privacy and Security” section, you will be presented with a range of settings that allow you to control who can view your posts, interact with your account, and access your personal information.
In the “Privacy and Security” section, you will find options to manage your account’s privacy settings, including who can see your posts, who can send you direct messages, and who can view your story. This section also offers control over data settings, such as whether you want to save login info, remember login activity, and more.
Take your time to explore the “Privacy and Security” section, as it contains crucial settings for your Instagram account. Familiarize yourself with the available options and adjust them according to your preferences.
By selecting “Privacy and Security,” you have completed the fifth step towards deleting your Instagram account. In the next step, we will guide you on how to find and choose the “Account” option in the settings menu.
Step 6: Choose “Account”
After accessing the “Privacy and Security” section in your Instagram account settings, the next step is to locate and choose the “Account” option. This section contains settings and controls specifically related to your Instagram account itself.
On the “Privacy and Security” settings page, scroll down until you reach the “Account” option. It is typically located below the privacy settings and above other sections like “Linked Accounts” or “Two-Factor Authentication.” Tap on the “Account” option to proceed.
By selecting the “Account” section, you will be presented with a variety of settings and options related to your Instagram account. This section allows you to manage important aspects of your account, such as your profile information, linked accounts, email and phone number, and more.
Take a moment to explore the “Account” section and familiarize yourself with the available settings and options. You may want to review and update your profile information, adjust your account’s visibility, or add or remove linked accounts.
In this step, it’s important to note that the settings and options within the “Account” section are related to your account as a whole, rather than the content or interaction on the platform. To delete your Instagram account, you will next need to proceed to the specific option that handles account deletion.
By choosing “Account,” you have successfully completed the sixth step towards deleting your Instagram account. In the next step, we will guide you on how to locate and select the “Delete Your Account” option in the account settings.
Step 7: Locate “Delete Your Account”
Once you have accessed the “Account” section in your Instagram account settings, the next step is to locate the option for “Delete Your Account.” This is the crucial step towards permanently deleting your Instagram account.
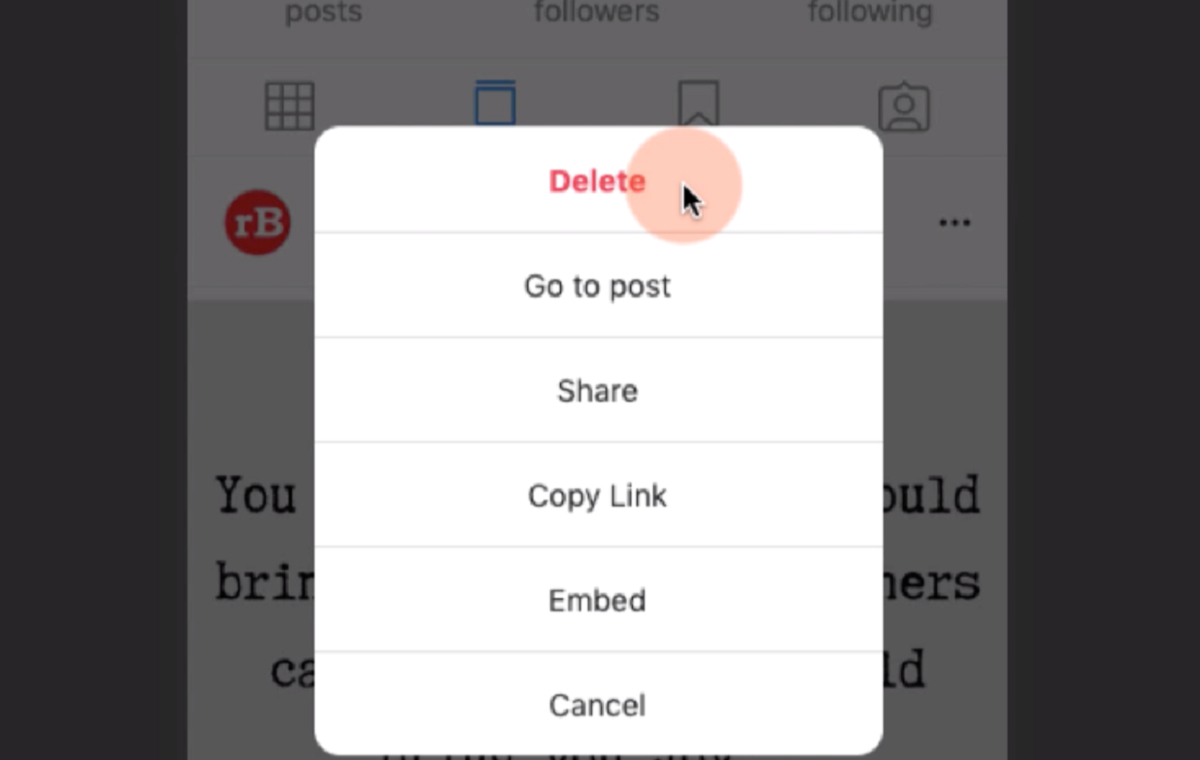
Scroll through the settings page until you find the section where the account-related options are listed. Look for the option labeled “Delete Your Account” or something similar. This option is usually located at the bottom of the “Account” section or may have its own dedicated subsection.
It’s important to note that the “Delete Your Account” option may also be referred to as “Deactivate Your Account,” “Close Account,” or “Disable Account,” depending on the version of the Instagram app you are using. Look for similar terms that convey the action of permanently removing your account from the platform.
Once you have located the “Delete Your Account” option, tap on it to proceed. Instagram may prompt you with additional information or ask for confirmation before allowing you to delete your account. Take the time to read through any warnings or instructions provided.
Keep in mind that deleting your Instagram account is irreversible, and all your photos, videos, comments, followers, and likes will be permanently removed from the platform. If you have any important data, consider backing it up before proceeding.
By successfully locating the “Delete Your Account” option, you have completed the seventh step towards permanently deleting your Instagram account. In the next step, we will guide you on how to provide a reason for deleting your account.
Step 8: Provide a reason for deleting your account
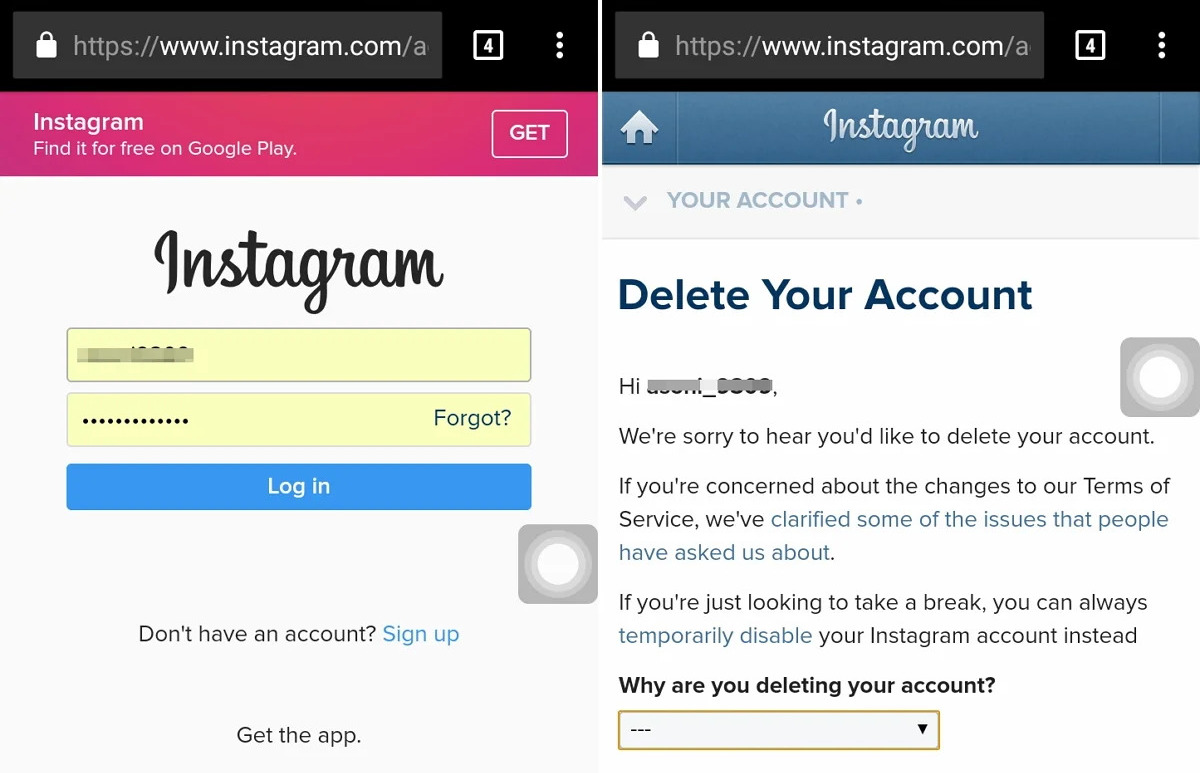
After selecting the “Delete Your Account” option in your Instagram settings, the next step is to provide a reason for deleting your account. Instagram asks for this information as a way to gather feedback and improve their platform, but it’s not mandatory to provide a reason if you prefer not to.
On the delete account page, you will be presented with a list of reasons for leaving Instagram. These reasons may include options such as “Privacy concerns,” “Too much time spent on the app,” “Creating a new account,” or “Sensitivity of content.” Choose the reason that best aligns with your decision to delete your account.
If none of the provided options accurately reflect your reason, there may be an “Other” or “Write-in” option available. Select this option and manually type in your reason for leaving Instagram.
It’s important to note that the reason you provide is for internal use only and does not affect the account deletion process. Instagram collects this data to gain insights into user preferences and behaviors.
After selecting or providing a reason, you may be prompted with additional messages or options. Read through the information and follow any instructions provided by Instagram to continue with the account deletion.
By providing a reason for deleting your account, you have completed the eighth step towards permanently removing your Instagram account. In the next step, we will guide you on how to enter your password to confirm the account deletion.
Step 9: Enter your password
After providing a reason for deleting your Instagram account, the next step is to enter your password to confirm the account deletion. This step ensures that only the account owner can delete the account and adds an extra layer of security to the process.
On the account deletion page, you will see a field where you need to type in the password associated with your Instagram account. This is the same password that you use to log into your account on the platform.
Enter your password carefully to ensure accuracy. Double-check for any typos or mistakes before proceeding. If you are unsure of your password, you may want to reset it beforehand to avoid any issues during the account deletion process.
Entering your password serves as a confirmation that you are the account owner and that you wish to proceed with deleting your Instagram account. It is an essential step in preventing unauthorized individuals from gaining access to your account and deleting it without your consent.
Once you have entered your password, some versions of the Instagram app may require you to re-enter it as an extra precaution. This ensures that you entered your password correctly and prevents accidental deletion of your account.
By successfully entering your password, you have completed the ninth step towards permanently deleting your Instagram account. In the final step, we will guide you on how to delete your account.
Step 10: Delete your account
After entering your password to confirm the deletion, you have reached the final step – deleting your Instagram account. This step is irreversible, and once you proceed with the deletion, all your account data, including photos, videos, comments, followers, and likes, will be permanently removed from the platform.
On the deletion confirmation page, carefully review any information or warnings provided by Instagram before proceeding. Ensure that you fully understand the consequences of deleting your account.
If you are certain about deleting your account, look for the option to “Delete Your Account” or a similar button. Tap on this button to initiate the account deletion process.
Once you have confirmed the deletion, Instagram may display a final confirmation message to ensure that you are absolutely sure about your decision. This is the last opportunity to reconsider before proceeding with the permanent deletion of your account.
Keep in mind that deleting your Instagram account is irreversible. If you change your mind after this point, you will not be able to recover your account data, including your username and any associated content.
After confirming the deletion, your account will be scheduled for permanent removal. The deletion process may take some time, so it’s normal if your account remains active for a short period after initiating the deletion. During this time, Instagram will ensure the proper removal of your account data from their servers.
Congratulations! By completing this final step, you have successfully deleted your Instagram account. You have now permanently removed your presence from the platform.
If you ever decide to rejoin Instagram, you will need to create a new account from scratch. Keep in mind that you cannot reactivate or recover a deleted Instagram account.