Introduction
Welcome to the world of Instagram, the popular social media platform where people share their photos and connect with friends and followers. One of the key features on Instagram is the ability to tag people in your posts. When you’re tagged in a photo or video, your username is linked to that post, making it visible to your followers and others who come across the post.
While being tagged can be a great way to engage with your audience and be part of someone else’s story, there may be instances where you want to remove a tag. Perhaps you’re not comfortable being associated with a particular post, or maybe you want to maintain a level of privacy. Whatever the reason, Instagram provides options to remove tags and manage your tagging settings.
In this article, we’ll explore the reasons why you might want to remove tags on Instagram and guide you through various methods to do so. Whether you’re new to Instagram or a long-time user, understanding how to remove tags can give you more control over your online presence and ensure that your Instagram experience remains enjoyable.
Understanding Instagram Tags
Instagram tags are a way to label and categorize content on the platform. When you tag someone in a post, their username becomes a clickable link, leading to their profile. This feature allows users to mention others in their posts and give them credit or recognition for being a part of the content. Additionally, tags can help increase the visibility of a post, as it will also be displayed on the tagged person’s profile.
There are two types of tags on Instagram: @mentions and hashtags. @mentions are user tags, and they directly link the tagged user to the post. Hashtags, on the other hand, allow users to categorize their posts and make them discoverable by others interested in similar topics or themes.
When you are tagged in a post, it will appear on your profile under the “Photos of You” section. This can be a great way to showcase collaborations, shared experiences, or simply to be part of someone else’s story. However, it’s important to keep in mind that being tagged in a post means that it becomes part of your online presence, visible to your followers and potentially the wider Instagram community.
Understanding how tags work on Instagram is crucial in order to manage and control your online presence effectively. It ensures that you can curate your profile and maintain a positive and consistent image on the platform.
Why Remove Tags on Instagram?
There may be various reasons why you would want to remove tags on Instagram. Let’s explore some of the common scenarios:
- Privacy concerns: In the age of social media, privacy is a significant concern for many users. You may not want certain posts to be associated with your profile or visible to your followers. Removing tags gives you control over what content is connected to your online identity.
- Inappropriate or offensive content: Sometimes, you may be tagged in a post that contains content you find offensive, inappropriate, or insensitive. Removing the tag ensures that you are not associated with such content.
- Professional reputation: If you are using Instagram for professional reasons, maintaining a certain image is crucial. Removing tags allows you to curate your online presence and ensure that the content associated with your profile aligns with your professional reputation.
- Managing personal relationships: In some cases, you may want to remove tags to manage personal relationships. For example, if there’s a post with an ex-partner that you no longer want to be connected to, removing the tag can help maintain boundaries and avoid potential awkwardness.
- Frequent tags from unrelated accounts: Are you constantly being tagged in posts from accounts that you have no connection to? It can be annoying! Removing tags from unrelated accounts helps keep your profile relevant and ensures that your tagged posts showcase meaningful connections.
By understanding the reasons why you may want to remove tags on Instagram, you can make informed decisions about managing your online presence and ensuring that your profile accurately reflects who you are and what you want to share with your followers.
How to Remove Tags on Instagram
If you find yourself in a situation where you need to remove a tag on Instagram, don’t worry – it’s a relatively straightforward process. Instagram provides several methods to untag yourself from a post or manage your tagging settings. Here are some effective ways to remove tags:
-
Method 1: Untag Yourself Using the Instagram App
To untag yourself using the Instagram app, follow these steps:
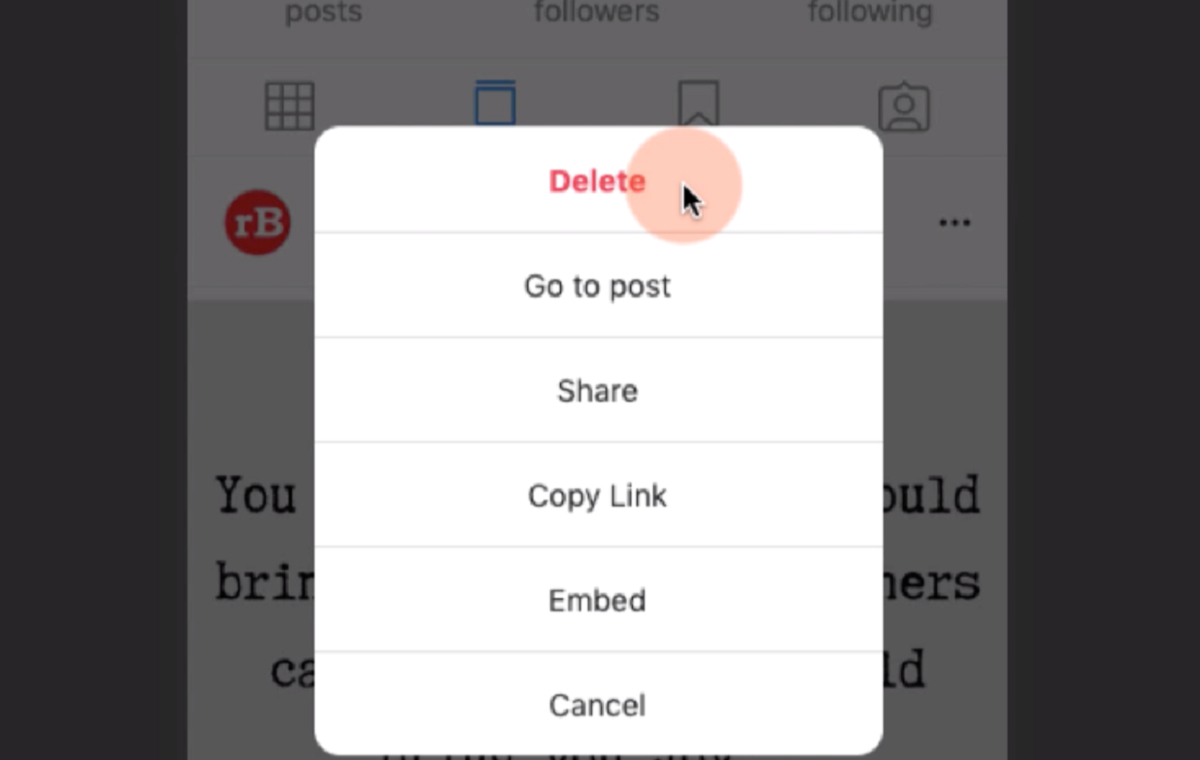
- Navigate to the post that you want to remove the tag from.
- Tap on the three-dot (…) icon in the top right corner of the post.
- Select “Remove Tag” from the options that appear.
- Confirm the removal by tapping “Remove” on the confirmation popup.
-
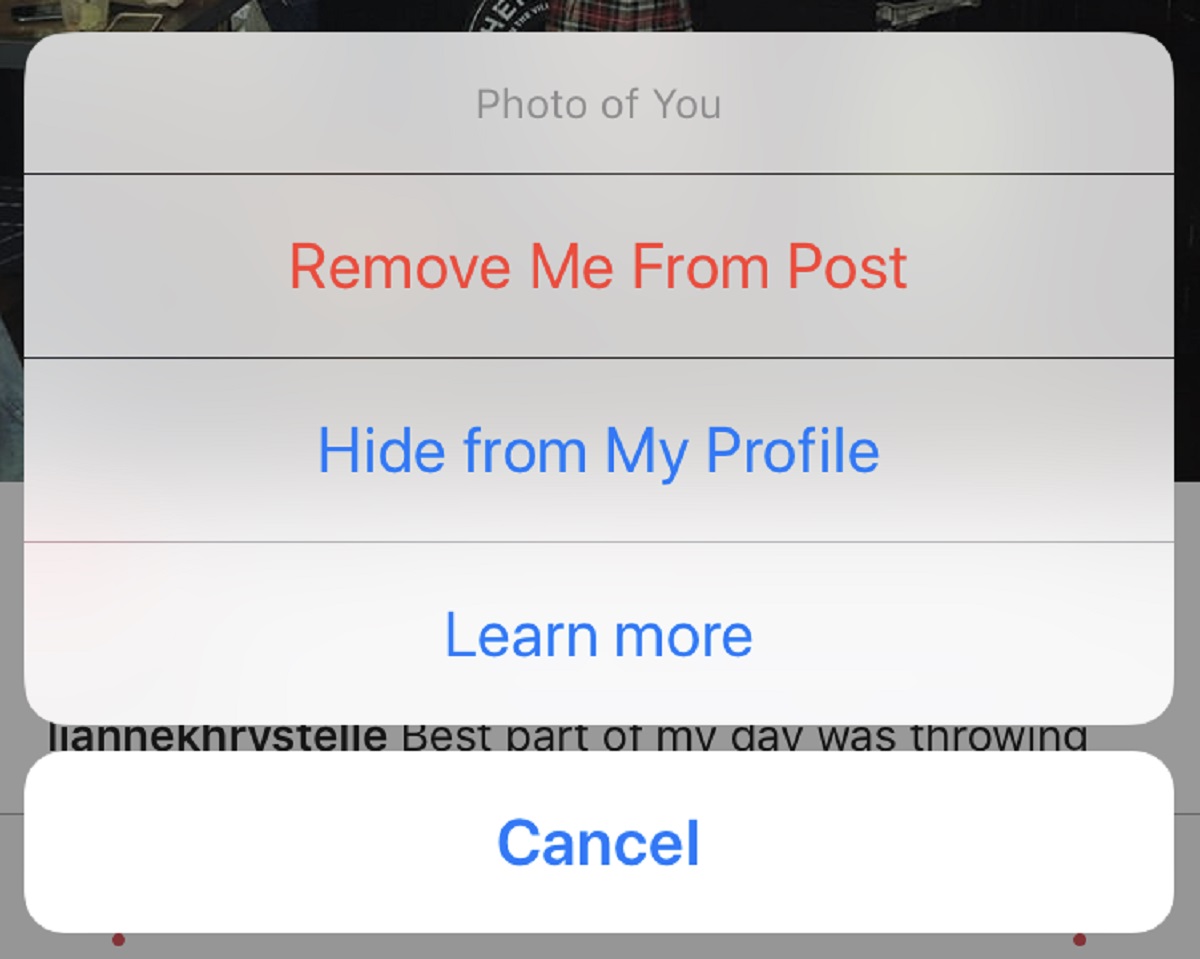
Method 2: Untag Yourself Using the Photo Options
Another way to remove a tag is by accessing the photo options directly from the post. Here’s how:
- Open the post that you’ve been tagged in.
- Tap on your username below the post caption.
- Select “Remove Me from Post” from the options that appear.
-
Method 3: Remove Yourself from a Tagged Post
If someone tags you in a post, you have the option to remove yourself from it. Here are the steps:
- Go to your profile by tapping on your profile picture.
- Tap on the “Photos of You” section.
- Find the post where you want to remove the tag and open it.
- Tap on the three-dot (…) icon in the top right corner of the post.
- Select “Remove Me from Post” to remove yourself from the tagged post.
-
Method 4: Report Inappropriate Tags
If someone tags you in a post that violates Instagram’s community guidelines, you can report it for review. Here’s what you can do:
- Open the post that contains the inappropriate tag.
- Tap on the three-dot (…) icon in the top right corner of the post.
- Select “Report” from the options.
- Choose the reason for reporting and follow the on-screen instructions to complete the report.
-
Method 5: Review and Approve Tags
If you prefer to manually review and approve tags before they appear on your profile, you can enable the “Tagging Options” feature. Here’s how:
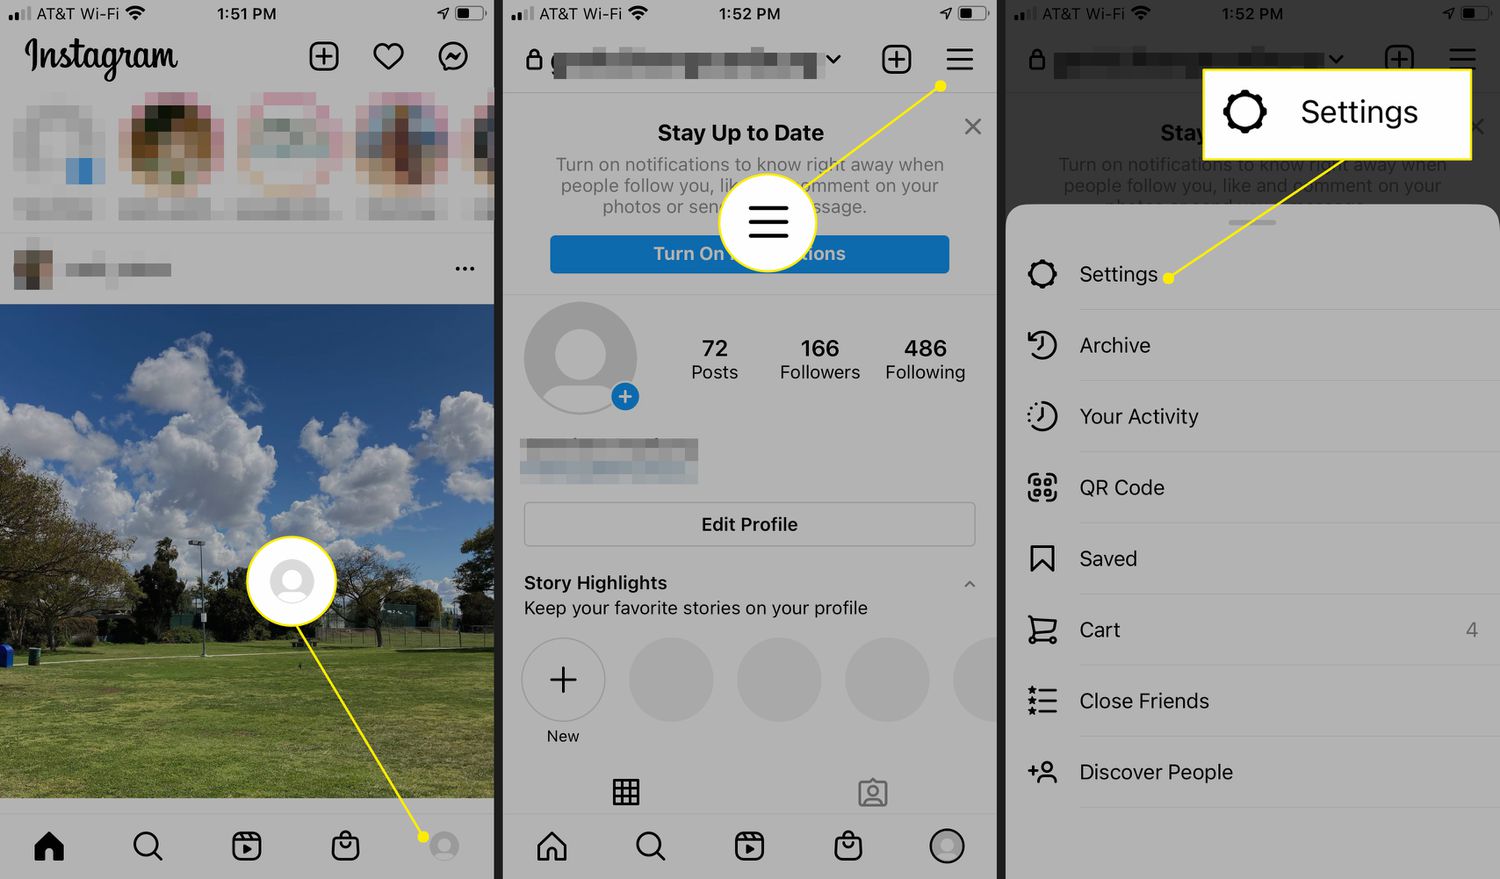
- Go to your profile and tap on the three-line menu icon.
- Select “Settings.”
- Tap on “Privacy” and then “Tags.”
- Choose “Manually Approve Tags” to review tags before they are added to your profile.
By using these methods, you can easily remove unwanted tags on Instagram and ensure that your profile accurately reflects your preferences and desired online presence.
Method 1: Untag Yourself Using the Instagram App
If you’ve been tagged in a post on Instagram and want to remove the tag, the Instagram app provides a simple and direct method to untag yourself. Follow the steps below to remove a tag using the Instagram app:
- Launch the Instagram app on your mobile device and log in to your account if you haven’t already.
- Locate the post where you have been tagged. You can find this by going to your profile and tapping on the “Photos of You” section.
- Open the post that you want to remove the tag from.
- On the top right corner of the post, you will see a three-dot (…) icon. Tap on it to access more options.
- A menu will appear with several options. Look for “Remove Tag” and tap on it.
- A confirmation message will appear, asking if you want to remove the tag. Tap “Remove” to proceed.
By following these steps, you have successfully removed the tag from the post. The post will no longer appear under the “Photos of You” section on your profile, and your username will no longer be linked to the post.
It’s important to note that removing the tag does not delete the post itself. The post will still exist on the original poster’s profile and be visible to their followers and the wider Instagram community.
This method provides a quick and straightforward way to untag yourself from a post on Instagram. It allows you to have control over how your username is associated with different posts and helps you manage your online presence effectively.
Method 2: Untag Yourself Using the Photo Options
If you have been tagged in a post on Instagram and want to remove the tag, another method you can use is to access the photo options directly from the post. Follow the steps below to untag yourself using the photo options:
- Open the Instagram app on your mobile device and log in to your account.
- Locate the post where you have been tagged. This can be done by going to your profile and tapping on the “Photos of You” section.
- Once you have found the post, tap on it to open it.
- Below the caption of the post, you will see your username tagged. Tap on your username.
- A menu will appear with various options. Look for “Remove Me from Post” and tap on it.
By following these steps, you have successfully untagged yourself from the post. Your username will no longer be linked to the post, and it will no longer appear under the “Photos of You” section on your profile.
It’s important to note that removing the tag does not delete the post itself. The post will still remain on the original poster’s profile and be visible to their followers and the wider Instagram community.
This method provides a convenient way to quickly untag yourself from a post on Instagram without having to navigate through multiple menus. It allows you to have more control over how your username is associated with different posts and helps you manage your online presence effectively.
Method 3: Remove Yourself from a Tagged Post
If someone tags you in a post on Instagram and you want to completely remove yourself from the tagged post, you have the option to do so. Follow the steps below to remove yourself from a tagged post:
- Open the Instagram app on your mobile device and log in to your account.
- Go to your profile by tapping on your profile picture at the bottom right corner of the screen.
- In your profile, you will see several tabs. Tap on the “Photos of You” tab.
- In the “Photos of You” section, you will find all the posts where you have been tagged.
- Scroll through the posts and find the one from which you want to remove yourself.
- Tap on the post to open it.
- In the top right corner of the post, you will see a three-dot (…) icon. Tap on it to access more options.
- A menu will appear with various options. Look for “Remove Me from Post” and tap on it.
Following these steps will remove you completely from the tagged post. Your username will no longer be linked to the post, and it will no longer appear under the “Photos of You” section on your profile.
It’s important to note that removing yourself from a tagged post does not delete the post itself. The post will still exist on the original poster’s profile and be visible to their followers and the wider Instagram community.
This method allows you to have full control over your online presence by removing yourself from any posts where you have been tagged. It ensures that your profile accurately reflects the content you want to be associated with and helps you maintain a desired online image.
Method 4: Report Inappropriate Tags
If you come across an inappropriate tag on Instagram, such as being tagged in a post that violates community guidelines, you have the option to report it for review. Instagram provides a reporting feature to address such situations. Here’s how you can report inappropriate tags:
- Open the Instagram app on your mobile device and log in to your account.
- Locate the post that contains the inappropriate tag.
- Tap on the three-dot (…) icon in the top right corner of the post to access more options.
- A menu will appear with several options. Look for the “Report” option and tap on it.
- Instagram will present you with a list of reporting options. Choose the most relevant category that describes the issue, such as “It’s spam” or “It’s inappropriate.”
- Follow the on-screen instructions to provide any additional details or evidence required for the report.
- Tap “Submit” to send the report to Instagram for review.
By reporting the inappropriate tag, you are bringing it to the attention of Instagram’s moderation team. They will review the reported content and take appropriate action, which may include removing the tag or even suspending or disabling the account responsible for the violation.
It’s important to note that Instagram encourages users to report any content or tags that go against their community guidelines to help maintain a positive and safe environment on the platform.
By utilizing the reporting feature, you actively contribute to the well-being of the Instagram community, ensuring that inappropriate tags are addressed and resolved.
Method 5: Review and Approve Tags
If you want to maintain control over the tags on your Instagram profile, you have the option to review and approve tags before they appear publicly. This feature gives you the ability to curate your profile and ensure that only relevant and desired tags are associated with your account. Here’s how you can review and approve tags:
- Open the Instagram app on your mobile device and log in to your account.
- Tap on the three-line menu icon in the top right corner of the screen to access the main menu.
- Scroll down and select “Settings” from the menu.
- In the Settings menu, tap on “Privacy.”
- Within the Privacy settings, choose “Tags.”
- Under “Tags,” you will see an option called “Manually Approve Tags.” Toggle this option to the enabled position.
Once you have enabled the “Manually Approve Tags” option, here’s how the process works:
- Whenever someone tags you in a post, you will receive a notification.
- Open the notification by tapping on it to review the tag.
- If you want to approve the tag and have it appear on your profile, tap on “Approve.”
- If you do not want to be tagged in the post, tap on “Ignore.”
By manually reviewing and approving tags, you have full control over what appears on your profile. This ensures that your profile accurately represents the content and individuals that you want to be associated with.
It’s important to note that enabling this feature does not prevent others from tagging you altogether. Rather, it allows you to decide which tags are visible on your profile. The original post will still exist on the other user’s profile and be visible to their followers.
This method provides you with the ability to curate your online presence and maintain a desired image on Instagram. It ensures that your profile showcases the tags that are meaningful and relevant to you.
Conclusion
Removing tags on Instagram allows you to take control of your online presence and curate your profile to accurately reflect your preferences and desired image. Whether it’s for privacy concerns, managing personal relationships, maintaining professional reputation, or addressing inappropriate tags, Instagram provides various methods to help you remove tags from posts. By understanding and utilizing these methods, you can effectively manage your tagging settings and ensure that your profile represents the content and connections that align with your online identity.
From untagging yourself using the Instagram app and photo options to removing yourself from a tagged post, each method offers a straightforward way to remove unwanted tags. Additionally, reporting inappropriate tags and enabling the review and approve feature allow you to further control the content associated with your profile.
Remember, the goal is to create a positive and engaging online experience on Instagram. By taking advantage of the available features, you can enjoy the platform while maintaining the desired level of privacy, professionalism, and authenticity.
Whether you’re an avid social media user or just starting your Instagram journey, knowing how to remove tags on Instagram is an essential tool. It empowers you to curate your online presence and ensure that your profile accurately reflects your preferences, experiences, and values.