Introduction
Deleting everything from a hard disk drive (HDD) is essential when you are planning to sell, donate, or dispose of your computer. Simply deleting files or formatting the drive is not enough, as the data can still be recovered using specialized software. To ensure the complete removal of data, it is important to follow certain steps to securely delete everything from the HDD.
In this article, we will discuss various methods that you can use to delete everything from your hard disk drive. It is important to note that these methods should only be used when you are sure that you no longer need any of the data stored on the drive, as they will permanently erase all data and cannot be undone.
Before we proceed with the steps, it is crucial to understand the importance of backing up your data. You should always create a backup of all the important files and documents stored on your computer before deleting everything from the hard disk drive. This ensures that you have a copy of all data that you may need in the future.
Once you have backed up your data, you can proceed with the deletion process using one of the following methods:
Step 1: Backup your data
Before you start deleting everything from your hard disk drive, it is crucial to back up all of your important data. This step ensures that you have a copy of all your files and documents, allowing you to restore them if needed in the future.
There are several ways to back up your data:
- External Hard Drive: Connect an external hard drive to your computer and manually copy and paste your files onto the drive. This method is simple and straightforward, but it may be time-consuming if you have a large amount of data.
- Cloud Storage: Utilize cloud storage services such as Google Drive, Dropbox, or Microsoft OneDrive to store your files online. These services provide a certain amount of free storage space, and you can also opt for paid plans if you require more space. Simply upload your files to the cloud and access them from any device with an internet connection.
- Network Attached Storage (NAS): If you have a NAS device connected to your home network, you can transfer your files directly to the NAS. NAS devices offer a large amount of storage space, which can be accessed by multiple devices on the same network.
- Online Backup Services: There are various online backup services available, such as Carbonite, Backblaze, and Acronis True Image, that offer automatic backup solutions. These services continuously back up your files in the background, ensuring that you never lose any data.
Choose the method that works best for you and ensure that all your important data is safely backed up before proceeding to delete everything from your hard disk drive. Once you have completed the backup process, you can move on to the next step.
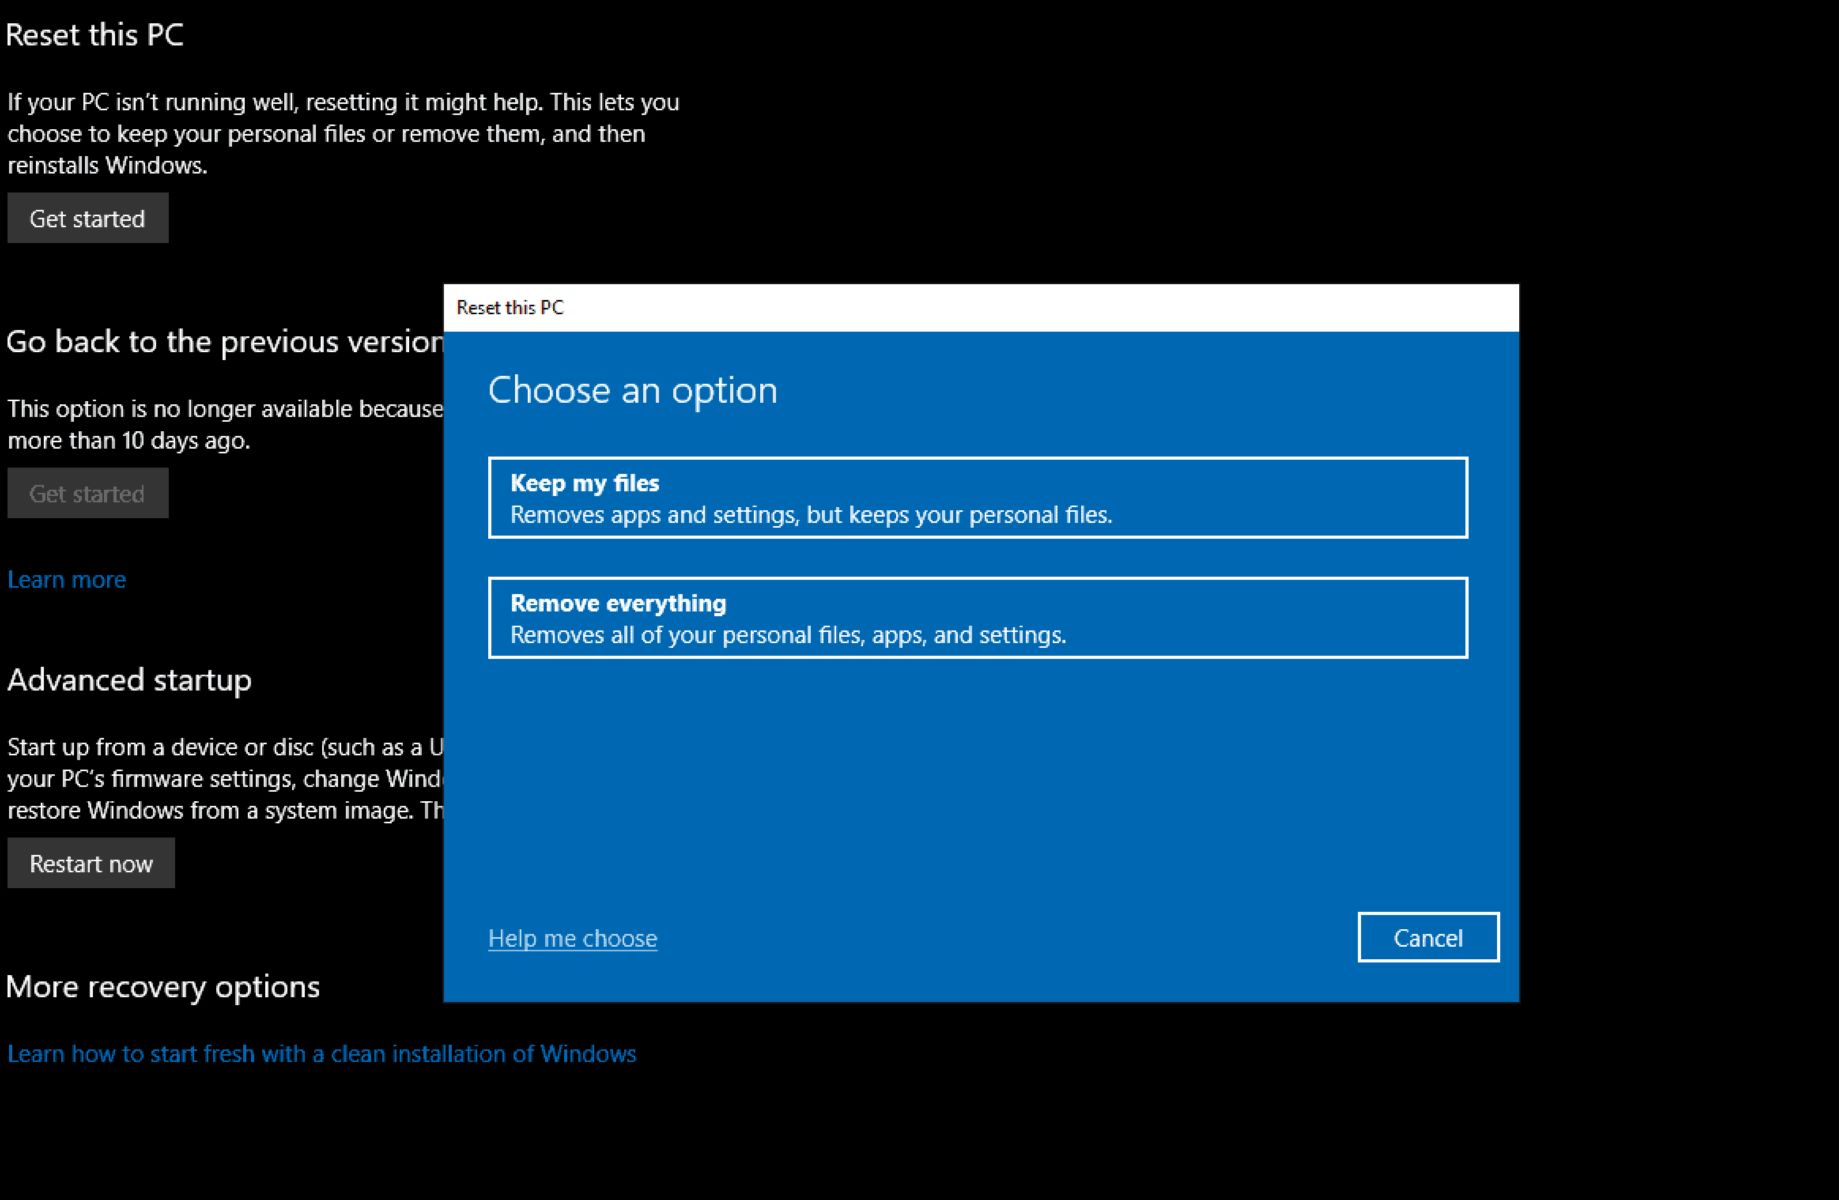
Step 2: Use built-in formatting tool
Once you have successfully backed up your data, the next step is to use the built-in formatting tool provided by your operating system. Formatting the hard disk drive will erase all existing data and prepare it for a fresh start.
The process may vary slightly depending on your operating system, but the general steps to format the hard disk drive are as follows:
- Windows:
- Open the “File Explorer” by pressing Windows key + E.
- Locate and right-click on the hard disk drive you want to format.
- Select “Format” from the drop-down menu.
- Select the desired file system (typically NTFS is recommended).
- Choose the allocation unit size (leave it as default if not sure).
- Check the box for “Quick Format” to speed up the process.
- Click “Start” and confirm the formatting process. Be aware that this will erase all data on the selected drive.
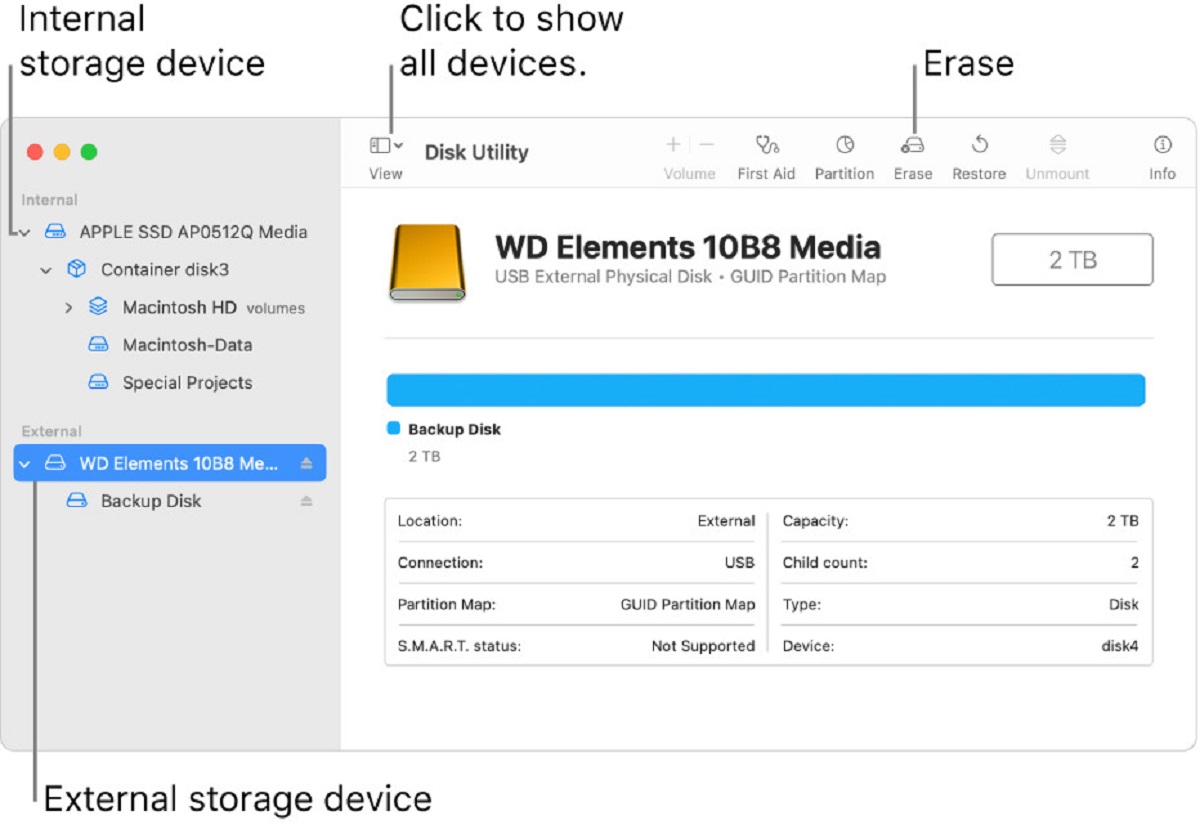
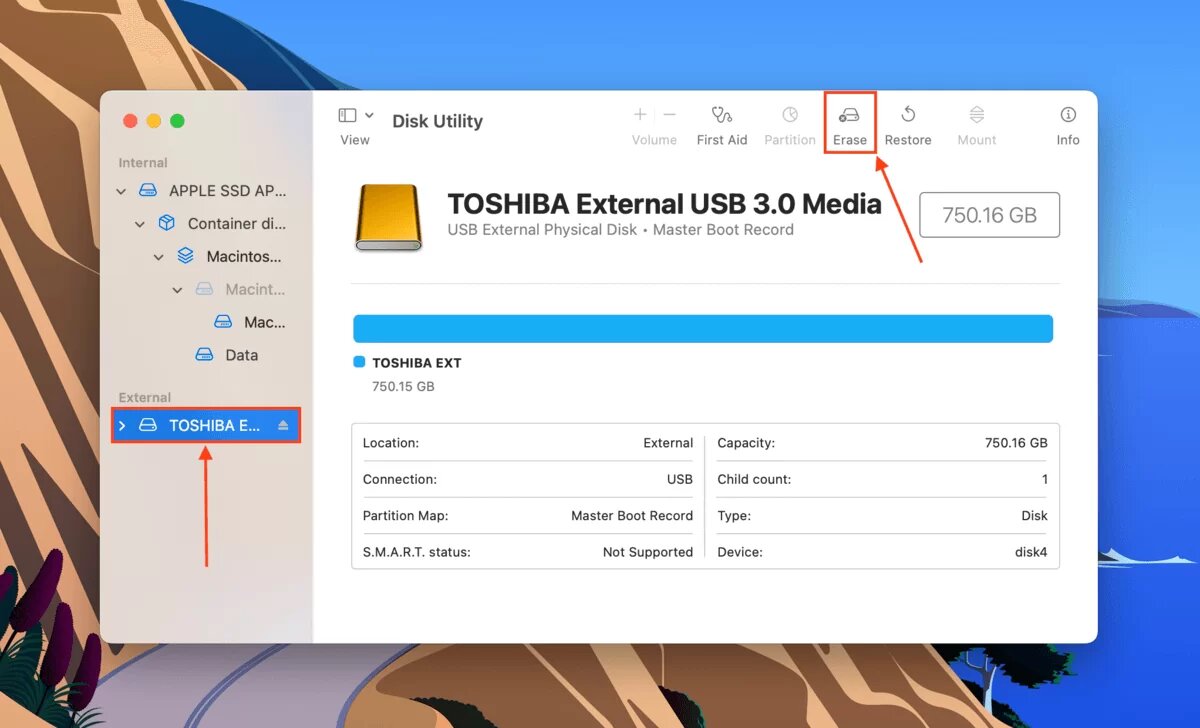
- macOS:
- Open “Finder” and click on the “Applications” folder.
- Open the “Utilities” folder, then launch “Disk Utility”.
- In the left sidebar, select the hard disk drive you want to format.
- Click on the “Erase” tab.
- Choose the desired format (typically Mac OS Extended or APFS).
- Enter a name for the formatted drive.
- Click “Erase” and confirm the formatting process. Remember that all data on the selected drive will be permanently deleted.
It is important to note that formatting the hard disk drive using the built-in tool is not completely secure. Although it makes it difficult for the average user to recover the data, specialized software may still be able to retrieve some information. For additional security, you can proceed to the next step to use disk utility software.
Step 3: Use disk utility software
After performing the built-in formatting process, it is recommended to further enhance the security of your data deletion by utilizing disk utility software. Disk utility software offers advanced features and algorithms that can securely erase the contents of your hard disk drive, making it extremely difficult to recover any deleted data.
There are several disk utility software options available, both free and paid, that you can choose from. Some popular choices include:
- CCleaner: CCleaner is a widely used disk utility software that offers a feature called “Drive Wiper.” This tool can securely erase the contents of your hard disk drive by overwriting the data multiple times, ensuring that it cannot be recovered.
- DBAN (Darik’s Boot and Nuke): DBAN is a free and open-source software that specializes in securely wiping hard drives. It operates by booting the computer using a DBAN bootable disk or USB drive, and then securely erases all data on the selected drive by using different overwrite patterns.
- BitRaser: BitRaser is a professional disk utility software that provides data erasure services for various storage devices, including hard disk drives. It offers advanced algorithms to wipe data, including DoD 5220.22-M, NIST 800-88, and more, making it virtually impossible to retrieve any deleted information.
Before using any disk utility software, ensure that you carefully follow the instructions provided by the software developer to perform a secure data erasure. It is important to note that the process may take some time, depending on the size of your hard disk drive and the software you are using.
By utilizing disk utility software, you can add an extra layer of security to your data deletion process, preventing any potential recovery of sensitive information. However, if you want to take data destruction a step further, you can proceed to the next step and physically destroy the hard disk drive.
Step 4: Use disk shredding software
If you want to ensure the highest level of data security and complete eradication of all data on your hard disk drive, you can use disk shredding software. Disk shredding software goes beyond traditional formatting and data erasure methods, employing advanced techniques to overwrite the entire disk space with random data patterns multiple times, making it nearly impossible for any data to be recovered.
There are several disk shredding software options available that you can consider:
- Eraser: Eraser is a free and open-source disk shredding software that allows you to securely erase data from your hard disk drive. It supports different shredding methods, including Gutmann, DoD 5220.22-M, and more.
- Securely File Shredder: Securely File Shredder is a lightweight and easy-to-use disk shredding software that ensures complete deletion of the data on your hard disk drive. It offers various shredding algorithms, including Simple Overwrite, DoD 5220.22-M, and Gutmann, to streamline the process.
- DiskGenius: DiskGenius is a comprehensive disk utility software that includes disk shredding functionality. It allows you to shred selected files or entire hard disk drives using different shred algorithms, providing enhanced data security.
When using disk shredding software, ensure that you carefully select the appropriate shredding method and follow the instructions provided by the software developer. The process may take a significant amount of time, depending on the size of the hard disk drive and the shredding method chosen.
By employing disk shredding software, you can rest assured that all data on your hard disk drive has been effectively and permanently destroyed, making it extremely difficult for anyone to recover any sensitive information.
However, if you want to take data destruction to the highest level, you can proceed to the final step and physically destroy the hard disk drive.
Step 5: Physically destroy the hard disk drive
If you are concerned about the ultimate security and complete destruction of the data on your hard disk drive, the final step is to physically destroy it. Physical destruction ensures that the hard disk drive becomes permanently inoperable and any data stored on it is irretrievable.
Here are some methods for physically destroying a hard disk drive:
- Drilling: Using a power drill, drill several holes through the hard disk drive. Make sure to drill through the platters, which are the internal magnetic disks that store the data. This process will render the drive unreadable and unusable.
- Smashing: Use a hammer or any heavy blunt object to smash the hard disk drive. Apply force to the platters and other components until they are completely shattered. This method obliterates the drive and makes it impossible to recover any data.
- Shredding: If you have access to a professional hard drive shredder, you can use it to shred the hard disk drive into tiny pieces. The shredder thoroughly destroys the drive, making it virtually impossible to retrieve any information from it.
- Degaussing: Degaussing is a method that uses a powerful magnetic field to erase the data stored on the hard disk drive. This process neutralizes the magnetic properties of the platters, rendering the drive unusable. However, degaussing equipment is typically expensive and requires expertise to operate.
It is important to note that physical destruction methods are irreversible, and once you have destroyed the hard disk drive, all data on it will be permanently lost. Therefore, make sure to double-check that you have backed up any important data before proceeding with this step.
By physically destroying the hard disk drive, you can have peace of mind knowing that even if someone were to obtain the drive, they would not be able to retrieve any information from it. This step concludes the process of completely deleting everything from your hard disk drive.
Conclusion
Deleting everything from a hard disk drive is a crucial step when you plan to sell, donate, or dispose of your computer. Simply deleting files or formatting the drive is not enough, as the data can still be recovered. To ensure the complete removal of data, it is important to follow a series of steps to securely delete everything from the HDD.
In this article, we discussed various methods for deleting everything from a hard disk drive, starting with the essential step of backing up your data. We then explored using the built-in formatting tool provided by your operating system to erase the drive’s contents. Additionally, we highlighted the use of disk utility software to enhance the security of data deletion.
For those seeking the highest level of data security, we introduced the concept of disk shredding software, which uses advanced techniques to overwrite the entire disk space with random data patterns. Furthermore, we discussed the option of physically destroying the hard disk drive, rendering it inoperable and preventing any possible data recovery.
It is important to evaluate your specific needs and requirements when choosing the appropriate method for deleting everything from your hard disk drive. Remember to always back up your data before proceeding with any deletion process to avoid losing important files or documents.
By following these steps and considering the various methods discussed in this article, you can ensure the complete removal of data from your hard disk drive, safeguarding your privacy and preventing any unauthorized access to your personal information.
Take the necessary precautions and choose the method that best suits your needs to confidently delete everything from your hard disk drive, providing you with peace of mind as you move forward with your computer disposal or transfer.