Introduction
Being connected to a wireless network is an essential part of our modern lives, allowing us to access the internet and stay connected with others. However, there may come a time when you need to delete a wireless network on your Windows 10 computer. This could be due to various reasons, such as troubleshooting connectivity issues, removing unwanted networks, or simply cleaning up your network list.
In this article, we will guide you through the process of deleting a wireless network on Windows 10. Whether you’re a seasoned tech-savvy user or new to the Windows operating system, you’ll find this step-by-step guide easy to follow.
We will explore the built-in network settings in Windows 10, where you can manage your Wi-Fi networks efficiently. By following these instructions, you will be able to remove any unwanted wireless networks easily and keep your network list organized.
Before we begin, it’s important to note that deleting a wireless network from your computer means that you will no longer be able to connect to it automatically. If you use this network regularly, you will need to reconnect and re-enter the network credentials when needed. Additionally, deleting a network will not affect any other devices connected to the same network, such as smartphones or tablets.
Now, without further ado, let’s dive into the step-by-step process of deleting a wireless network on Windows 10.
Step 1: Open the Network & Internet Settings
The first step to deleting a wireless network on Windows 10 is to access the Network & Internet settings. This is where you can manage all aspects of your computer’s network connections.
To begin, click on the Start button, located in the bottom left corner of your screen. From the Start menu, select the “Settings” icon, which resembles a gear.
Once you have opened the Settings app, you will see various categories. Look for the “Network & Internet” category and click on it to proceed.
In the Network & Internet settings, you will find a range of options related to your computer’s network connections, including Wi-Fi, Ethernet, VPN, and more.
Alternatively, you can also access the Network & Internet settings by right-clicking on the network icon in the system tray – the small collection of icons located in the bottom right corner of the screen. From the context menu, select “Open Network & Internet settings.”
By following either of these methods, you will successfully open the Network & Internet settings in Windows 10, giving you control over your computer’s network connections.
Are you ready for the next step? Let’s move on to accessing the Wi-Fi settings in the following section.
Step 2: Access Wi-Fi Settings
Once you have opened the Network & Internet settings, the next step is to access the Wi-Fi settings. This is where you can manage and configure your computer’s wireless network connections.
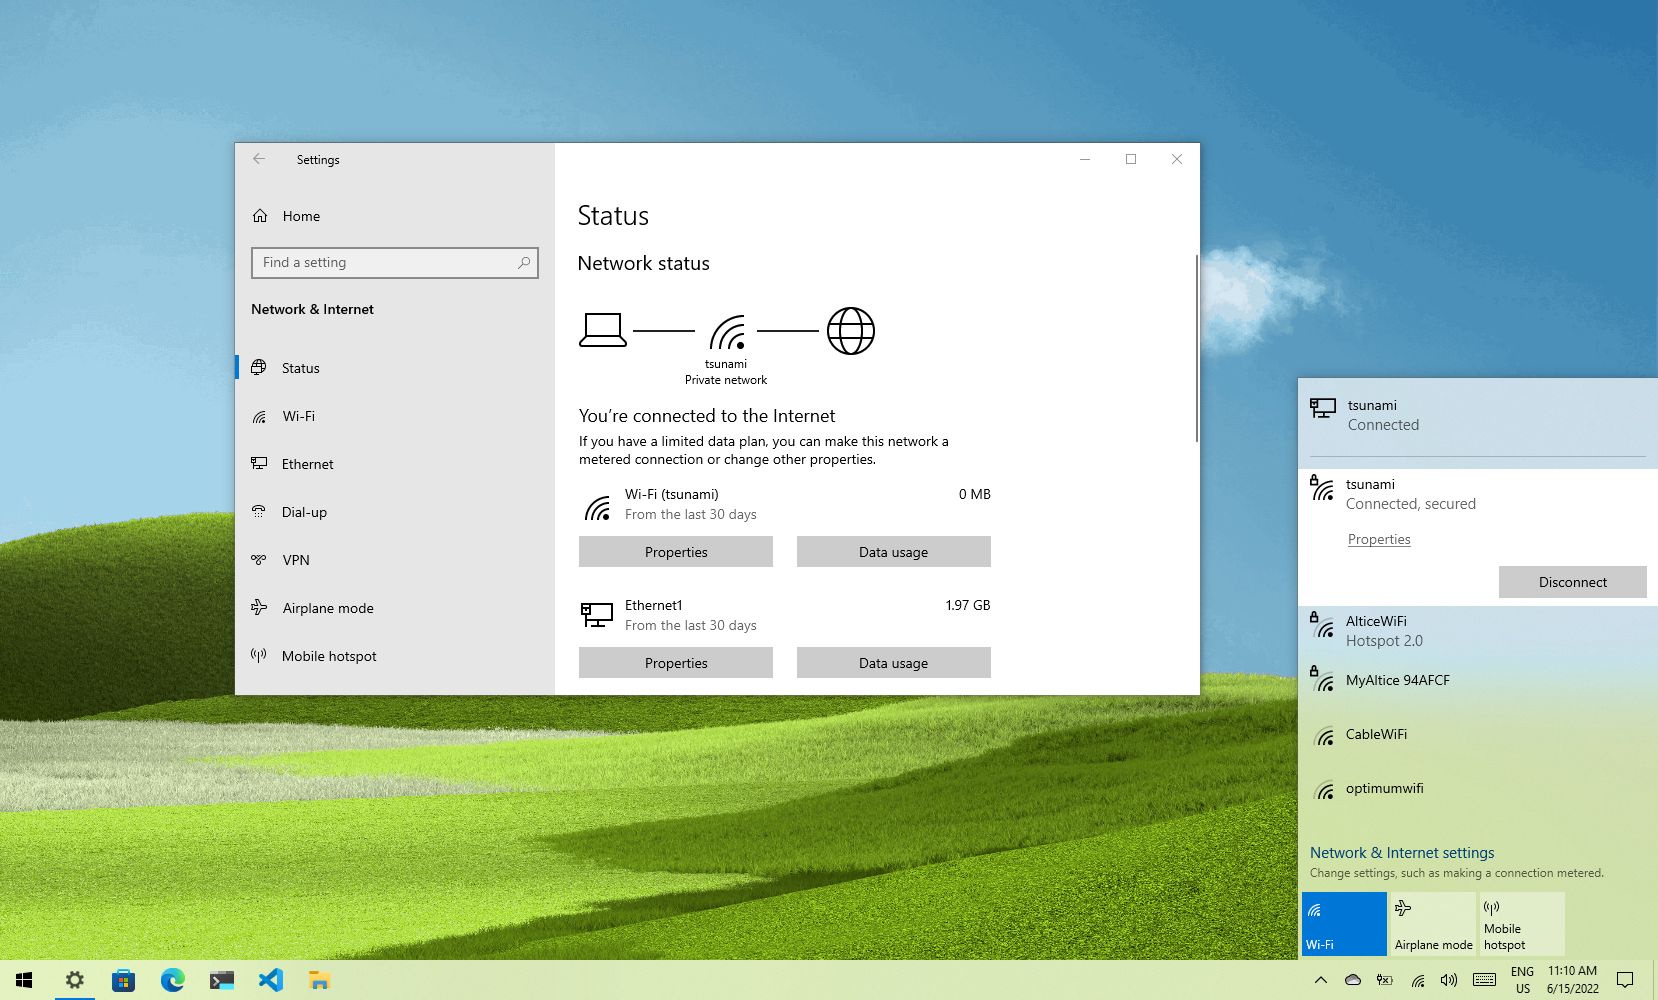
In the Network & Internet settings window, you will see a sidebar on the left side of the screen. Look for the “Wi-Fi” option and click on it. This will take you to the Wi-Fi settings page.
Alternatively, you can also access the Wi-Fi settings directly from the system tray. Look for the Wi-Fi icon, which resembles a series of curved lines, and right-click on it. From the context menu, select “Open Network & Internet settings.” This will bring you to the Network & Internet settings, where you can then click on the “Wi-Fi” option.
By accessing the Wi-Fi settings, you will be able to manage your computer’s wireless network connections effectively. This includes connecting to new networks, managing existing networks, and deleting unwanted networks.
Now that you have successfully accessed the Wi-Fi settings, let’s move on to the next step, which involves managing known networks.
Step 3: Manage Known Networks
With the Wi-Fi settings page open, it’s time to manage the known networks on your Windows 10 computer. This step allows you to view a list of all the wireless networks that your computer has connected to in the past.
On the Wi-Fi settings page, scroll down until you see the section titled “Manage known networks.” Here, you will find a list of all the Wi-Fi networks that your computer has previously connected to, organized in chronological order.
In this list, you will see the names (also known as SSIDs) of the networks, along with information indicating whether you are currently connected to them or not. Take a moment to review the networks in the list and identify the one you wish to delete.
If you have a long list of known networks or have trouble finding the specific network you want to delete, you can use the search function at the top of the page. Simply enter the name of the network you want to find, and Windows will filter the list accordingly.
Now that you’ve located the network you wish to delete, let’s move on to the next step, which involves forgetting the network.
Step 4: Locate the Wireless Network to Delete
Now that you have accessed the Wi-Fi settings and identified the “Manage known networks” section, it’s time to locate the specific wireless network that you want to delete from your Windows 10 computer.
Scroll through the list of known networks and look for the name (SSID) of the network you wish to delete. The networks are typically listed in chronological order, with the most recently connected network appearing at the top.
If you are having trouble finding the network you want to delete, you can use the search function at the top of the “Manage known networks” section. Simply type in the name of the network, and Windows will filter the list accordingly, making it easier to locate the desired network.
Pay attention to the network names and ensure that you are selecting the correct one for deletion. It’s essential to double-check, as deleting the wrong network may lead to connectivity issues or impact other devices that rely on that network.
Once you have located the network that you want to delete, proceed to the next step to complete the deletion process.
Step 5: Forget Network
Now that you have found the specific wireless network that you want to delete, it’s time to proceed with removing it from your Windows 10 computer. This can be done by “forgetting” the network, which will remove it from your list of known networks.
To forget the network, simply click on it once to select it. Once selected, you will see a “Forget” button appear just below the list of known networks. Click on the “Forget” button to initiate the deletion process.
Windows will ask for confirmation before deleting the network. A pop-up message will appear, asking if you are sure you want to forget the network. Double-check that you have selected the correct network, as deleting it will remove it from your list entirely.
Click on the “Forget” button in the confirmation message to proceed with deleting the network. Windows will remove the selected network from your list of known networks, ensuring that your computer no longer automatically connects to it.
It’s important to note that forgetting a network does not affect other devices connected to the same network. It only removes the network from your Windows 10 computer’s list of known networks.
Now that the network has been successfully forgotten, let’s move on to the next step to verify the network deletion.
Step 6: Confirmation Message
After clicking on the “Forget” button to delete the network, Windows will display a confirmation message to ensure that you intended to remove the network from your list of known networks.
The confirmation message serves as a final check to make sure that you have selected the correct network for deletion. It helps prevent accidental removal of networks and ensures that your network settings remain accurate and up-to-date.
When the confirmation message appears, it will typically include information such as the name (SSID) of the network and a reminder that forgetting the network means you will no longer connect to it automatically.
Review the details in the confirmation message to ensure that you are deleting the correct network. If you have any doubts, you can click on the “Cancel” button to abort the deletion process and return to the Wi-Fi settings page.
However, if you are certain that you want to proceed with deleting the network, click on the “Forget” or “Confirm” button in the confirmation message. This action will remove the selected network from your Windows 10 computer’s list of known networks.
Once you have confirmed the deletion, Windows will complete the process and remove the network from your list. You will no longer see the network in the “Manage known networks” section of the Wi-Fi settings page.
Before we conclude, let’s move on to the final step, which involves verifying that the network has been successfully deleted.
Step 7: Verify Network Deletion
After deleting a wireless network from your Windows 10 computer, it’s important to verify that the network has been successfully removed from your list of known networks. This step allows you to confirm that the network deletion was effective.
To verify the network deletion, navigate back to the Wi-Fi settings page. Scroll down to the “Manage known networks” section and review the list of networks. Check if the network you deleted is no longer listed.
If you cannot find the network in the list, congratulations! You have successfully deleted the wireless network from your Windows 10 computer. It will no longer appear as an option for automatic connection, providing you with a clean and organized network list.
If you still see the network in the list, double-check that you followed the previous steps correctly. Make sure that you selected the correct network for deletion and clicked on the “Forget” button to remove it.
If the network is still present after following the steps, you may need to repeat the process. Ensure that you are connected to the network you want to delete and try forgetting it again.
Remember, deleting a network from your Windows 10 computer’s list of known networks does not affect the network itself or any other devices connected to it. It simply stops your computer from automatically connecting to the network.
With the network deletion successfully verified, you have completed the process of deleting a wireless network on Windows 10. Congratulations!
Now you have the knowledge and skills to manage your Wi-Fi connections and keep your network list organized. Whether you’re troubleshooting connectivity issues or cleaning up unwanted networks, you can confidently navigate the Network & Internet settings in Windows 10.
Thank you for following this step-by-step guide. If you have any further questions or need assistance, feel free to refer back to this article or reach out to Microsoft support for additional help.
Conclusion
Managing your wireless networks on Windows 10 is a straightforward process that gives you control over your network connections. By following the steps outlined in this guide, you can easily delete unwanted networks and keep your network list clean and organized.
We began by opening the Network & Internet settings, where we accessed the Wi-Fi settings. From there, we proceeded to the “Manage known networks” section, where we located the specific network we wanted to delete. Then, we clicked on the network and chose the “Forget” option to initiate the deletion process.
After confirming the deletion, we verified that the network was successfully removed from the list of known networks in the Wi-Fi settings. This ensured that the network would no longer connect automatically on our Windows 10 computer.
Deleting a wireless network does not affect other devices connected to the same network, and it can be helpful for troubleshooting connectivity issues or removing unwanted networks.
Now that you have mastered the process of deleting wireless networks on Windows 10, you can confidently manage your network connections and maintain a clean and efficient network list. Whether you’re optimizing your Wi-Fi settings or troubleshooting connection problems, these skills will come in handy.
Remember to exercise caution when deleting networks and always double-check that you have selected the correct one. Removing the wrong network could lead to connectivity issues or undesired consequences.
Thank you for following this guide. We hope it has been informative and has empowered you to manage your wireless networks effectively on your Windows 10 computer. If you have any further questions or need assistance, feel free to refer back to this article or seek support from Microsoft. Happy networking!