Introduction
Deleting your Facebook account on Android may seem like a daunting task, but it’s actually quite straightforward. Whether you want to take a break from social media or permanently remove your account, there are a couple of options available to you. In this guide, we will walk you through the step-by-step process of deactivating your account or permanently deleting it, depending on your preference.
Facebook is one of the most popular social networking platforms, connecting billions of people around the world. While it offers various features and benefits, some users may find themselves wanting to disconnect from the platform due to privacy concerns, excessive screen time, or simply a desire to be more present in real-life. Whatever your reasons may be, we’ve got you covered.
In the following sections, we will outline three different methods to delete your Facebook account on Android. The first option is to deactivate your account temporarily, allowing you to take a break from Facebook without permanently losing your data. The second option is to permanently delete your account, erasing all your information from Facebook’s servers. Lastly, we will discuss how you can request an account deletion directly through the Facebook Help Center.
Before proceeding, it’s important to note that deleting your Facebook account is irreversible. Once you delete your account, you won’t be able to recover any of your data, including photos, posts, and messages. Therefore, it’s crucial to make sure you have a backup of any important information before proceeding with the deletion process.
Now that we’ve covered the basics, let’s dive into the different options for deleting your Facebook account on Android.
Option 1: Deactivating Your Facebook Account
If you want to take a temporary break from Facebook without permanently deleting your account, deactivating your account is the option for you. Deactivating your account will make your profile and information invisible to others on the platform, but you can reactivate it at any time by simply logging back in.
To deactivate your Facebook account on Android, follow these steps:
- Launch the Facebook app on your Android device.
- Tap on the hamburger menu icon in the top right corner of the app. It looks like three horizontal lines stacked on top of each other.
- Scroll down to find the “Settings & Privacy” section and tap on it.
- In the expanded menu, tap on “Settings”.
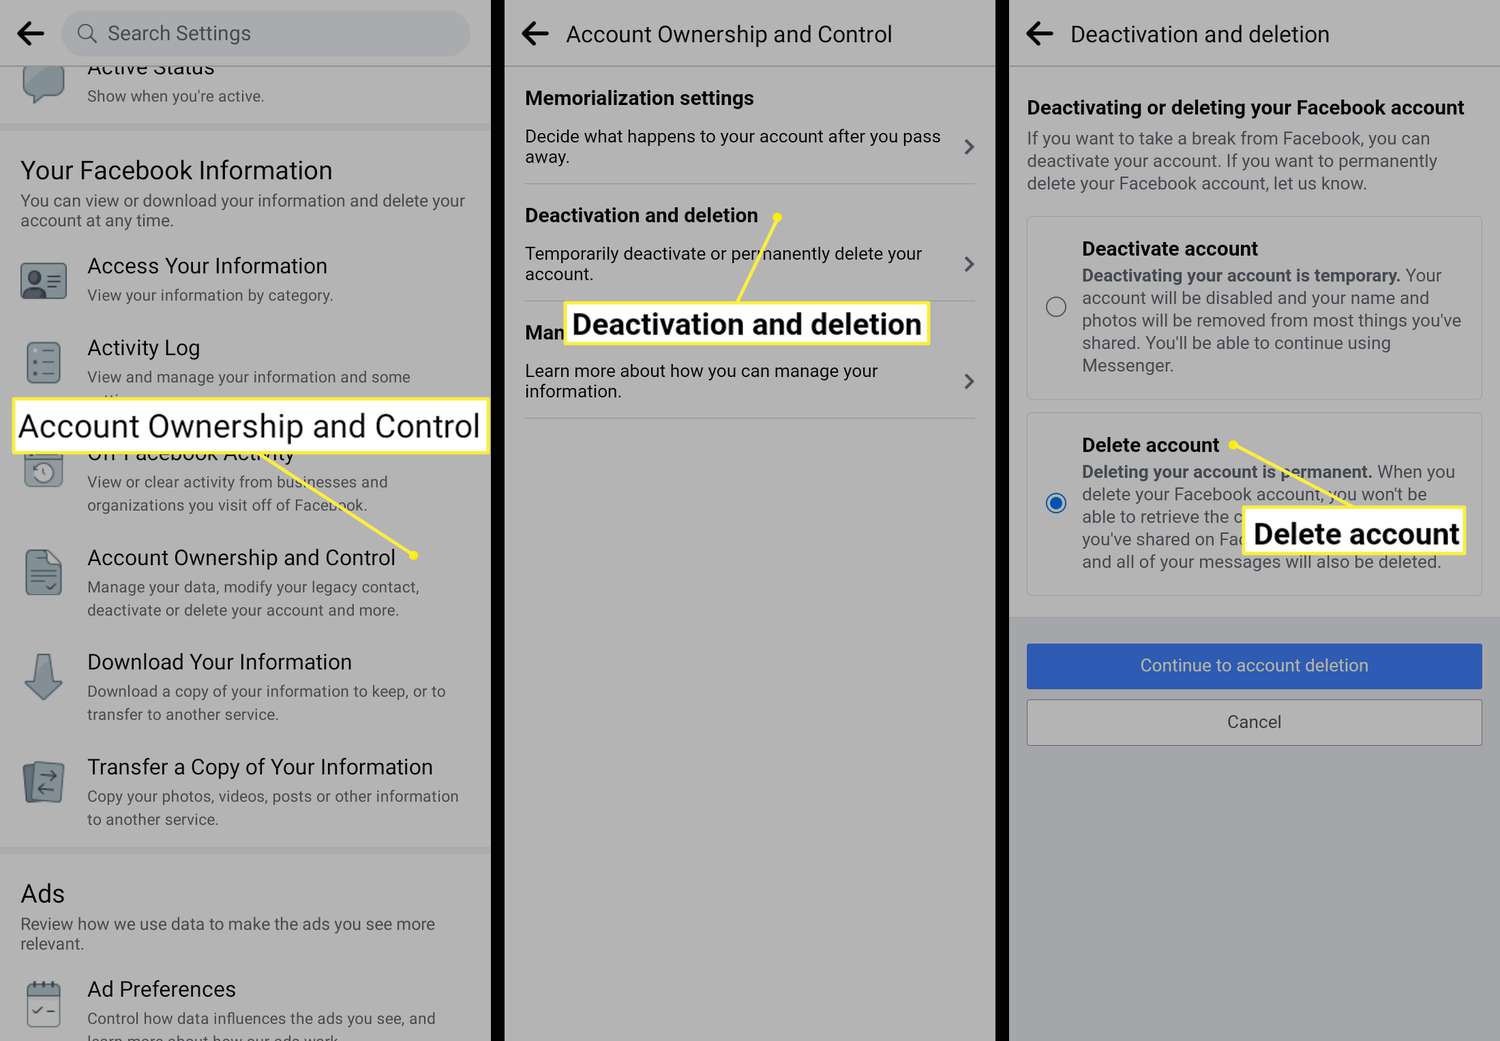
- Scroll down to the “Your Facebook Information” section and tap on “Account Ownership and Control”.
- Under the “Account Ownership and Control” section, you’ll find the option to “Deactivate Your Account”. Tap on it.
- A screen will appear explaining what happens when you deactivate your account. Read the information and tap on the “Continue” button.
- You may be prompted to enter your password for security purposes. Once you’ve entered your password, tap on “Continue”.
- You’ll be asked to select a reason for deactivating your account. Choose an option from the list, or you can tap on “Other” and provide your own reason in the text box.
- Finally, tap on the “Deactivate” button to confirm your decision.
Once you’ve completed these steps, your Facebook account will be deactivated, and you will be logged out of the app. Your profile, photos, and posts will no longer be visible to others, but your data will be saved on Facebook’s servers in case you decide to reactivate your account in the future.
To reactivate your account, simply log back into the Facebook app using your previous login credentials, and your account will be restored with all your information intact.
Keep in mind that even though your account is deactivated, Facebook may still retain some of your information, such as messages you’ve sent to others. If you want to completely remove your data from Facebook’s servers, you’ll need to proceed with the permanent deletion option, which we’ll discuss in the next section.
Option 2: Permanently Deleting Your Facebook Account
If you’ve decided that you no longer want to use Facebook and want to remove all your data from the platform, permanently deleting your account is the way to go. This option will permanently erase your profile, photos, posts, and any other information associated with your account.
To permanently delete your Facebook account on Android, follow these steps:
- Launch the Facebook app on your Android device.
- Tap on the hamburger menu icon in the top right corner of the app.
- Scroll down to find the “Settings & Privacy” section and tap on it.
- In the expanded menu, tap on “Settings”.
- Scroll down to the “Your Facebook Information” section and tap on “Account Ownership and Control”.
- Under the “Account Ownership and Control” section, you’ll find the option to “Deactivate and Delete Your Account”. Tap on it.
- A screen will appear with information about deleting your account. Read the information and tap on the “Continue to Account Deletion” button.
- You may be prompted to enter your password for security purposes. Once you’ve entered your password, tap on “Continue”.
- You’ll be asked to confirm your decision to delete your account. Tap on the “Delete Account” button.
- A pop-up message will appear, notifying you that account deletion is permanent and can’t be undone. Tap on “Delete Account” to proceed.
After following these steps, your Facebook account will be permanently deleted, and you will no longer have access to it. Your profile, photos, posts, and any other information associated with your account will be removed from Facebook’s servers.
It’s important to note that it may take up to 90 days for Facebook to delete all your information from their backups. During this time, your account and information may still be visible to others. However, you won’t be able to reactivate your account or access any of your previous data.
If you change your mind before the 90-day period expires, avoid logging back into your account or using any Facebook-related services, as doing so may cancel the deletion request and reactivate your account.
Now that you know how to permanently delete your Facebook account on Android, let’s move on to the next step, which is logging out of the app and uninstalling it from your device.
Step 1: Launch the Facebook App
To begin the process of deleting your Facebook account on Android, you’ll first need to open the Facebook app on your device. Look for the familiar blue icon with the white lowercase “f” and tap on it to launch the app.
If you don’t have the Facebook app installed on your Android device, you can download it for free from the Google Play Store. Simply search for “Facebook” in the Play Store, select the official Facebook app, and tap on “Install” to download and install it onto your device.
Once the app is installed or if you already have it on your device, locate the Facebook app icon on your home screen or app drawer, and tap on it to open the app.
After launching the app, you’ll be prompted to log in to your Facebook account. Enter your email or phone number and your password to proceed. If you have enabled two-factor authentication, you may also be required to enter the verification code that was sent to your registered mobile device.
If you are already logged in to the app, you will be taken directly to your Facebook home screen. In this case, skip to the next step to learn how to access the settings menu.
Now that you have successfully launched the Facebook app on your Android device and logged in to your account, it’s time to move on to the next step: opening the settings menu.
Step 2: Opening the Settings Menu
Once you have launched the Facebook app and logged in to your account, the next step is to access the settings menu. This is where you’ll find the options to manage your account, including the ability to deactivate or delete your Facebook account.
To open the settings menu, follow these steps:
- On the Facebook app home screen, look for the three horizontal lines in the top right corner. This is known as the hamburger menu icon. Tap on it to open the menu.
- Scroll down the menu until you locate the “Settings & Privacy” section. This section contains various account-related settings.
- Tap on the “Settings & Privacy” section to expand it and reveal additional options.
- In the expanded menu, tap on the “Settings” option. This will take you to the main settings screen for your Facebook account.
Once you tap on “Settings,” the app will load the settings screen, where you can customize your account settings, privacy preferences, notification settings, and more. This is where you’ll find the necessary options to deactivate or delete your Facebook account.
Opening the settings menu is an essential step in the process of deleting your Facebook account. It allows you to access the account management features and make the necessary changes to deactivate or permanently delete your account.
Now that you have successfully opened the settings menu, let’s move on to the next step: navigating to your Facebook information.
Step 3: Navigating to Your Facebook Information
After opening the settings menu in the Facebook app, the next step is to navigate to your Facebook information. This section contains various options related to your account, including the ability to manage your personal data, privacy settings, and account ownership.
To access your Facebook information, follow these steps:
- On the settings screen, scroll down until you find the “Your Facebook Information” section. This section is usually located towards the bottom of the settings menu.
- Tap on “Your Facebook Information” to expand the section and reveal the available options.
By tapping on “Your Facebook Information,” you will be taken to a new screen that contains several options related to managing your data and account.
This section is where you’ll find the necessary options to proceed with deactivating or permanently deleting your Facebook account. It also provides other options such as managing your activity log, downloading a copy of your Facebook data, or managing your preferences for off-Facebook activity.
Navigating to your Facebook information is a crucial step in the process of deleting your account. It allows you to access the specific settings and features required to deactivate or permanently delete your Facebook account.
Now that you have successfully navigated to your Facebook information, let’s move on to the next step: accessing account ownership and control.
Step 4: Accessing Account Ownership and Control
After navigating to your Facebook information, the next step is to access the account ownership and control settings. This section is where you’ll find the options to manage your account status, including the ability to deactivate or permanently delete your Facebook account.
To access account ownership and control, follow these steps:
- On the “Your Facebook Information” screen, look for the “Account Ownership and Control” option. This section is typically located towards the top.
- Tap on “Account Ownership and Control” to open the section and explore the available options.
Once you tap on “Account Ownership and Control,” you will be presented with a range of settings and options related to managing your Facebook account.
This section allows you to take control of your account and make important decisions regarding its status. Here, you can choose whether to deactivate your account temporarily or permanently delete it from Facebook’s servers.
It’s worth noting that the exact layout and options may vary slightly depending on your Facebook app version and updates. However, the essential components for managing your account ownership and control will typically be present in this section.
Accessing account ownership and control is a crucial step as it allows you to make informed decisions about the future of your Facebook account. Whether you choose to take a break by deactivating your account or decide to permanently remove your presence from the platform, this section provides the necessary options to proceed.
Now that you have successfully accessed account ownership and control, let’s move on to the next step: initiating the deletion process.
Step 5: Initiating the Deletion Process
Once you have accessed the account ownership and control settings, it’s time to initiate the deletion process for your Facebook account. This step will allow you to choose between deactivating your account temporarily or permanently deleting it from the platform.
To initiate the deletion process, follow these steps:
- On the account ownership and control screen, look for the option related to deactivating or deleting your account. The exact wording may vary, but it should be clearly labeled.
- Tap on the appropriate option to proceed.
When you initiate the deletion process, Facebook will provide you with some information about the consequences of deactivating or permanently deleting your account. Take the time to read through the information to ensure you understand the implications.
If you choose to deactivate your account temporarily, Facebook will disable your profile and hide it from other users. Your personal information and data will be saved and can be reactivated by logging back into your account at any time.
If you opt for permanent deletion, Facebook will erase your profile, photos, posts, and any other information associated with your account. This process is irreversible, and you will not be able to recover your data after deletion. It may take some time for Facebook to completely remove all your information from their servers.
After initiating the deletion process, follow the on-screen instructions to proceed. This may involve confirming your decision, entering your password for security purposes, or providing a reason for deleting your account.
Take your time to carefully review the options and double-check your decision before confirming the deletion. Once you confirm, your Facebook account will be deactivated or permanently deleted according to your choice.
Now that you have successfully initiated the deletion process, let’s move on to the next step: confirming your decision.
Step 6: Confirming Your Decision
After initiating the deletion process for your Facebook account, the next step is to confirm your decision. This step ensures that you are fully aware of the consequences of deactivating or permanently deleting your account and allows you to proceed with certainty.
To confirm your decision, follow these steps:
- On the confirmation screen, carefully review the information provided by Facebook regarding the consequences of deactivating or deleting your account. Make sure you understand the implications before proceeding.
- If you are confident in your decision, tap on the “Continue” or “Confirm” button to move forward.
By confirming your decision, you are acknowledging that you understand the consequences and are ready to proceed with deactivating or permanently deleting your Facebook account.
It’s important to note that once you confirm your decision, the process cannot be undone. If you choose to deactivate your account, you can reactivate it at any time by logging back in. However, if you decide to permanently delete your account, all your data and information will be permanently removed from Facebook’s servers.
Take a moment to reflect on your decision and ensure that it aligns with your intentions for your Facebook account. If you have any doubts or need more time to consider, you can always cancel the deletion process and revisit it at a later time.
Now that you have successfully confirmed your decision, let’s move on to the next step: logging out of the Facebook app and uninstalling it from your device, if desired.
Step 7: Logging Out and Uninstalling the Facebook App
After completing the deletion process for your Facebook account, the final step is to log out of the Facebook app and, if desired, uninstall it from your Android device. This step ensures that you no longer have access to your account and removes the app from your device, providing a clean break from Facebook.
To log out of the Facebook app and uninstall it, follow these steps:
- On the Facebook app home screen, tap on the hamburger menu icon in the top right corner.
- Scroll down to the bottom of the menu and tap on “Log Out”. This will log you out of your Facebook account on the app.
- If you wish to remove the Facebook app from your Android device, go to the home screen or app drawer and find the Facebook app icon.
- Press and hold the app icon until a menu appears, then select “Uninstall” or drag the app to the “Uninstall” option that appears at the top of the screen.
- Confirm the uninstallation when prompted. The Facebook app will be uninstalled from your Android device.
By logging out of the Facebook app, you will no longer have access to your account unless you log back in again. This step ensures that you are completely disconnected from your Facebook account.
Uninstalling the Facebook app goes a step further, removing the app from your Android device. This can provide a sense of closure and make it easier to resist the temptation of returning to the platform.
Keep in mind that uninstalling the app is optional and based on personal preference. If you prefer to keep the app installed but want to ensure that you are logged out, simply log out of your account and refrain from opening the app.
Congratulations! You have successfully completed the process of deleting your Facebook account on Android. It’s important to note that the deletion process may take some time to finalize, and it’s recommended to avoid logging back in or using any Facebook-related services during this time.
Now that you have logged out and uninstalled the Facebook app, you can enjoy your time away from the platform and explore other ways to connect with friends and family.
Option 3: Requesting Account Deletion Through Facebook Help Center
If you are unable to delete your Facebook account through the regular settings and options, or if you have encountered any issues during the process, you can reach out to the Facebook Help Center for assistance. Facebook provides a dedicated support system to help users with various account-related inquiries, including account deletion requests.
To request account deletion through the Facebook Help Center, follow these steps:
- Launch the Facebook app on your Android device or access the Facebook website on a browser.
- Tap on the hamburger menu icon in the top right corner to open the menu.
- Scroll down and tap on “Help & Support”.
- In the Help & Support menu, tap on “Help Center”. This will open the Facebook Help Center interface.
- Once you are in the Help Center, use the search bar to look for “delete account”.
- From the search results, select the relevant article or topic that pertains to account deletion.
- Read through the information provided to ensure it matches your needs and requirements.
- If the information is insufficient or you encounter any issues, look for the “Contact Us” or “Submit a Request” option within the Help Center.
- Tap on “Contact Us” or “Submit a Request” to reach out to Facebook support. Provide the necessary details regarding your account deletion request and any specific issues you have encountered.
- Submit your request and wait for a response from Facebook support. They will guide you through the account deletion process and help resolve any outstanding issues.
Requesting account deletion through the Facebook Help Center provides a more personalized approach and allows you to address any concerns or difficulties you may have encountered during the regular deletion process.
It’s important to note that response times may vary, and it may take some time for Facebook support to assist you with your account deletion request. However, they are dedicated to helping users and will work towards resolving your issue promptly.
If you encounter any difficulties or need further assistance during the account deletion process, reaching out to the Facebook Help Center is an excellent option to explore.
Now that you are aware of the option to request account deletion through the Facebook Help Center, you have multiple avenues to ensure the successful deletion of your Facebook account.
Conclusion
Deleting your Facebook account on Android can be a decision that brings peace of mind, more privacy, or a break from social media. In this guide, we covered three different options for deleting your account: deactivating it temporarily, permanently deleting it from Facebook’s servers, or requesting account deletion through the Facebook Help Center.
If you opt for deactivating your account temporarily, you can take a break from Facebook without permanently losing your data. Remember that you can reactivate your account at any time by logging back in.
If you choose to permanently delete your account, all your profile information, photos, and posts will be erased from Facebook’s servers. This is an irreversible process, so be sure to back up any important data before proceeding.
If you encounter any difficulties during the deletion process or have specific concerns, contacting the Facebook Help Center is a valuable option. They can provide personalized assistance to address your account deletion request and resolve any outstanding issues.
After deleting your account, consider logging out of the Facebook app and uninstalling it from your Android device if you no longer intend to use the platform. This will help create a clean break and eliminate temptation.
Deleting your Facebook account can be a liberating decision, allowing you to reclaim your time, privacy, and focus. However, it’s important to consider the implications and weigh the pros and cons before making a final decision.
Remember that social media platforms are constantly evolving, and it’s up to you to decide what role they play in your life. Whether you choose to delete your Facebook account or continue using it, prioritize your well-being and ensure that your online activities align with your personal goals.
Now that you have all the information and options, you can proceed with confidence and make the choice that feels right for you. Best of luck on your journey towards reclaiming your digital presence!