Introduction
Asana is a popular project management tool that helps teams stay organized and collaborate effectively. One of the most useful features of Asana is the ability to create and use templates. Templates in Asana enable you to streamline your workflow by providing a pre-defined structure for recurring tasks or projects.
Imagine you have a set of tasks that need to be completed every week or a project with a standardized set of deliverables. Instead of reinventing the wheel each time, you can create a template in Asana. Templates allow you to save time, ensure consistency, and reduce the chances of missing important steps or details.
Creating a template in Asana is a straightforward process that involves identifying your recurring tasks or projects, organizing them within a template project, customizing task details, and saving the template for future use. Whether you’re a project manager, a marketing professional, or a freelancer, using templates in Asana can significantly improve your productivity and efficiency.
In this article, we will guide you through the process of creating a template in Asana. We’ll cover the steps you need to follow to identify your recurring tasks, set up your template project, customize task details, and save the template for future use. By the end, you’ll be equipped with the knowledge and skills to leverage Asana templates to optimize your workflow and accomplish more in less time.
What is a template in Asana?
A template in Asana is a pre-designed structure that serves as a blueprint for recurring tasks or projects. It allows you to create a standardized set of tasks, assignees, due dates, and other details that can be replicated and used again and again.
Think of a template as a skeleton or framework that you can apply to different projects or tasks to save time and ensure consistency. Templates in Asana provide a starting point for organizing and managing your work, while still allowing flexibility for customization and adaptation to specific needs.
When you create a template in Asana, you have the freedom to define the structure, sequence, and dependencies of tasks. You can also assign tasks to specific team members, set due dates, add descriptions or instructions, attach relevant files, and more. Templates serve as a guide, ensuring that important steps are not overlooked and that everyone involved in the project is on the same page.
Using templates in Asana offers several benefits. Firstly, it saves you time and effort by eliminating the need to recreate similar tasks or projects from scratch. Instead of starting from zero, you can simply select a template and customize it according to your specific requirements. This accelerates the project kickoff process and allows you to jump right into the work.
Secondly, templates promote consistency and standardization. By using the same structure and specifications for recurring tasks or projects, you ensure that nothing essential is missed and that the outcome is consistent every time. This is especially valuable when working on projects with multiple team members or when onboarding new team members.
Lastly, templates in Asana enable scalability. As your organization grows and takes on more projects, templates ensure that best practices are replicated and applied consistently throughout the company. This helps maintain quality, aligns the team’s efforts, and facilitates smooth collaboration across different projects and teams.
In summary, templates in Asana provide a powerful tool to streamline your workflow, save time, ensure consistency, and promote collaboration. By leveraging templates, you can simplify project management and focus on delivering high-quality results.
Why use templates in Asana?
Templates in Asana offer a multitude of benefits that can greatly enhance your project management capabilities and overall efficiency. Let’s explore why using templates in Asana is advantageous:
1. Time-saving: Templates enable you to skip the repetitive and time-consuming task of setting up similar projects or tasks from scratch. By using a pre-designed template, you can save valuable time and quickly get started on your work.
2. Consistency: Using templates ensures that all your recurring tasks or projects follow a consistent structure and predefined set of steps. This consistency promotes efficiency, reduces errors, and helps team members easily understand their roles and responsibilities.
3. Error prevention: Templates act as a safety net by preventing crucial steps or details from being overlooked. By having a standardized template in place, you can minimize the risk of errors and ensure that every task or project is completed accurately and thoroughly.
4. Collaboration: Templates facilitate collaboration among team members. When everyone is working from the same template, it becomes easier to coordinate efforts, share information, and track progress. Additionally, templates provide a common understanding of project requirements, ensuring alignment and reducing misunderstandings.
5. Efficient onboarding: Templates are particularly beneficial when onboarding new team members. By providing them with a predefined template, you can quickly bring them up to speed on the standard processes and tasks. This accelerates their integration into the team and improves their productivity.
6. Scaling your organization: Templates play a vital role in scaling your organization’s workflows. As your team grows and takes on more projects, templates ensure consistency and maintain high levels of productivity. Templates act as a foundation for best practices, allowing teams to efficiently execute tasks and maintain quality across various projects.
7. Flexibility: Even with pre-designed templates, Asana provides the flexibility to customize and adapt them to suit your specific needs. You can easily modify tasks, assignees, due dates, and other details within the template while still maintaining its core structure. This flexibility allows you to cater to unique project requirements while benefitting from the efficiency of using a template.
In summary, using templates in Asana saves time, maintains consistency, prevents errors, enhances collaboration, aids in efficient onboarding, scales organizational workflows, and offers flexibility. By incorporating templates into your project management processes, you can optimize efficiency, boost productivity, and achieve better outcomes.
Getting started with creating a template
Creating a template in Asana is a simple and intuitive process. Whether you’re new to Asana or an experienced user, follow these steps to get started with creating your own templates:
Step 1: Identify your recurring tasks or projects
Take some time to identify the tasks or projects that you frequently repeat. These could be weekly reports, monthly marketing campaigns, or any other tasks that follow a similar structure. By pinpointing these recurring tasks, you’ll have a clear idea of what you want to include in your template.
Step 2: Create a new project for your template
In Asana, create a new project specifically dedicated to your template. This will help keep your templates organized and easily accessible whenever you need them. Give your project a descriptive name that clearly indicates its purpose, such as “Marketing Campaign Template” or “Weekly Report Template”.
Step 3: Add and organize tasks in your template project
Start adding the individual tasks that make up your template. Consider the sequence and dependencies of these tasks to ensure they are logically organized. To make your template more flexible, you can include optional tasks or sections that can be added or removed as needed.
Step 4: Customize task details and assignees
For each task, customize the details such as task name, assignee, and any relevant descriptions or instructions. Assign tasks to specific team members to clearly define responsibilities. This will ensure that everyone knows what they need to do when using the template for a new project.
Step 5: Add subtasks and dependencies
If your tasks have subtasks or dependencies, add them to the relevant tasks in your template. Subtasks break down larger tasks into manageable steps, while dependencies define the order in which tasks need to be completed.
Step 6: Set due dates and reminders
Assign due dates to each task to create a timeline for your template. This helps keep your projects on track and ensures that tasks are completed on time. Additionally, set up reminders to notify team members of upcoming deadlines.
Step 7: Use sections to categorize tasks
To further organize your template, use sections to group related tasks together. This makes it easier to navigate and find the specific tasks you need when using the template for a new project.
Step 8: Add any necessary attachments or links
If your template requires attachments or links to relevant documents, resources, or reference materials, add them to the respective tasks. This ensures that all necessary information is easily accessible when using the template.
Step 9: Save your template
Once you have finished customizing your template project, save it as a template. In Asana, you can create a “Save as Template” copy of your project, which can be accessed and used for future projects.
Step 10: Using your template for new projects or tasks
When you need to create a new project or task based on your template, simply select the template from your list of saved templates. Asana will create a copy of the template that you can customize further for the specific project or task at hand.
By following these steps, you can easily create and use templates in Asana to streamline your workflow, save time, and ensure consistency in your recurring tasks or projects.
Step 1: Identify your recurring tasks or projects
The first step in creating a template in Asana is to identify the tasks or projects that you frequently repeat. These recurring tasks can include weekly reports, monthly marketing campaigns, client onboarding processes, or any other tasks that follow a similar structure or require the same set of actions.
Start by reviewing your work routines and identifying the tasks or projects that you find yourself doing repeatedly. These are tasks that have a specific sequence of steps or require similar deliverables. Look for patterns and commonalities across these tasks to determine which ones can benefit from being turned into a template.
Consider the following questions to help you identify recurring tasks or projects:
- Which tasks do you find yourself doing on a regular basis?
- Which projects have similar workflows or require the same set of deliverables?
- Are there any tasks or projects that are repetitive, time-consuming, or prone to errors?
- Are there any processes that you or your team constantly go through to achieve the desired outcome?
By answering these questions, you’ll be able to create a list of recurring tasks or projects that are suitable candidates for turning into templates.
For example, if you regularly run social media campaigns for clients, you can identify the individual tasks involved such as content creation, scheduling posts, monitoring engagement, and preparing analytics reports. These tasks can be grouped into a template that can be used for each new social media campaign, saving time and ensuring consistency.
Another example could be an employee onboarding process where you have a set of tasks that need to be completed for each new hire. These tasks can include setting up accounts, scheduling orientation sessions, assigning training materials, and providing necessary resources. By creating a template, you can ensure that each new hire goes through the same structured onboarding process.
Identifying your recurring tasks or projects is the foundation of creating a template in Asana. It allows you to streamline your workflow, save time, and ensure consistency across similar projects or tasks. Once you have a clear list of these tasks, you can move on to the next step of creating your template project in Asana.
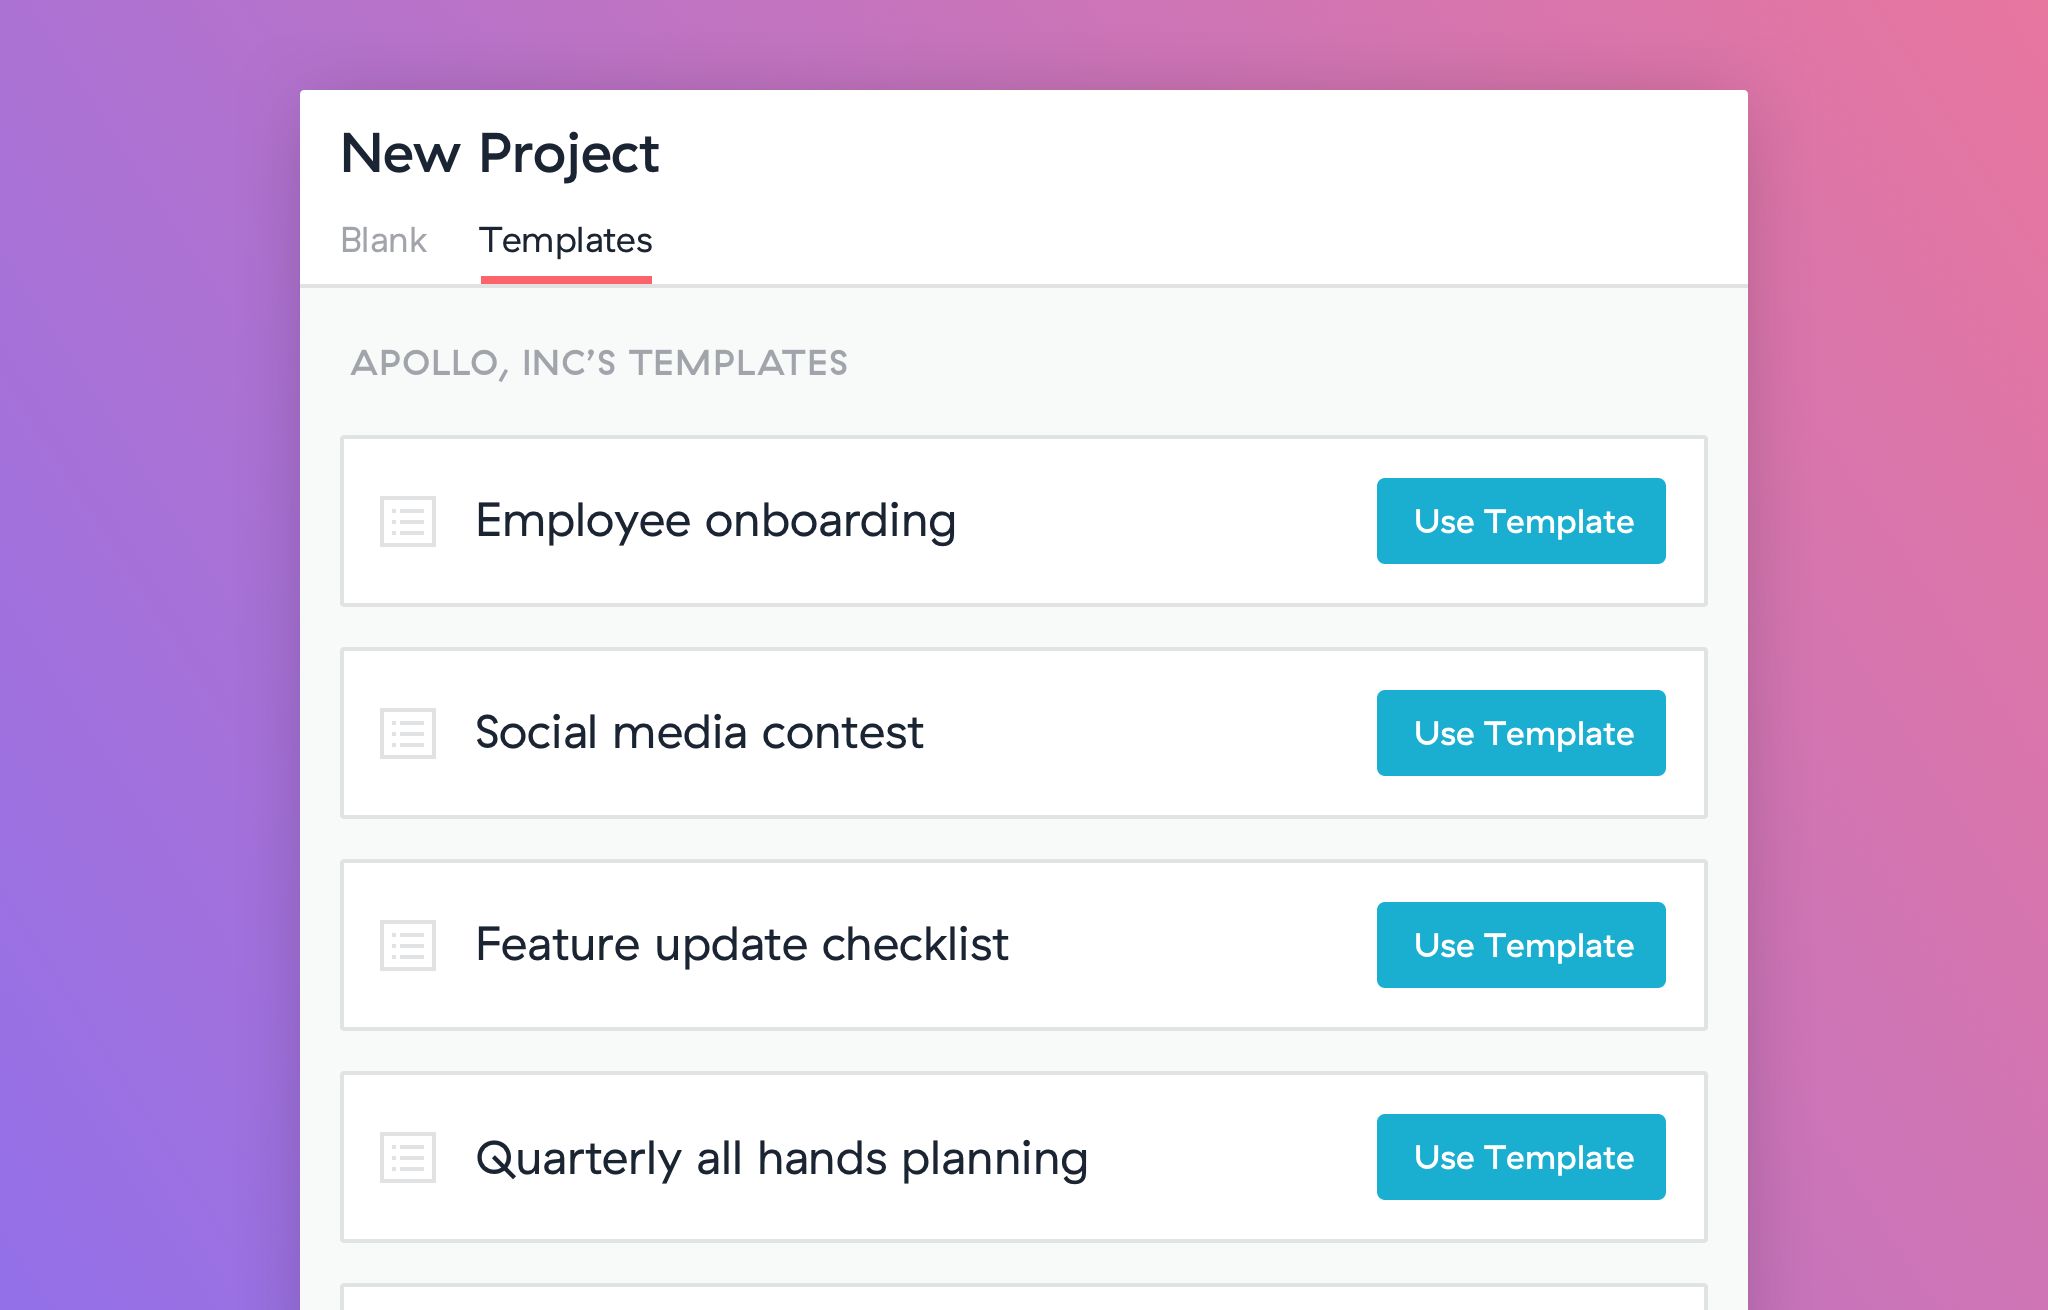
Step 2: Create a new project for your template
Once you have identified the recurring tasks or projects that you want to turn into a template, the next step is to create a new project in Asana specifically dedicated to your template.
To create the project for your template, follow these steps:
- Login to your Asana account and navigate to the “Projects” section.
- Click on the “+ New Project” button to start creating a new project.
- Give your project a descriptive name that clearly indicates its purpose. For example, you can name it “Marketing Campaign Template” or “Weekly Report Template”.
- Optional: You can choose to add a project description to provide more context or instructions for using the template.
- Set the privacy settings for your project. Depending on your preferences, you can make the project public to the entire team or keep it private.
- Click on the “Create Project” button to complete the project setup.
By creating a dedicated project for your template, you can keep your templates organized and easily accessible whenever you need them. It also ensures that your templates won’t be mixed up with other projects, making them easier to find and use.
Having a separate project for your template allows you to customize and manage it independently from other projects. You can add and remove tasks, modify task details, and make any necessary updates without affecting the actual projects that you create using the template.
Remember to give your template project a name that clearly reflects its purpose. This will make it easier for you and your team members to identify and select the appropriate template when starting a new project.
Creating a new project specifically for your template is an essential step in organizing your templates and ensuring their easy accessibility. Once you have created the project, you can proceed to the next step of adding and organizing tasks within your template project.
Step 3: Add and organize tasks in your template project
After creating a new project for your template in Asana, the next step is to add and organize the tasks that make up your template.
To add and organize tasks within your template project, follow these steps:
- Open your template project in Asana.
- Click on the “+ Add Task” button to add a new task.
- Enter a descriptive name for the task that clearly indicates what needs to be done.
- Repeat the above steps to add all the tasks that are part of your template.
- Once you have added all the tasks, consider the logical order in which they should be completed.
- Reorder the tasks by simply dragging and dropping them into the desired sequence.
When adding tasks to your template, think about the specific actions or steps required to complete each task. Be clear and concise in naming the tasks to avoid confusion and provide a clear understanding of what needs to be done.
For example, if your template is for a weekly content creation process, tasks may include “Brainstorm content ideas”, “Write blog post”, “Design social media graphics”, and “Schedule social media posts”. Each task should represent a distinct action that contributes to the overall completion of the project.
Organizing the tasks in the right sequence is crucial to ensure that your template follows a logical flow. Consider the dependencies and relationships between tasks. Some tasks may need to be completed before others can begin, while some tasks may be independent of one another. Adjust the task order accordingly by dragging and dropping tasks within the template project.
In addition to the main tasks, you can also include subtasks within each task if there are smaller steps or sub-actions involved. Subtasks help break down complex tasks into more manageable components, facilitating better organization and tracking of progress.
Remember, the goal of organizing tasks within your template project is to create a clear and structured framework that ensures each step is accounted for in the final output. By adding and organizing tasks effectively, you lay the foundation for a comprehensive template that can be easily replicated for future projects.
Once you have added and organized your tasks, you can proceed to the next step of customizing task details and assigning them to relevant team members.
Step 4: Customize task details and assignees
After adding and organizing tasks within your template project in Asana, the next step is to customize the details of each task and assign them to the relevant team members.
To customize task details and assignees, follow these steps:
- Open your template project in Asana.
- Select a task that you want to customize.
- Modify the task name and description to provide clarity and specific instructions for completing the task.
- If necessary, set a due date for the task to ensure it is completed within a specific time frame.
- Assign the task to the appropriate team member or assignees by typing their name(s) in the assignee field.
- Repeat the above steps for each task within your template project.
When customizing the task details, aim to provide clear instructions and expectations. Be as specific as possible to ensure that team members understand what needs to be done and how to complete the task successfully.
For example, if one of the tasks in your template is “Write blog post,” you can customize the task by specifying the topic, word count, required research, and any specific guidelines to follow. This level of detail helps maintain consistency and ensures that the task is completed to the desired standards.
Setting due dates for tasks within your template is essential to create a timeline for completing the project. Consider the dependencies and priorities of tasks to ensure that the due dates are realistic and aligned with the overall project timeline.
Assigning tasks to team members is an important step in distributing responsibilities and ensuring accountability. Depending on the nature of the task, you may assign tasks to specific individuals or multiple assignees if it requires collaboration.
As you customize task details and assignees, it’s essential to consider the unique requirements of each project or task while still maintaining the core structure of your template. This customization allows for flexibility within the template, ensuring that it can be used for various projects without compromising its effectiveness.
Once you have customized task details and assigned the tasks to the relevant team members, you can proceed to the next step of adding subtasks and dependencies, if applicable.
Step 5: Add subtasks and dependencies
Enhance the organization and structure of your template project in Asana by adding subtasks and dependencies to the tasks. Subtasks break down larger tasks into smaller, more manageable steps, while dependencies define the order in which tasks need to be completed.
To add subtasks and dependencies within your template project, follow these steps:
- Open your template project in Asana.
- Select the task for which you want to add subtasks or dependencies.
- Click on the task to open its details panel on the right-hand side.
- Within the details panel, navigate to the “Subtasks” section and click on the “+ Add subtask” button.
- Enter the name and details of the subtask.
- Repeat the above steps to add all the necessary subtasks within the task.
- To add dependencies, go to the “Dependencies” section within the details panel.
- Click on the “+ Add dependency” button and select the task(s) that need to be completed before the current task can start.
- Repeat the above steps to establish all the necessary dependencies within the template project.
Subtasks allow you to break down complex or lengthy tasks into smaller, more actionable steps. This makes it easier to assign specific responsibilities to team members and track progress more granularly. Use subtasks to define the specific actions or processes required to complete a task and include any relevant details or instructions.
Dependencies, on the other hand, define the sequence in which tasks should be completed. By establishing dependencies between tasks, you ensure that one task cannot begin until its predecessor has been completed. This helps maintain the logical flow and order of tasks within your template, preventing any confusion or inconsistencies.
For example, if your template includes a task for “Creating website wireframes,” you can add subtasks such as “Gather client requirements,” “Sketch wireframe concepts,” “Refine wireframes based on feedback,” and “Finalize wireframes.” By breaking down the task into these subtasks, you create a clear roadmap for completing the larger task.
Similarly, if you have a task for “Designing logo,” you can set a dependency on the task “Gather brand guidelines” or “Sketch initial logo concepts” to ensure that the necessary prerequisites are completed before starting the logo design process.
Adding subtasks and dependencies within your template project helps provide more structure and guidance for team members when using the template for new projects or tasks. It enables better organization, collaboration, and alignment within the project workflow.
Once you have added subtasks and dependencies, you can proceed to the next step of setting due dates and reminders.
Step 6: Set due dates and reminders
Setting due dates and reminders within your template project in Asana is an integral part of managing your tasks and ensuring that they are completed on time. By establishing deadlines and reminders, you can keep your team members on track and maintain a sense of urgency and accountability.
To set due dates and reminders within your template project, follow these steps:
- Open your template project in Asana.
- Select the task for which you want to set a due date or reminder.
- Within the task details panel on the right-hand side, navigate to the “Due Date” section.
- Click on the calendar icon to select a specific date for the task’s due date.
- Customize the due time by clicking on the clock icon and selecting the desired time.
- Repeat the above steps for each task within your template project.
- To set reminders for tasks, click on the “Add Reminder” button within the task details panel.
- Select the desired time frame for the reminder, such as “1 day before,” “1 hour before,” or a custom time frame.
- Repeat the above steps to set reminders for all relevant tasks.
Setting due dates for tasks within your template project helps create a timeline and ensure that tasks are completed within the desired timeframe. Deadlines add a sense of urgency and facilitate better project planning and management. Consider the dependencies and priorities of tasks when assigning due dates to ensure a coherent workflow.
Reminders play a crucial role in notifying team members of upcoming deadlines or important milestones. By setting reminders, you ensure that your team stays informed and can plan their work accordingly. Reminders can be set at various intervals, such as a day before, an hour before, or at a specific custom time frame that best suits your project’s needs.
For example, if you have a task in your template for “Submitting weekly report,” you can set the due date to be every Friday at 5 PM. Additionally, you can set a reminder for team members to receive a notification an hour before the deadline to ensure that the reports are submitted on time.
By setting due dates and reminders within your template project, you provide clear expectations, maintain accountability, and improve overall project management. It ensures that tasks are completed in a timely manner and helps avoid any last-minute rushes or missed deadlines.
Now that you have set due dates and reminders for your tasks, you can proceed to the next step of using sections to categorize tasks within your template project.
Step 7: Use sections to categorize tasks
Organizing your tasks within your template project in Asana is essential to ensure clarity and ease of navigation. Sections provide a visual way to categorize and group related tasks within your template, making it easier for you and your team members to identify and locate specific tasks.
To use sections to categorize tasks within your template project, follow these steps:
- Open your template project in Asana.
- Click on the “+ Add Section” button above the task list.
- Give the section a name that represents the category or theme of the tasks to be included within it.
- Drag and drop tasks into the appropriate sections based on their context or purpose.
- Repeat the above steps to create additional sections and reorganize tasks within them.
Sections allow you to group tasks based on their commonalities, priorities, or project phases. They provide a visual separation and help organize your template project into meaningful segments.
For example, if your template project is for a marketing campaign, you can create sections such as “Planning,” “Execution,” and “Evaluation.” Under the “Planning” section, you can include tasks related to conducting market research, identifying target audience, and creating a campaign strategy. In the “Execution” section, you can group tasks such as content creation, social media scheduling, and ad campaign management.
Using sections not only makes it easier to locate tasks within a template project but also enables you to focus on specific aspects of the project. It provides a structured view of your template, improving overall organization and helping you and your team members stay on track.
Sections can be customized and adapted based on your specific needs or project requirements. You can add, remove, or modify sections as necessary to ensure that your template reflects the most effective way to categorize and organize your tasks.
By utilizing sections to categorize tasks within your template project, you create a more intuitive and visually appealing structure. This helps navigate through the template efficiently and enables you to focus on the tasks and priorities within each category.
Now that you have organized tasks using sections, you can proceed to the next step of adding any necessary attachments or links within your template project.
Step 8: Add any necessary attachments or links
Enhance the effectiveness of your template project in Asana by including any necessary attachments or links that provide additional context, resources, or reference materials for completing the tasks within your template.
To add attachments or links within your template project, follow these steps:
- Open your template project in Asana.
- Select the task for which you want to add an attachment or link.
- Within the task details panel on the right-hand side, navigate to the “Attachments” section.
- Click on the “+ Attach File” button to upload a file from your local storage.
- Alternatively, click on the “+ Link” button to add a hyperlink to an external resource.
- Repeat the above steps for each task within your template project that requires attachments or links.
Attachments can include relevant files, documents, images, or any other resources that are needed for effectively completing the tasks within your template. Attachments provide direct access to the required information, eliminating the need for team members to search for files or resources separately.
For example, if one of the tasks in your template is “Create presentation,” you can attach the PowerPoint template or design elements that should be used for consistency. This ensures that the necessary assets are readily available to team members when they work on the task.
In addition to attachments, you can also include links to external resources or references. These can be URLs to specific websites, online documents, or cloud-based storage systems where additional information or guidelines are located. Links provide quick access to the relevant resources, helping team members gather the information they need to complete the task effectively.
By including attachments and links within your template project, you provide a centralized location for all the necessary materials and references. This helps streamline workflow, saves time, and promotes consistency in accessing the required resources.
Remember to review and verify the accessibility of attachments and links periodically to ensure they remain valid and up to date. Remove or update any attachments or links that are no longer relevant or accessible to maintain the efficiency and effectiveness of the template project.
With attachments and links incorporated into your template project, you have created a comprehensive resource hub to support the successful completion of tasks within the template.
Next, we will move on to the next step of saving your template for future use.
Step 9: Save your template
After customizing your template project in Asana with all the necessary details, it’s time to save it as a template. Saving your template allows you to reuse it for future projects without having to recreate the structure and tasks from scratch.
To save your template in Asana, follow these steps:
- Open your template project in Asana.
- Click on the three-dot menu icon within the project header.
- Select the “Save as Template” option from the dropdown menu.
- Give your template a descriptive name that represents its purpose or contents.
- Optional: Add a brief description or instructions for using the template.
- Click “Save” to create the template.
Once you have saved your template, it will be stored in your Asana account’s template library. You can easily access and use it to create new projects based on the template whenever needed.
When naming your template, be sure to choose a name that clearly reflects its purpose or the type of projects it is designed for. A descriptive name makes it easier for you and your team members to identify and select the appropriate template when starting a new project.
Additionally, you can add a brief description or instructions within the template to provide guidance on how to use it effectively. These details can include any specific considerations, steps, or best practices that should be followed when utilizing the template.
It’s important to note that saving a template does not affect the original template project. Any changes or updates made to the saved template will not be reflected in the original project or other projects created from the template. This allows you to maintain the integrity and structure of the template project while customizing individual projects created using the template.
With your template saved, you can now move onto the final step of using your template to create new projects or tasks efficiently.
Step 10: Using your template for new projects or tasks
With your template saved in Asana, you can utilize it to create new projects or tasks efficiently. By leveraging your template, you can skip the repetitive setup process and ensure consistency in your workflow.
To use your template for new projects or tasks, follow these steps:
- Open your Asana account and navigate to the “Projects” or “My Tasks” section.
- Click on the “+ Create” button to start a new project or task.
- In the creation window, select the “From Template” option.
- Choose the template you want to use from your template library.
- Enter any project- or task-specific details or adjustments.
- Click “Create” to generate the new project or task from the template.
When creating a new project or task from your template, you have the flexibility to customize it to meet the specific requirements of the project or task at hand. You can add or remove tasks, modify due dates, assign new team members, and make any necessary adjustments while keeping the core structure intact.
By using your template, you save time and effort by not having to recreate the structure or tasks from scratch. You maintain consistency by ensuring that each new project or task follows the same predefined framework.
For example, let’s say you have a template for a weekly social media content calendar. When you need to create a new social media campaign project, you can simply select the template and make adjustments for the specific campaign, such as updating the campaign dates, changing the content themes, and assigning tasks to the relevant team members.
Similarly, if your template is for a recurring monthly report, you can create a new task for the report as required, customize the due date, and assign it to the appropriate team member. The predefined structure and tasks from the template ensure that the key components for the report are not overlooked.
By using your template for new projects or tasks, you streamline your workflow, maintain consistency, and improve efficiency. It not only saves time but also helps you focus on the unique aspects of each project or task without having to start from scratch every time.
Remember to periodically review and update your templates as your processes and requirements evolve. This ensures that your templates remain relevant and in line with your current workflows.
By following these steps and utilizing your template library, you can leverage the power of Asana to create new projects or tasks with ease and efficiency.
Conclusion
Creating templates in Asana can greatly enhance your productivity and efficiency by providing a pre-designed structure for recurring tasks or projects. By following the step-by-step process outlined in this guide, you can create templates that save you time, ensure consistency, and improve collaboration within your team.
By identifying your recurring tasks or projects, creating a new project for your template, adding and organizing tasks, customizing task details and assignees, and setting due dates and reminders, you establish a solid foundation for your template. Additionally, by incorporating subtasks, dependencies, and sections, you can further refine the structure and organization of your template.
By including attachments or links and saving your template, you create a comprehensive resource that provides all the necessary materials and instructions. This makes it easier for team members to understand and complete tasks within the template. Finally, by using your template to create new projects or tasks, you can bypass repetitive setup processes, maintain consistency, and focus on the unique aspects of each project or task.
Templates in Asana offer a powerful solution for streamlining your workflow, saving time, and ensuring consistency in your projects. Whether you’re working on marketing campaigns, client onboarding processes, or weekly reports, utilizing templates can significantly improve your project management capabilities.
Remember to regularly review and update your templates as your processes evolve, ensuring they remain relevant and aligned with your current workflows and requirements. With proper utilization and maintenance of templates, you can optimize your productivity and achieve better results in your projects.
Start creating and using templates in Asana today, and experience the benefits of a more streamlined and efficient project management process.