Introduction
Welcome to the comprehensive guide on how to connect your JVC Smart TV to the internet wirelessly. With the advanced features of your JVC Smart TV, you have the ability to access a wide range of online content, including streaming services, social media platforms, and more. However, in order to take advantage of these features, you need to ensure that your TV is successfully connected to the internet.
Connecting your JVC Smart TV to the internet wirelessly not only eliminates the hassle of messy cables but also provides the flexibility to place your TV anywhere within your Wi-Fi network’s range. Whether you’re setting up your new JVC Smart TV or reconfiguring the internet settings, this guide will walk you through the step-by-step process to get your TV online.
Before we dive into the steps, it’s important to note that the exact process may vary depending on the model and operating system of your JVC Smart TV. However, the general concepts and instructions provided in this guide should still apply. So, let’s get started on connecting your JVC Smart TV to the internet wirelessly!
Step 1: Check the Requirements
Before you begin connecting your JVC Smart TV to the internet wirelessly, it’s crucial to ensure that you have everything you need. Here are the requirements:
- Wi-Fi Network: Make sure you have an active Wi-Fi network in your home or office. If you don’t have one, you’ll need to set up a Wi-Fi router and connect it to a reliable internet source.
- JVC Smart TV: Ensure that your JVC Smart TV is turned on and functioning properly. Familiarize yourself with the TV’s remote control and locate the settings menu.
- Wi-Fi Password: If your Wi-Fi network is secured with a password, have it handy. You will need to enter the password during the connection process.
These basic requirements are essential for establishing a wireless connection between your JVC Smart TV and your Wi-Fi network. Once you have checked off these prerequisites, you’re ready to move on to the next step and start the connection process.
Step 2: Connect your JVC Smart TV to a Wi-Fi Network
Now that you have confirmed you have a functioning Wi-Fi network and your JVC Smart TV is ready, it’s time to establish the wireless connection. Follow these steps to connect your JVC Smart TV to your Wi-Fi network:
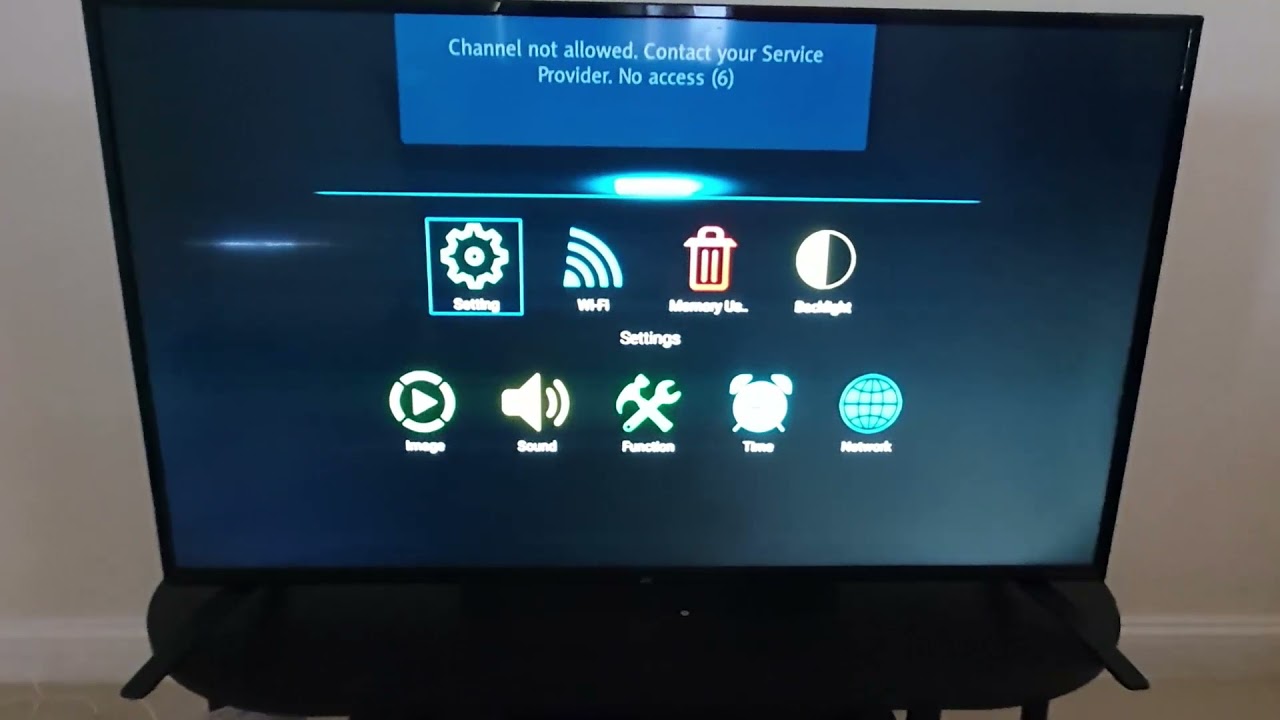
- Using your JVC TV remote, navigate to the settings menu. The exact location of the settings menu may vary depending on your TV model, but it is often represented by a gear or cog icon.
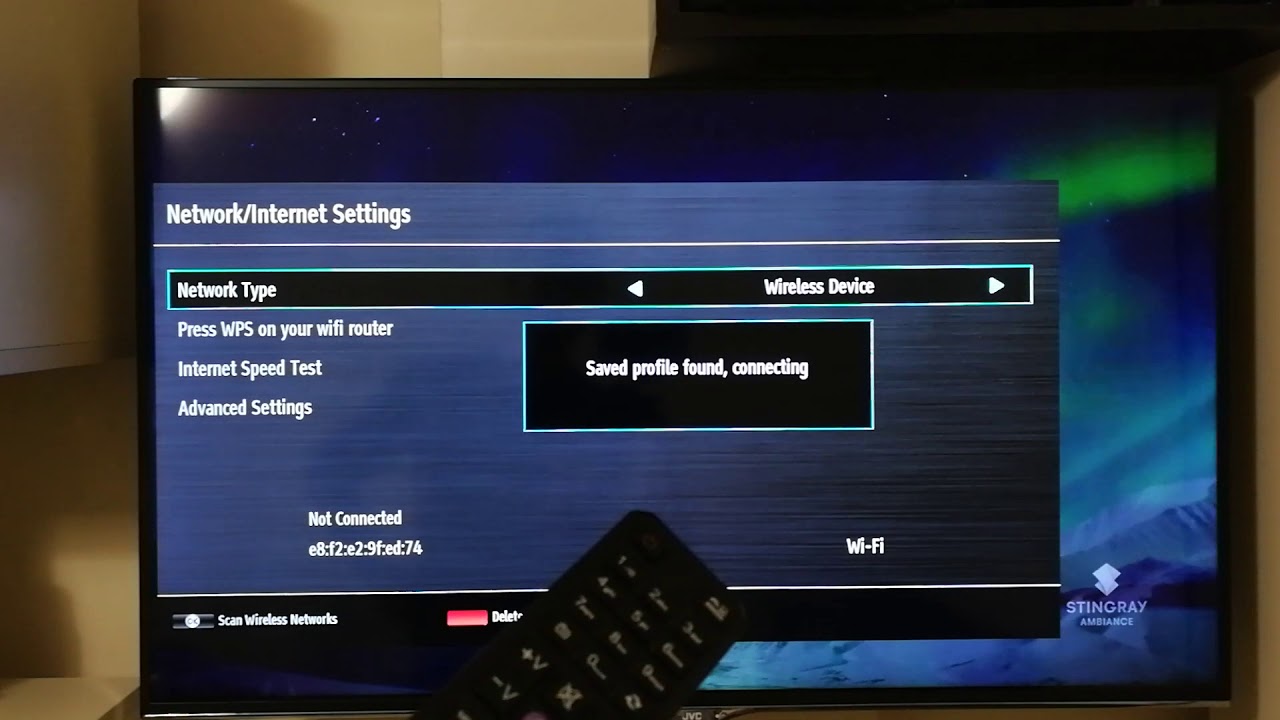
- Scroll through the settings menu until you find the “Network” or “Wireless” option. Select it to access the network settings.
- In the network settings, look for the “Wi-Fi” option and select it. This should take you to the Wi-Fi setup screen.
- On the Wi-Fi setup screen, your JVC Smart TV will display a list of available Wi-Fi networks in range. Locate your Wi-Fi network from the list and highlight it.
- Once you have selected your Wi-Fi network, you will be prompted to enter the Wi-Fi password. Use the alphanumeric buttons on your remote to enter the password accurately.
- After entering the password, select “Connect” or a similar option to initiate the connection process. Your JVC Smart TV will attempt to connect to the Wi-Fi network.
- Wait for a few moments while your JVC Smart TV establishes the connection with the Wi-Fi network. Once connected, you should see a confirmation message or symbol indicating a successful connection.
It’s important to note that the user interface and options may differ slightly depending on your JVC Smart TV model and the version of the operating system it runs. However, the general process should remain similar across most JVC Smart TVs.
Congratulations! You have successfully connected your JVC Smart TV to your Wi-Fi network. You can now enjoy the endless possibilities of online streaming, browsing, and content on your TV.
Step 3: Enter Wi-Fi Password
When connecting your JVC Smart TV to a Wi-Fi network, you may encounter security-enabled networks that require a password for access. In this step, we will guide you through the process of entering the Wi-Fi password on your JVC Smart TV:
- After selecting your Wi-Fi network from the available options, you will be prompted to enter the Wi-Fi password.
- Using your JVC Smart TV remote control, use the alphanumeric buttons to input the password. Pay careful attention to the characters and ensure they are entered correctly.
- As you enter the password, the characters might appear as asterisks or dots on the screen to protect your privacy.
- Double-check the password for any typos or mistakes before proceeding. One incorrect character can prevent a successful connection.
- Once you have entered the Wi-Fi password correctly, move to the “Connect” or similar option on the screen and select it.
- Your JVC Smart TV will now attempt to connect to the Wi-Fi network using the provided password.
- Wait a few moments while the connection is established. The TV will notify you once the connection is successful.
It’s essential to enter the Wi-Fi password accurately to ensure a smooth connection. If you are unsure about the password, you can consult your Wi-Fi router’s documentation or contact your internet service provider for assistance.
By successfully entering the Wi-Fi password, you have completed this step. Your JVC Smart TV is now connected to the Wi-Fi network, allowing you to enjoy an array of online content and features.
Step 4: Test the Connection
After connecting your JVC Smart TV to the Wi-Fi network and entering the Wi-Fi password, it’s important to test the connection to ensure it is working properly. Follow these steps to perform a connection test:
- On your JVC Smart TV remote control, navigate back to the settings menu.
- Scroll through the settings menu until you find the “Network” or “Internet” option.
- Select the “Network Test” or “Internet Test” option. This will initiate a test to check the connectivity and speed of your internet connection.
- Wait for the test to complete. The duration of the test may vary depending on your connection speed.
- Once the test is finished, your JVC Smart TV will display the results, indicating the status of the connection.
If the test shows that the connection is successful, congratulations! Your JVC Smart TV is now connected to the internet wirelessly and ready to access a wide range of online content.
However, if the test indicates a connection issue or failure, there are a few troubleshooting steps you can try:
- Ensure that your Wi-Fi network is functioning properly. Check if other devices can connect to the network and access the internet.
- Restart your JVC Smart TV and Wi-Fi router. Power cycling both devices can often resolve minor connectivity issues.
- Verify that the Wi-Fi signal is strong and your TV is within range of the router. In case of a weak signal, consider relocating the router or using a Wi-Fi range extender.
- Make sure you have entered the correct password during the connection process. Retrace your steps and double-check the password for any errors.
By testing the connection and troubleshooting any issues, you can ensure a stable and reliable wireless connection for your JVC Smart TV.
Step 5: Troubleshooting Common Issues
While connecting your JVC Smart TV to a Wi-Fi network is usually a straightforward process, you may encounter some common issues along the way. In this step, we will explore a few troubleshooting steps to help you address these issues:
- No Wi-Fi Networks Found: If your JVC Smart TV is unable to detect any Wi-Fi networks, ensure that your Wi-Fi router is turned on and functioning properly. Check if other devices can connect to the network. If not, restart your router and try again.
- Incorrect Password: If you receive an “Incorrect Password” error, double-check the password for any typos or mistakes. Ensure that the password is entered exactly as specified, including uppercase and lowercase letters, as well as any special characters.
- Weak Signal or Intermittent Connection: If you experience a weak Wi-Fi signal or intermittent connection, try relocating your JVC Smart TV closer to the Wi-Fi router. Alternatively, consider using a Wi-Fi range extender to improve the signal strength and coverage.
- Firmware Update: Outdated firmware can sometimes cause connectivity issues. Check for any available firmware updates for your JVC Smart TV and install them if necessary. Refer to the TV’s user manual or the JVC website for instructions on updating the firmware.
- Restart Devices: If you encounter any connectivity issues, a simple restart of both your JVC Smart TV and Wi-Fi router can often resolve the problem. Power off both devices, wait for a few seconds, and then power them back on.
- Contact Support: If you have exhausted all troubleshooting steps and are still unable to connect your JVC Smart TV to the Wi-Fi network, it may be necessary to reach out to customer support. Contact JVC’s customer support team for further assistance and guidance.
By following these troubleshooting steps, you can overcome common issues that may arise when connecting your JVC Smart TV to a Wi-Fi network. Remember, patience and persistence are key, and with a bit of troubleshooting, you’ll be able to enjoy seamless wireless connectivity on your JVC Smart TV.
Conclusion
Congratulations! You have successfully connected your JVC Smart TV to the internet wirelessly. By following the step-by-step process outlined in this guide, you have gained access to a world of online content, including streaming services, social media platforms, and more.
Throughout this guide, we covered the requirements for connecting your JVC Smart TV to a Wi-Fi network, the steps to establish the connection, entering the Wi-Fi password, testing the connection, and troubleshooting common issues that may arise.
Remember, while the specific instructions and options may vary depending on your JVC Smart TV model and operating system, the general concepts and approaches remain the same. Always refer to your TV’s user manual or consult the official JVC support resources for model-specific instructions.
If you encounter any difficulties during the connection process or face any issues with the wireless connection on your JVC Smart TV, don’t hesitate to reach out to the JVC customer support team. They will be able to provide further assistance and guidance to ensure a smooth and seamless experience.
Now that you’re connected, sit back, relax, and enjoy your favorite shows, movies, and online content on your JVC Smart TV. Make the most of the advanced features and explore the vast possibilities that the internet has to offer, all from the comfort of your living room.