Before You Begin
Before setting up your JVC Smart TV, it’s essential to ensure that you have everything you need and are aware of a few key considerations. Taking a few minutes to prepare will help streamline the setup process and ensure a smooth experience. Here are a few things to keep in mind before you begin:
- Check the contents of the box: Open the box and ensure that all the components are included. You should find the TV unit, remote control, power cord, and any other accessories that may be included.
- Measure and choose the ideal location: Measure the space where you plan to set up your JVC Smart TV. Consider factors such as viewing distance, room lighting, and accessibility to power outlets. Choose a location that provides optimal viewing angles and minimizes glare from windows or other light sources.
- Secure a stable surface: Your JVC Smart TV should be placed on a stable and secure surface to prevent accidental falls or damage. It’s recommended to use a sturdy TV stand or wall mount that is appropriately sized for your TV.
- Prepare the Internet connection: Ensure that you have a stable and reliable internet connection available. The TV will need to connect to the internet for full access to the smart features and online content.
- Collect necessary information: Gather any necessary login information for streaming services, such as Netflix or Hulu, if you plan to use them. It will make the setup process faster and more convenient.
By taking these preparatory steps, you’ll be ready to set up your JVC Smart TV with ease. Now, let’s move on to the step-by-step process of unpacking and setting up your TV.
Step 1: Unbox the TV
Unboxing your new JVC Smart TV is an exciting first step towards enjoying high-quality entertainment in the comfort of your own home. Follow these simple instructions to safely unbox your TV:
- Prepare a clean workspace: Clear a space on a clean and flat surface like a table or the floor. This will provide you with enough room to lay out the TV and its accessories.
- Open the box: Use a pair of scissors or a box cutter to carefully cut the tape on the top of the box. Open the flaps and remove any additional packaging materials.
- Handle with care: Gently lift the TV out of the box, making sure to hold it from the base and avoid touching the screen. TVs are delicate and prone to damage if mishandled, so take your time and handle it with care.
- Remove protective materials: Look for any protective foam or plastic wrapping around the TV. Carefully remove these materials, ensuring you don’t miss any small pieces that might be tucked away near the stand or the edges of the TV.
- Inspect for damage: Take a moment to inspect the TV for any visible signs of damage. Look for cracks, dents, or any other issues that may have occurred during shipping. If you notice any damage, contact the retailer or manufacturer immediately for further instructions.
- Locate the accessories: Inside the box, you’ll find a range of accessories, including the remote control, batteries, power cord, and user manual. Carefully remove each accessory and set them aside for later use.
- Save the packaging: If you have the space, it’s a good idea to keep the TV box and packaging materials in case you need to move or store the TV in the future. Properly storing the TV in its original packaging can help protect it from any potential damage.
By following these steps, you can safely unbox your JVC Smart TV without any issues. Now that you’ve unboxed your TV, it’s time to move on to the next step of setting it up.
Step 2: Place the TV in the Desired Location
After unboxing your JVC Smart TV, it’s time to find the perfect spot to place it. Consider these factors when selecting the ideal location:
- Viewing angle: Choose a location that provides a comfortable viewing angle for everyone in the room. The TV should be positioned at eye level or slightly below eye level for optimal viewing experience.
- Room lighting: Avoid placing the TV in direct sunlight or near bright light sources to minimize glare on the screen. Ensure that the room lighting can be controlled to provide an optimal viewing experience.
- Stability: Find a stable and secure surface for your TV, such as a TV stand or wall mount. Make sure the surface can support the weight and size of your TV to prevent accidents or damage.
- Accessibility: Ensure that the TV is easily accessible for connecting cables, plugging in peripherals, and accessing the rear ports. Having easy access will make future setups or adjustments more convenient.
- Avoiding obstructions: Ensure that there are no obstructions in front of the TV that could block the view. Consider the arrangement and placement of furniture, decor, and other elements that could obstruct the TV screen.
Once you have identified the perfect location, carefully place the TV in the desired spot, ensuring that it is level and stable. If you are using a TV stand, make sure it is properly assembled and securely attached to prevent the TV from wobbling or tipping over. If you choose to mount the TV on the wall, make sure to follow the manufacturer’s instructions and use appropriate mounting hardware.
Remember to keep the TV away from excessive heat sources, moisture, and areas with poor ventilation to prevent any potential damage to the device. Taking the time to find the ideal location for your JVC Smart TV will ensure an optimal viewing experience and the longevity of your TV.
Step 3: Connect the Power Cord
Now that you’ve placed your JVC Smart TV in the desired location, it’s time to connect the power cord. Follow these simple steps to ensure a safe and proper power connection:
- Locate the power port: Look for the power input port on the back of the TV. It is usually labeled as “Power” or identified by a power symbol.
- Plug in the power cord: Take the power cord that came with your TV and connect one end to the power input port on the TV. Ensure that the plug fits securely into the port without any forceful twisting or bending.
- Connect to a power outlet: Plug the other end of the power cord into a nearby power outlet. Make sure that the power outlet is easily accessible and provides the necessary voltage for your TV (check the requirements in the user manual).
- Power on the TV: Locate the power button on the TV or the remote control. Press the power button to turn on the TV. You may need to wait for a few seconds for the TV to power up and display the JVC logo or initial setup screen.
It’s important to note that you should only use the power cord supplied with your JVC Smart TV. Using a different power cord may not provide the correct voltage or could damage the TV.
Once you have connected the power cord and powered on the TV, you are ready to proceed with the next steps of setting up your JVC Smart TV. Keep in mind that some TVs may have additional power-saving options or settings that you can customize to optimize energy consumption and performance.
Step 4: Set Up the Remote Control
After connecting the power cord, the next step in setting up your JVC Smart TV is to set up the remote control. Follow these steps to ensure your remote control is properly configured:
- Insert batteries: Open the battery compartment on the back of the remote control. Insert the batteries according to the polarity marked inside the compartment. Make sure to match the positive (+) and negative (-) ends of the batteries with the corresponding indicators.
- Pair the remote with the TV: If your remote control requires pairing with your JVC Smart TV, follow the instructions provided in the user manual. Typically, this involves pressing certain buttons in a specific sequence or holding down a button for a set period of time. Consult the manual for the specific pairing process for your remote control model.
- Test the functionality: Once the remote control is paired, test its functionality. Press the power button to ensure it turns the TV on and off. Try pressing the volume and channel buttons to verify that they adjust the settings accordingly. If any buttons are not responding, double-check the battery placement and replace them if necessary.
- Familiarize yourself with the buttons: Take a moment to familiarize yourself with the different buttons and functions on the remote control. This will help you navigate through the TV’s settings, menus, and applications more efficiently.
- Additional features: Depending on the model of your JVC Smart TV, the remote control may have additional features such as a dedicated Netflix or Amazon Prime Video button. Explore these additional buttons and functions to make the most out of your TV watching experience.
If you encounter any issues with the remote control, consult the user manual or contact JVC customer support for assistance. Having a properly set up remote control will ensure easy access and navigation through the TV’s features and settings.
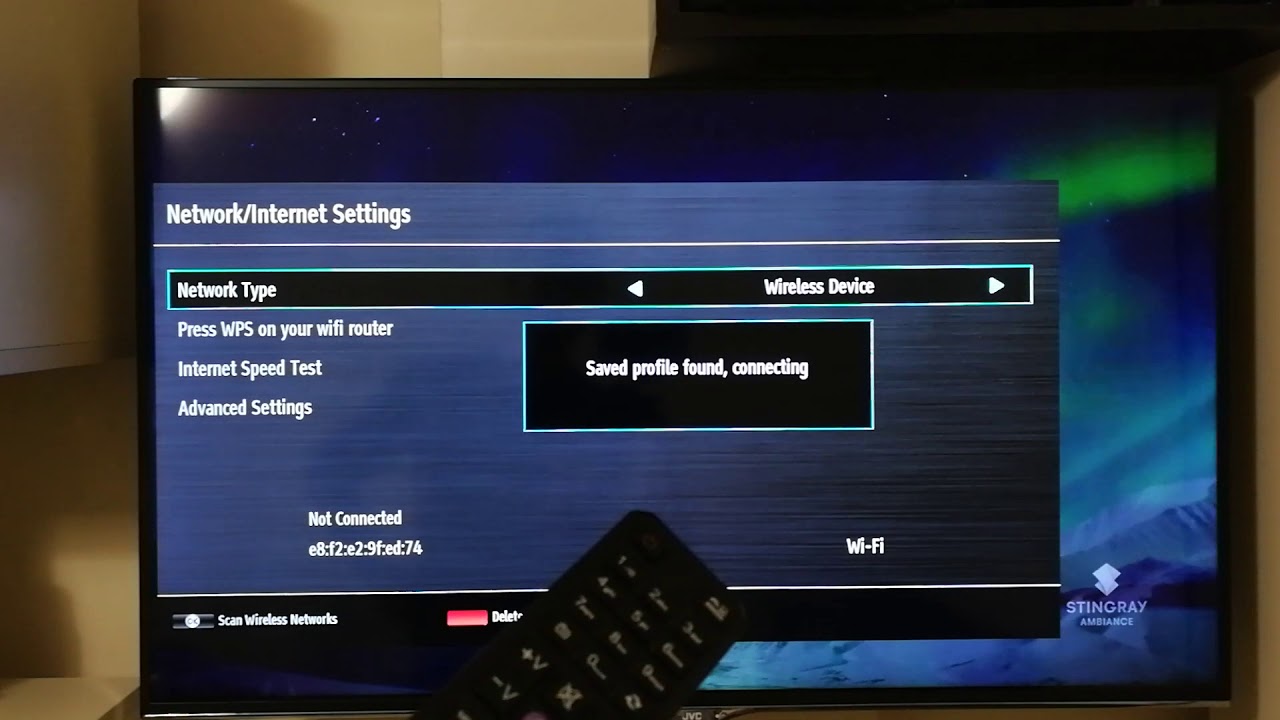
Step 5: Connect the TV to the Internet
A crucial step in setting up your JVC Smart TV is connecting it to the internet. Here’s how to establish a stable internet connection for your TV:
- Check available connection methods: Determine the available connection methods on your JVC Smart TV. It may support Ethernet (wired) or Wi-Fi (wireless) connectivity. Review the user manual or TV settings to identify the options available.
- Wired Connection (Ethernet): If you prefer a wired connection, connect one end of the Ethernet cable to the LAN port on the back of the TV and the other end to your router or modem. Ensure the connection is secure.
- Wireless Connection (Wi-Fi): To establish a wireless connection, access the TV’s settings menu and navigate to the network or Wi-Fi section. Select your wireless network from the available options and enter the network password, if prompted. Follow the on-screen instructions to complete the connection process.
- Connection Troubleshooting: If you encounter any issues during the connection process, ensure that your Wi-Fi router is functioning correctly and has an internet connection. Restarting the router or resetting its settings may resolve connectivity issues. If the problem persists, consult the TV’s user manual or contact the manufacturer’s support for further assistance.
- Confirm the connection status: Once connected, verify the internet connection status on your JVC Smart TV. Access the network settings or navigate to the TV’s homepage to ensure that the internet is active and properly working.
Connecting your JVC Smart TV to the internet is essential for accessing and enjoying various online features, streaming services, and apps. With a stable internet connection, you can make the most of your smart TV experience.
Step 6: Run Initial Setup
After connecting your JVC Smart TV to the internet, it’s time to run the initial setup process. Follow these steps to configure your TV settings:
- Language and Region: Select your preferred language and region from the options provided. This will customize the TV’s settings and menus to your desired language and location.
- Terms and Conditions: Read and agree to the terms and conditions of use, if prompted. It’s important to familiarize yourself with the terms and privacy policies to understand how your data is collected and used by the TV manufacturer or streaming services.
- Date and Time: Set the correct date and time for your TV. This is important for time-sensitive features, such as scheduled recordings or program reminders.
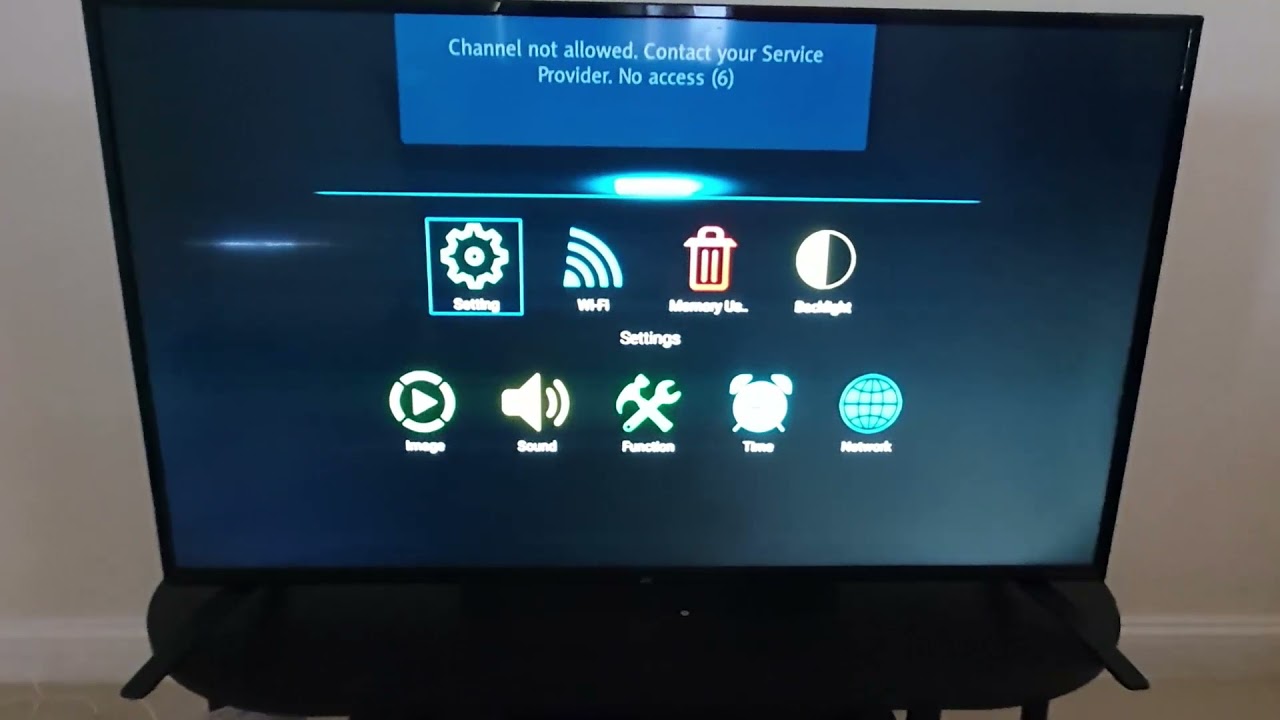
- TV Source: Select the TV source, whether it’s cable, satellite, or an antenna. This step will configure the TV’s internal tuner to receive channels from the selected source.
- Channel Scan: Perform a channel scan to search for available digital or analog channels. This process will detect and save the available channels for easy access.
- Software Updates: Check for software updates for your JVC Smart TV. Updating the software will ensure that your TV has the latest features, enhancements, and security patches.
- Set Up External Devices: If you plan to connect external devices such as a gaming console, Blu-ray player, or soundbar, follow the on-screen instructions to configure the necessary settings for each device.
- Personalization Options: Explore the personalization options available on the TV, such as picture settings, sound settings, and accessibility features. Adjust these settings according to your preferences for an optimized viewing and listening experience.
Running the initial setup on your JVC Smart TV will ensure that all the necessary configurations are complete. This includes language preferences, channel scanning, and software updates. Once the initial setup is complete, you can move on to customizing your TV settings and exploring its features.
Step 7: Personalize Your TV Settings
Now that you have completed the initial setup of your JVC Smart TV, it’s time to personalize the settings according to your preferences. By customizing the TV settings, you can enhance your viewing experience and tailor it to your liking. Here’s how to personalize your TV settings:
- Picture Settings: Access the picture settings menu and adjust parameters such as brightness, contrast, color saturation, and sharpness. Experiment with these settings to find the ideal picture quality and optimize the viewing experience.
- Sound Settings: Explore the sound settings menu to adjust audio parameters like volume, equalization, and audio modes. Fine-tune these settings to suit your listening preferences and make the most out of your TV’s sound capabilities.
- Input and Output Settings: Configure the input and output settings for external devices connected to your TV. This includes adjusting audio and video settings for HDMI devices, setting up audio output options, and selecting the appropriate input source for your connected devices.
- Smart TV Features: Familiarize yourself with the smart TV features and apps available on your JVC Smart TV. Explore the app store to download and install additional apps and customize the home screen layout according to your preferences.
- Accessibility Options: If you require accessibility features, navigate to the accessibility settings and enable options such as closed captions, audio descriptions, or text-to-speech. These settings ensure an inclusive and user-friendly TV experience for individuals with specific needs.
- Parental Controls: Set up parental controls to limit access to certain content based on age rating or specific channels. This feature helps to create a child-friendly viewing environment and control the content that can be accessed on the TV.
- Energy-Saving Settings: Adjust the energy-saving settings to optimize power consumption. These settings can help reduce energy usage by adjusting display brightness, screen timeout, or putting the TV in sleep mode when not in use.
By personalizing your TV settings, you can create a customized and optimized viewing experience that suits your preferences and needs. Take the time to explore and adjust these settings to enhance the overall enjoyment of your JVC Smart TV.
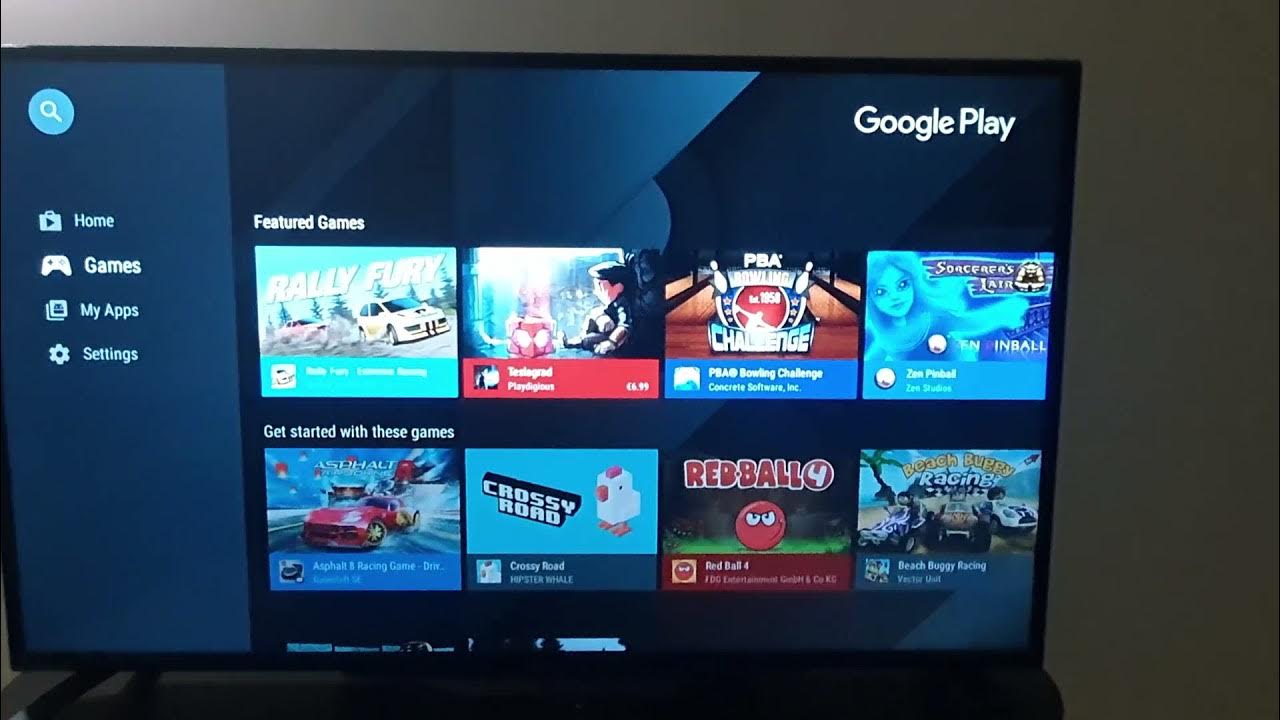
Step 8: Accessing Apps and Features
One of the advantages of owning a JVC Smart TV is the ability to access a wide range of apps and features right from your television. Here’s how you can explore and make the most of the available apps and features:
- Home screen: Start by navigating to the home screen of your JVC Smart TV. This is where you’ll find a collection of apps, shortcuts, and recommended content.
- App Store: Access the built-in app store on your TV to discover and download additional apps. Browse through different categories, such as entertainment, games, lifestyle, or news, to find apps that suit your interests.
- Popular apps: Explore and install popular apps that are commonly used for streaming movies, TV shows, and videos. This may include apps like Netflix, Hulu, Amazon Prime Video, YouTube, and more. Log in to your accounts and start enjoying your favorite content.
- Smart features: Take advantage of the smart features of your JVC Smart TV. These may include voice control, screen mirroring, built-in web browsers, or multi-screen capabilities. Refer to the user manual or the TV’s settings menu to explore and enable these features.
- Customization: Customize the layout and arrangement of your home screen to make it more convenient and easily accessible. Move your favorite apps to the front or create favorite app shortcuts for quick navigation.
- Streaming devices: If you have external streaming devices, such as a Roku Stick or Chromecast, connect them to your TV and explore their respective apps and features. This allows you to access even more apps and services beyond the built-in smart features of the TV.
- Additional features: Besides app-based content, explore the additional features that your JVC Smart TV may offer. This could include USB media playback, screen recording, gaming capabilities, or social media integration.
With a variety of apps and features available, your JVC Smart TV can serve as a central hub for all your entertainment needs. Take the time to explore and enjoy the various apps and features, making your TV experience more versatile and enjoyable.
Step 9: Troubleshooting Tips
Even with the most well-designed technology, occasional issues may arise. Here are some troubleshooting tips to help you resolve common problems you may encounter with your JVC Smart TV:
- No power: If your TV isn’t turning on, double-check the power cord connection and ensure it is securely plugged into both the TV and the power outlet. Also, make sure the outlet is functional by plugging in another device. If the issue persists, contact JVC customer support for assistance.
- No internet connection: If you’re experiencing connectivity issues, confirm that your Wi-Fi network is functioning correctly. Restart your router and try reconnecting your TV to Wi-Fi. You may also try moving your TV closer to the router for a stronger signal. If the problem persists, consider contacting your internet service provider for further assistance.
- Audio or video problems: If you’re encountering issues with sound or picture quality, check the HDMI or audio cables to ensure they are securely connected. Try using a different HDMI port or cable if available. Adjust the picture and sound settings on your TV to optimize the audio and video output. If the problem persists, consult the user manual or contact JVC customer support for further troubleshooting steps.
- App-related issues: If you’re having trouble with specific apps freezing, crashing, or not functioning as expected, try closing and reopening the app. Clear the cache or data for the problematic app through the TV’s settings menu. You may also consider uninstalling and reinstalling the app. If the issue persists, check for app updates or contact the app’s support team for further assistance.
- Remote control problems: If your remote control is not working correctly, replace the batteries and ensure they are inserted correctly. Ensure there are no obstacles between the remote and the TV that may interfere with the signal. If necessary, re-pair the remote control with the TV following the instructions in the user manual. If the remote control continues to malfunction, consider purchasing a new one or contact JVC customer support for further assistance.
- General troubleshooting: If you encounter any other issues that are not covered in the above points, refer to the TV’s user manual for additional troubleshooting tips. It may provide specific solutions for common problems or offer instructions on performing a factory reset if necessary.
Remember, if you’re unable to resolve an issue on your own, don’t hesitate to reach out to JVC customer support or consult a professional technician for further assistance. They can provide specific troubleshooting steps or arrange for repairs if needed.
Conclusion
Setting up your JVC Smart TV can be an exciting and rewarding experience. By following the step-by-step process outlined in this guide, you can ensure a smooth and successful setup. From unboxing the TV to personalizing the settings and accessing various apps and features, each step is crucial in maximizing your enjoyment of the TV. Remember to take your time, read the user manual, and seek assistance whenever needed.
Once your JVC Smart TV is set up, you can immerse yourself in a world of entertainment, whether it’s streaming your favorite shows and movies, accessing a variety of apps, or enjoying the smart features and customization options. With proper troubleshooting knowledge, you can overcome common issues that may arise, ensuring that your TV continues to deliver exceptional performance.
Make the most of your JVC Smart TV by exploring and experimenting with its features, settings, and app selection. Regularly update the TV’s software and explore new apps to keep up with the latest entertainment trends. Remember to adjust the picture and sound settings to suit your preferences and to create a personalized viewing experience.
Enjoy your JVC Smart TV and the incredible entertainment it brings to your home!