Introduction
Welcome to our guide on how to clone an NVMe SSD with only one slot. NVMe (Non-Volatile Memory Express) SSDs are known for their lightning-fast speed and superior performance, making them a popular choice among tech enthusiasts and professionals. However, there may come a time when you need to clone your NVMe SSD, whether it’s for backup purposes, upgrading to a larger capacity drive, or transferring data to a new computer.
Cloning an NVMe SSD with just one slot may seem like a challenging task, as traditional cloning methods usually require two slots. However, with the right tools and techniques, it is possible to successfully clone your NVMe SSD using only one slot.
In this guide, we will walk you through the step-by-step process of cloning an NVMe SSD with only one slot. We will provide you with the necessary information and resources to ensure a smooth and successful cloning experience. Whether you are a seasoned tech expert or a beginner in the world of SSD cloning, this guide is designed to help you achieve your goal with ease.
Before we dive into the nitty-gritty details, let’s take a moment to understand what exactly an NVMe SSD is and why cloning it can be beneficial.
Understanding NVMe SSD
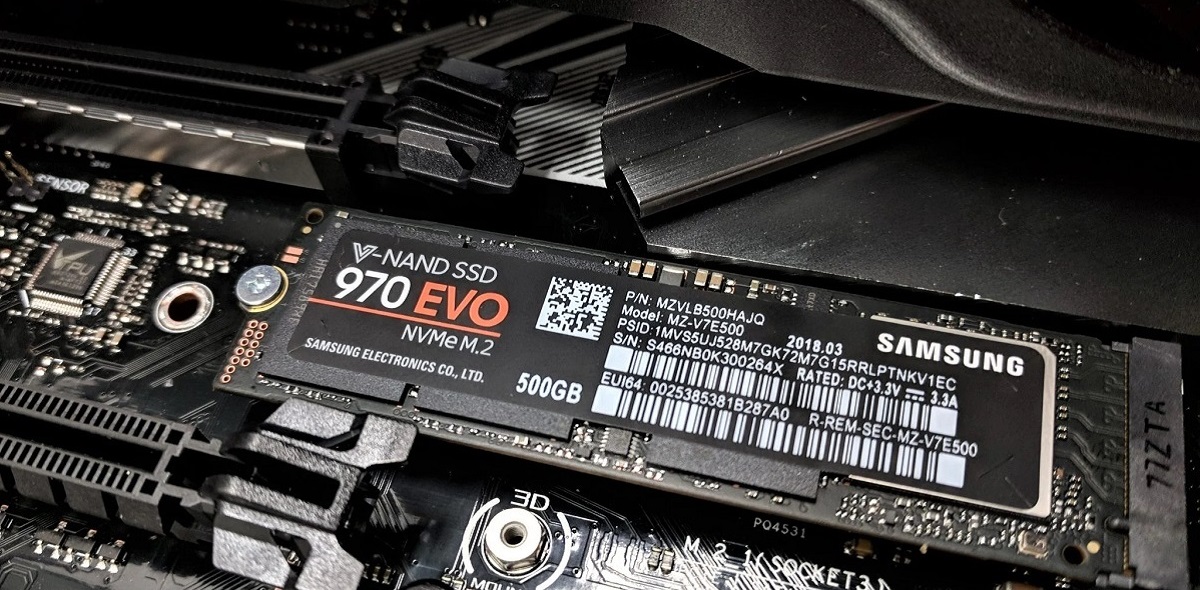
Before we proceed with the cloning process, it’s essential to have a basic understanding of what exactly an NVMe SSD is and how it differs from traditional SSDs.
NVMe, which stands for Non-Volatile Memory Express, is an industry-standard communication protocol designed specifically for solid-state drives. It is optimized for accessing and transferring data at high speeds, making it the go-to choice for enthusiasts and professionals who require fast and reliable storage solutions.
Unlike traditional SSDs that utilize the SATA interface, NVMe SSDs connect directly to the PCIe bus, resulting in significantly faster data transfer speeds. This direct connection removes the bottleneck typically associated with SATA-based SSDs and enables NVMe SSDs to deliver unmatched performance.
One of the key advantages of NVMe SSDs is their low latency, which refers to the time it takes for data to be accessed from the storage device. NVMe SSDs provide ultra-low latency, resulting in rapid response times and improved overall system performance. This makes them ideal for resource-intensive tasks such as gaming, video editing, and data analysis.
In addition to their speed, NVMe SSDs also offer high storage capacities, ranging from a few hundred gigabytes to several terabytes. This allows users to store large amounts of data, including multimedia files, software applications, and operating systems, without worrying about running out of storage space.
Furthermore, NVMe SSDs have no moving parts, which makes them more durable and resistant to physical shock and vibration compared to traditional hard drives. This solid-state construction also leads to quieter operation, lower power consumption, and reduced heat generation.
Overall, understanding the fundamental characteristics and benefits of NVMe SSDs is crucial when it comes to cloning them. By knowing how these drives work and what sets them apart from traditional SSDs, you’ll be better equipped to perform the cloning process effectively and ensure the successful transfer of your valuable data.
Why Clone NVMe SSD
There are several reasons why you might need to clone your NVMe SSD. Cloning involves creating an exact copy of your existing drive and transferring it to a new drive. Here are some common scenarios where cloning an NVMe SSD becomes necessary:
1. Upgrade to a Larger Capacity Drive: If you find that your current NVMe SSD is running out of storage space, or if you need more room to accommodate your growing data needs, cloning allows you to upgrade to a larger capacity drive without losing any data or reinstalling the operating system and applications.
2. Backing up Data: Cloning your NVMe SSD provides an effective way to back up your data. By creating a duplicate copy of your drive, you can have a reliable backup in case of drive failure or data loss. This ensures that your important files, documents, and multimedia content are protected and can be easily recovered when needed.
3. Transferring Data to a New Computer: When getting a new computer, you may want to transfer all your data from the old computer to the new one. Cloning your NVMe SSD allows you to migrate all your files, settings, and applications seamlessly to the new system, saving you time and effort in setting up everything from scratch.
4. Testing New Software or Configuration: Before making any significant changes to your NVMe SSD, such as updating the operating system or installing new software, it’s wise to clone your drive first. By doing so, you can create a snapshot of your current setup, enabling you to revert back to the original state if any issues arise during the testing process.
5. Cloning for Business Purposes: In a business environment, cloning NVMe SSDs can be helpful for deploying standardized system configurations across multiple machines. It ensures consistency in software, settings, and data, reducing the setup time for each individual workstation.
Cloning your NVMe SSD provides a convenient and efficient method to accomplish these tasks. Whether you need to upgrade your storage capacity, create backups, transfer data to a new computer, or ensure consistency across multiple machines, cloning offers a reliable solution that saves time and minimizes the risk of data loss.
Cloning NVMe SSD using One Slot
Cloning an NVMe SSD using only one slot may seem challenging at first, as traditional cloning methods typically require both the source and target drives to be connected simultaneously. However, there are alternative approaches that allow you to clone your NVMe SSD using just one slot. Here’s how:
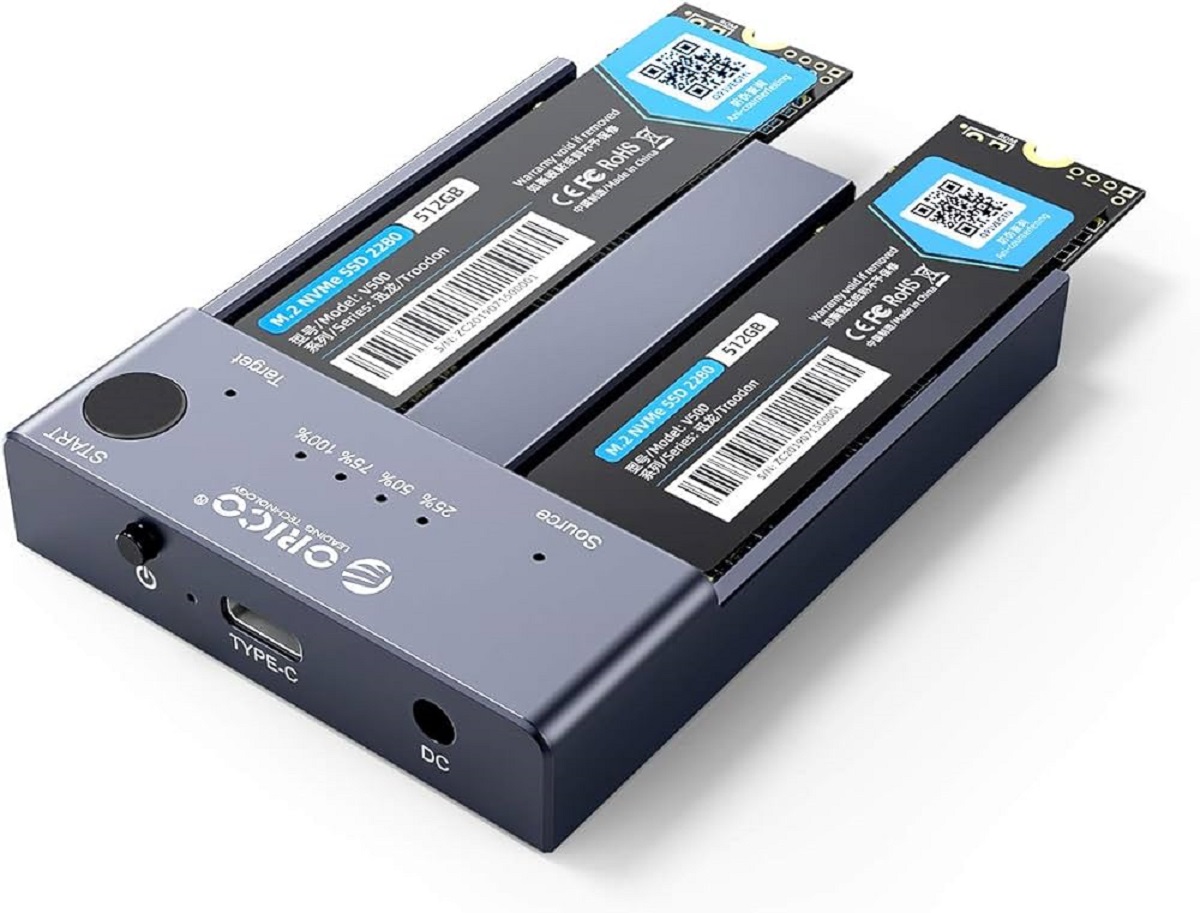
1. Use an External USB Adapter: One method is to use an external USB adapter specifically designed for NVMe SSDs. This adapter connects to your NVMe SSD and turns it into an external drive that can be connected to your computer’s USB port. Once connected, you can use cloning software to clone the NVMe SSD to another drive that is also connected to your computer via USB. This method allows you to clone the NVMe SSD even if you have only one slot available.
2. Utilize a Disk Cloning Software: Another option is to use disk cloning software that supports NVMe SSDs. These software solutions often come with versatile features that allow you to clone drives regardless of the slot limitations. With this method, you will need to connect the destination drive, which can be either an external drive or an internal drive (using a separate SATA to USB adapter), and use the software to clone the NVMe SSD directly to the destination drive.
3. Use Disk Imaging Software: Disk imaging software allows you to create an image or exact replica of your NVMe SSD and save it to an external storage device. You can then restore the image to a new drive using the same software. This method effectively achieves the same result as cloning, allowing you to transfer your data and system configuration to a new drive.
When using any of these methods, it is essential to ensure that you have adequate storage space on the destination drive to accommodate the entire contents of the NVMe SSD. Additionally, make sure to select a reliable and reputable software solution that is compatible with NVMe SSDs to ensure a successful cloning process.
By leveraging external adapters, disk cloning software, or disk imaging software, you can overcome the limitation of having only one slot and successfully clone your NVMe SSD. These methods provide you with flexibility and convenience while preserving your data and system configuration.
Recommended Tools
When it comes to cloning an NVMe SSD with only one slot, having the right tools can make the process much smoother and more efficient. Here are some recommended tools that can help you successfully clone your NVMe SSD:
1. External USB Adapter: An external USB adapter designed specifically for NVMe SSDs is a useful tool to have. It allows you to connect your NVMe SSD to your computer’s USB port, effectively turning it into an external drive. This adapter is essential if you are using the USB adapter method mentioned earlier in this guide.
2. Disk Cloning Software: A reliable disk cloning software is crucial for cloning your NVMe SSD. Look for cloning software that explicitly supports NVMe SSDs and offers features such as sector-by-sector cloning, incremental cloning, and the ability to clone to external drives. Tools like Acronis True Image, EaseUS Todo Backup, and Clonezilla are popular choices that can help you clone your NVMe SSD effectively.
3. Disk Imaging Software: In addition to cloning software, disk imaging software can also be a valuable tool for transferring your NVMe SSD data to a new drive. This software allows you to create an image or exact replica of your NVMe SSD and save it to an external storage device. Some recommended disk imaging software options include Macrium Reflect, Norton Ghost, and AOMEI Backupper.
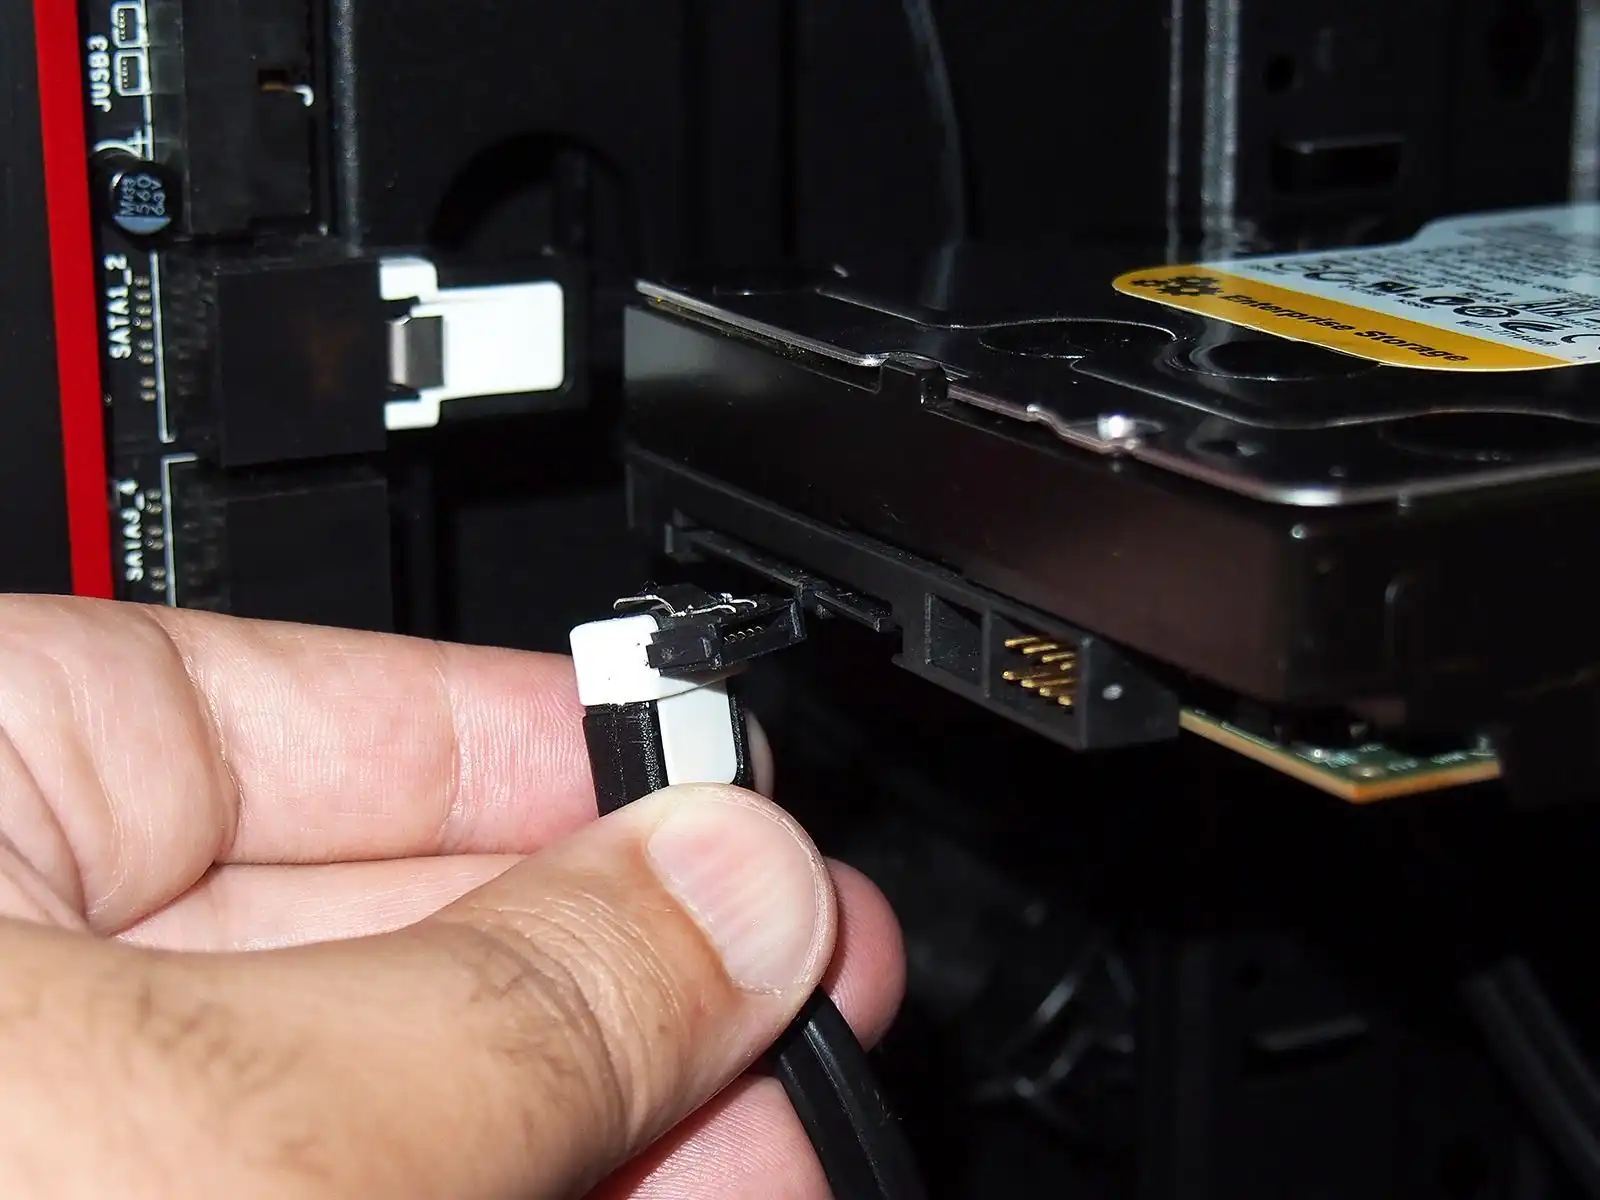
4. SATA to USB Adapter: If you plan on using an internal drive as the destination drive for cloning, a SATA to USB adapter can be handy. This adapter allows you to connect an internal SATA drive to a USB port, enabling you to clone your NVMe SSD to the destination drive using disk cloning software.
5. USB Flash Drive: Having a USB flash drive with sufficient storage capacity is useful for creating bootable media or saving disk images when using disk imaging software. It ensures that you have a portable storage device for transferring files and performing the cloning process.
6. Screwdriver and Anti-Static Wrist Strap: If you plan on directly installing or replacing your NVMe SSD in your computer, having a screwdriver and an anti-static wrist strap can be helpful. These tools ensure that you can safely handle the NVMe SSD and protect it from damage caused by electrostatic discharge.
Remember, the recommended tools mentioned here may vary depending on your specific cloning method and personal preferences. It’s important to choose tools that are compatible with your system and provide reliable performance to ensure a successful cloning experience.
Step 1: Preparing for Cloning
Before diving into the process of cloning your NVMe SSD, it’s crucial to properly prepare your system and gather all the necessary tools. Following these steps will help ensure a smooth and successful cloning process:
1. Back Up Your Data: Before proceeding with any major changes to your NVMe SSD, it’s always a good idea to create a backup of your data. This serves as a safety net in case anything goes wrong during the cloning process. Make sure to store the backup on an external drive or a separate storage location to keep your data secure.
2. Choose the Cloning Method: Decide on the specific method you will use for cloning your NVMe SSD. Determine if you will use an external USB adapter, disk cloning software, or disk imaging software. Consider factors such as the available tools and your level of comfort and expertise with each method.
3. Verify Compatibility: Ensure that the source NVMe SSD and the destination drive are compatible with the chosen cloning method. Check the specifications and requirements of the tools and software you plan to use to confirm compatibility. This step helps prevent any issues or errors during the cloning process.
4. Clear Unnecessary Files: To optimize the cloning process and minimize the amount of data transferred, it’s advisable to clear any unnecessary files and clean up your source NVMe SSD. Remove temporary files, redundant applications, and unnecessary data to reduce the overall size of the drive, making the cloning process quicker and more efficient.
5. Ensure Sufficient Storage Space: Check the available storage space on the destination drive. Make sure it has enough space to accommodate the contents of the source NVMe SSD. Cloning requires enough space for all the data, including the operating system, applications, and personal files.
6. Prepare Tools and Cables: Ensure that you have all the necessary tools and cables on hand, such as an external USB adapter or a SATA to USB adapter if required. Double-check that the cables are in good working condition to avoid any connection issues during the cloning process.
7. Follow Safety Precautions: Take necessary safety precautions by wearing an anti-static wrist strap to prevent electrostatic discharge. This protects your NVMe SSD from potential damage. Additionally, ensure that you are working in a clean and well-ventilated environment to prevent any dust or heat-related issues during the process.
8. Familiarize Yourself with Cloning Software: If you are using disk cloning or disk imaging software, take some time to familiarize yourself with the software’s interface and features. Understand the process of selecting source and destination drives, choosing the appropriate cloning options, and executing the cloning process.
By following these preparation steps, you’ll be ready to proceed with the cloning process in a smooth and organized manner. Taking the time to properly prepare will help minimize the risk of any errors and ensure a successful cloning experience.
Step 2: Creating a Backup
Creating a backup of your NVMe SSD is an essential step before proceeding with the cloning process. This ensures that your data is safely stored and can be easily recovered in case of any issues or errors during the cloning process. Here’s how to create a backup of your NVMe SSD:
1. Choose a Backup Method: There are several backup methods you can choose from, depending on your preference and available resources. You can use built-in backup tools in your operating system, third-party backup software, or even disk imaging software that allows you to create an exact replica of your NVMe SSD.
2. Select Backup Destination: Determine where you will store the backup. It is recommended to use an external storage device, such as an external hard drive, USB flash drive, or network-attached storage (NAS) device. Make sure the destination drive has enough storage space to accommodate the entire contents of your NVMe SSD.
3. Backup System Files and Personal Data: Depending on your backup method, you can choose to back up both system files and personal data or focus on specific files and folders that are important to you. Ensure that all crucial files, documents, media, and settings are included in the backup to ensure a complete restore of your NVMe SSD.
4. Schedule Regular Backups: To maintain a current and up-to-date backup of your NVMe SSD, consider scheduling regular backups. Depending on your needs, you can set up automatic backups on a daily, weekly, or monthly basis. This ensures that your data is always protected and minimizes the risk of data loss.
5. Verify Backup Integrity: Once the backup is complete, it is crucial to verify its integrity. Perform a test restore of a small subset of files from the backup to ensure that the backup is accessible and all the data is intact. This step gives you peace of mind knowing that your backup is usable when needed.
6. Store Backup in a Safe Location: After creating the backup, store it in a safe and secure location. Consider keeping the backup in a separate physical location, such as a fireproof safe, off-site storage, or cloud storage, to protect against physical damage or loss due to unforeseen circumstances.
7. Update the Backup Regularly: As you make changes to your NVMe SSD, such as adding or removing files, applications, or system configurations, remember to update the backup accordingly. Regularly reviewing and updating the backup ensures that your data is always up to date and accurately reflects the state of your NVMe SSD.
Creating a backup of your NVMe SSD is a critical step in the cloning process. It provides a safety net and gives you the confidence to proceed with the cloning process, knowing that your data is protected and can be easily recovered if needed.
Step 3: Cloning the NVMe SSD
Now that you have prepared your system and created a backup of your NVMe SSD, it’s time to move on to the actual cloning process. Follow these steps to clone your NVMe SSD with ease:
1. Connect the Destination Drive: If you are using an external USB adapter or a separate internal drive as the destination drive, connect it to your computer. Ensure that it is recognized and visible in your operating system.
2. Launch the Cloning Software: Open the disk cloning software or disk imaging software that you have chosen. Choose the option to clone a drive or create a disk image, depending on the software. Select the source NVMe SSD as the drive or partition you want to clone.
3. Select the Destination Drive: Choose the destination drive where you want to clone your NVMe SSD. It should be the connected drive that you want to clone the data to. Ensure that you have selected the correct destination drive to avoid unintended data loss.
4. Configure Cloning Settings: Depending on your cloning software, you may have options to configure specific cloning settings. These options may include choosing the cloning method (such as sector-by-sector or incremental), adjusting partition sizes, or excluding specific files or folders from the cloning process. Configure the settings according to your requirements.
5. Start the Cloning Process: Once you have reviewed and finalized the cloning settings, begin the cloning process. The software will start copying the data from the source NVMe SSD to the destination drive. This process may take some time, depending on the size of the data being cloned and the speed of your system.
6. Monitor the Cloning Progress: Keep an eye on the cloning progress to ensure that it proceeds smoothly. Most cloning software provides a progress bar or estimated time remaining. Avoid interrupting the process or turning off your computer during the cloning process to prevent any data corruption or loss.
7. Verify the Cloned Drive: Once the cloning process is complete, verify the cloned drive to ensure that all data has been successfully copied. You can do this by comparing file sizes, checking that all partitions are present and accessible, and performing a quick test by opening some files or applications from the cloned drive.
8. Keep the Original Drive Intact: To maintain a backup and ensure data integrity, it is highly recommended to keep the original NVMe SSD intact until you are completely satisfied with the cloned drive’s performance. This allows you to revert back to the original SSD if any issues arise.
By following these steps, you can successfully clone your NVMe SSD to the destination drive while preserving your data and system configuration. The cloning process ensures that all your files, applications, and settings are transferred to the new drive, allowing for a seamless transition without the need to reinstall everything from scratch.
Step 4: Verifying the Cloned Drive
After completing the cloning process, it’s important to verify the cloned drive to ensure that all data has been accurately transferred and that the drive is functioning properly. Follow these steps to verify the cloned drive:
1. Check Drive Capacity: Compare the capacity of the cloned drive with the original NVMe SSD. Ensure that the cloned drive has the same or larger capacity than the original drive to ensure all data was successfully copied.
2. Compare File Structure: On the cloned drive, navigate through the file structure and compare it with the original NVMe SSD. Verify that all files, folders, and directory structures have been copied accurately.
3. Verify Data Integrity: Select a few important files from different areas of the cloned drive and compare them with their counterparts on the original NVMe SSD. Check if the file sizes, timestamps, and content are identical to ensure that the data integrity has been maintained during the cloning process.
4. Test Access to Files: Open several files and applications from the cloned drive to ensure they are accessible and working properly. Test different file types, including documents, images, videos, and executable files, to ensure their functionality on the cloned drive.
5. Check System Configuration: Verify that the system configuration, including the operating system version, device drivers, and settings, has transferred correctly to the cloned drive. Ensure that device drivers are properly installed and that the operating system recognizes the hardware components connected to the drive.
6. Boot from the Cloned Drive (optional): If you want to use the cloned drive as the primary bootable drive, restart your computer and set the cloned drive as the boot device in the system BIOS or UEFI settings. Verify that the system successfully boots up from the cloned drive and that all applications and settings are functional.
7. Perform Additional Testing: If you want to ensure complete functionality and reliability of the cloned drive, consider running additional tests, such as disk performance tests, file transfer speed tests, and running resource-intensive applications to gauge overall system stability.
8. Keep the Original Drive Intact: It is recommended to keep the original NVMe SSD intact for a brief period, even after verifying the cloned drive, to allow for fallback options in case unexpected issues arise. This ensures that you still have the original drive with your data intact while you finalize the transition to the cloned drive.
By following these steps, you can confidently verify the cloned drive’s accuracy and functionality, ensuring that all your data and system configuration have been successfully transferred. Verifying the cloned drive provides peace of mind and ensures a seamless transition to using the new drive without any data loss or functionality issues.
Step 5: Booting from the Cloned Drive
Once you have verified the cloned drive and ensured that all data and settings are intact, you can proceed to boot your system from the cloned drive. Follow these steps to successfully boot from the cloned drive:
1. Prepare Bootable Media (if necessary): If you cloned your NVMe SSD to an external drive or if your system requires a specific bootable media, create a bootable USB flash drive or DVD with your operating system installation files. Make sure the bootable media contains the necessary files to start your computer.
2. Connect the Cloned Drive: If you used an external drive for cloning, connect it to your computer using the appropriate cable or adapter. Ensure that the cloned drive is recognized and visible in your system’s BIOS or UEFI settings.
3. Access System BIOS or UEFI Settings: Restart your computer and access the BIOS or UEFI settings by pressing the appropriate key during the startup process. This key varies depending on the motherboard manufacturer (common keys include Del, F2, F12, or Esc).
4. Set the Cloned Drive as the Boot Device: In the BIOS or UEFI settings, navigate to the “Boot” or “Startup” section. Change the boot order so that the cloned drive is set as the primary boot device. Save the changes and exit the settings.
5. Restart the Computer: Restart your computer to initiate the boot process from the cloned drive. The system will now boot from the cloned NVMe SSD instead of the original drive.
6. Verify Successful Boot: Once the computer restarts, observe the startup process to ensure that it successfully boots from the cloned drive. Check that the operating system loads without any issues and that all applications and settings are functioning properly.
7. Test System Performance: After booting from the cloned drive, test the overall system performance by running various applications, performing file transfers, and conducting any necessary system stability tests. This ensures that the cloned drive is operating optimally and providing the expected performance.
8. Keep the Original Drive as a Backup: To maintain a backup of your data and have a fallback option, it is recommended to keep the original NVMe SSD intact for a period of time. This way, you can switch back to the original drive if any unforeseen issues arise after booting from the cloned drive.
By following these steps, you can successfully boot your system from the cloned NVMe SSD. Booting from the cloned drive confirms that the cloning process was completed accurately and that the system is now fully operational with the new drive. Enjoy the enhanced performance and storage capacity of your cloned NVMe SSD!
Conclusion
Congratulations! You have successfully learned how to clone an NVMe SSD with only one slot. Cloning an NVMe SSD might seem challenging at first, but by following the step-by-step process outlined in this guide, you can transfer your data and system configuration to a new drive with ease.
Throughout the process, you learned the significance of understanding NVMe SSD technology and why cloning it can be beneficial. You discovered alternative methods for cloning using external USB adapters, disk cloning software, and disk imaging software. Additionally, you familiarized yourself with recommended tools to ensure a smooth cloning experience.
You prepared for the cloning process by creating a backup of your NVMe SSD and verifying its integrity. Then, you went on to cloning the NVMe SSD by connecting the destination drive, launching the cloning software, and configuring the necessary settings. After the cloning process, you verified the cloned drive to ensure the data’s accuracy and functionality.
Finally, you learned how to boot from the cloned drive and verified its successful operation. By completing these steps, you can confidently transition to using the cloned NVMe SSD as your primary drive, benefiting from its improved speed and increased storage capacity without losing any data or system configuration.
Remember to keep the original NVMe SSD as a backup for a while, just in case any unexpected issues arise. Regularly back up your data and update the cloned drive as you make changes to your system to ensure data integrity and minimize the risk of data loss.
By following this guide, you have gained the knowledge and skills to confidently clone an NVMe SSD with only one slot. This allows you to adapt and upgrade your storage solution without the need for complicated setup or data migration processes. Enjoy the enhanced performance and storage capabilities of your cloned NVMe SSD!