Introduction:
Welcome to our guide on how to clean the fan in the Lenovo U510 Ultrabook. Over time, dust and debris can accumulate in the fan of your laptop, causing it to work harder and potentially overheating sensitive components. It’s essential to regularly clean the fan to ensure optimal performance and prolong the lifespan of your device.
The Lenovo U510 Ultrabook is a sleek and powerful laptop designed to deliver a seamless computing experience. However, like any electronic device, it requires regular maintenance to keep it running smoothly. Cleaning the fan is a straightforward and effective way to prevent temperature-related issues and maintain the overall health of your laptop.
In this guide, we’ll walk you through the step-by-step process of cleaning the fan in your Lenovo U510 Ultrabook. We’ll provide you with detailed instructions and tips to make the process as easy and hassle-free as possible. By following this guide, you’ll be able to safely remove dust and debris from the fan, enhancing its cooling efficiency and ensuring optimal performance.
Before we dive into the cleaning process, it’s important to note that opening your laptop may void its warranty. If your laptop is still under warranty, we recommend reaching out to Lenovo’s customer support for assistance. However, if your warranty has expired or you feel comfortable taking on the task, this guide will equip you with the necessary steps to clean the fan effectively.
Now that we’ve provided you with an overview of what to expect, let’s move on to the reasons why it’s crucial to clean the fan of your Lenovo U510 Ultrabook.
Reasons to Clean the Fan:
Regularly cleaning the fan in your Lenovo U510 Ultrabook is essential for several reasons. Here are the key reasons why it’s important to keep the fan clean:
1. Prevent Overheating: The fan in your laptop is responsible for cooling down internal components, such as the CPU and GPU, by circulating air. Over time, dust and debris can accumulate on the fan blades, hindering its ability to effectively dissipate heat. Cleaning the fan ensures proper airflow, preventing overheating and potential damage to vital components.
2. Improve Performance: When the fan is clogged with dirt and debris, the laptop may start to experience performance issues. As the components heat up, they may throttle the processing power to avoid damage, resulting in a slower and less responsive system. By cleaning the fan, you can restore optimal performance and enjoy a faster and more efficient laptop experience.
3. Extend Lifespan: Overheating can significantly reduce the lifespan of your laptop. Excessive heat puts stress on the internal components, potentially leading to premature failure. By regularly cleaning the fan, you can minimize heat buildup and increase the longevity of your Lenovo U510 Ultrabook.
4. Enhance Battery Life: When the laptop’s components are working harder due to poor cooling, it can drain the battery more quickly. By cleaning the fan and improving airflow, you can help reduce the strain on the components, resulting in improved battery efficiency and longer battery life.
5. Reduce Noise: A dusty fan tends to produce more noise as it spins at higher speeds to compensate for limited airflow. Cleaning the fan can help reduce noise levels, providing a quieter and more enjoyable computing experience.
6. Maintain Warranty: If your laptop is still under warranty, manufacturers often recommend regular maintenance to ensure warranty coverage. Cleaning the fan is part of this maintenance routine, helping you adhere to warranty requirements and avoiding any potential disputes.
By recognizing these reasons to clean the fan, you can understand the importance of this simple maintenance task for your Lenovo U510 Ultrabook. In the next section, we will discuss the necessary tools and materials you’ll need to clean the fan effectively.
Necessary Tools and Materials:
Before you begin cleaning the fan in your Lenovo U510 Ultrabook, it’s important to gather the necessary tools and materials. Having the right equipment will make the process more efficient and ensure you can complete the task effectively. Here are the essentials:
1. Compressed Air Canister: This is the most crucial tool for cleaning the fan. A canister of compressed air allows you to blow the dust and debris out from the fan and other hard-to-reach areas. Ensure the canister has a long, thin nozzle attachment for better precision.
2. Soft-bristled Brush: You’ll need a small, soft-bristled brush to remove any stubborn dust particles that the compressed air can’t dislodge. It should be gentle enough to prevent damage to delicate components.
3. Microfiber Cloth: A microfiber cloth is handy for wiping the exterior surfaces of the laptop and removing any fingerprints or smudges. Make sure the cloth is clean and free of lint.
4. Antistatic Gloves: Although not essential, wearing antistatic gloves can help protect sensitive components from electrostatic discharge during the cleaning process. This is especially important if you’re working on a carpeted surface.
5. Phillips Head Screwdriver: Depending on the laptop model, you may need a Phillips head screwdriver to remove the screws that secure the bottom cover. Check the laptop’s user manual or online guides to determine the specific screwdriver size required.
6. Small Container: Prepare a small container to collect the dust and debris that you dislodge from the fan. This will ensure easy disposal and prevent the particles from spreading around your workspace.
7. Optional: Thermal Paste: If you plan to remove the heatsink to access the fan, you may need thermal paste to reapply it. Check the laptop’s user manual or consult online resources to determine if thermal paste is recommended for your specific model.
Having these tools and materials on hand will make the cleaning process smoother and more efficient. Once you have them ready, you’re all set to proceed to the next section, where we’ll guide you through the steps of cleaning the fan in your Lenovo U510 Ultrabook.
Step 1: Shut down the Lenovo U510 Ultrabook:
Before you begin cleaning the fan in your Lenovo U510 Ultrabook, it’s important to ensure that the laptop is completely shut down. This will prevent any accidental damage and protect you from any electrical hazards. Follow these steps to properly shut down your Lenovo U510 Ultrabook:
1. Save your work: Make sure to save all of your open files and close any running applications. This will prevent any data loss or corruption during the shutdown process.
2. Exit all programs: Close any programs or applications that are running in the background. This includes web browsers, media players, or any other software that may be consuming system resources.
3. Disconnect peripherals: If you have any external devices connected to your laptop, such as USB drives, printers, or external monitors, safely disconnect them. This will ensure a smooth shutdown process.
4. Click on the Start button: Located in the bottom left corner of your screen, the Start button is usually represented by the Windows logo. Click on it to open the Start menu.
5. Click on the Power icon: At the bottom of the Start menu, you’ll see the Power button. Click on it to reveal the power options.
6. Choose “Shut down”: From the power options menu, select the “Shut down” option. This will initiate the shutdown process for your Lenovo U510 Ultrabook.
7. Wait for the laptop to power off: Once you’ve selected the “Shut down” option, your laptop will begin the process of powering off. Wait for the screen to go black and for all lights on the laptop to turn off. This indicates that the laptop has successfully shut down.
By following these steps, you will ensure that your Lenovo U510 Ultrabook is properly shut down and ready for the next steps in the fan cleaning process. Remember to wait for the laptop to fully power off before proceeding. In the next section, we’ll discuss how to prepare your workspace for cleaning the fan.
Step 2: Prepare the Workspace:
Before you begin cleaning the fan in your Lenovo U510 Ultrabook, it’s important to prepare your workspace. This will ensure a clean and organized environment, making the cleaning process more efficient and reducing the risk of damage to your laptop. Follow these steps to properly prepare your workspace:
1. Choose a clean and well-lit area: Find a workspace where you have enough room to lay out the necessary tools and materials. Ensure the area is well-lit, allowing you to see clearly during the cleaning process.
2. Work on a stable surface: Select a stable and flat surface to work on, such as a desk or a table. Avoid working on surfaces that are prone to vibrations, as this can increase the risk of accidents or damage to delicate components.
3. Gather a clean microfiber cloth: Before you begin, have a clean microfiber cloth ready. This will be used to wipe down the exterior surfaces of your laptop and remove any dirt or smudges.
4. Remove any distractions: Clear the workspace of any unnecessary items or distractions that may interfere with the cleaning process. This will help you stay focused and minimize the risk of accidents.
5. Put on antistatic gloves (optional): If you have antistatic gloves, consider putting them on to protect sensitive components from electrostatic discharge. This is especially important if you’re working on a carpeted surface.
6. Ensure proper ventilation: Adequate ventilation is crucial during the cleaning process to disperse any airborne dust particles. If possible, open a window or turn on a fan to maintain good airflow in the room.
7. Keep a small container nearby: Place a small container nearby to collect the dust and debris that you dislodge from the fan. This will make it easier for disposal and prevent the particles from spreading around your workspace.
By following these steps, you will create an ideal workspace for cleaning the fan in your Lenovo U510 Ultrabook. A clean and organized environment will help you stay focused and ensure a smooth cleaning process. Once your workspace is prepared, you’re ready to move on to the next step: removing the bottom cover of the laptop.
Step 3: Remove the Bottom Cover of the Laptop:
In order to access the fan in your Lenovo U510 Ultrabook, you’ll need to remove the bottom cover of the laptop. Follow these steps carefully to safely remove the bottom cover:
1. Gather the necessary tools: Before proceeding, ensure you have the appropriate Phillips head screwdriver that fits the screws on the bottom cover of your Lenovo U510 Ultrabook.
2. Flip the laptop upside down: Carefully turn your laptop over so that the bottom part is facing up. Place it on a stable and flat surface to avoid any potential damage.
3. Identify and remove the screws: Examine the bottom cover of your laptop and locate the screws that are holding it in place. They are usually marked with small icons or symbols. Use the Phillips head screwdriver to carefully remove these screws. Keep the screws in a safe place as you will need them later to reassemble the laptop.
4. Remove the bottom cover: Once all the screws are removed, gently lift the bottom cover from the edges. Be cautious and go slow to avoid any excessive force or damage. Some laptops may have clips or additional tabs holding the cover in place, so take your time and ensure you release them before fully removing the cover.
5. Set aside the bottom cover: Once the bottom cover is detached, set it aside in a clean and secure location. Ensure that it is placed on a soft surface to prevent any scratches or damage.
Removing the bottom cover provides access to the internal components of your Lenovo U510 Ultrabook, including the fan. However, it’s important to note that opening your laptop may void any existing warranty. If your laptop is still under warranty, consider reaching out to the manufacturer’s customer support for assistance.
By carefully following these steps, you have successfully removed the bottom cover of your Lenovo U510 Ultrabook. You are now ready to move on to the next step: locating and accessing the fan.
Step 4: Locate and Access the Fan:
Now that you have successfully removed the bottom cover of your Lenovo U510 Ultrabook, it’s time to locate and access the fan. Follow these steps to find the fan and prepare it for cleaning:
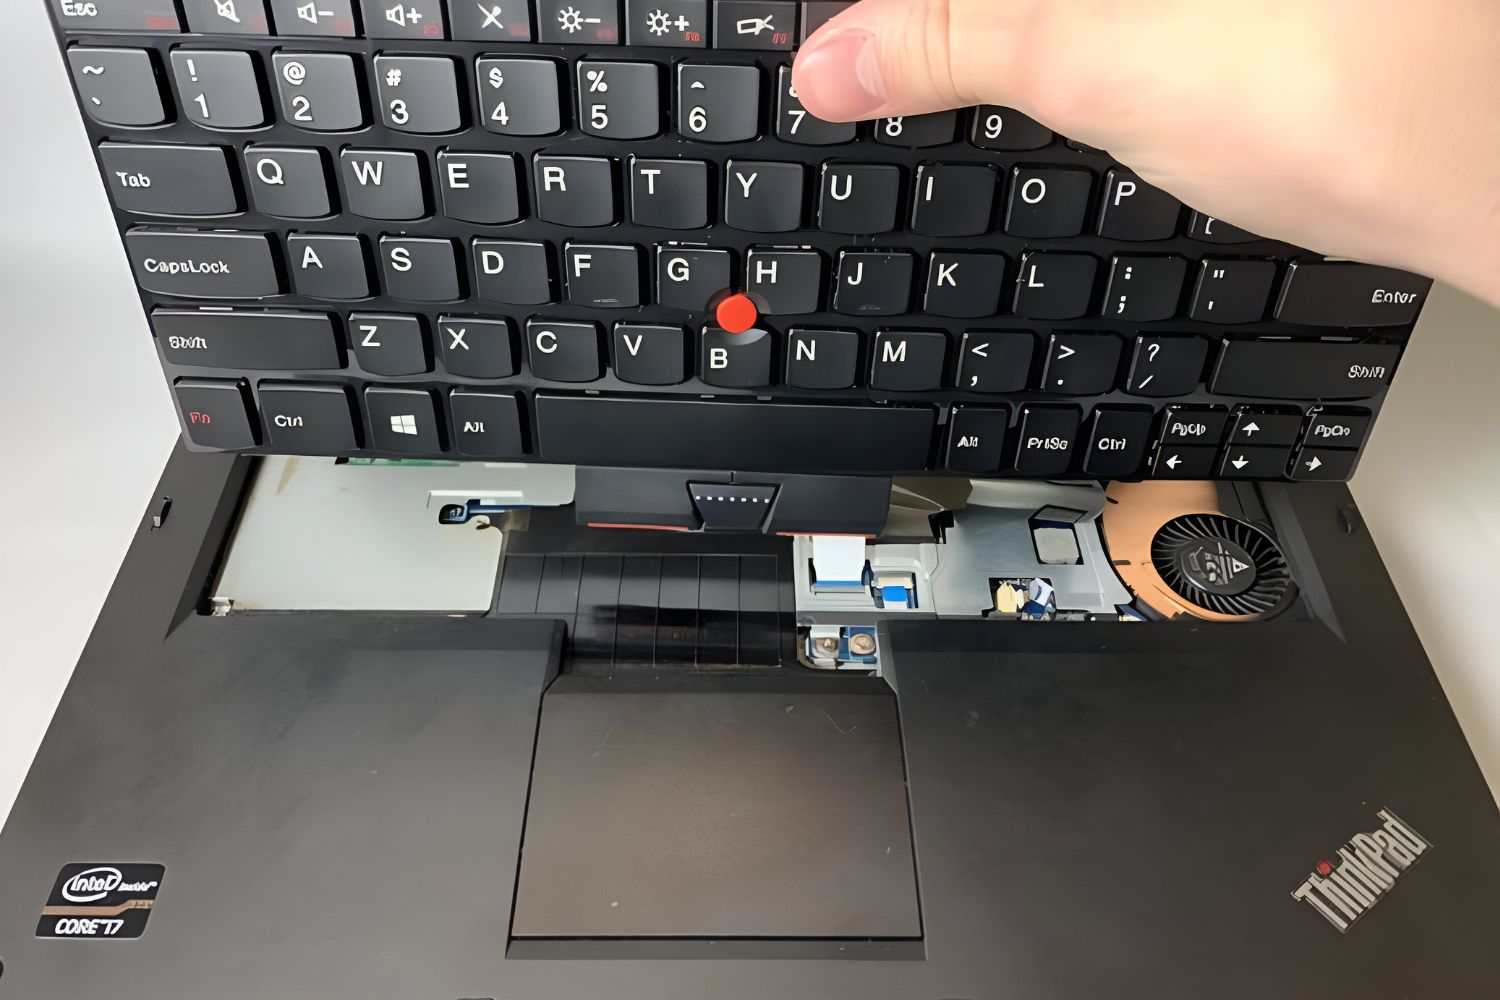
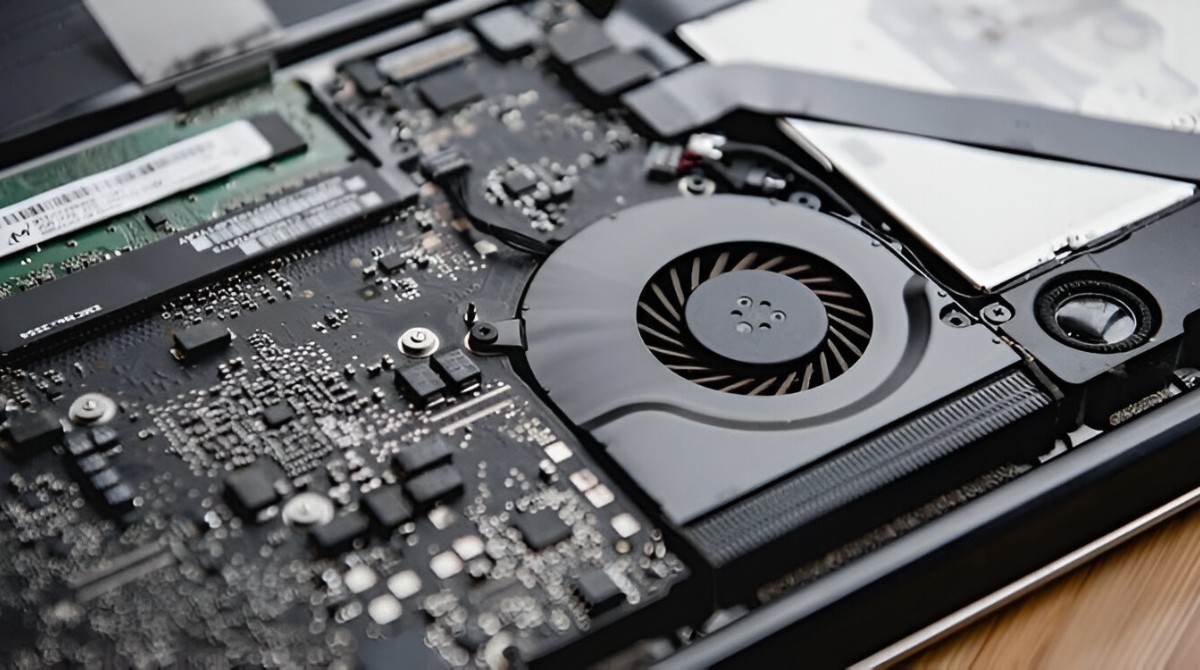
1. Locate the fan: Look for the fan, which is typically located near one of the corners of the laptop’s internal components. It is commonly positioned in close proximity to the heatsink, which helps dissipate heat. The fan will have a set of fan blades and is connected to the motherboard via a cable.
2. Identify any obstructions: Take a moment to inspect the fan for any visible obstructions such as dust, hair, or debris. It’s common for these particles to accumulate on the fan blades and affect its performance. Make a mental note of any significant accumulation that you will address in the cleaning process.
3. Ensure proper precautions: Before proceeding to clean the fan, ensure that you take appropriate measures to prevent damage to the laptop’s components. Avoid applying excessive pressure or touching any delicate parts of the fan or surrounding components.
4. Secure cables and connectors: Take note of any cables or connectors that are connected to the fan or surrounding area. Gently ensure they are securely connected and properly seated. It’s important not to accidentally dislodge or damage any of these cables.
5. Take precautionary measures (optional): If you need to access the fan blades directly, consider using a small piece of tape to secure the blades temporarily. This will prevent them from spinning during the cleaning process and reduce the risk of accidental damage.
It’s important to exercise caution while handling the interior components of your laptop. Be mindful of static electricity and avoid direct contact with any delicate parts. Take your time during this step to ensure a safe and efficient cleaning process.
By following these steps, you have successfully located and accessed the fan in your Lenovo U510 Ultrabook. In the next step, we will discuss how to effectively clean the fan using compressed air.
Step 5: Use Compressed Air to Clean the Fan:
Using compressed air is an effective way to clean the fan in your Lenovo U510 Ultrabook. Follow these steps to safely and efficiently clean the fan using compressed air:
1. Select an appropriate angle: Position the laptop in a way that allows you to access the fan easily. It’s generally best to keep the laptop flat on the surface, ensuring steady and controlled airflow.
2. Hold the compressed air canister upright: Shake the canister gently to ensure the compressed air is well-distributed. Hold the canister in an upright position, following the manufacturer’s instructions for proper handling.
3. Target the fan and surrounding areas: Direct the nozzle of the compressed air canister towards the fan and surrounding areas. Make sure you’re targeting the fan blades, heatsink, and any visible dust or debris. Maintain a safe distance of several inches to avoid causing any damage.
4. Blow away the dust and debris: Press the trigger on the compressed air canister to release short bursts of air onto the fan blades and surrounding areas. Start from a lower intensity and gradually increase the pressure as needed. Use a sweeping motion to cover all angles and dislodge any stubborn dust particles.
5. Pay attention to other components: While focusing on the fan, ensure that you also direct the compressed air towards other components, such as the heatsink and surrounding circuitry. This will help remove any accumulated dust that could affect overall cooling efficiency.
6. Use a brush for stubborn particles (optional): If there are any particularly stubborn dust particles that the compressed air can’t remove, use a soft-bristled brush to gently dislodge them. Be careful not to apply too much pressure or use any abrasive materials that could damage sensitive components.
7. Double-check for cleanliness: After using the compressed air, visually inspect the fan and surrounding areas to ensure they are clean and free of any visible dust or debris. If necessary, repeat the process until you are satisfied with the results.
Cleaning the fan with compressed air helps eliminate dust and debris, restoring optimal airflow and preventing overheating of internal components. Once you have completed this step, proceed to the next step to reassemble your laptop and conclude the cleaning process.
Step 6: Reassemble the Laptop:
After successfully cleaning the fan in your Lenovo U510 Ultrabook, it’s time to reassemble the laptop. Follow these steps to securely put back the bottom cover and ensure everything is back in place:
1. Retrieve the bottom cover: Locate the bottom cover that you set aside earlier. Ensure there is no debris or dust on the inside of the cover before proceeding.
2. Align the cover: Carefully align the bottom cover with the edges of the laptop’s chassis. Ensure that all screw holes are properly aligned to avoid any issues during reassembly.
3. Press down gently: Once properly aligned, apply gentle and even pressure to the cover. Start from one corner and gradually move along the edges to secure the cover in place.
4. Insert and tighten the screws: Retrieve the screws that you removed earlier and use the Phillips head screwdriver to insert and tighten them back into the screw holes. Be careful not to overtighten, as this can damage the threads or the screw heads.
5. Verify a secure fit: After tightening all the screws, give the bottom cover a gentle tug to ensure it is securely attached to the laptop. It should sit flush and not have any noticeable gaps or wiggling.
6. Double-check components and connections: Before completing the reassembly process, ensure that any cables or connectors that were detached during the disassembly are securely connected. Verify that all components are in their proper places and nothing has been left loose.
7. Power on the laptop: Once you’re confident that everything is properly reassembled, press the power button to turn on your Lenovo U510 Ultrabook. Listen for any abnormal noises or observe any unusual behavior during startup. If everything appears normal, proceed to the next step.
By successfully reassembling your Lenovo U510 Ultrabook, you have completed the cleaning process and restored the laptop to its original state. Now, it’s time to conclude the process and enjoy the benefits of a cleaner and more efficiently cooled laptop.
Conclusion:
Congratulations! You have successfully learned how to clean the fan in your Lenovo U510 Ultrabook. By following the step-by-step process outlined in this guide, you have taken an important step towards maintaining your laptop’s performance and longevity.
Cleaning the fan is crucial for preventing overheating and improving the overall functioning of your laptop. Regular maintenance ensures that the fan can effectively dissipate heat, which helps prevent performance issues and potential damage to internal components.
Remember, before you begin, always shut down the laptop and prepare a clean workspace. Gather the necessary tools, including compressed air, a soft-bristled brush, and a microfiber cloth. Take your time and be gentle when removing the bottom cover, locating the fan, and using compressed air to clean it.
After cleaning the fan, reassembling the laptop is the final step. Ensure that the bottom cover is properly aligned and securely fastened with the screws. Double-check all connections and components before powering on your laptop to ensure everything is functioning correctly.
By regularly cleaning the fan in your Lenovo U510 Ultrabook, you are extending its lifespan, improving its performance, and minimizing the risk of overheating. Enjoy a cooler and more efficient computing experience.
It’s important to remember that if you are unsure or uncomfortable with disassembling and cleaning your laptop’s fan, it’s always recommended to seek professional assistance or contact Lenovo’s customer support for guidance.
Thank you for following this guide. We hope it has been helpful in maintaining and optimizing your Lenovo U510 Ultrabook. Happy computing!