Introduction
Welcome to this guide on how to change the keypad on your Lenovo Ultrabook S230U. Over time, the keypad on your laptop may become worn out or damaged, causing issues with typing and overall functionality. Fortunately, replacing the keypad is a relatively simple process that can breathe new life into your laptop.
Before we proceed, it’s important to note that you should always exercise caution when working inside your laptop to avoid causing any damage. If you are not comfortable with performing the following steps, it’s recommended to seek assistance from a professional or contact Lenovo support for guidance.
In this step-by-step guide, we will walk you through the process of changing the keypad on your Lenovo Ultrabook S230U. We will cover everything from powering off the laptop to installing the new keypad and powering it back on again.
To successfully complete this task, you will need a few basic supplies, including a small Phillips head screwdriver, a plastic spudger or guitar pick, and a replacement keypad specifically designed for the Lenovo Ultrabook S230U.
Now that you have a brief overview of what to expect, let’s gather the necessary supplies and get started with the first step: powering off the laptop.
Supplies Needed
Before we begin replacing the keypad on your Lenovo Ultrabook S230U, let’s gather the necessary supplies. Having these items on hand will ensure a smooth and hassle-free process. Here’s what you’ll need:
- Small Phillips head screwdriver: This is necessary for removing the screws on the laptop’s keypad bezel.
- Plastic spudger or guitar pick: You’ll use this tool to gently pry off the keypad bezel without scratching or damaging the laptop’s surface.
- Replacement keypad: Make sure to get a replacement keypad that is specifically designed for the Lenovo Ultrabook S230U to ensure proper compatibility and functionality.
These three items are essential to successfully changing the keypad on your Lenovo Ultrabook S230U. Double-check that you have all of them before proceeding with the next steps. If you don’t have these supplies readily available, you can purchase them online or visit a local electronics store.
By having the necessary tools and the correct replacement keypad, you’ll be well-equipped to complete the keypad replacement process. Now that we have our supplies ready, let’s move on to the first step: powering off the laptop.
Step 1: Powering Off the Laptop
The first step in replacing the keypad on your Lenovo Ultrabook S230U is to power off the laptop. This ensures a safe working environment and prevents any accidental damage while working on the device.
To power off your laptop, follow these simple steps:
- Save any open files or applications you are currently working on.
- Close all programs and windows to prepare for the shutdown.
- Click on the “Start” button, typically located in the bottom-left corner of the screen.
- From the Start menu, click on the “Power” option.
- Select “Shut Down” from the power options menu.
- Wait for the laptop to completely shut down. This process may take a few moments.
Once the laptop is powered off, make sure to unplug it from any power sources, such as the charger or docking station. This eliminates the risk of electric shock and allows for easier handling during the rest of the keypad replacement process.
Now that you have successfully powered off your Lenovo Ultrabook S230U, you are ready to move on to the next step: removing the keypad bezel. Remember to handle the laptop with care and maintain a clean and organized workspace to ensure a smooth and successful keypad replacement.
Step 2: Removing the Keypad Bezel
With the laptop powered off and unplugged, we can now proceed to remove the keypad bezel. The keypad bezel is the plastic frame that surrounds the keypad and holds it in place. Follow these steps to safely remove it:
- Locate the small screws that secure the keypad bezel to the laptop’s palm rest. These screws are usually located on the bottom or sides of the bezel.
- Using a small Phillips head screwdriver, carefully remove the screws by turning them counterclockwise. Keep the screws in a safe place to avoid misplacing them.
- Once all the screws are removed, gently lift the edge of the keypad bezel using a plastic spudger or guitar pick. Insert the spudger or pick between the bezel and the laptop’s palm rest.
- Work your way around the edges, applying gentle pressure to release the plastic clips that secure the bezel in place. Take your time and be careful not to force or bend the plastic during this process.
- Continue releasing the clips until the keypad bezel is completely detached from the laptop.
- Set the bezel aside in a safe place, ensuring that it doesn’t get damaged or scratched.
Removing the keypad bezel can be a delicate process, so be patient and gentle when handling the laptop. Once the bezel is successfully removed, you will have clear access to the keypad and its connection cable. In the next step, we will disconnect the keypad cable to proceed with the replacement process.
Step 3: Disconnecting the Keypad Cable
Now that the keypad bezel has been removed, we can proceed to disconnect the keypad cable. The keypad cable is the thin ribbon-like cable that connects the keypad to the laptop’s motherboard. Follow these steps to safely disconnect the keypad cable:
- Locate the keypad cable connector on the motherboard. This connector is typically located near the center of the laptop, close to the keypad area.
- Gently lift the connector’s retention tab or flap using your fingers or a small tool. This will release the tension on the cable and allow you to disconnect it.
- Once the retention tab is lifted, carefully pull the keypad cable straight out of the motherboard connector. Avoid pulling on the cable itself as this may cause damage. Instead, grasp the plastic connector firmly and gently pull it away.
- Ensure that the keypad cable is completely disconnected from the motherboard. Take note of the cable’s orientation and position for easy reconnection later.
It’s important to handle the keyboard cable with care and avoid any excessive bending or twisting. If the cable doesn’t disconnect easily, double-check that the retention tab is fully lifted before attempting to remove it again. Once the keypad cable is disconnected, you can proceed to the next step: removing the old keypad from the laptop.
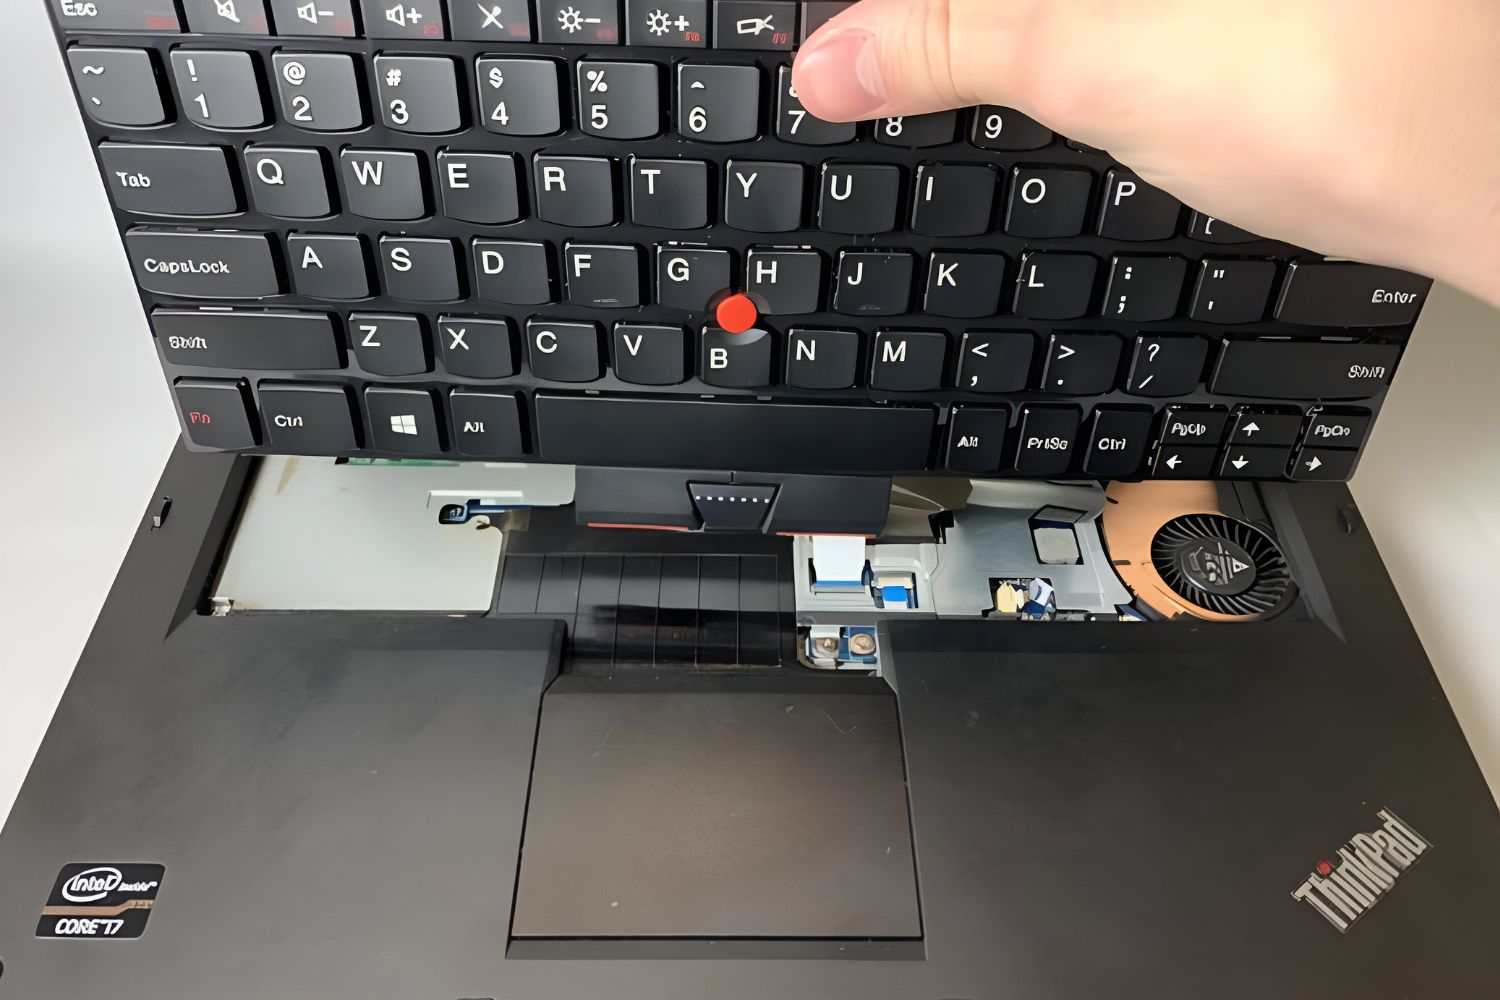
Step 4: Removing the Old Keypad
With the keypad cable disconnected, we can now move on to removing the old keypad from your Lenovo Ultrabook S230U. Follow these steps to safely remove the old keypad:
- Gently lift the edges of the old keypad using your fingers or a plastic spudger. Start from one corner and work your way around the edges.
- As you lift the keypad, be mindful of any adhesive or clips that may be holding it in place. Take your time and apply gentle pressure to release any adhesion without causing damage.
- Continue lifting the keypad until it is completely detached from the laptop’s palm rest.
- Set the old keypad aside, making sure to keep it in a safe place where it won’t get damaged.
Once the old keypad is removed, take a moment to inspect the laptop’s palm rest for any dirt, debris, or residue that may have accumulated over time. If necessary, use a soft cloth or cleaning solution specifically designed for electronic devices to wipe away any dirt or stains. This will ensure a clean surface for the installation of the new keypad.
Now that the old keypad has been successfully removed, we can proceed to the next step: installing the new keypad onto your Lenovo Ultrabook S230U.
Step 5: Installing the New Keypad
Now that the old keypad has been removed, it’s time to install the new keypad onto your Lenovo Ultrabook S230U. Follow these steps to ensure a proper installation:
- Take the new keypad and align it with the laptop’s palm rest, making sure it fits securely into place.
- Ensure that the keypad’s connector matches up with the motherboard connector in the laptop. Align the connector accordingly, taking note of the orientation and position.
- Gently press down on the keypad, starting from the center and working your way towards the edges. Apply even pressure to ensure that the keypad is properly secured.
- Make sure that the keypad is flat and flush against the laptop’s palm rest without any gaps or unevenness.
It’s important to handle the new keypad with care and avoid applying excessive force during installation. Take your time to properly align and secure the keypad onto the laptop’s palm rest.
Once the new keypad is properly installed, double-check that it feels stable and is securely in place. Wiggle the keypad slightly to ensure it doesn’t move or come loose. If necessary, reposition the keypad to ensure a snug fit.
Congratulations! You have successfully installed the new keypad onto your Lenovo Ultrabook S230U. In the next step, we will reconnect the keypad cable, allowing for the full functionality of the keypad on your laptop.
Step 6: Reconnecting the Keypad Cable
With the new keypad installed, it’s time to reconnect the keypad cable to your Lenovo Ultrabook S230U. Follow these steps to ensure a secure and proper connection:
- Locate the keypad cable connector on the laptop’s motherboard.
- Gently insert the keypad cable into the motherboard connector, making sure it is properly aligned.
- Once aligned, firmly press the keypad cable into the connector until it clicks into place.
- Ensure that the cable is fully inserted and that there are no visible gaps between the connector and the cable.
It’s important to handle the keypad cable with care and avoid any excessive bending or twisting during the connection process. Take your time and double-check the alignment before pressing it into place. This will ensure a secure connection and proper functionality of the keypad.
Once the keypad cable is securely connected, gently tug on it to ensure it is properly seated. It should not detach easily or feel loose. If you encounter any issues or resistance during this step, double-check the alignment and try again.
Great job! You have successfully reconnected the keypad cable to your Lenovo Ultrabook S230U. In the next step, we will reattach the keypad bezel to complete the process.
Step 7: Reattaching the Keypad Bezel
With the keypad cable reconnected, it’s time to reattach the keypad bezel onto your Lenovo Ultrabook S230U. Follow these steps to ensure a secure and proper reattachment:
- Take the keypad bezel and align it with the edges of the laptop’s palm rest.
- Gently press the bezel onto the laptop, starting from one corner and working your way around the edges.
- Apply even pressure to ensure that the bezel snaps back into place and properly clips onto the laptop.
- Check that all the sides and corners of the bezel are securely attached and there are no gaps or misalignments.
- If your laptop had screws holding the bezel in place, use a small Phillips head screwdriver to reinsert and tighten the screws.
It’s important to handle the keypad bezel with care during reattachment to avoid causing any damage. Take your time to ensure that the bezel is properly aligned and snugly fits onto the laptop’s palm rest.
Once the keypad bezel is securely reattached, inspect it to ensure that it sits flush against the laptop’s surface and matches the surrounding areas. It should look seamless and provide a clean, professional appearance.
Great job! You have successfully reattached the keypad bezel onto your Lenovo Ultrabook S230U. In the final step, we will power on the laptop and test the functionality of the newly installed keypad.
Step 8: Powering On the Laptop
Now that you have completed the keypad replacement process, it’s time to power on your Lenovo Ultrabook S230U and ensure the functionality of the newly installed keypad. Follow these steps to power on your laptop:
- Ensure that the laptop is still unplugged from any power sources.
- Take a moment to double-check that all the connections, including the keypad cable, are secure and properly aligned.
- Press and hold the power button located on the laptop’s keyboard or side panel.
- Release the power button when you see the Lenovo logo or the laptop begins to power on.
- Wait for the laptop to fully boot up and reach the desktop screen.
As your laptop powers on, pay close attention to the functioning of the keypad. Test each key to ensure that it responds accurately and registers your keystrokes. Also, check for any unusual behavior or malfunctioning keys that may require further attention.
If you notice any issues with the keypad, it’s advisable to double-check the connections and ensure that the keypad is properly installed. If the problem persists, you may want to consult Lenovo support or seek assistance from a professional.
Congratulations! You have successfully powered on your Lenovo Ultrabook S230U and tested the functionality of the newly installed keypad. Enjoy your refreshed laptop experience with the improved typing experience provided by the new keypad.
Conclusion
Congratulations on successfully replacing the keypad on your Lenovo Ultrabook S230U! By following these step-by-step instructions, you were able to remove the old keypad, install a new one, and ensure its proper functionality. Now, you can enjoy a refreshed typing experience and improved functionality on your laptop.
Remember, when working inside your laptop, always exercise caution and take your time to avoid causing any damage. If at any point you feel unsure about the process, it’s recommended to seek assistance from a professional or contact Lenovo support for guidance.
By having the necessary supplies and following each step carefully, you can complete the keypad replacement process with confidence. Taking care to align the keypad properly, reconnect the keypad cable securely, and reattach the keypad bezel with precision will result in a seamless and professional end result.
With your newly installed keypad, you can now enjoy the smooth and accurate typing experience on your Lenovo Ultrabook S230U. Remember to test the keypad thoroughly after powering on the laptop to ensure its proper functionality and address any issues that may arise.
Thank you for following this guide. We hope it has been helpful in guiding you through the keypad replacement process for your Lenovo Ultrabook S230U. Enjoy your refreshed laptop and improved typing experience!