Introduction
Setting up multiple monitors on your computer can greatly enhance your productivity. Whether you’re a professional who needs to multitask efficiently or simply enjoy the convenience of a larger display, having multiple monitors can make a significant difference. However, one common issue that users encounter is the order in which the monitors are labeled as “1” and “2” by the operating system.
In a typical setup, the primary monitor is designated as Monitor 1, while the secondary monitor is labeled as Monitor 2. This order may not always align with your desired arrangement, and it can be frustrating to navigate between screens when they are not in the correct order.
But fear not, as changing the order of your monitors is a straightforward process. In this guide, we’ll explore how to change which monitor is labeled as Monitor 1 and Monitor 2 on both Windows and Mac operating systems. By following these simple steps, you’ll be able to customize your display setup to suit your preferences.
So, if you’re ready to take control of your monitor order and optimize your workspace, let’s dive in!
Why would you want to change which monitor is 1 and 2?
Before we delve into the steps of changing the monitor order, let’s first address why you might want to do this in the first place.
One of the main reasons for changing the monitor order is to align it with your physical setup. Sometimes, the default order assigned by the operating system doesn’t match the actual physical positioning of your monitors. This can lead to confusion and inconvenience, especially when you need to move your cursor or drag windows between screens.
If you have a specific way you want your monitors to be arranged, changing the monitor order can make it easier for you to navigate between screens and maintain your workflow. By rearranging the monitor order to match your physical setup, you can work seamlessly and avoid any confusion.
Another reason to change the monitor order is to prioritize certain applications or tasks. When you have multiple monitors, the primary display is typically the one where new applications and windows open by default. By assigning the desired monitor as Monitor 1, you can ensure that your most important tasks or commonly used applications open on that specific screen.
Furthermore, having the ability to change the monitor order allows you to control which monitor becomes the primary display. This is important if you have a preferred monitor for tasks that require higher resolution or better color accuracy. By designating that monitor as Monitor 1, you can enjoy an optimized viewing experience for your primary tasks.
Additionally, some software applications or games may require specific display settings or monitor orders to function properly. By adjusting the monitor order, you can ensure compatibility and avoid any technical issues that may arise.
Ultimately, changing the monitor order gives you the flexibility to customize your display setup according to your specific needs and preferences. Whether it’s aligning with your physical setup, prioritizing tasks, optimizing viewing experience, or ensuring compatibility, having control over the monitor order can greatly enhance your overall productivity and user experience.
Step 1: Connecting the monitors
The first step in changing the monitor order is to ensure that your monitors are properly connected to your computer. Follow these straightforward steps to connect your monitors:
- Turn off your computer and monitors. This will prevent any potential electrical damage and ensure a smooth setup process.
- Determine the video output ports on your computer and the corresponding ports on your monitors. Common video output ports include HDMI, DisplayPort, and VGA.
- Connect one end of the selected video cable to your computer’s video output port.
- Connect the other end of the video cable to the corresponding video input port on your first monitor.
- If you have additional monitors, repeat steps 3 and 4 to connect them to your computer using the available video output ports. Make sure to connect each monitor to a separate video output port on your computer.
- Once all the monitors are connected, securely tighten the cable connections to ensure a stable connection.
- Turn on your computer and monitors.
Once your monitors are connected, the operating system will detect them and assign default labels as Monitor 1 and Monitor 2. To change the monitor order and customize your display setup, proceed to the next step.
Step 2: Identifying the monitors
Before changing the monitor order, it’s essential to identify each monitor correctly. This will help you determine the current arrangement and make changes accordingly. Follow these steps to identify your monitors:
- Right-click on your desktop and select “Display settings” from the context menu. This will open the display settings window.
- In the display settings window, you will see a representation of your monitors. Each monitor will be labeled with a number, such as “1” or “2”. The primary monitor is usually labeled as “1”. Take note of the current labels for reference.
- If you’re unsure which monitor corresponds to the physical positioning, you can click on the “Identify” button. This will display a large number on each monitor, helping you visually identify them.
- Make a note of the desired order in which you want the monitors to be labeled. For example, if your physical setup has the left monitor as the primary one, you’ll want to designate it as “1”.
With the help of these identification steps, you’ll have a clear understanding of your current monitor arrangement and the desired order you wish to achieve. Now, let’s move on to the next step and learn how to change the monitor order on Windows.
Step 3: Changing the monitor order in Windows
Windows provides a simple and intuitive way to change the monitor order. Follow these steps to adjust the monitor order in Windows:
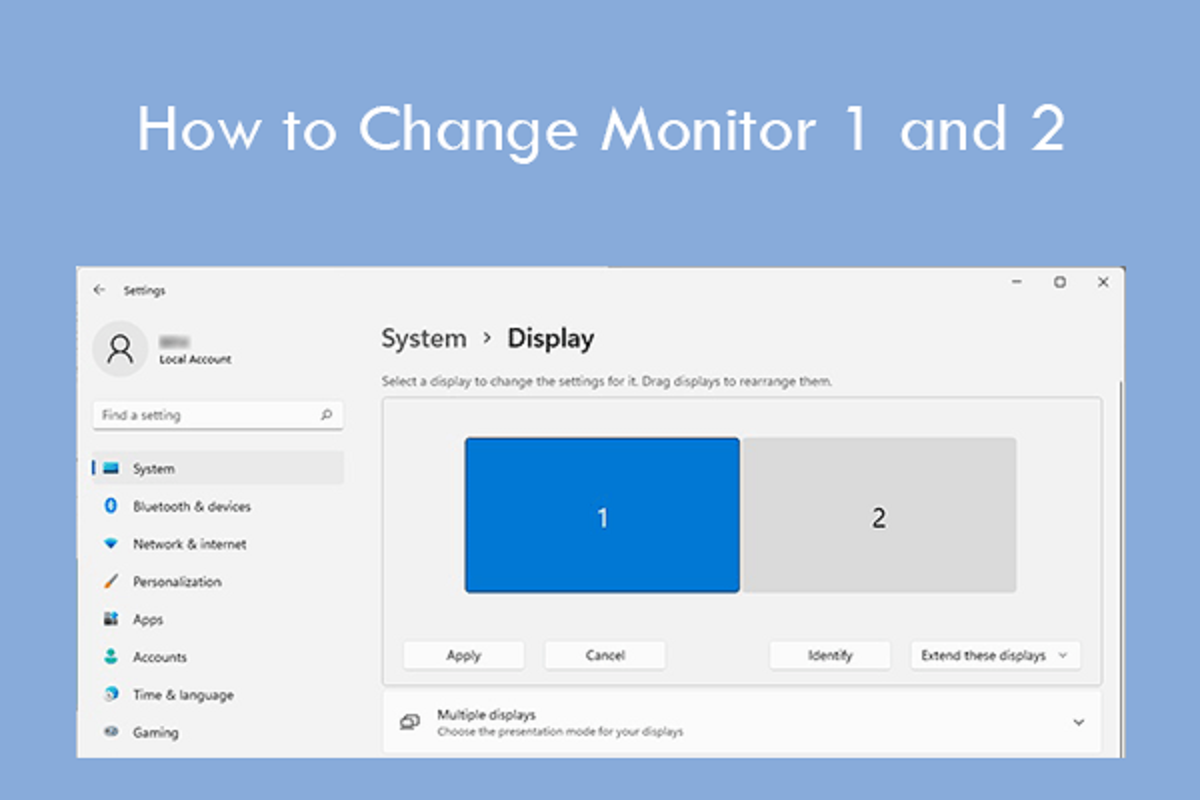
- Right-click on your desktop and select “Display settings” from the context menu. This will open the display settings window.
- In the display settings window, you will see the representation of your monitors. Click and drag the monitor icons to rearrange them according to your desired order. For example, dragging Monitor 2 to the left of Monitor 1 will effectively switch their positions.
- As you drag the monitors, you will notice that the arrangement in the display settings window changes accordingly.
- Once you have set the desired monitor order, click the “Apply” button to save the changes.
- Windows will prompt you to confirm the changes made. If the new arrangement appears as expected, click “Keep Changes”. Otherwise, click “Revert” to revert back to the previous configuration.
After confirming the changes, Windows will update the monitor order accordingly. You can now enjoy your customized monitor setup with the correct labels and order.
If you experience any issues or the changes don’t take effect, double-check the cable connections between your computer and monitors, as well as the driver software for your graphics card. Updating the drivers or reconnecting the cables can often resolve any connectivity issues.
That’s it! You have successfully changed the monitor order in Windows. Next, let’s explore how to change the monitor order on Mac systems.
Step 4: Changing the monitor order on Mac
If you’re using a Mac, you can easily change the monitor order through the System Preferences. Follow these steps to adjust the monitor order on Mac:
- Click on the Apple menu in the top-left corner of your screen and select “System Preferences”.
- In the System Preferences window, click on “Displays”.
- Click on the “Arrangement” tab at the top of the window.
- You will see a representation of your monitors. To change the monitor order, click and drag the white menu bar at the top of one monitor and move it to the desired position. The other monitors will adjust accordingly.
- If you have an external monitor, you can also rearrange it by dragging its icon relative to the built-in display icon.
- Once you have set the desired monitor order, close the System Preferences window.
After making these changes, your monitor order on your Mac system will be updated accordingly. The arrangement you set in the System Preferences will reflect the physical positioning of your monitors.
If you encounter any issues or if the changes don’t take effect, ensure that your monitors are connected properly and try restarting your Mac. This can often resolve any temporary display issues.
Now you’re all set! You’ve successfully changed the monitor order on your Mac system. Your monitors will be labeled correctly, allowing for a smoother workflow.
In the next step, we’ll explore some common issues users may encounter during the monitor order change process and provide troubleshooting tips.
Step 5: Troubleshooting common issues
While changing the monitor order is usually a straightforward process, there may be some common issues that you could encounter along the way. Here are a few troubleshooting tips to help you overcome these obstacles:
- No display on one or both monitors: Check the cable connections between your computer and monitors. Ensure that they are securely plugged in and try reconnecting them if necessary. Additionally, verify that the monitors are powered on and set to the correct input source.
- Monitors not detected: If your computer fails to detect one or more monitors, ensure that the necessary drivers are installed. Visit the website of the monitor manufacturer or your computer’s graphics card manufacturer to download and install the latest drivers.
- Incorrect monitor order: If the changes you made to the monitor order don’t take effect, restart your computer and check again. Sometimes, a simple reboot can resolve any temporary display issues.
- Display scaling issues: Changing the monitor order may affect the scaling settings and display resolution. If you experience any scaling or resolution issues, adjust these settings in the display settings menu of your operating system to ensure a proper visual experience.
- Non-responsive monitors: If you find that one or more monitors appear to be unresponsive after changing the monitor order, try disconnecting and reconnecting the affected monitor(s). If the issue persists, consult the support resources of your monitor manufacturer for further assistance.
If you encounter any other specific issues during the process, refer to the documentation or support resources provided by your device manufacturer or operating system provider for further troubleshooting steps.
By following these troubleshooting tips, you can overcome common issues and ensure a successful monitor order change. Now, you can enjoy your preferred monitor arrangement and boost your productivity.
Conclusion
Changing the monitor order can greatly enhance your productivity and improve your overall workflow by aligning your display setup with your physical arrangement. Whether you’re using Windows or Mac, the process of changing the monitor order is relatively simple and can be done in just a few steps.
By properly connecting your monitors, identifying them, and rearranging their order in the operating system settings, you can customize your workspace to suit your preferences and optimize your viewing experience.
However, it’s essential to remember that if you encounter any issues during the process, such as non-responsive monitors or incorrect display scaling, there are troubleshooting steps you can take to overcome them.
So, take control of your monitor order today and enjoy a seamless and efficient multi-monitor setup tailored to your needs.
Now that you have the knowledge and steps required to change the monitor order, you can confidently create a more personalized and effective workspace.
Happy multitasking!