Introduction
Welcome to our guide on how to change the WiFi on Google Home. If you just got a new WiFi router or you’re moving to a new place with a different network, it’s important to update the WiFi settings on your Google Home device. The process may seem daunting at first, but don’t worry – we’ll walk you through the steps to make it a breeze.
Google Home is a popular voice-activated smart speaker that can perform a variety of tasks, from playing music to controlling smart home devices. To fully utilize its features, it needs to be connected to a WiFi network. By updating the WiFi settings, you can ensure a seamless connection and continue enjoying all the benefits of your Google Home.
In this guide, we’ll cover everything you need to know about changing the WiFi on your Google Home device. We’ll provide clear instructions to help you reset your Google Home, connect it to a new WiFi network, and reconnect it to your Google account. Additionally, we’ll offer troubleshooting tips to address any issues you may encounter along the way.
Before we dive into the steps, make sure you have the necessary information on hand, such as the new WiFi network name (SSID) and password. It’s also a good idea to have your smartphone or tablet ready, as you’ll need it to complete the setup process. Now, let’s get started and learn how to change the WiFi on your Google Home!
Why Change WiFi on Google Home?
There are several reasons why you might need to change the WiFi on your Google Home device. Here are a few common scenarios where updating the WiFi settings becomes necessary:
- New WiFi Router: If you’ve recently purchased a new WiFi router or upgraded your existing one, you’ll need to connect your Google Home to the new network to ensure a stable and fast connection.
- Moving to a New Location: When you move to a new place, you’ll likely have a different WiFi network. Changing the WiFi on your Google Home allows it to connect to the new network and continue functioning seamlessly.
- Improving WiFi Signal: If you experience weak WiFi signal strength in certain areas of your home, you might want to install a WiFi extender or set up a new mesh network. In such cases, updating the WiFi on your Google Home can help it connect to the improved network and provide better performance.
- Solving Connectivity Issues: If you’ve been experiencing frequent disconnections or other connectivity issues with your Google Home, changing the WiFi settings can often resolve these problems. Sometimes, simply reconnecting to the same network can fix temporary glitches or conflicts.
By changing the WiFi on your Google Home, you ensure that it stays connected to a reliable network, enabling seamless voice commands, music streaming, device control, and other smart features. It helps maintain a consistent connection, eliminating any potential interruptions in the device’s functionality.
Now that we understand why it’s important to update the WiFi settings let’s move on to the preparation stage before changing the WiFi on your Google Home device.
Preparing to Change WiFi
Before diving into the process of changing the WiFi on your Google Home device, it’s essential to prepare a few things to ensure a smooth transition. Here’s what you need to do:
Gather Information
Make sure you have the following information readily available:
- New WiFi Network Name (SSID): This is the name of the WiFi network you want to connect your Google Home to. It can usually be found on the back or bottom of your WiFi router.
- New WiFi Password: The password is necessary to gain access to the WiFi network. It’s typically a combination of letters, numbers, and special characters. If you don’t have the password, contact the network administrator or refer to the new router’s documentation.
Ensure Compatibility
Double-check that your Google Home device is compatible with the new WiFi network. Most Google Home devices support both 2.4 GHz and 5 GHz WiFi bands. However, if your new network operates only on a specific band, ensure that your Google Home device is capable of connecting to it.
Have a Mobile Device Ready
Ensure your smartphone or tablet is nearby and connected to the new WiFi network. You’ll need it to complete the setup process and connect your Google Home to the new WiFi.
Plan a Convenient Time
Choose a time when you can afford the device to be temporarily disconnected from the internet. Keep in mind that during the setup process, your Google Home won’t be able to respond to voice commands or perform its usual functions until it’s connected to the new WiFi network. It’s best to schedule the change when you don’t heavily rely on the device.
With all the necessary information gathered and your mobile device ready, you’re now prepared to proceed with changing the WiFi on your Google Home device. In the next section, we’ll guide you through the step-by-step process of resetting and reconnecting your Google Home to the new WiFi network.
Step 1: Resetting Google Home
The first step in changing the WiFi on your Google Home device is to reset it. Resetting allows you to clear the existing WiFi settings and start fresh with the new network. Here’s how to do it:
- Locate the physical reset button on your Google Home device. The location of the reset button may vary depending on the model. Typically, it can be found on the back or bottom of the device.
- Press and hold the reset button for about 15 seconds or until you see the lights on the Google Home device begin to flash.
- Release the reset button and wait for the Google Home device to complete the reset process. The lights will flash, indicating that the device is resetting.
- Once the reset is complete, you’ll hear the Google Assistant voice say, “Welcome to Google Home. To get started, download the Google Home app on a phone or tablet.”
By resetting your Google Home, you have cleared the previous WiFi settings, and the device is now ready to be connected to the new WiFi network. Let’s move on to the next step, where we’ll guide you through the process of connecting your Google Home to the new WiFi network.
Step 2: Connecting to the New WiFi Network
Now that you’ve reset your Google Home device, it’s time to connect it to the new WiFi network. Follow these steps to establish a connection:
- Open the Google Home app on your smartphone or tablet. If you don’t have the app installed, download it from the App Store (iOS) or Google Play Store (Android) and sign in with your Google account.
- In the app, tap on the “+” icon or the “Add” button to set up a new device.
- Select “Set up device” and choose “New devices” or “Set up new devices” from the options.
- Follow the on-screen instructions to connect your Google Home to the new WiFi network. The app will guide you through the process, which involves selecting your Google Home device from the list, confirming your location, and choosing your preferred WiFi network.
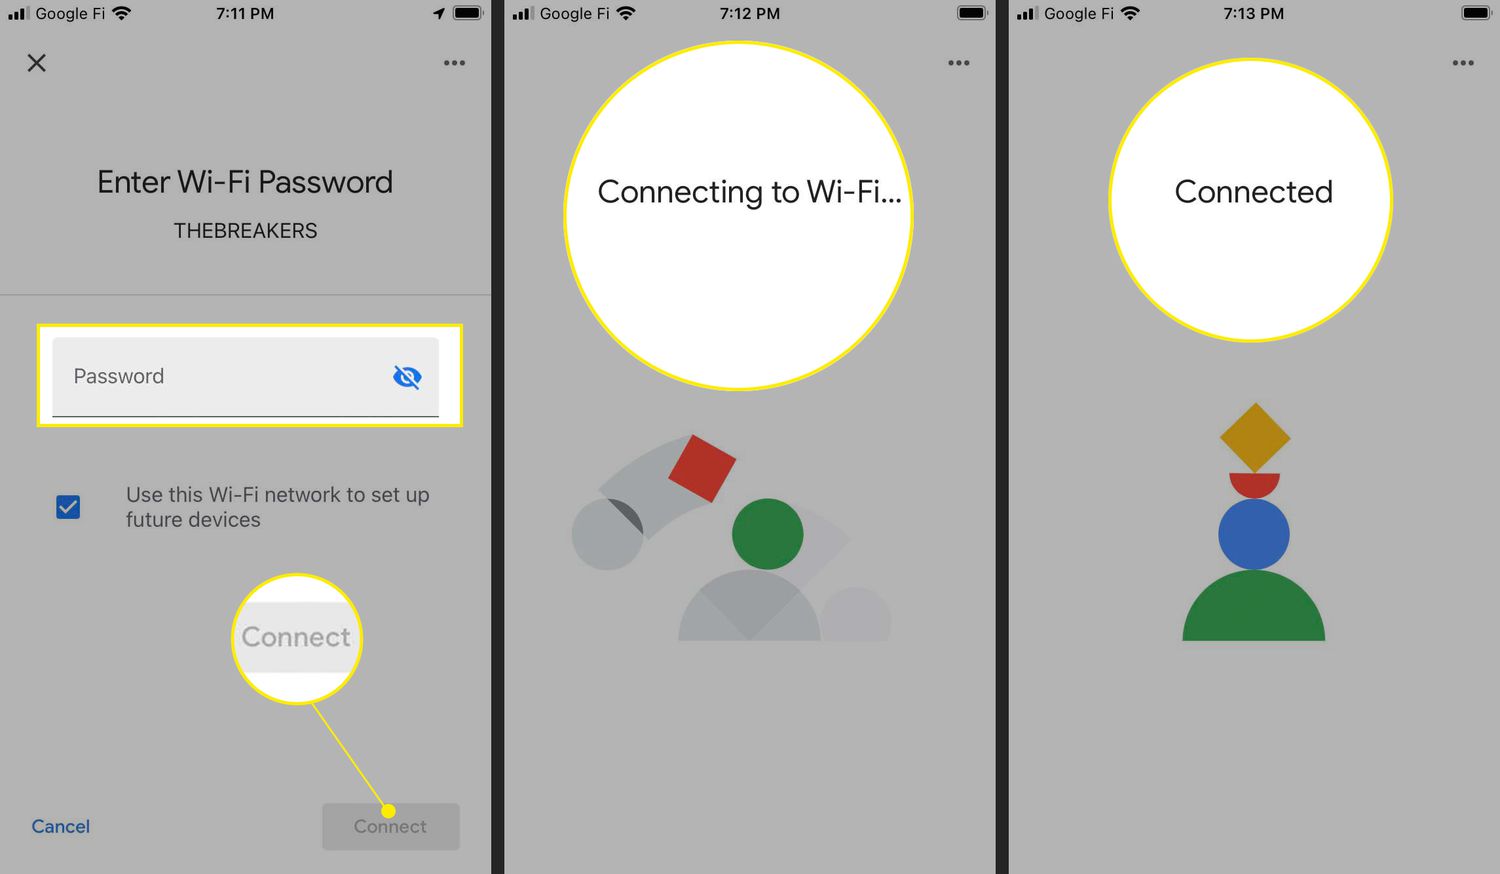
- When prompted, enter the new WiFi network’s password. Ensure you enter the password correctly to establish a successful connection.
- Once entered, tap “Next” or “Connect” to proceed.
- The app will then attempt to establish a connection between your Google Home and the new WiFi network. The process may take a few moments, so be patient.
- Once the connection is established, you’ll receive a confirmation message indicating that your Google Home is connected to the new WiFi network.
After successfully connecting your Google Home to the new WiFi network, you’re one step closer to enjoying its smart features and functionalities. However, there’s one more important step left – reconnecting your Google Home to your Google account. Let’s move on to the next section for guidance on completing this crucial step.
Step 3: Reconnecting Google Home to Your Account
After successfully connecting your Google Home to the new WiFi network, the final step is to reconnect it to your Google account. This ensures that your device is personalized with your preferences and can access your Google Assistant settings. Follow these steps to complete the process:
- Open the Google Home app on your smartphone or tablet.
- If you’re not already on the home screen, navigate to it by tapping the home icon at the bottom of the app.
- You should see your Google Home device listed on the home screen. Tap on it to access its settings.
- In the device settings, look for the “Reconnect” or “Re-link” option. It may be located under the “Settings” or “Device Info” section.
- Tap on “Reconnect” or “Re-link” and follow the on-screen instructions.
- You’ll be prompted to sign in to your Google account. Enter your account credentials to proceed.
- Once signed in, the app will establish a connection between your Google Home device and your Google account.
- After the connection is established, you’ll have the option to customize your Google Assistant settings, such as language preferences, voice match, and more.
- Follow the prompts to personalize your Google Home experience according to your preferences.
Once you’ve completed the reconnection process, your Google Home device will be successfully linked to your Google account. You can now enjoy the full range of features and functionalities, utilizing the power of the Google Assistant through your Google Home device.
If you encounter any issues during the reconnection process or experience connectivity problems, refer to the troubleshooting tips in the next section. These tips can help you troubleshoot and resolve common issues that may arise when changing the WiFi on your Google Home.
Troubleshooting Tips
While changing the WiFi on your Google Home device is usually a straightforward process, there may be times when you encounter some difficulties or face connectivity issues. Here are some troubleshooting tips to help you resolve common problems:
1. Ensure Correct WiFi Network:
Make sure you are connecting your Google Home to the correct WiFi network. Double-check the network name (SSID) and password you entered during the setup process.
2. Check WiFi Signal Strength:
Weaker WiFi signal can cause connectivity issues. Ensure that your Google Home is within range of the WiFi router or consider relocating it for a stronger signal.
3. Restart Router and Google Home:
Try restarting both your WiFi router and Google Home device. Power off the router, wait for a few seconds, and then turn it back on. Similarly, unplug your Google Home device, wait for a moment, and then plug it back in.
4. Disable Network Isolation/Client Isolation:
If you are experiencing connectivity issues when interacting with other devices on the network, check if there is any network isolation or client isolation setting enabled on your router. Disable it if necessary.
5. Update Firmware:
Check if there are any firmware updates available for your WiFi router or Google Home device. Keeping the firmware up to date can resolve compatibility issues and improve performance.
6. Factory Reset Google Home:
If all else fails, you can try performing a factory reset on your Google Home. This will erase all settings and data, allowing you to set it up from scratch. Note that this should be a last resort and will require you to repeat the entire setup process.
If you continue to experience difficulties, consult the Google Home support documentation or contact their customer support for further assistance. They can provide personalized guidance based on your specific situation.
By following these troubleshooting tips, you should be able to resolve most common issues and regain a stable connection between your Google Home device and the new WiFi network.
Conclusion
Changing the WiFi on your Google Home device is a simple yet essential process to ensure a seamless connection and access to all the smart features it offers. By following the steps outlined in this guide, you can easily reset your Google Home, connect it to a new WiFi network, and reconnect it to your Google account.
We discussed the reasons why you might need to change the WiFi on your Google Home, such as getting a new router, moving to a new location, improving WiFi signal, or solving connectivity issues. We also emphasized the importance of gathering the necessary information, ensuring compatibility, and having a mobile device ready before proceeding with the setup process.
Step by step, we covered how to reset your Google Home and connect it to the new WiFi network using the Google Home app. We then walked you through the process of reconnecting your Google Home to your Google account, ensuring a personalized and seamless experience. Additionally, we provided troubleshooting tips to help you overcome common connectivity issues that may arise during the setup process.
Remember, if you encounter any difficulties or need further assistance, consult the Google Home support documentation or reach out to their customer support for personalized guidance.
Now that you have successfully changed the WiFi on your Google Home, you can enjoy all the benefits of a stable and reliable connection, allowing you to interact with your device, play music, control your smart home devices, and more through voice commands. Enjoy your enhanced Google Home experience!