Introduction
Welcome to this guide on how to change the Wi-Fi on your Chromecast. Whether you’ve moved to a new location with a different Wi-Fi network or simply need to update your existing network information, this tutorial will walk you through the process step by step.
The Chromecast is a popular streaming device that allows you to cast your favorite movies, TV shows, and music from your phone, tablet, or computer to your TV. It connects to your Wi-Fi network to access the internet and stream content seamlessly. So, when your Wi-Fi network changes, you’ll need to update the Chromecast with the new network information to ensure uninterrupted streaming.
Changing the Wi-Fi on Chromecast may seem like a daunting task, but rest assured, it’s a fairly simple process. In this guide, you’ll learn how to reset the Chromecast, connect it to a new Wi-Fi network, and troubleshoot common issues that may arise during the process.
Before we get started, make sure you have the necessary equipment and software handy. You’ll need your Chromecast device, a TV with an available HDMI port, a smartphone or computer with the Google Home app installed, and access to the new Wi-Fi network you want to connect to.
Now let’s dive into the steps required to change the Wi-Fi on your Chromecast and get you back to streaming your favorite content in no time.
Step 1: Resetting the Chromecast
The first step in changing the Wi-Fi on your Chromecast is to reset the device. Resetting the Chromecast will erase all existing network settings and bring it back to its factory default state, allowing you to set it up again with your new Wi-Fi network.
To reset the Chromecast, locate the small button on the side or back of the device. Using a paperclip or a similar tool, press and hold the button for about 10-15 seconds until the LED indicator on the Chromecast starts flashing. This indicates that the reset process has begun.
Once the Chromecast begins resetting, you can release the button. The LED indicator will continue flashing for a few more seconds before it turns solid again, indicating that the reset is complete.
Now that you’ve successfully reset your Chromecast, it’s ready to be set up with the new Wi-Fi network.
Note: If you’re using the Chromecast Ultra, the reset button is located on the bottom of the device and requires a straightened paperclip to access.
Resetting the Chromecast is a straightforward process, but if you encounter any issues or the LED indicator doesn’t light up or flash when you press the reset button, try disconnecting the power cable from the Chromecast, waiting for a few seconds, and then reconnecting it. This can often resolve minor glitches and allow you to proceed with the reset process.
Now that your Chromecast is reset, let’s move on to the next step: connecting it to a new Wi-Fi network.
Step 2: Connecting the Chromecast to a New Wi-Fi Network
Once you’ve reset your Chromecast, it’s time to connect it to your new Wi-Fi network. Remember that you’ll need your smartphone, tablet, or computer with the Google Home app installed for this step.
1. Make sure your smartphone, tablet, or computer is connected to the same Wi-Fi network that you want to connect your Chromecast to. This is important for the initial setup process.
2. Launch the Google Home app on your device and sign in with your Google account if prompted.
3. Tap on the “+” symbol at the top left corner of the app to add a new device.
4. On the following screen, select “Set up device” and then choose “New devices” to begin the setup process for your Chromecast.
5. The app will now search for available devices. When your Chromecast appears on the screen, tap on it to continue.
6. A code will be displayed on your TV screen as well as on the Google Home app. Make sure that the code on your TV matches the one on your app, and then tap “Yes” to proceed.
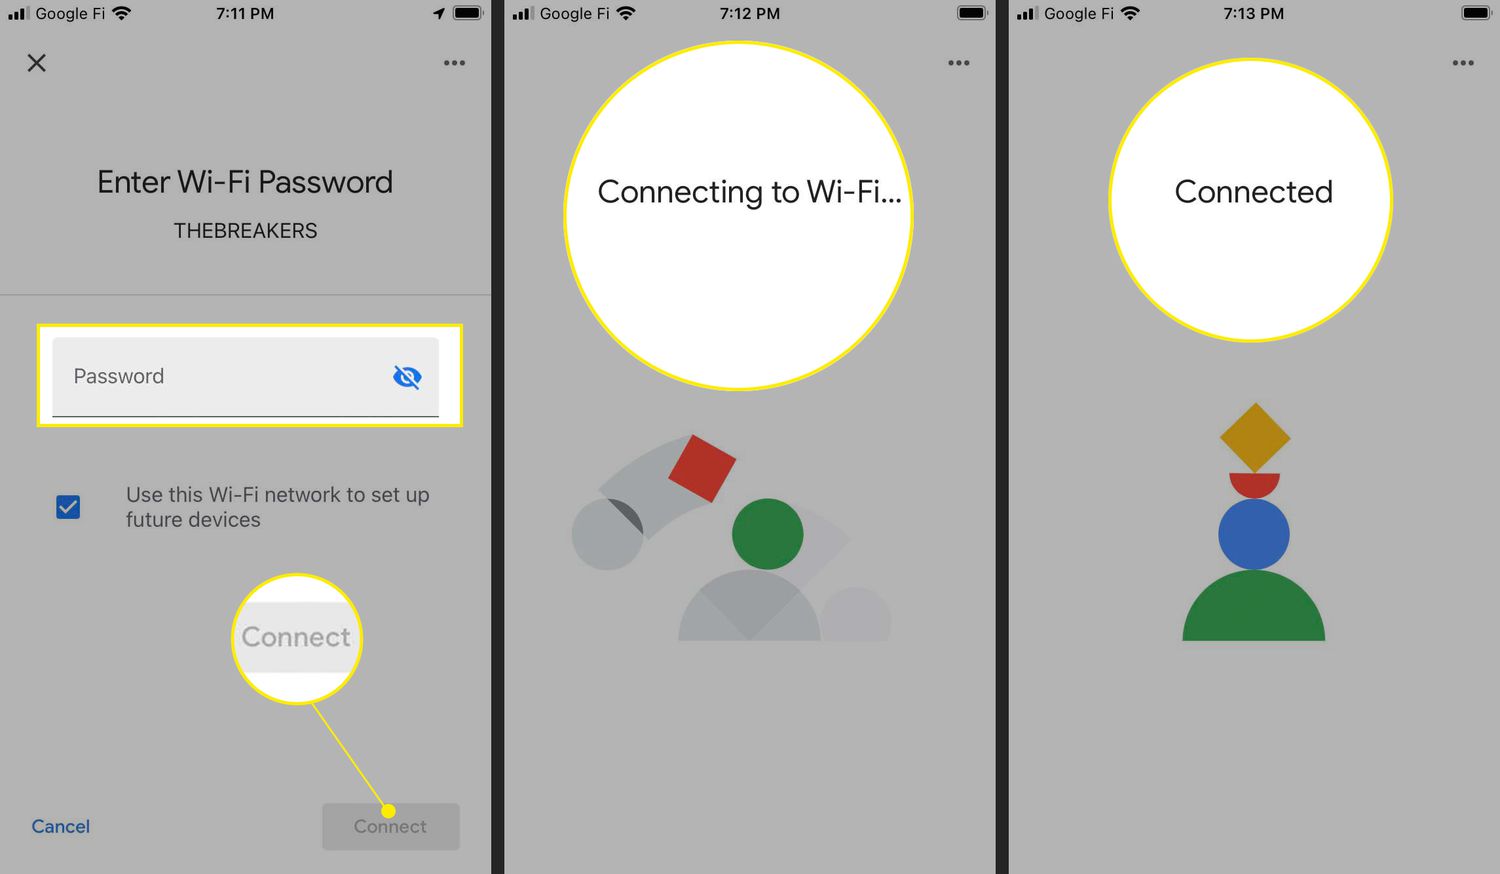
7. Next, you’ll be prompted to choose the Wi-Fi network you want to connect your Chromecast to. Select your new Wi-Fi network from the list.
8. Enter the Wi-Fi network password if prompted. Make sure to type it accurately to avoid any connectivity issues.
9. The app will now connect your Chromecast to the new Wi-Fi network. This process may take a minute or two, so be patient.
10. Once the connection is successful, you’ll see a confirmation message on the app, indicating that your Chromecast is now connected to the new Wi-Fi network.
Congratulations! You’ve successfully connected your Chromecast to the new Wi-Fi network. Now you’re all set to enjoy seamless streaming on your TV.
In case you encounter any issues during the setup process, make sure to double-check that your device and the Chromecast are connected to the same Wi-Fi network, and that you’re following the steps correctly. If problems persist, try resetting both your Chromecast and Wi-Fi router and repeat the setup process.
Step 3: Using the Google Home App to Change Wi-Fi on Chromecast
If you’ve already set up your Chromecast with an existing Wi-Fi network but need to change it, you can easily do so using the Google Home app on your smartphone, tablet, or computer.
Here’s how to change the Wi-Fi on your Chromecast using the Google Home app:
1. Ensure that your device is connected to the same Wi-Fi network as your Chromecast.
2. Launch the Google Home app and sign in to your Google account if necessary.
3. Tap on the “Devices” tab at the bottom of the screen to see a list of your connected devices.
4. Locate the Chromecast you want to change the Wi-Fi for and tap on it to open its settings.
5. Within the device settings, tap on the gear icon or the three-dot menu at the top right corner of the screen to access advanced settings.
6. Scroll down and select “Wi-Fi” or “Wi-Fi settings” to view the current network information.
7. Tap on the current Wi-Fi network name to see the available networks in your area.
8. Select the new Wi-Fi network you want to connect your Chromecast to from the list.
9. If the new Wi-Fi network is password-protected, you’ll be prompted to enter the network password. Carefully type in the password and tap “Connect” or “Save” to continue.
10. The Google Home app will now attempt to connect your Chromecast to the new Wi-Fi network. Wait for a few moments as the connection is established.
11. Once the connection is successful, you’ll see a confirmation message on the app, indicating that your Chromecast is now connected to the new Wi-Fi network.
That’s it! You have successfully changed the Wi-Fi on your Chromecast using the Google Home app. You can now enjoy streaming your favorite content on your TV with the updated network settings.
If you encounter any issues during the process, make sure that your device and the Chromecast are connected to the same Wi-Fi network and follow the steps accurately. Restarting your device and Chromecast, as well as ensuring a stable internet connection, can often resolve any connectivity problems.
Now that you’ve learned how to change the Wi-Fi on your Chromecast using the Google Home app, let’s move on to troubleshooting common issues that may arise during this process.
Step 4: Troubleshooting Common Issues
While changing the Wi-Fi on your Chromecast is usually a straightforward process, you may encounter some common issues along the way. Here are a few troubleshooting tips to help you resolve any problems that may arise:
1. Make sure your device and Chromecast are connected to the same Wi-Fi network. If they’re not, you won’t be able to access the Chromecast settings in the Google Home app. Double-check your Wi-Fi connections and try again.
2. Verify that you’re following the correct steps in the setup process. It’s important to carefully follow the instructions provided in this guide and select the correct options on your device and in the Google Home app.
3. Restart your Chromecast and Wi-Fi router. Sometimes, a simple restart can resolve minor connectivity issues. Disconnect the power from both your Chromecast and Wi-Fi router, wait for a few seconds, and then reconnect the power.
4. Ensure that your Wi-Fi network is functioning properly. Test your Wi-Fi connection by connecting your smartphone or computer to the network and accessing the internet. If there are any issues with your network, contact your internet service provider for assistance.
5. Check the Wi-Fi signal strength. If your Chromecast is too far away from the Wi-Fi router, it may have a weak signal, leading to connectivity problems. Try moving the Chromecast closer to the router or consider using Wi-Fi extenders to improve the signal strength.
6. Reset your Chromecast if necessary. If you’ve encountered persistent issues and have followed all the troubleshooting steps, you may need to reset your Chromecast and start the setup process from scratch. Refer to Step 1 of this guide for instructions on resetting your Chromecast.
If you’re still unable to change the Wi-Fi on your Chromecast or encounter any other difficulties during the process, it’s recommended to check the official Google support page for further troubleshooting steps or contact the Google support team for assistance.
By following these troubleshooting tips, you can overcome common issues and successfully change the Wi-Fi on your Chromecast, ensuring a seamless streaming experience.
Conclusion
Changing the Wi-Fi on your Chromecast is a simple process that allows you to keep enjoying seamless streaming on your TV. By following the steps outlined in this guide, you can reset your Chromecast, connect it to a new Wi-Fi network, and troubleshoot common issues that may arise along the way.
Remember to have the necessary equipment and software handy, such as your Chromecast device, a TV with an available HDMI port, a smartphone or computer with the Google Home app, and access to the new Wi-Fi network.
Start by resetting your Chromecast using the reset button on the device. Once it’s reset, connect it to the new Wi-Fi network using the Google Home app. Make sure your device and the Chromecast are connected to the same Wi-Fi network and follow the steps accurately.
If you encounter any issues during the process, try troubleshooting tips such as restarting your Chromecast and Wi-Fi router, checking your Wi-Fi signal strength, and ensuring your Wi-Fi network is functioning properly.
Remember that in some cases, you may need to contact Google’s support team or refer to their support page for further assistance.
Now that you’re equipped with knowledge on how to change the Wi-Fi on your Chromecast, you can confidently update your network settings and continue enjoying your favorite movies, TV shows, and music seamlessly streamed to your TV.
Happy streaming!