Introduction
When it comes to optimizing your Nvidia graphics card for the best performance and visual experience, understanding how to change the settings is crucial. Whether you’re a gamer looking to enhance your gaming experience or a designer aiming for the most accurate colors, adjusting the graphics card settings can make a significant difference in your computing performance.
The Nvidia Control Panel is a powerful tool that allows you to fine-tune various aspects of your graphics card, such as display settings, resolution, 3D settings, image and video quality, power management, and more. By customizing these settings, you can ensure that your graphics card is working at its optimal level, delivering stunning visuals and smooth gameplay.
In this guide, we will walk you through the step-by-step process of changing Nvidia graphics card settings using the Nvidia Control Panel. Whether you are a seasoned computer enthusiast or new to tweaking graphics card settings, this guide will provide you with all the information you need to make the most out of your Nvidia graphics card.
Before we dive into the settings, it’s important to note that changes made in the Nvidia Control Panel can affect the performance and behavior of your graphics card. It is recommended to make incremental changes and test them to ensure stability and compatibility with your system.
Now, let’s get started on this journey to unlock the full potential of your Nvidia graphics card by exploring the various settings available in the Nvidia Control Panel. Strap in and prepare to elevate your visual experience to new heights!
Step 1: Opening the Nvidia Control Panel
The first step in changing the Nvidia graphics card settings is to open the Nvidia Control Panel. This control panel allows you to access all the necessary settings to customize your graphics card.
To open the Nvidia Control Panel, you can either right-click on your desktop and select “Nvidia Control Panel” from the context menu, or you can locate it in the system tray by clicking on the Nvidia icon and selecting “Open Nvidia Control Panel.”
Once the Nvidia Control Panel is open, you will see a variety of options and settings on the left-hand side. These options are organized into different categories, such as “Display,” “3D Settings,” “Video,” “Manage 3D Settings,” and more. Each category contains specific settings that you can modify to suit your preferences.
It’s important to note that the number and availability of settings may vary depending on your specific graphics card model and driver version. However, the general process of changing the settings remains the same.
Now that we have opened the Nvidia Control Panel, it’s time to move on to the next step and explore the different display settings that can be adjusted.
Step 2: Adjusting Display Settings
Display settings play a crucial role in how your visuals appear on the screen. By adjusting these settings, you can improve image quality, color accuracy, and overall viewing experience on your Nvidia graphics card.
To start adjusting the display settings, navigate to the “Display” category in the Nvidia Control Panel. Here, you will find options to modify various aspects such as resolution, refresh rate, and color settings.
First, let’s talk about resolution. The resolution refers to the number of pixels displayed on your screen. Higher resolutions yield sharper and more detailed visuals, while lower resolutions may result in a larger and more pixelated display. To set the resolution, click on the “Change resolution” option and select the desired resolution from the drop-down menu.
Next, you can adjust the refresh rate. The refresh rate determines how many times the screen refreshes per second. Higher refresh rates, such as 144Hz or 240Hz, offer smoother motion and reduce screen tearing in fast-paced games. To change the refresh rate, select the “Change resolution” option and choose the desired refresh rate from the drop-down menu.
Color settings are also crucial for achieving accurate and vibrant visuals. Under the “Display” category, you will find options to adjust brightness, contrast, gamma, and color depth. Experiment with these settings to find the right balance for your display.
Additionally, if you have multiple displays connected to your Nvidia graphics card, you can configure the settings individually for each display. Simply select the desired display under the “Select display” option in the “Display” category and make the necessary adjustments.
Once you have made the desired changes to the display settings, click on the “Apply” button to save the changes and enjoy the optimized visuals on your Nvidia graphics card.
Now that we have fine-tuned the display settings, let’s move on to the next step and explore how to change the resolution and refresh rate.
Step 3: Changing Resolution and Refresh Rate
Changing the resolution and refresh rate on your Nvidia graphics card can greatly impact the visual clarity and smoothness of your display. By adjusting these settings, you can tailor your viewing experience to your preferences and the capabilities of your monitor.
To change the resolution and refresh rate, navigate to the “Display” category in the Nvidia Control Panel. Here, you will find the “Change resolution” option.
To modify the resolution, click on the “Change resolution” option. You will see a list of available resolutions for your monitor. Select the desired resolution from the drop-down menu. It’s generally recommended to choose the native resolution of your monitor for the best image quality and sharpness. However, you can experiment with different resolutions to find the one that suits your needs and provides a comfortable viewing experience.
Next, let’s discuss the refresh rate. The refresh rate refers to the number of times the image on your screen is updated per second. A higher refresh rate can improve the smoothness of motion in videos and games. To change the refresh rate, click on the “Change resolution” option, and you will find the available refresh rates in the drop-down menu. Select the desired refresh rate that your monitor supports.
Keep in mind that the available resolutions and refresh rates may vary depending on your graphics card and monitor. It’s recommended to refer to your monitor’s specifications to ensure you select settings that are compatible and optimal.
After adjusting the resolution and refresh rate, click on the “Apply” button to apply the changes. Your screen may flicker temporarily as the settings are applied. If the new settings work well for you, confirm the changes by clicking “Yes” in the confirmation dialog box. If the new settings cause any issues, you can wait for the dialog box to automatically revert the changes, or you can manually revert them by clicking “No” in the confirmation dialog box.
Now that you have successfully changed the resolution and refresh rate, let’s proceed to the next step and explore how to modify the 3D settings on your Nvidia graphics card.
Step 4: Modifying 3D Settings
Modifying the 3D settings on your Nvidia graphics card can greatly enhance your gaming experience and optimize the performance of 3D applications. By adjusting these settings, you can fine-tune the graphics and effects to achieve the desired visual quality and performance.
To access the 3D settings, navigate to the “3D Settings” category in the Nvidia Control Panel.
The first tab you will encounter is the “Global Settings” tab, which allows you to modify the 3D settings for all applications. Here, you can adjust options such as image quality, texture filtering, antialiasing, and more. These settings apply globally to all 3D applications, so be cautious when making changes and ensure compatibility with your games or software.
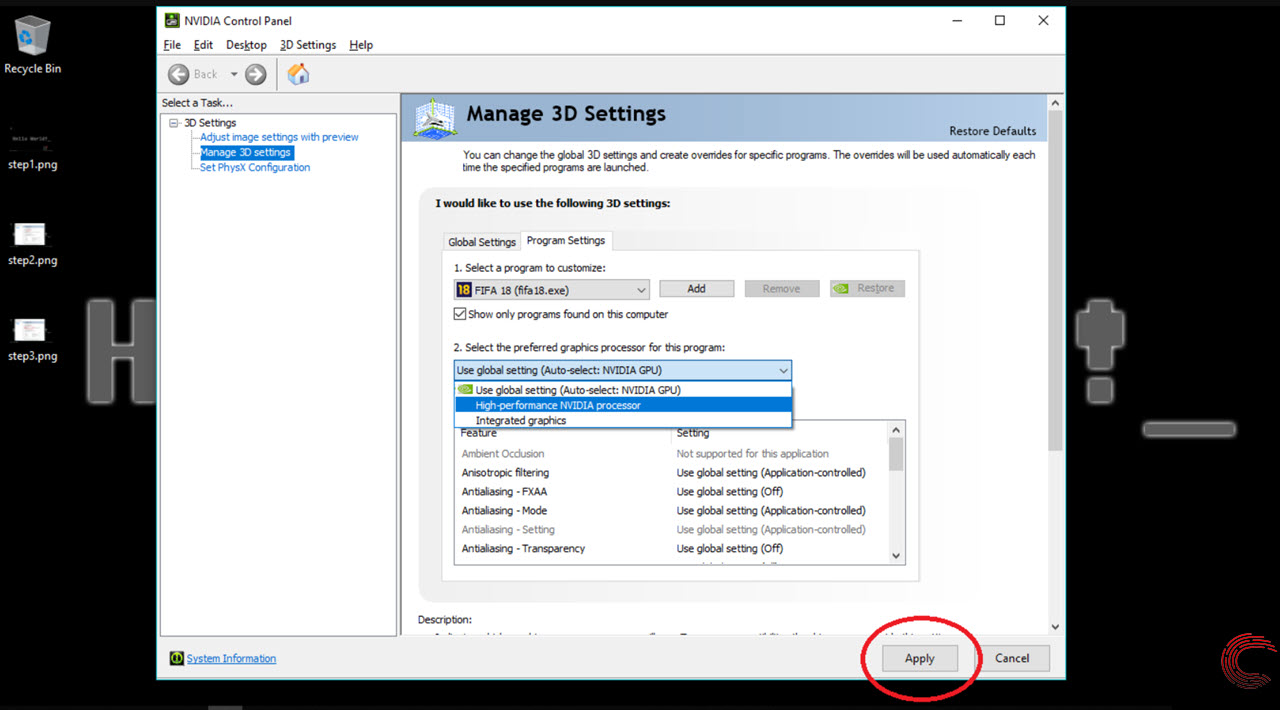
If you want to customize the settings for specific applications, you can use the “Program Settings” tab. This tab allows you to choose individual applications and apply specific 3D settings to optimize their performance. You can select an application by clicking on the “Add” button and navigating to the executable file of the application.
Within the “Program Settings” tab, you can adjust settings like antialiasing, texture filtering, vertical sync, and more. These settings allow you to tailor the 3D performance and visual quality to match the requirements of each application.
It’s recommended to experiment with different settings and observe the impact on performance and visual quality. Some settings may provide better image quality but can be demanding on system resources, while others can improve performance but may sacrifice some visual fidelity. Finding the right balance is key to achieving optimal results.
Once you have made the desired changes to the 3D settings, click on the “Apply” button to save the changes. These settings will take effect immediately in the respective applications.
Now that you have learned how to modify the 3D settings on your Nvidia graphics card, let’s move on to the next step and explore how to optimize image and video quality.
Step 5: Optimizing Image and Video Quality
Optimizing image and video quality is essential for achieving stunning visuals on your Nvidia graphics card. By adjusting various settings, you can enhance the color accuracy, sharpness, and overall appearance of images and videos.
To optimize image and video quality, navigate to the “Video” category in the Nvidia Control Panel.
Within the “Video” category, you will find several options to customize the image and video settings. One important setting is the “Dynamic Range” option, which determines the range of colors and contrast displayed on your screen. You can choose between full range (0-255) and limited range (16-235), depending on your display’s capabilities and the content you are viewing.
Color settings are another crucial aspect of image and video quality. Under the “Adjust video color settings” option, you can adjust settings such as brightness, contrast, hue, and saturation. Experiment with these settings to achieve the desired balance and enhance the visual characteristics of your content.
Additionally, the “Deinterlacing” option allows you to improve the quality of interlaced video content by reducing flickering and enhancing the overall smoothness of movement.
For advanced users, the “Video playback control” option provides additional settings to customize the video playback experience. Here, you can enable features like “SmartSharpen” to enhance image sharpness, “Noise Reduction” to reduce unwanted visual artifacts, and “Edge Enhancement” to improve edge definition in videos.
Remember to apply the changes by clicking on the “Apply” button. You can also preview the changes using the “Preview” button to evaluate the impact of the modifications before finalizing them.
Now that you have optimized image and video quality on your Nvidia graphics card, let’s move on to the next step and explore how to configure power management settings.
Step 6: Configuring Power Management
Configuring power management settings is crucial to balance performance and energy efficiency on your Nvidia graphics card. By adjusting these settings, you can optimize the power consumption of your graphics card based on your usage requirements.
To configure power management settings, navigate to the “Manage 3D Settings” category in the Nvidia Control Panel.
Within the “Manage 3D Settings” category, you will find the “Power management mode” option. This option allows you to choose between two modes: “Adaptive” and “Prefer maximum performance.”
The “Adaptive” power management mode is recommended for most users, as it dynamically adjusts the power consumption of your graphics card based on the workload. This mode can provide a balance between performance and power efficiency, ensuring that your graphics card delivers optimal performance when needed without consuming excessive power during idle or less demanding tasks.
On the other hand, the “Prefer maximum performance” power management mode keeps the graphics card running at maximum performance at all times. While this mode ensures consistent high performance, it may consume more power and generate more heat. It is suitable for users who prioritize maximum performance over energy efficiency.
Choose the power management mode that aligns with your specific needs and use case. Once you have made the selection, click on the “Apply” button to save the changes.
It’s important to note that power management settings can vary depending on your graphics card model and driver version. Some newer graphics cards may offer additional power management options, such as “Optimal Power,” which further optimizes power consumption based on usage patterns.
By configuring power management settings, you can ensure that your Nvidia graphics card operates efficiently and delivers the desired performance while minimizing unnecessary power consumption.
Now that you have configured the power management settings, let’s move on to the next step and explore how to adjust multiple displays on your Nvidia graphics card.
Step 7: Adjusting Multiple Displays
If you have multiple displays connected to your Nvidia graphics card, adjusting the settings for each display independently can enhance your productivity and improve your multitasking experience. With Nvidia graphics cards, you can easily configure multiple displays to suit your preferences.
To adjust multiple displays, navigate to the “Display” category in the Nvidia Control Panel.
Under the “Display” category, you will find options to customize the settings for each connected display individually. Select the desired display from the “Select display” drop-down menu to modify its settings.
There are several adjustments you can make for each display, such as resolution, refresh rate, and orientation. You can also set one display as the primary display, which will be the main screen to show your desktop icons and taskbar.
Furthermore, you can arrange the displays in a specific order to match their physical placement. Simply click and drag the display icons in the “Arrange displays” section to arrange them accordingly. This ensures that your mouse movements and window transitions are seamless across the multiple displays.
If you use multiple displays for gaming or other applications that benefit from a wider field of view, you can enable Nvidia Surround, a feature that merges multiple displays to create an ultra-wide gaming or working space. Nvidia Surround is particularly useful for immersive gaming experiences or working on large-scale projects.
Once you have made the necessary adjustments to each display, click on the “Apply” button to apply the changes. There might be a brief screen flicker as the settings are applied.
With the ability to adjust multiple displays, you can create a personalized and efficient workspace that suits your workflow and enhances your productivity.
Now that you have learned how to adjust multiple displays on your Nvidia graphics card, let’s move on to the next step and explore how to customize desktop color settings.
Step 8: Customizing Desktop Color Settings
Customizing the desktop color settings on your Nvidia graphics card allows you to adjust the color accuracy and vibrancy of your display, ensuring that your visuals are visually appealing and true to life. With the Nvidia Control Panel, you have the flexibility to fine-tune the color settings to suit your preferences.
To customize the desktop color settings, navigate to the “Adjust desktop color settings” option in the Nvidia Control Panel.
Within the “Adjust desktop color settings” section, you will find various options to customize the color settings. These settings include gamma, brightness, contrast, and digital vibrance.
Gamma refers to the brightness and contrast of different shades of colors displayed on your screen. Adjusting the gamma can help enhance image clarity and contrast. You can use the gamma slider to increase or decrease the intensity of the shade gradation.
Brightness determines the overall lightness or darkness of the display. By modifying the brightness setting, you can either increase or decrease the overall luminosity of the screen. Adjust this setting based on your environmental lighting conditions and personal preferences.
Contrast, on the other hand, determines the difference between the lightest and darkest shades of colors displayed on your screen. Increasing the contrast can improve the image’s depth and make colors appear more vibrant and distinct.
Digital vibrance is a setting that allows you to intensify the colors on your screen. It enhances the saturation of colors, making them appear more vivid. Adjust this setting according to your preference, but be cautious not to over-saturate the colors, as it may result in an unnatural display.
As you modify the color settings, you can use the “Apply” button to preview the changes before saving them. This allows you to fine-tune the settings until you achieve the desired color balance.
Remember that individual preferences for color settings differ, and environmental lighting conditions may also impact how colors appear on your screen. Experiment with different settings to find the optimal balance that suits your needs and provides an enjoyable visual experience.
Now that you have customized the desktop color settings on your Nvidia graphics card, let’s move on to the final step and explore how to manage surround, PhysX, and Virtual Reality settings.
Step 9: Managing Surround, PhysX, and Virtual Reality
Managing surround, PhysX, and virtual reality settings on your Nvidia graphics card is crucial for creating immersive gaming experiences and optimizing performance in certain applications. The Nvidia Control Panel provides options to configure these settings based on your specific requirements and hardware capabilities.
To manage surround, PhysX, and virtual reality settings, navigate to the “Manage 3D Settings” category in the Nvidia Control Panel.
Under the “Manage 3D Settings” category, you will find options like “Set up surround, PhysX,” and “Manage virtual reality.” These settings are specific to advanced display configurations and virtual reality experiences. Let’s take a closer look at each of them:
1. Surround: Surround is a feature that allows you to connect multiple monitors and create a single ultra-wide display for an immersive gaming or working environment. To set up surround, click on the “Set up surround” option. Follow the on-screen instructions to configure your multi-monitor setup. Note that not all graphics cards and monitors support Surround, so ensure compatibility before enabling this feature.
2. PhysX: PhysX is a physics engine that enhances the realism of in-game physics simulations. By utilizing the processing power of your Nvidia graphics card, PhysX can deliver more accurate and interactive physics effects in supported games. Under the “PhysX settings” option, you can choose whether to let the Nvidia graphics card handle the physics processing or to use the CPU for PhysX calculations.
3. Virtual Reality: Virtual reality (VR) settings enable you to optimize your Nvidia graphics card for smooth and immersive VR experiences. Under the “Manage virtual reality” option, you can adjust settings like GPU performance, resolution, and frame rate to ensure optimal performance and visual quality in VR applications.
Each of these settings requires careful consideration of your hardware capabilities and the software you intend to use. Refer to the specific requirements and recommendations for each feature to achieve the best possible performance and experience.
Once you have made the necessary adjustments to the surround, PhysX, and virtual reality settings, click on the “Apply” button to save the changes. These settings will help you create immersive and realistic gaming experiences or optimize your graphics card for virtual reality applications.
Congratulations! You have successfully managed the surround, PhysX, and virtual reality settings on your Nvidia graphics card.
With the completion of this final step, you have explored the various settings and options available in the Nvidia Control Panel, allowing you to unleash the full potential of your Nvidia graphics card and customize it to suit your specific needs and preferences.
Make sure to periodically check for driver updates from Nvidia to ensure you have the latest features and improvements for your graphics card. Enjoy the enhanced visual experience and improved performance that comes with adjusting the settings on your Nvidia graphics card!
Conclusion
Congratulations on mastering the art of changing Nvidia graphics card settings! By exploring the Nvidia Control Panel and adjusting various options, you have unlocked the potential to achieve the best performance and visual experience on your graphics card.
In this guide, we covered the step-by-step process of opening the Nvidia Control Panel, adjusting display settings, changing resolution and refresh rates, modifying 3D settings, optimizing image and video quality, configuring power management, adjusting multiple displays, customizing desktop color settings, and managing surround, PhysX, and virtual reality settings.
Each of these steps empowers you to fine-tune your Nvidia graphics card based on your specific requirements, whether you’re a gamer seeking smooth gameplay and stunning visuals or a professional aiming for accurate color representation and performance optimization.
Remember to carefully assess the impact of each setting and make incremental changes to ensure system stability and compatibility. Take the time to experiment with different options to find the perfect balance that suits your preferences and enhances your overall computing experience.
Additionally, keep in mind that graphics card settings can vary depending on your specific hardware configuration and driver version. Always refer to your graphics card’s documentation and the Nvidia website for the most up-to-date information and recommendations.
With your newfound knowledge and familiarity with the Nvidia Control Panel, you have the tools to unleash the full potential of your Nvidia graphics card. So go ahead, dive into the Control Panel, and explore the settings to create the ultimate visual experience!
Happy tweaking!