Why switch to Nvidia graphics card?
When it comes to upgrading your graphics card, Nvidia is a brand that stands out among the competition. Known for their cutting-edge technology and superior performance, Nvidia graphics cards offer several advantages that make them a top choice for gamers, graphic designers, and video editors. In this section, we will explore some of the key reasons why you should consider making the switch to an Nvidia graphics card.
1. Unmatched Performance: Nvidia graphics cards are renowned for their exceptional performance capabilities. Whether you are a hardcore gamer or a professional video editor, an Nvidia card can handle demanding tasks seamlessly, providing smooth gameplay and rendering high-resolution graphics without lag or stuttering.
2. Advanced Graphics Technologies: Nvidia constantly pushes the boundaries of graphics technology, introducing features such as ray tracing, DLSS (Deep Learning Super Sampling), and AI-powered image enhancement. These cutting-edge technologies enhance the visual quality, realism, and immersion in games and graphics-intensive applications.
3. Extensive Software Support: Nvidia works closely with game developers and software companies to optimize their drivers and ensure compatibility with the latest games and applications. This means that you can take full advantage of the visual effects and performance enhancements offered by new releases without any compatibility issues.
4. Broad Range of Models: Nvidia offers a wide range of graphics card models to suit different budgets and requirements. Whether you are a casual gamer or a professional creating 3D animations, you can find an Nvidia card that fits your needs and delivers the performance you desire.
5. Improved Power Efficiency: Nvidia graphics cards are known for their energy efficiency, allowing you to enjoy high-performance gaming or graphics-intensive tasks without consuming excessive power. This not only helps reduce your electricity bills but also contributes to a greener and more sustainable environment.
6. Reliable Driver Support: Nvidia provides regular driver updates to ensure compatibility with new games, fix bugs or performance issues, and introduce new features. Their robust driver support ensures that your graphics card remains up-to-date and optimized for the best performance.
Switching to an Nvidia graphics card can significantly elevate your gaming and graphic design experiences. The combination of exceptional performance, advanced graphics technologies, extensive software support, and a broad range of models makes Nvidia the go-to choice for gamers and professionals alike.
Now that you understand the benefits of switching to an Nvidia graphics card, let’s move on to the next steps in the process – checking compatibility and requirements.
Check compatibility and requirements
Before making the switch to an Nvidia graphics card, it is essential to check the compatibility and requirements to ensure a smooth installation process. Here are the key steps to follow:
1. Check your system specifications: Start by checking your computer’s specifications to determine if it meets the requirements for the Nvidia graphics card you plan to install. Look for factors such as the available PCIe slot, power supply wattage, and physical space inside your computer case.
2. Determine the compatibility: Visit Nvidia’s official website or consult the documentation that comes with the Nvidia graphics card to verify its compatibility with your operating system. Ensure that your operating system version is supported, and any necessary drivers or software updates are available.
3. Review power requirements: Nvidia graphics cards often require a specific power supply capacity to function optimally. Check the minimum power supply wattage recommended by Nvidia and ensure that your power supply unit meets or exceeds that requirement. If necessary, upgrade your power supply unit.
4. Consider the physical dimensions: Nvidia graphics cards come in various sizes, from compact to longer models. Measure the available space inside your computer case to ensure that the card will fit without any clearance or interference issues with other components.
5. Check cooling and airflow: Nvidia graphics cards can generate heat during intense usage, so it’s important to ensure that your computer case has adequate cooling and airflow. Ensure that your case has sufficient fans or cooling mechanisms to prevent overheating and maintain optimal performance.
6. Research additional requirements: Some Nvidia graphics cards may have additional requirements, such as specific ports or connectors, to support certain features or connectivity options. Review the specifications of the card you are considering and ensure that your system can accommodate these requirements.
7. Take note of any compatibility issues: Research online forums or Nvidia support resources to check if there are any reported compatibility issues with your specific hardware or software configuration. If any potential limitations or conflicts arise, consider alternative solutions or seek assistance from Nvidia’s customer support.
By thoroughly checking the compatibility and requirements before switching to an Nvidia graphics card, you can avoid potential installation or performance issues. Ensuring that your system meets the necessary specifications will help guarantee a successful upgrade and allow you to enjoy the full benefits of your new Nvidia card.
Once you have verified compatibility, it’s time to proceed to the next step – backing up your data.
Backup your data
Before making any major hardware changes on your computer, such as installing an Nvidia graphics card, it is crucial to back up your data to avoid the risk of losing important files. Follow these steps to ensure that your data is safely backed up:
1. Identify important files: Determine which files are critical to your work or personal data. This may include documents, photos, videos, game saves, or any other files that you cannot afford to lose.
2. Choose a backup method: Select a backup method that suits your needs. You can use external storage devices such as external hard drives or USB flash drives, or leverage cloud-based backup services like Dropbox, Google Drive, or OneDrive.
3. Organize and clean up: Take the time to organize your files and delete any unnecessary data. This will not only make the backup process more manageable but also ensure that you are only backing up the essential files.
4. Perform the backup: Begin the backup process by transferring your important files to the chosen backup location. If you are using an external storage device, connect it to your computer and copy the files. If you are using a cloud-based service, follow the instructions provided by the service to upload your files.
5. Verify the backup: Double-check that your files have been successfully transferred to the backup location and that they are accessible. Test a few files to ensure they open properly and are not corrupted.
6. Create a backup schedule: It’s a good practice to establish a regular backup schedule. This ensures that any new files or changes made to existing files are backed up promptly, minimizing the risk of data loss in the future.
7. Store backups securely: Store your backups in a secure location, whether it be a physical external drive kept in a safe place or using strong passwords and encryption for cloud-based storage. This will protect your data from unauthorized access or accidental loss.
By backing up your data before installing your new Nvidia graphics card, you can have peace of mind knowing that your important files are safe and can be easily restored if needed. Take the time to complete this essential step before moving on to the next phase – uninstalling your current graphics card drivers.
Uninstall current graphics card drivers
Before installing your new Nvidia graphics card, it is crucial to uninstall the drivers associated with your current graphics card. This ensures a clean installation and prevents any conflicts or compatibility issues. Follow these steps to uninstall the current graphics card drivers:
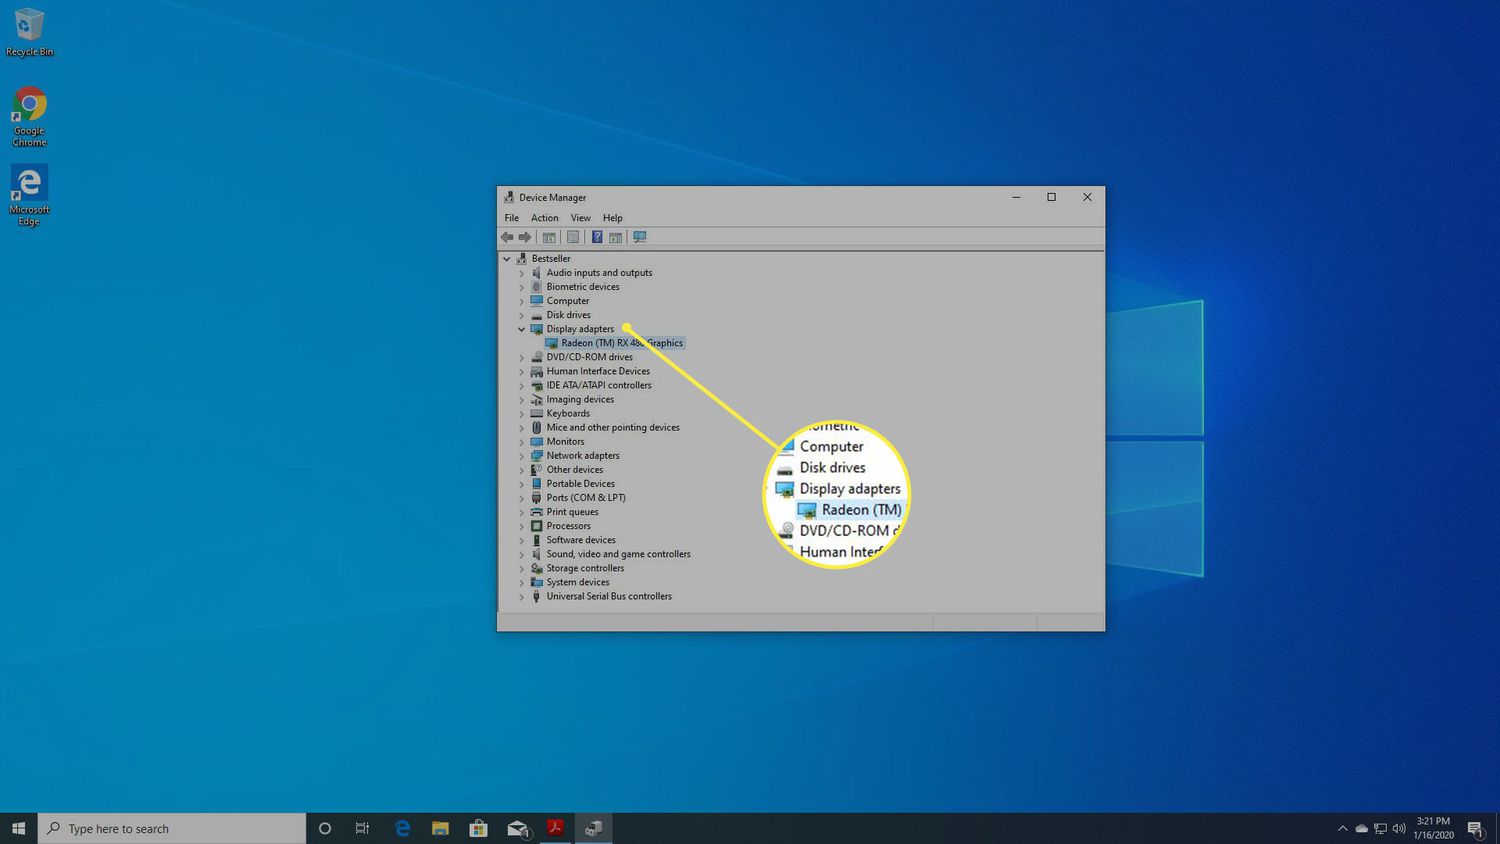
1. Open Device Manager: Right-click on the Windows Start button and select “Device Manager” from the menu. Alternatively, you can search for “Device Manager” in the Windows search bar.
2. Expand Display Adapters: In the Device Manager, locate the “Display Adapters” category and click on the arrow next to it to expand the list of display devices installed on your system.
3. Identify your current graphics card: Locate your current graphics card from the list. It will be labeled with the name of the manufacturer and model.
4. Uninstall the drivers: Right-click on your current graphics card and select “Uninstall device” from the context menu. A confirmation window may appear asking you to confirm the uninstallation. Choose “Delete the driver software for this device” if prompted.
5. Follow the uninstallation wizard: Follow the prompts provided by the uninstallation wizard to complete the removal of the old graphics card drivers from your system. The process may take a few moments.
6. Restart your computer: Once the uninstallation process is complete, restart your computer to ensure that all remnants of the old drivers are removed from the system.
7. Verify driver removal: After restarting, open Device Manager again and navigate to the “Display Adapters” category. Ensure that your old graphics card is no longer listed. If it is still present, right-click on it and select “Uninstall device” again to remove any remaining traces of the drivers.
By uninstalling the current graphics card drivers, you prepare your system for the smooth installation of your new Nvidia graphics card. Removing the old drivers ensures that there are no conflicts with the new drivers and allows for optimal performance. Now that you have successfully uninstalled the drivers, the next step is to physically install your new Nvidia graphics card.
Physically install the Nvidia graphics card
Now that you have uninstalled the drivers for your old graphics card, it’s time to physically install your new Nvidia graphics card. Follow these steps to ensure a successful installation:
1. Power off your computer: Shut down your computer and unplug the power cable. This will prevent any electrical accidents and ensure your safety during the installation process.
2. Open your computer case: Remove the side panel of your computer case. This will give you access to the internal components of your computer. Refer to your computer’s user manual if you’re unsure how to open the case.
3. Locate the PCIe slot: Identify the PCIe slot on your motherboard. This is where the Nvidia graphics card will be installed. PCIe slots are typically longer and located towards the bottom of the motherboard.
4. Remove the slot cover: Remove the metal slot cover corresponding to the PCIe slot you will be using. Unscrew any screws holding the cover in place and set it aside. This will create an opening for the graphics card to be inserted.
5. Handle the graphics card with care: Remove the Nvidia graphics card from its packaging. Hold it by the edges to avoid touching the sensitive components. Avoid bending or placing excessive pressure on the card.
6. Insert the graphics card: Align the gold contacts on the bottom of the graphics card with the PCIe slot. Gently insert the card into the slot and press down firmly until it is securely seated. It should fit snugly and evenly into the slot.
7. Secure the graphics card: Once the graphics card is inserted, use a screw or latch on the PCIe slot to secure it in place. This will prevent any accidental disconnection or movement of the card.
8. Close your computer case: Put the side panel back on your computer case and secure it with the appropriate screws. Ensure that the panel is firmly in place to avoid any loose connections.
9. Reconnect cables and power on: Reconnect any cables you disconnected earlier, including the power cable. Power on your computer and wait for it to start up. The operating system should automatically detect the new Nvidia graphics card.
By following these steps, you have successfully physically installed your new Nvidia graphics card. Now it is time to proceed to the next section, which involves downloading and installing the latest Nvidia drivers.
Download and install the latest Nvidia drivers
After physically installing your new Nvidia graphics card, the next step is to download and install the latest drivers to ensure optimal performance and compatibility. Follow these steps to download and install the latest Nvidia drivers:
1. Open your web browser: Launch your preferred web browser and navigate to Nvidia’s official website (www.nvidia.com).
2. Locate the drivers section: Once on Nvidia’s website, navigate to the “Drivers” or “Support” section. Look for a tab or link specifically labeled for downloading drivers.
3. Specify your graphics card details: Select your Nvidia graphics card model and the operating system you are using. This will help ensure that you download the correct drivers for your specific hardware and software configuration.
4. Download the drivers: Click on the “Download” button to start the download process. The Nvidia website may ask you to agree to their terms and conditions before initiating the download.
5. Run the driver installation file: Once the download is complete, locate the driver installation file in your computer’s downloads folder or the location where you saved it. Double-click on the file to run the installation process.
6. Follow the installation wizard: The Nvidia driver installation will launch an installation wizard. Follow the prompts provided by the wizard to install the drivers. Make sure to read any additional information or options presented during the installation process.
7. Customize driver installation options: During the installation, you may have the option to choose additional components or settings. Customize these settings according to your preferences or leave them at their default values if you are unsure.
8. Complete the installation: Once the installation is complete, restart your computer to ensure that the new Nvidia drivers are fully integrated into the system. This will allow the graphics card to function optimally.
9. Verify driver installation: After restarting, check Device Manager to ensure that the Nvidia graphics card is recognized and the drivers are installed correctly. Verify that the card is listed under the “Display Adapters” category without any warning symbols.
By downloading and installing the latest Nvidia drivers, you ensure that your graphics card is up to date and ready to deliver optimal performance. Now that the driver installation is complete, it’s time to move on to configuring the settings for your Nvidia graphics card.
Configure Nvidia graphics card settings
After installing the latest Nvidia drivers, it is important to configure the settings of your Nvidia graphics card to optimize performance and customize your visual experience. Here are the key steps to follow:
1. Open Nvidia Control Panel: Right-click on your desktop and select “Nvidia Control Panel” from the context menu. This will open the Nvidia Control Panel, which allows you to adjust various settings.
2. Adjust 3D settings: In the Nvidia Control Panel, navigate to the “3D Settings” section. Here, you can fine-tune the visual quality and performance of your graphics card by adjusting settings such as antialiasing, texture filtering, and vertical sync.
3. Customize display settings: Navigate to the “Display” section in the Nvidia Control Panel. Here, you can adjust settings like resolution, refresh rate, and color depth. Customize these settings according to your preferences and the capabilities of your monitor.
4. Optimize game settings: If you are a gamer, you can optimize the settings for specific games through the “Manage 3D settings” option in the Nvidia Control Panel. This allows you to enhance the graphics quality and performance for individual game titles.
5. Enable or disable features: Nvidia graphics cards often come with additional features such as ray tracing, DLSS, or image sharpening. Depending on the capabilities of your graphics card, you can enable or disable these features in the Nvidia Control Panel.
6. Manage multiple displays: If you have multiple displays connected to your Nvidia graphics card, you can configure the settings for each display in the “Set up multiple displays” section. Adjust resolutions, orientation, and other display settings according to your preferences.
7. Update drivers and software: Regularly check for driver and software updates through the Nvidia Control Panel. Keeping your drivers up to date ensures that you have access to the latest features, bug fixes, and performance improvements.
8. Save and apply settings: After configuring the desired settings, click on the “Apply” button in the Nvidia Control Panel to save and apply the changes. This ensures that your custom settings are utilized by your Nvidia graphics card.
By configuring the settings of your Nvidia graphics card, you can enhance the visual quality, performance, and overall experience of your computer. Take the time to explore the various options in the Nvidia Control Panel and customize them to meet your specific needs and preferences.
Now that you have successfully configured the settings of your Nvidia graphics card, it’s time to move on to the next step – testing and optimizing its performance.
Test and optimize performance
Once you have configured the settings of your Nvidia graphics card, it is important to test and optimize its performance to ensure smooth and seamless operation. Follow these steps to test and optimize your Nvidia graphics card:
1. Benchmark your system: Run benchmarking software, such as 3DMark or Unigine Heaven, to test the performance of your Nvidia graphics card. These programs simulate demanding graphics scenarios and provide scores that can help you assess the performance of your system.
2. Monitor temperatures: Use monitoring software, such as MSI Afterburner or HWMonitor, to keep an eye on the temperatures of your Nvidia graphics card. High temperatures can affect performance and stability. Ensure that the temperatures stay within acceptable limits during gaming or graphics-intensive tasks.
3. Adjust fan speeds: If you notice that your Nvidia graphics card is running hot, consider adjusting the fan speeds using overclocking software like MSI Afterburner. Increasing fan speeds can help dissipate heat more effectively and keep the card running at optimal temperatures.
4. Overclock (optional): If you are comfortable with advanced configurations, you can explore overclocking your Nvidia graphics card using software like MSI Afterburner. Overclocking can enhance performance, but it also increases heat output, so ensure that you monitor temperatures and stability closely.
5. Optimize in-game graphics settings: Adjust the graphics settings within your games to achieve the right balance between visual quality and performance. Each game may have different graphics settings, so experiment and find the optimal balance that suits your preferences and hardware capabilities.
6. Update drivers regularly: Nvidia releases driver updates periodically to enhance performance, fix bugs, and optimize compatibility with new game releases. It is essential to keep your Nvidia drivers up to date to ensure the best performance and compatibility with the latest software.
7. Stay updated with Nvidia software: Aside from drivers, Nvidia provides additional software utilities that can enhance your experience. Check for updates to software like GeForce Experience, which can optimize game settings automatically and provide a more user-friendly experience.
8. Perform regular maintenance: Clean your Nvidia graphics card and your computer’s internal components regularly to prevent dust buildup, which can impair cooling and performance over time. Use compressed air or specialized cleaning tools to remove dust from the fans, heatsinks, and other components.
By testing and optimizing the performance of your Nvidia graphics card, you can ensure that you are getting the best possible experience from your hardware. Regular monitoring, adjustments, and maintenance will help keep your graphics card running smoothly and efficiently.
Now that you have tested and optimized the performance of your Nvidia graphics card, you are ready to enjoy your enhanced gaming, graphics, or video editing experiences. In the next section, we will address common troubleshooting issues you may encounter during this process.
Troubleshooting common issues
While installing and using your Nvidia graphics card, you may encounter some common issues. Here are a few troubleshooting tips to help resolve these issues:
1. Driver installation errors: If you experience issues during the installation of Nvidia drivers, try performing a clean installation. Completely uninstall the existing drivers using a tool like Display Driver Uninstaller (DDU), then download and install the drivers again.
2. Display issues: If you encounter issues with your display, such as flickering or distorted images, first make sure that your cables are properly connected. If the problem persists, try changing the display cable or using a different port on your graphics card.
3. Performance issues: If you notice a drop in performance or frame rate, ensure that your graphics card is not overheating. Clean the graphics card and ensure that the fans are functioning properly. You can also check if there are any background processes or applications consuming excessive system resources.
4. Compatibility issues: Some games or applications may have compatibility issues with certain Nvidia drivers. Check for any game-specific updates or patches, and ensure that you are using the latest drivers recommended for your hardware and software.
5. Error codes and crashes: If you encounter error codes or frequent crashes, try updating your drivers to the latest version. Additionally, check for any available Windows updates, as they may address compatibility issues that can cause errors and crashes.
6. Power supply issues: If you experience system instability or unexpected shutdowns, it may be due to an insufficient power supply. Ensure that your power supply unit meets the minimum requirements of your Nvidia graphics card. Consider upgrading your power supply if necessary.
7. Conflicting software: Some software applications, such as antivirus programs or third-party utilities, can interfere with Nvidia drivers. Temporarily disable or uninstall any such software and test if the issue persists. If necessary, consult the software’s documentation or contact their support for further assistance.
8. Driver rollback: If you encounter issues after updating your Nvidia drivers, you can try rolling back to a previous version. Use the device manager to uninstall the current drivers and install an older version that was known to work well with your system.
If you continue to experience issues with your Nvidia graphics card, consider seeking help from Nvidia’s customer support or consulting user forums, where you can find solutions and guidance from other users who may have encountered similar issues.
Remember to always make sure you have backups of your important files and create system restore points before making significant changes to your system to easily revert back if needed.
With these troubleshooting tips, you should be able to resolve common issues and enjoy a smoother experience with your Nvidia graphics card.
Conclusion
Congratulations on successfully switching to an Nvidia graphics card! By following the steps outlined in this guide, you have taken the necessary actions to ensure a smooth transition and optimize the performance of your graphics card.
Switching to an Nvidia graphics card offers numerous benefits, including unmatched performance, advanced graphics technologies, extensive software support, a broad range of models, improved power efficiency, and reliable driver support. These features make Nvidia a popular choice among gamers, graphic designers, and video editors.
Throughout the process, you have learned how to check compatibility and system requirements, back up your data, uninstall the current graphics card drivers, physically install the Nvidia graphics card, download and install the latest Nvidia drivers, configure the graphics card settings, test and optimize performance, and troubleshoot common issues.
Remember to keep your Nvidia drivers and software up to date, regularly test and optimize your graphics card’s performance, and troubleshoot any issues that may arise. Proper maintenance and monitoring are key to ensuring that your Nvidia graphics card continues to deliver the best visuals and performance for your gaming or professional needs.
If you encounter any specific issues or have additional questions, don’t hesitate to reach out to Nvidia’s customer support or refer to their official documentation and online resources for further assistance. Additionally, user forums can be a valuable source of information and community-based solutions for troubleshooting.
Enjoy your enhanced gaming or graphics experience with your Nvidia graphics card, and may it bring you countless hours of immersive and visually stunning adventures!