Introduction
Changing the keyboard language on your Mac can be incredibly useful, especially if you frequently switch between multiple languages or work on projects that require different language inputs. Whether you need to type in English, Spanish, French, or any other language, Mac provides a simple and straightforward method for changing the keyboard language.
In this step-by-step guide, we will walk you through the process of changing the keyboard language on your Mac. Whether you are using a MacBook, iMac, or Mac mini, the process remains consistent across all Mac devices.
By adjusting the keyboard language settings, you can ensure that your typing experience matches the language you want to use. This is beneficial not only for multilingual individuals but also for those who are learning a new language. With just a few clicks, you can switch between different keyboard layouts and seamlessly communicate in the language of your choice.
So, whether you need to switch to a different language or you want to explore the available keyboard layouts, let’s dive into the detailed steps required to change the keyboard language on your Mac.
Step 1: Opening System Preferences
The first step in changing the keyboard language on your Mac is to open the System Preferences. System Preferences is where all the settings for your Mac are located, allowing you to customize various aspects of your device.
To open System Preferences, you have a couple of different options. The easiest way is to click on the Apple menu icon in the top-left corner of your screen and select “System Preferences” from the dropdown menu.
Alternatively, you can also access System Preferences by clicking on the “System Preferences” icon located in your Dock, which is the row of icons at the bottom of your screen.
Once you have opened System Preferences, a window will appear with various icons representing different settings and preferences. These icons are categorized into different sections such as “Personal,” “Hardware,” and “Internet & Wireless.”
Now that you have successfully opened System Preferences, you are one step closer to changing the keyboard language on your Mac. In the next step, we will navigate to the “Keyboard” settings within System Preferences to continue with the process.
Step 2: Selecting the “Keyboard” Option
Once you have accessed the System Preferences window on your Mac, it’s time to locate and select the “Keyboard” option. The “Keyboard” settings allow you to customize various keyboard-related preferences, including the keyboard language.
To find the “Keyboard” option, look for the keyboard icon within the System Preferences window. It is typically represented by a white keyboard on a blue background.
You can either scroll through the list of icons to find the “Keyboard” option, or you can use the search bar located at the top right corner of the System Preferences window. Simply type “Keyboard” into the search bar, and the system will automatically filter the options to display the relevant settings.
Once you have located the “Keyboard” option, click on it to proceed to the next step.
The “Keyboard” settings window will now open, displaying several tabs at the top. These tabs include “Keyboard,” “Text,” “Shortcuts,” “Input Sources,” and “Dictation.” For changing the keyboard language, we will be focusing on the “Input Sources” tab.
By selecting the “Keyboard” option, you have successfully reached the appropriate settings page to proceed with changing the keyboard language on your Mac. In the next step, we will explore the “Input Sources” tab and its functionalities.
Step 3: Clicking on the “Input Sources” tab
After selecting the “Keyboard” option in the System Preferences window, you will be presented with several tabs at the top of the “Keyboard” settings page. In this step, we will focus on the “Input Sources” tab, as it is where you can add and manage different keyboard languages on your Mac.
To access the “Input Sources” tab, simply click on it, and the page will display a list of available keyboard languages that are currently installed on your Mac. Here, you will also find options to add or remove keyboard languages based on your preferences.
Upon clicking on the “Input Sources” tab, you will be presented with a list of keyboard languages in the left-hand sidebar. These languages are organized in alphabetical order, making it easy to locate and select the desired keyboard language.
Additionally, you will find checkboxes next to each language in the sidebar. These checkboxes indicate the currently active keyboard languages on your Mac. If a checkbox is ticked, it means that the keyboard language is enabled and available for use.
To proceed with changing the keyboard language or adding a new one, simply click on the checkbox next to the desired language. The checkbox will be ticked, indicating that the language is selected and ready to be used.
You may also notice that some keyboard languages have sub-options, such as variations for different country-specific keyboard layouts. These sub-options allow you to further customize the keyboard language settings based on your specific needs and preferences.
By clicking on the “Input Sources” tab, you have successfully navigated to the section where you can manage and select different keyboard languages on your Mac. In the next step, we will explore the process of adding a new keyboard language to your Mac.
Step 4: Adding a New Keyboard Language
If you want to add a new keyboard language to your Mac, the “Input Sources” tab in the “Keyboard” settings is where you can easily accomplish this. Adding a new keyboard language allows you to expand your language options and switch between different layouts as per your preference.
To add a new keyboard language, start by accessing the “Input Sources” tab in the “Keyboard” settings. Here, you will see a list of currently installed keyboard languages in the left-hand sidebar.
At the bottom left corner of the “Input Sources” tab, you will find a “+”, or “Add” button. Click on this button to open a dropdown menu containing a list of available keyboard languages.
Scroll through the list to find the desired language you want to add to your keyboard layouts. You can also use the search bar at the top of the dropdown menu to quickly find the language you are looking for.
Once you have located the language you want to add, simply click on it to include it in your keyboard layouts.
After adding a new keyboard language, you will notice that it appears in the left-hand sidebar of the “Input Sources” tab, alongside the previously installed languages. A checkbox will appear next to the newly added language, indicating that it is now available for use.
If desired, you can also enable the “Show Input menu in menu bar” option, which will display a language icon in the top menu bar. This makes it easier to switch between different keyboard languages directly from the menu bar.
By following these steps, you can effortlessly add a new keyboard language to your Mac and expand your typing capabilities. In the next step, we will learn how to select the desired keyboard language from the available options.
Step 5: Selecting the Desired Keyboard Language
After adding a new keyboard language to the “Input Sources” tab in the “Keyboard” settings, you can now proceed to select the desired language for your keyboard. This step allows you to switch between different keyboard layouts and use the language that suits your needs.
To select the desired keyboard language, start by accessing the “Input Sources” tab in the “Keyboard” settings.
In the left-hand sidebar of the “Input Sources” tab, you will see a list of the installed keyboard languages, including the one you just added.
To switch to a specific language, simply click on the checkbox next to the corresponding language in the sidebar. The checkbox will be ticked, indicating that the language is now selected and active for use.
You can select multiple language options if needed, allowing you to conveniently switch between different keyboard layouts as per your requirements.
Furthermore, if you have enabled the “Show Input menu in menu bar” option, you can also switch between different keyboard languages directly from the menu bar. Click on the language icon in the menu bar and select the desired language from the dropdown menu.
By following these steps, you can easily select the desired keyboard language on your Mac. Whether you need to switch between English, French, Spanish, or any other language, you now have the flexibility to type in the language of your choice. In the next step, we will explore how to arrange the keyboard languages to suit your preferences.
Step 6: Arranging the Keyboard Languages
Once you have added and selected the desired keyboard languages on your Mac, you have the option to arrange them in a specific order. This allows you to prioritize and easily switch between the keyboard languages you frequently use.
To arrange the keyboard languages, navigate to the “Input Sources” tab in the “Keyboard” settings.
In the left-hand sidebar, you will see a list of the installed keyboard languages with checkboxes next to each language.
To rearrange the order, simply click and drag a language to the desired position in the list. As you drag a language, you will notice a blue line indicating where the language will be placed once you release the mouse button.
By arranging the order of the keyboard languages, you can customize the switching process to suit your preferences. The topmost language in the list will be the default language when you first start typing, but you can easily switch to other languages by using keyboard shortcuts or the language menu in the menu bar.
Remember to click the “Apply” or “OK” button at the bottom of the “Keyboard” settings window to save your changes.
By arranging the keyboard languages in the order you prefer, you can improve your typing efficiency and seamlessly switch between different language inputs.
In the next step, we will cover how to remove unwanted keyboard languages from your Mac.
Step 7: Removing Unwanted Keyboard Languages
If you have added keyboard languages that you no longer need or want to use on your Mac, you can easily remove them from the “Input Sources” tab in the “Keyboard” settings. Removing unwanted keyboard languages helps declutter your language options and simplifies the process of switching between preferred languages.
To remove unwanted keyboard languages, start by accessing the “Input Sources” tab in the “Keyboard” settings.
In the left-hand sidebar, you will see a list of the installed keyboard languages, including the ones you added.
To remove a language, simply click on the checkbox next to the language you want to remove, unchecking it.
Once you uncheck a language, it will no longer be available in the keyboard layout options on your Mac.
If you no longer see the need for a specific language, you can remove it from the list entirely. To do this, click on the “-” or “Remove” button located below the list of keyboard languages.
A confirmation prompt will appear asking if you want to remove the selected language. Click “Remove” to confirm and permanently delete the language from your keyboard layouts.
By removing unwanted keyboard languages, you can streamline your language options and focus on the ones you frequently use.
In the next step, we will explore keyboard language shortcuts that can offer a quicker way to switch between different languages.
Step 8: Keyboard Language Shortcuts
Switching between different keyboard languages on your Mac can be made even more convenient and efficient by using keyboard shortcuts. These shortcuts allow you to quickly change the input language without needing to navigate through menus or settings.
To utilize keyboard language shortcuts, start by accessing the “Input Sources” tab in the “Keyboard” settings.
In the left-hand sidebar, you will see a list of the installed keyboard languages.
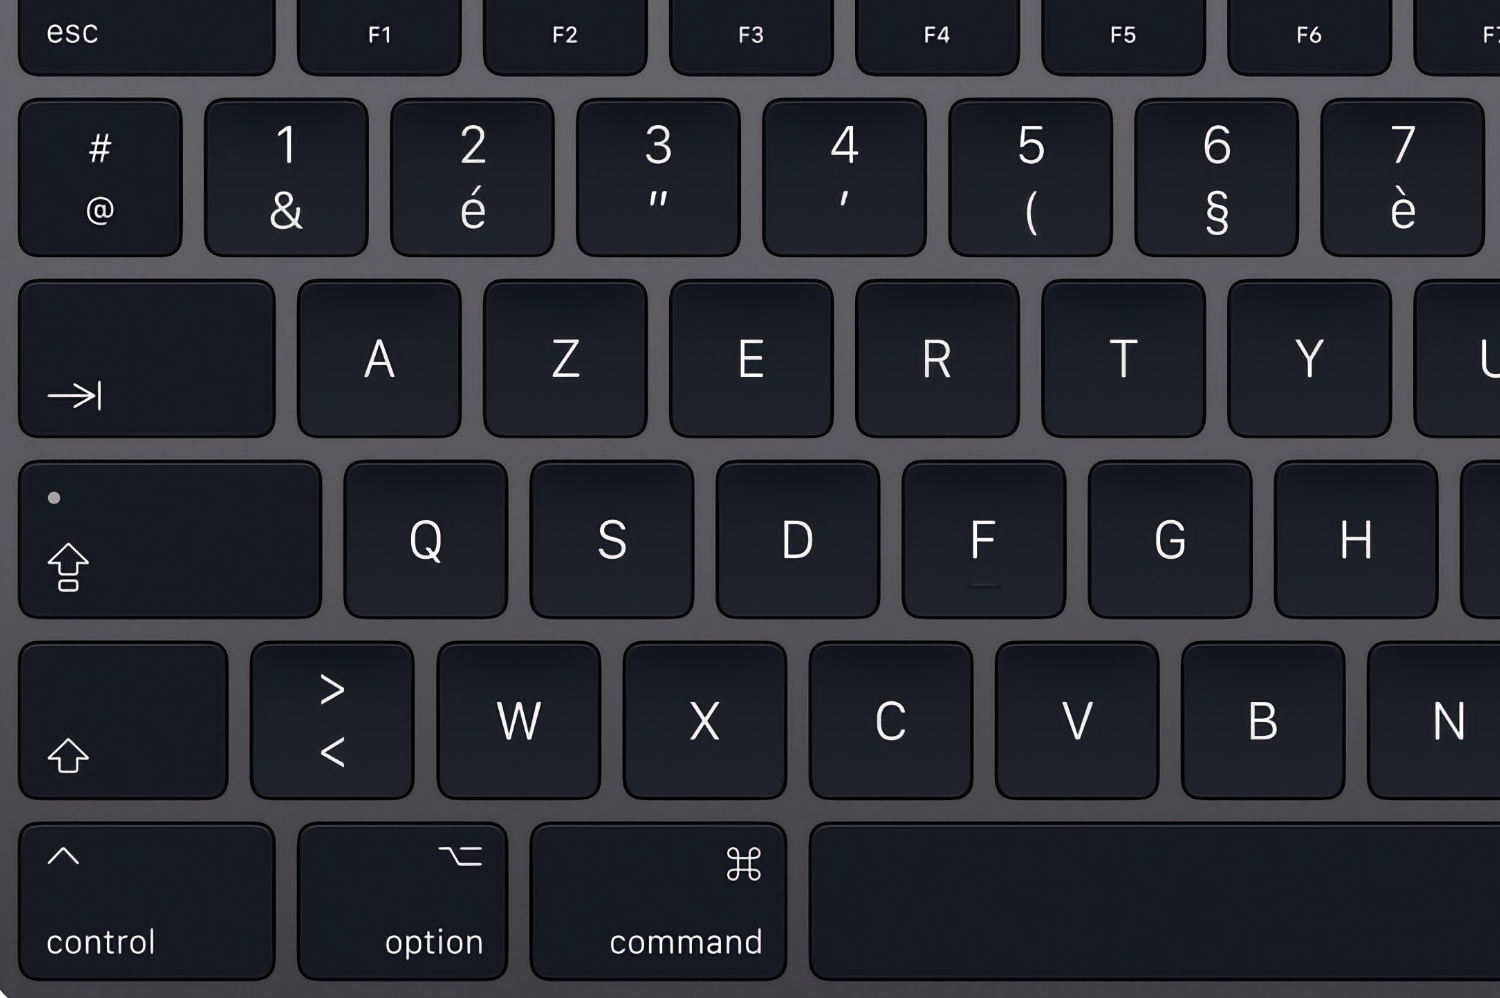
Next to each language, you will notice a checkbox. By default, each language is assigned a keyboard shortcut, which is typically a combination of the Command (⌘) key and the Spacebar.
To switch between languages using the keyboard shortcut, simply press and hold the Command key (⌘) while pressing the Spacebar. Each time you press the shortcut, the keyboard language will cycle to the next one in your list.
If you prefer to use a different keyboard shortcut to switch between languages, you can customize the shortcuts by selecting the “Input Sources” tab and clicking on the “Keyboard Shortcuts” button at the bottom-right corner of the window.
In the “Keyboard Shortcuts” window, select the “Input Sources” option from the left sidebar. Here, you can modify or add new shortcuts for cycling through languages, as well as for directly selecting a specific language.
By using keyboard language shortcuts, you can seamlessly switch between different keyboard languages without interrupting your workflow.
Congratulations! You have successfully learned how to change, add, remove, and rearrange keyboard languages on your Mac. By following these steps, you can tailor your keyboard settings to your specific language needs and enhance your typing experience.
Conclusion
Changing the keyboard language on your Mac is a simple yet powerful feature that allows you to type in multiple languages and enhance your productivity. Whether you need to switch between languages for work, studying, or personal use, the steps outlined in this guide have provided you with a comprehensive understanding of how to change the keyboard language on your Mac.
By following the step-by-step instructions, you can easily open the System Preferences, navigate to the Keyboard settings, and access the Input Sources tab. From there, you have the flexibility to add new keyboard languages, select the desired language for typing, arrange the languages in a preferred order, and remove any unwanted languages.
Additionally, we discussed how keyboard language shortcuts can further expedite the process of switching between languages. By utilizing keyboard shortcuts, you can seamlessly transition between different keyboard layouts without interrupting your workflow.
Remember, changing the keyboard language on your Mac is not only useful for multilingual individuals, but it can also be beneficial for those learning a new language or working on projects that require specific language inputs.
Now that you have the knowledge and tools to change the keyboard language on your Mac, take full advantage of this feature and enjoy a more personalized and efficient typing experience. Embrace the versatility and convenience that comes with typing in different languages effortlessly on your Mac.
So, go ahead and start exploring the rich diversity of keyboard languages available to you. Adapt your Mac to your language preferences and unlock new possibilities in communication and creativity.