Introduction
Welcome to the world of Chromecast, a versatile device that allows you to stream your favorite media content directly to your TV. Whether it’s movies, TV shows, music, or even photos, Chromecast enables you to enjoy all your digital entertainment on a bigger screen with just a few simple steps. In this guide, we will focus on casting media from Windows Media Player to Chromecast, opening up a whole new realm of possibilities for your streaming experience.
Chromecast is a small, affordable streaming device developed by Google. It plugs into the HDMI port of your TV and connects to your home network, allowing you to cast media content from various devices. With Chromecast, you can transform your television into a smart TV and access a wide range of streaming services such as Netflix, YouTube, Hulu, and more.
Windows Media Player, on the other hand, is a popular media player and library application bundled with the Windows operating system. While it may not have as many features as some of the dedicated media streaming applications, its integration with Windows makes it a convenient choice for users who want to stream their local media collection to Chromecast.
In the following sections, we’ll guide you through the process of setting up Chromecast, installing Windows Media Player, and connecting the two to enable seamless casting. We’ll also address common troubleshooting issues that you may encounter along the way. So, let’s dive in and unlock the full potential of Chromecast with Windows Media Player!
What is Chromecast?
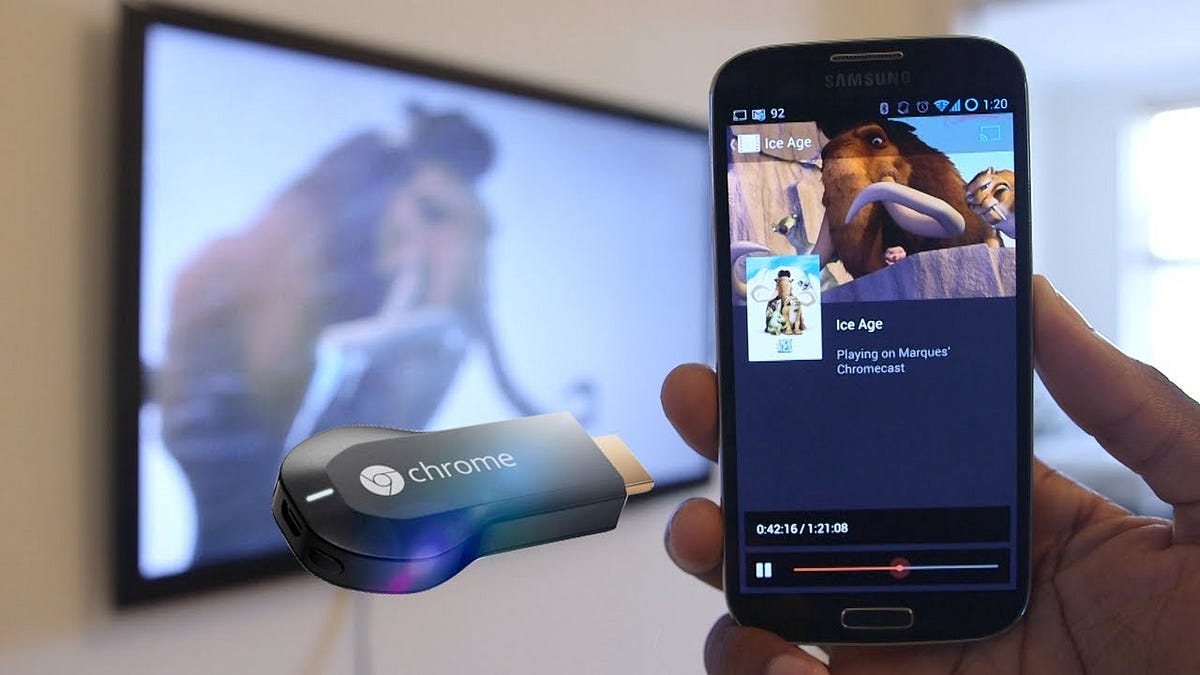
Chromecast is a compact streaming device that allows you to wirelessly stream media from your smartphone, tablet, or computer to your TV. It was developed by Google and has become incredibly popular due to its simplicity and versatility. With Chromecast, you can easily turn your ordinary TV into a smart TV, opening up a world of entertainment options.
The device itself is a small dongle that plugs into the HDMI port of your television. It connects to your home Wi-Fi network, allowing you to stream content directly from the internet or cast media from your personal devices. Chromecast supports a wide range of streaming services, including popular platforms like Netflix, YouTube, Spotify, and many more.
One of the key advantages of Chromecast is its cross-platform compatibility. It works seamlessly with both Android and iOS devices, as well as with Windows, macOS, and Chromebook computers. This means that regardless of the devices you own, you can still enjoy the convenience and entertainment that Chromecast offers.
Using Chromecast is incredibly straightforward. Once your Chromecast is set up and connected to your TV, you can control it using your smartphone or computer as a remote. Simply open a supported app, like YouTube or Netflix, and select the Cast icon. You can then choose your Chromecast device from the list, and the media will start playing on your TV. You can even control playback, volume, and other settings directly from your device.
Another fantastic feature of Chromecast is its ability to support multi-room audio. You can set up multiple Chromecast devices in different rooms and synchronize them to play the same audio content throughout your home. This is perfect for parties or when you want to create an immersive audio experience.
Overall, Chromecast is a versatile and affordable streaming device that provides a convenient way to enjoy your favorite movies, TV shows, music, and more on the big screen. It eliminates the need for cables or complex setups, making it accessible to users of all technical levels. With Chromecast, you can take your entertainment to the next level and make the most out of your TV.
Casting to Chromecast from Windows Media Player
If you prefer using Windows Media Player to manage your media library and want to cast your local content to Chromecast, you’re in luck. While Windows Media Player does not natively support casting, there are workarounds available that allow you to stream your media from the player to your Chromecast device.
Here are the steps to cast media from Windows Media Player to Chromecast:
- Step 1: Set up Chromecast
- Step 2: Install Windows Media Player
- Step 3: Connect Windows Media Player to Chromecast
- Step 4: Cast media to Chromecast from Windows Media Player
Before you can cast media from Windows Media Player, make sure your Chromecast device is properly set up and connected to your TV. Follow the instructions provided with your Chromecast to complete the setup process.
If you don’t have Windows Media Player installed on your computer, you’ll need to install it. Windows Media Player is typically included with Windows operating systems, but you may need to enable it or download it from the Microsoft website if it’s not already available on your system.
To establish a connection between Windows Media Player and your Chromecast device, you’ll need to use a third-party software. One popular option is the Chrome browser, which has built-in casting capabilities. Open Chrome and click on the three-dot menu in the upper-right corner. From the dropdown menu, select “Cast.” A window will appear, showing available Chromecast devices. Choose your desired Chromecast and click “Cast to” to establish the connection.
With the connection established, it’s time to cast your media from Windows Media Player. Open Windows Media Player and select the media file you want to play. Once the file starts playing in Windows Media Player, click on the three-dot menu in the upper-right corner and select “Cast to” from the dropdown menu. Choose your Chromecast device from the list, and the media will begin playing on your TV.
Please note that the performance and compatibility may vary depending on your computer’s specifications, network connection, and the version of Windows Media Player you are using. Additionally, since the casting process relies on third-party software, there may be occasional limitations or requirements specific to the casting software you are using.
Now that you know how to cast media from Windows Media Player to Chromecast, you can enjoy your favorite movies, music, and more on the big screen, all controlled from your Windows computer. Explore your media library and share your personal collection with friends and family, creating an immersive viewing experience in your own living room.
Step 1: Set up Chromecast
In order to cast media from Windows Media Player to Chromecast, you need to first set up your Chromecast device. The setup process is simple and only takes a few minutes to complete. Here’s how you can do it:
- Connect Chromecast to your TV: Start by plugging the Chromecast device into an available HDMI port on your TV. Ensure that your TV is powered on and set to the correct HDMI input source.
- Connect Chromecast to power: Use the USB power cable provided with your Chromecast to connect it to a power outlet. You can either plug it into a wall adapter or use a USB port on your TV if it has one.
- Switch TV input: Using your TV remote, switch to the HDMI input source where you connected the Chromecast device.
- Download the Google Home app: On your smartphone or tablet, download the Google Home app from the App Store (iOS) or Google Play Store (Android).
- Set up Chromecast: Open the Google Home app and follow the on-screen instructions to set up your Chromecast. This will involve connecting your phone or tablet to the Chromecast’s built-in Wi-Fi network and completing the setup process through the app.
- Connect Chromecast to your Wi-Fi network: During the setup process, you will be prompted to connect your Chromecast to your home Wi-Fi network. Follow the instructions in the Google Home app to complete the connection.
- Name your Chromecast: Once connected to your Wi-Fi, you can choose a name for your Chromecast device. This is helpful if you have multiple Chromecast devices in different rooms.
- Finish setup: Once you have completed the above steps, the setup process is complete. You can now start casting media to your Chromecast from various devices, including Windows Media Player.
Setting up your Chromecast is an essential first step to enable casting from Windows Media Player. It establishes the connection between your Chromecast and your home network, allowing you to stream media content seamlessly to your TV. By following these easy steps, you’ll be ready to enjoy the convenience and entertainment that Chromecast offers.
Step 2: Install Windows Media Player
In order to cast media from Windows Media Player to Chromecast, you need to ensure that Windows Media Player is installed on your computer. While Windows Media Player is typically included in Windows operating systems, it may not be activated by default on some versions. If you do not have it installed, follow these steps to install Windows Media Player:
- Check if Windows Media Player is already installed: To see if you have Windows Media Player installed on your computer, you can do a quick search by clicking on the Start button and typing “Windows Media Player” in the search bar. If Windows Media Player appears in the search results, it is already installed on your system, and you can skip the rest of this step. If not, proceed to the next step.
- Enable Windows Media Player feature: On some versions of Windows, Windows Media Player may not be enabled by default. To enable it, follow these steps:
- Press the Windows key + R to open the Run dialog box.
- Type “appwiz.cpl” and press Enter.
- In the Programs and Features window, click on “Turn Windows Features on or off” in the left-hand menu.
- In the Windows Features window, scroll down and locate “Media Features”.
- Expand “Media Features” and check the box next to “Windows Media Player”.
- Click on OK to save the changes and wait for Windows to install Windows Media Player.
- Download Windows Media Player: If Windows Media Player is not included or enabled on your version of Windows, you can download it from the official Microsoft website. Go to the Microsoft website and search for “Windows Media Player download. Follow the provided instructions to download and install Windows Media Player on your computer.
- Restart your computer: After the installation is complete, it is recommended to restart your computer to ensure that all changes take effect.
Once Windows Media Player is installed and activated on your computer, you are ready to proceed with the next steps to connect Windows Media Player to Chromecast and start casting your media files.
Step 3: Connect Windows Media Player to Chromecast
To cast media from Windows Media Player to Chromecast, you need to establish a connection between the two. Although Windows Media Player does not natively support casting, you can use third-party software to bridge the gap. One common method is to utilize the casting capabilities of the Google Chrome browser. Follow these steps to connect Windows Media Player to Chromecast:
- Open the Google Chrome browser: If you don’t already have Google Chrome installed on your computer, you can download it from the official Google Chrome website. Make sure you have the latest version of Google Chrome installed on your system.
- Launch the Chrome browser: Once installed, open the Google Chrome browser on your computer.
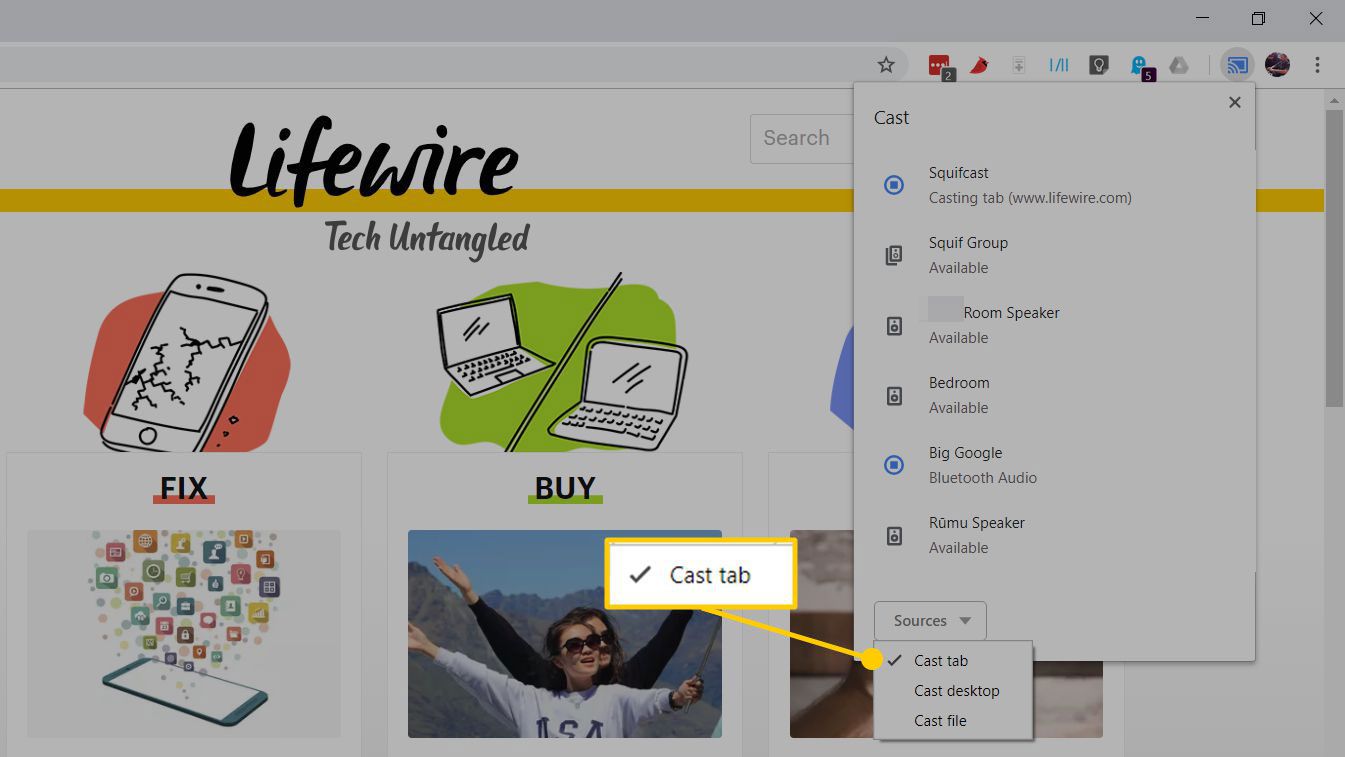
- Click on the three-dot menu: In the upper-right corner of the Chrome browser window, click on the three-dot menu icon. This will open a menu with various options.
- Select “Cast” from the menu: From the dropdown menu that appears when you click on the three-dot menu icon, select “Cast.” This will open the casting settings in a new tab.
- Choose your Chromecast device: In the casting settings tab, you will see a list of available Chromecast devices on your network. Select the Chromecast device you want to connect to and cast media from Windows Media Player.
- Establish the connection: After selecting your Chromecast device, you will be prompted to confirm the casting connection. Click on the “Cast Desktop” option or select the specific tab where you have Windows Media Player open.
- Start casting media: With the connection established, you can now start casting media from Windows Media Player to Chromecast through the Chrome browser. Simply open Windows Media Player and play the media file you want to cast. The media playback will be mirrored on your TV via Chromecast.
It’s important to note that the performance and compatibility of casting from Windows Media Player to Chromecast may vary depending on the third-party software used and the specifications of your computer. Additionally, ensure that your Chromecast and computer are connected to the same Wi-Fi network for a seamless casting experience.
Now that you have successfully connected Windows Media Player to Chromecast, you can enjoy your local media files on the big screen with the convenience of wireless casting. Sit back, relax, and immerse yourself in your favorite movies, music, and more directly from Windows Media Player on your TV.
Step 4: Cast media to Chromecast from Windows Media Player
Now that you have connected Windows Media Player to Chromecast, it’s time to start casting your media files from Windows Media Player to your TV. Follow these steps to cast media to Chromecast:
- Open Windows Media Player: Launch Windows Media Player on your computer. You can find it in the Start menu or by searching for “Windows Media Player” in the search bar.
- Select the media file: Choose the media file you want to cast from your local library or connected devices within Windows Media Player. It can be a video, audio, or even a photo file.
- Click on the “Play” button: Click on the “Play” button within Windows Media Player to start playing the selected media file.
- Open the casting menu: While the media is playing, click on the three-dot menu located in the upper-right corner of Windows Media Player. This will open a dropdown menu with various options.
- Select “Cast to Device”: From the dropdown menu, click on the “Cast to Device” option.
- Choose your Chromecast device: A list of available devices will appear. Select your Chromecast device from the list.
- Start casting: After selecting your Chromecast device, Windows Media Player will start casting the media file to your TV via Chromecast. The media content will now play on your TV, while still being controlled from your computer.
- Control playback: You can control playback options such as pause, play, stop, and volume directly in Windows Media Player on your computer. The changes will be reflected on the TV where the media is being casted.
It’s important to note that the casting performance may depend on the file’s format, your computer’s processing power, and your network connection. If you encounter any issues with playback or connectivity, make sure you have a stable network connection and try casting a different media file.
With Windows Media Player successfully casting media to Chromecast, you can now enjoy your local media content on the big screen. Whether it’s watching videos, listening to music, or displaying photos, casting from Windows Media Player allows you to bring your multimedia experience to the next level.
Troubleshooting Common Issues
While casting media from Windows Media Player to Chromecast is generally a seamless process, there may be occasional issues that you encounter along the way. Here are some common problems that users may face and their possible solutions:
- No Chromecast device detected: If Windows Media Player is unable to detect your Chromecast device, make sure that both your computer and Chromecast are connected to the same Wi-Fi network. Restarting your router and Chromecast device may also help establish a connection.
- Poor video quality or buffering: If the video quality is poor or you experience buffering issues, check your internet connection speed. Make sure you have a stable and fast internet connection. You can also try reducing the video quality within Windows Media Player or adjusting the playback settings in the casting menu.
- No audio: If you experience issues with audio playback, ensure that your computer’s audio output is set correctly. Check the volume levels in both Windows Media Player and your TV. Additionally, verify that the media file you are trying to cast has audio content.
- Compatibility issues: Some media formats may not be supported for casting from Windows Media Player to Chromecast. Check if the file format of your media is compatible with Chromecast by referring to the official Chromecast documentation. If the media file is not compatible, consider converting it to a supported format or using a different media player.
- Video lag or synchronization issues: If you notice video lag or synchronization problems between the audio and video, it may be due to network congestion or a slow computer. Close any unnecessary applications or devices that may be consuming network bandwidth. You can also try connecting your computer directly to your router with an Ethernet cable for a more stable connection.
- Up-to-date software: Ensure that both Windows Media Player and the Chrome browser are updated to their latest versions. Outdated software can sometimes cause compatibility issues and may not support the latest casting functionality.
If you encounter any other issues while casting from Windows Media Player to Chromecast, it is recommended to consult the official support documentation provided by Windows Media Player, Chromecast, or reach out to their respective support channels for further assistance.
By troubleshooting common issues, you can ensure a smoother casting experience and enjoy your media content without disruptions. Don’t let technical difficulties stand in the way of your entertainment!
Conclusion
Casting media from Windows Media Player to Chromecast opens up a world of possibilities for enjoying your favorite movies, music, and photos on the big screen. Through the steps outlined in this guide, you can easily connect Windows Media Player to Chromecast and start casting your local media files effortlessly.
Chromecast, a versatile streaming device developed by Google, allows you to transform your TV into a smart TV and access a multitude of streaming services. With Windows Media Player, you have a familiar media player and library application that can be used to manage and play your local media collection.
By following the steps outlined in this guide, you can set up Chromecast, ensure Windows Media Player is installed on your computer, connect Windows Media Player to Chromecast using the Google Chrome browser, and finally cast media from Windows Media Player to your Chromecast device.
We have also discussed some common troubleshooting issues that you may encounter and provided possible solutions to resolve them.
With the ability to cast media from Windows Media Player to Chromecast, you can enjoy a more immersive and convenient streaming experience. Watch your favorite movies, listen to music, and share your photo slideshows on the big screen with family and friends.
Remember to have the latest software updates for both Windows Media Player and the Chrome browser, as well as a stable internet connection, to ensure the best casting performance.
We hope this guide has been helpful in aiding you to cast media from Windows Media Player to Chromecast. Now, sit back, relax, and enjoy your multimedia content on the big screen with the simplicity and convenience of Chromecast!