Introduction
Welcome to our guide on how to cancel a channel on Amazon Prime. Amazon Prime offers a vast selection of channels that users can subscribe to for additional entertainment options. However, there may come a time when you want to cancel a channel subscription. Whether you have finished watching the content, want to try a different channel, or simply want to cut down on your monthly expenses, canceling a channel on Amazon Prime is a straightforward process.
In this article, we will walk you through the step-by-step process of canceling a channel on Amazon Prime. We will guide you on accessing your Amazon account, navigating to the Prime Video Channels page, finding the channel you want to cancel, managing your subscription, and confirming the cancellation. By following these simple instructions, you will be able to cancel your unwanted channel subscription with ease.
Canceling a channel on Amazon Prime does not affect your overall Amazon Prime membership. It only cancels the subscription to the specific channel you choose. You will still be able to enjoy all the benefits and features that come with your Amazon Prime membership, such as free two-day shipping, access to Prime Video, Prime Music, and much more.
So, whether you are striving to streamline your Amazon Prime channels or looking for ways to manage your subscriptions, let’s dive into this guide and learn how to cancel a channel on Amazon Prime.
Step 1: Accessing Your Amazon Account
The first step in canceling a channel on Amazon Prime is to access your Amazon account. Here’s how you can do it:
- Open your preferred web browser and go to www.amazon.com.
- Click on the “Sign In” button located at the top-right corner of the webpage.
- Enter your Amazon account email address and password in the respective fields.
- Click on the “Sign In” button to log into your Amazon account.
Once you have successfully logged into your Amazon account, you will be ready to move on to the next step of canceling the channel on Amazon Prime. Keep in mind that you need to have an active Amazon Prime membership to access the Prime Video Channels page and manage your subscriptions.
If you don’t have an Amazon account, you can easily create one by clicking on the “Create your Amazon account” or “Start here” button on the login page. Follow the prompts to provide the required information, such as your name, email address, and password, to create your Amazon account.
Now, let’s proceed to the next step to navigate to the Prime Video Channels page.
Step 2: Navigating to the Prime Video Channels Page
Once you have successfully accessed your Amazon account, the next step is to navigate to the Prime Video Channels page. Follow these simple instructions:
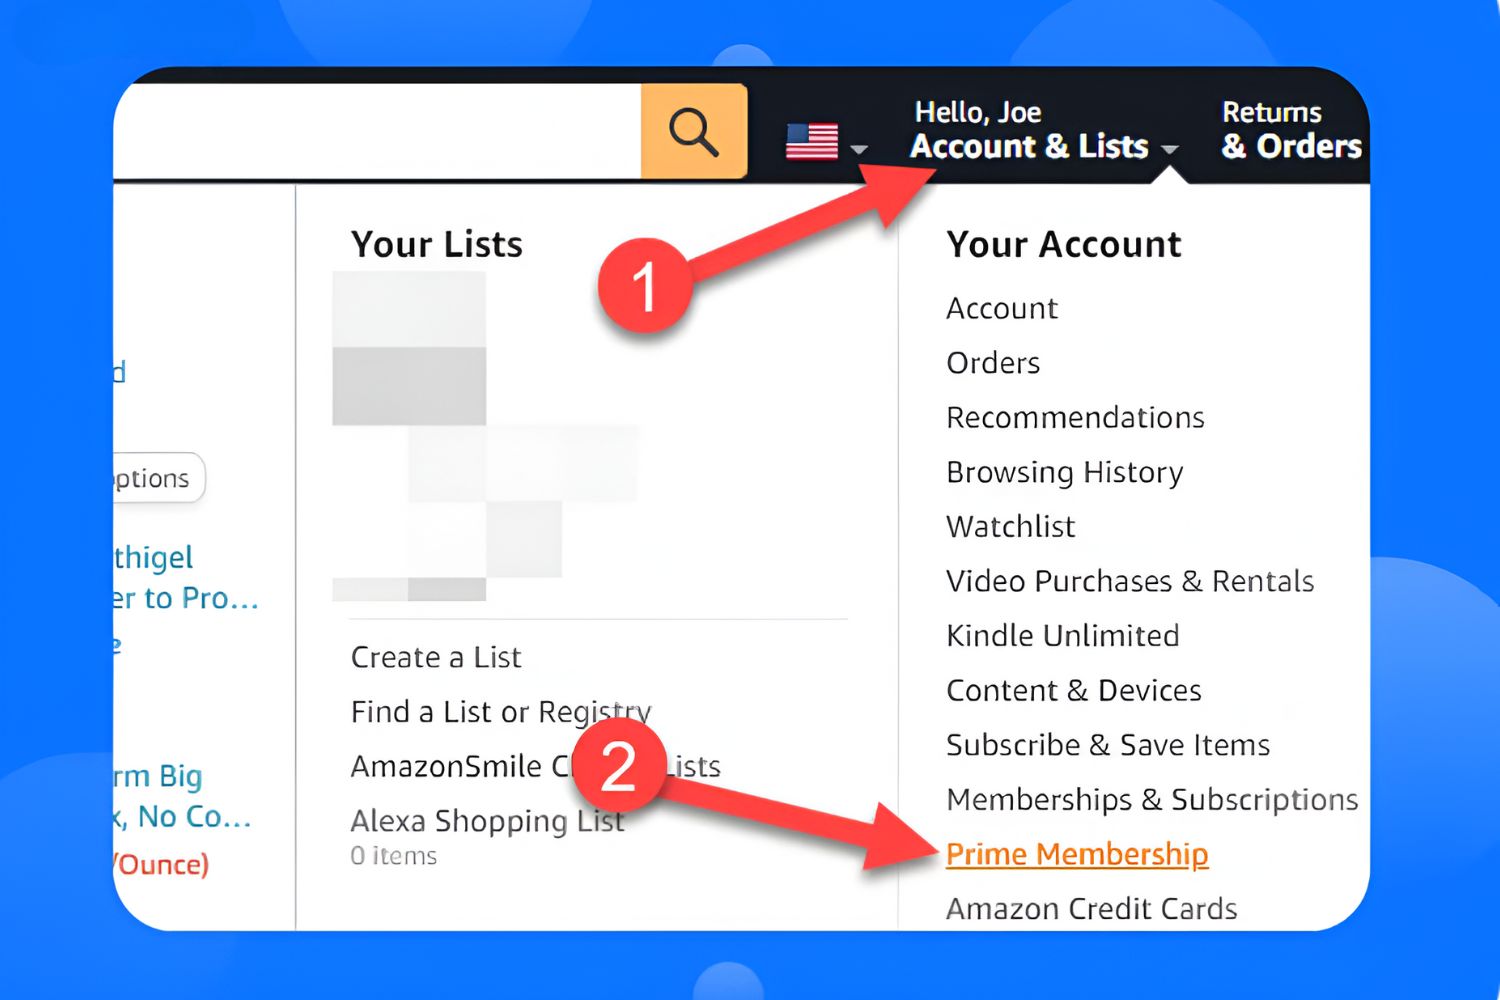
- On the Amazon homepage, hover your cursor over the “Account & Lists” option located at the top-right corner of the page.
- A dropdown menu will appear. Click on the “Prime Video” option.
- On the Prime Video page, you will find the option “Channels” in the top menu. Click on it.
- You will now be redirected to the Prime Video Channels page, which displays all the available channels that you have subscribed to.
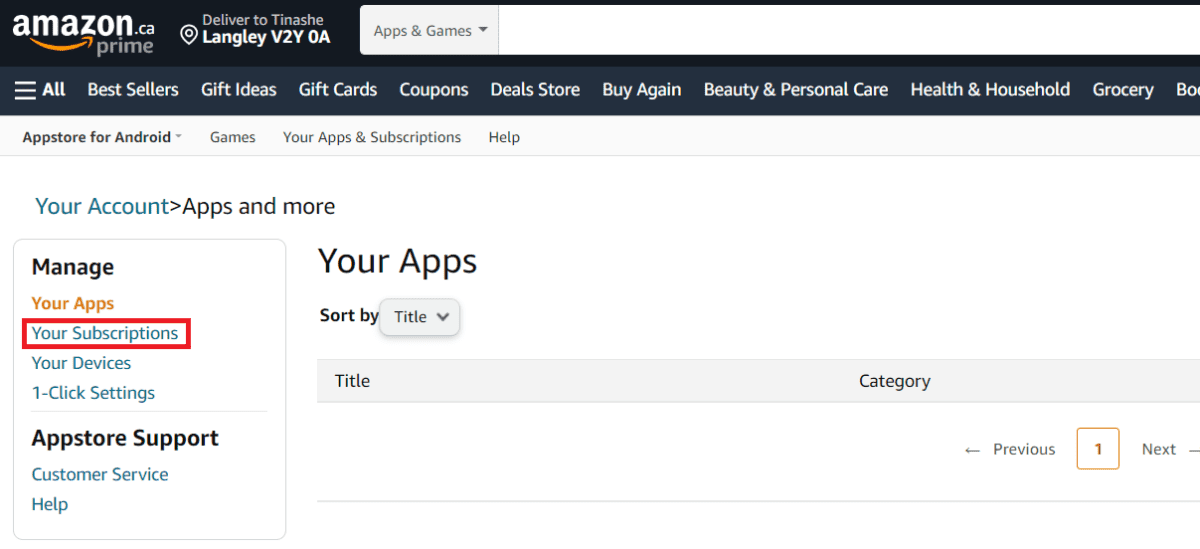
On the Prime Video Channels page, you will see a list of all the channels that are associated with your Amazon Prime account. This page allows you to manage your channel subscriptions easily.
If you have trouble finding the Prime Video Channels page, you can directly access it by visiting www.amazon.com/channels.
Now that you have successfully navigated to the Prime Video Channels page, let’s move on to the next step and find the channel that you want to cancel.
Step 3: Finding the Channel to Cancel
Once you have reached the Prime Video Channels page, the next step is to locate the specific channel that you want to cancel. Follow these steps:
- Scroll down the page to browse through the list of channels you have subscribed to.
- You can use the search bar at the top of the page to search for a specific channel by name.
- Alternatively, you can use the categories or featured sections on the page to find the channel you want to cancel.
- Click on the channel you wish to cancel to access its dedicated channel page.
On the dedicated channel page, you will find information about the channel, such as the subscription cost, description, and available content. You may also see options to explore more content or manage your subscription preferences.
It’s important to double-check that you have selected the correct channel before proceeding with the cancellation process. This ensures that you don’t accidentally cancel the wrong subscription.
Now that you have found the channel you want to cancel, let’s move on to the next step and learn how to manage your subscription.
Step 4: Managing Your Subscription
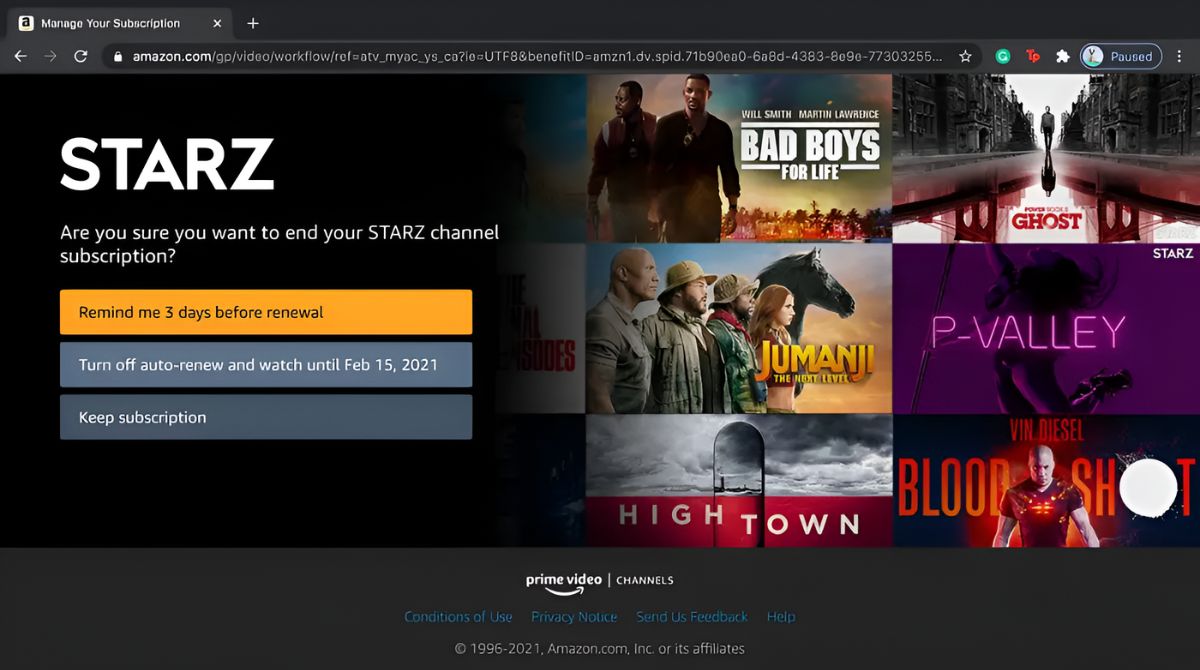
Once you have accessed the dedicated channel page for the subscription you wish to cancel, it’s time to manage your subscription settings. Follow these simple steps:
- On the channel page, you will typically find an option that says “Manage Subscription” or “Cancel Subscription.” Click on this option to proceed.
- Depending on the channel, you may be prompted to enter your account password or reconfirm your identity for security purposes.
- Review the details of your subscription, such as the renewal date, subscription benefits, and any associated costs.
- Look for the option to cancel your subscription. This can usually be found under the subscription details or in a separate “Cancel Subscription” section.
- Click on the “Cancel Subscription” button or link to initiate the cancellation process.
When canceling a channel subscription on Amazon Prime, it’s vital to read through any information or terms provided on the cancellation page. This ensures that you understand the consequences of canceling, including the loss of any access to exclusive content or benefits associated with that specific channel.
It’s also worth noting that some channels may offer the option to pause or suspend your subscription instead of canceling it outright. This allows you to temporarily halt your subscription without losing access to the channel’s content. If this option is available, you can consider it as an alternative to cancellation.
Once you have canceled or managed your subscription settings, let’s move on to the final step of confirming the cancellation.
Step 5: Confirming the Cancellation
After managing your subscription settings, the final step is to confirm the cancellation of the channel on Amazon Prime. Follow these last few steps to ensure that the cancellation is processed successfully:
- Review the cancellation details on the confirmation page to ensure accuracy. Take note of any final instructions or information provided.
- Click on the “Confirm” or “Cancel Subscription” button to finalize the cancellation process.
- After confirming the cancellation, you should see a confirmation message indicating that your subscription has been successfully canceled.
- Take a moment to verify that the canceled channel no longer appears in your list of active subscriptions on the Prime Video Channels page.
It’s important to remember that the cancellation of a channel subscription on Amazon Prime will take effect at the end of your current billing period. This means that you will still have access to the channel and its content until the subscription period expires. Once the cancellation is processed, you will no longer be billed for the channel.
Additionally, cancelling a channel on Amazon Prime does not entitle you to any refunds for previous subscription charges. You will only stop being billed for future subscription renewals.
By following these steps and confirming the cancellation, you have successfully ended your subscription to the selected channel on Amazon Prime. You can now enjoy exploring other channels or manage your subscriptions as needed.
Conclusion
Cancelling a channel on Amazon Prime is a simple process that allows you to manage your subscriptions and tailor your entertainment options according to your preferences. By following the five steps outlined in this guide, you can easily cancel a channel on Amazon Prime:
- Access your Amazon account.
- Navigate to the Prime Video Channels page.
- Find the channel you want to cancel.
- Manage your subscription settings.
- Confirm the cancellation.
Remember to read through the terms and any important information provided on the cancellation page to understand the implications of canceling your subscription. If available, consider pausing or suspending your subscription as an alternative to cancellation.
After confirming the cancellation, your access to the channel and its content will continue until the end of your current billing period. You will no longer be billed for the channel beyond that point. Cancelling a channel does not affect your overall Amazon Prime membership or its associated benefits.
Now that you have the knowledge to cancel a channel on Amazon Prime, you can easily tailor your channel subscriptions to match your interests and preferences. Whether you’re looking to try new channels or manage your monthly expenses, the control is in your hands.
Thank you for following this guide. We hope it has been helpful to you in canceling a channel on Amazon Prime. Happy viewing!