Introduction
Welcome to our guide on how to cancel your Showtime subscription on Amazon Prime. Whether you’ve finished watching your favorite Showtime series or just want to try out a different channel, cancelling a subscription is a straightforward process that can be done in just a few steps. By following this guide, you’ll be able to easily navigate through the Amazon Prime website and cancel your Showtime subscription hassle-free.
Showtime is known for its exciting array of original series, movies, and documentaries. However, if the content is no longer grabbing your interest or you simply want to free up some space in your streaming lineup, cancelling your Showtime subscription is a simple solution. Keep in mind that by cancelling your Showtime subscription, you’ll no longer have access to all the content that Showtime has to offer.
In the following steps, we’ll walk you through the process of cancelling your Showtime subscription on Amazon Prime. Whether you’re accessing Amazon Prime on your computer or through the mobile app, the steps remain the same, ensuring a seamless experience across devices. So, without further ado, let’s get started with cancelling your Showtime subscription on Amazon Prime.
Step 1: Go to the Amazon Prime website
To begin the process of cancelling your Showtime subscription on Amazon Prime, the first step is to visit the official Amazon Prime website. You can do this by opening a web browser and navigating to www.amazon.com.
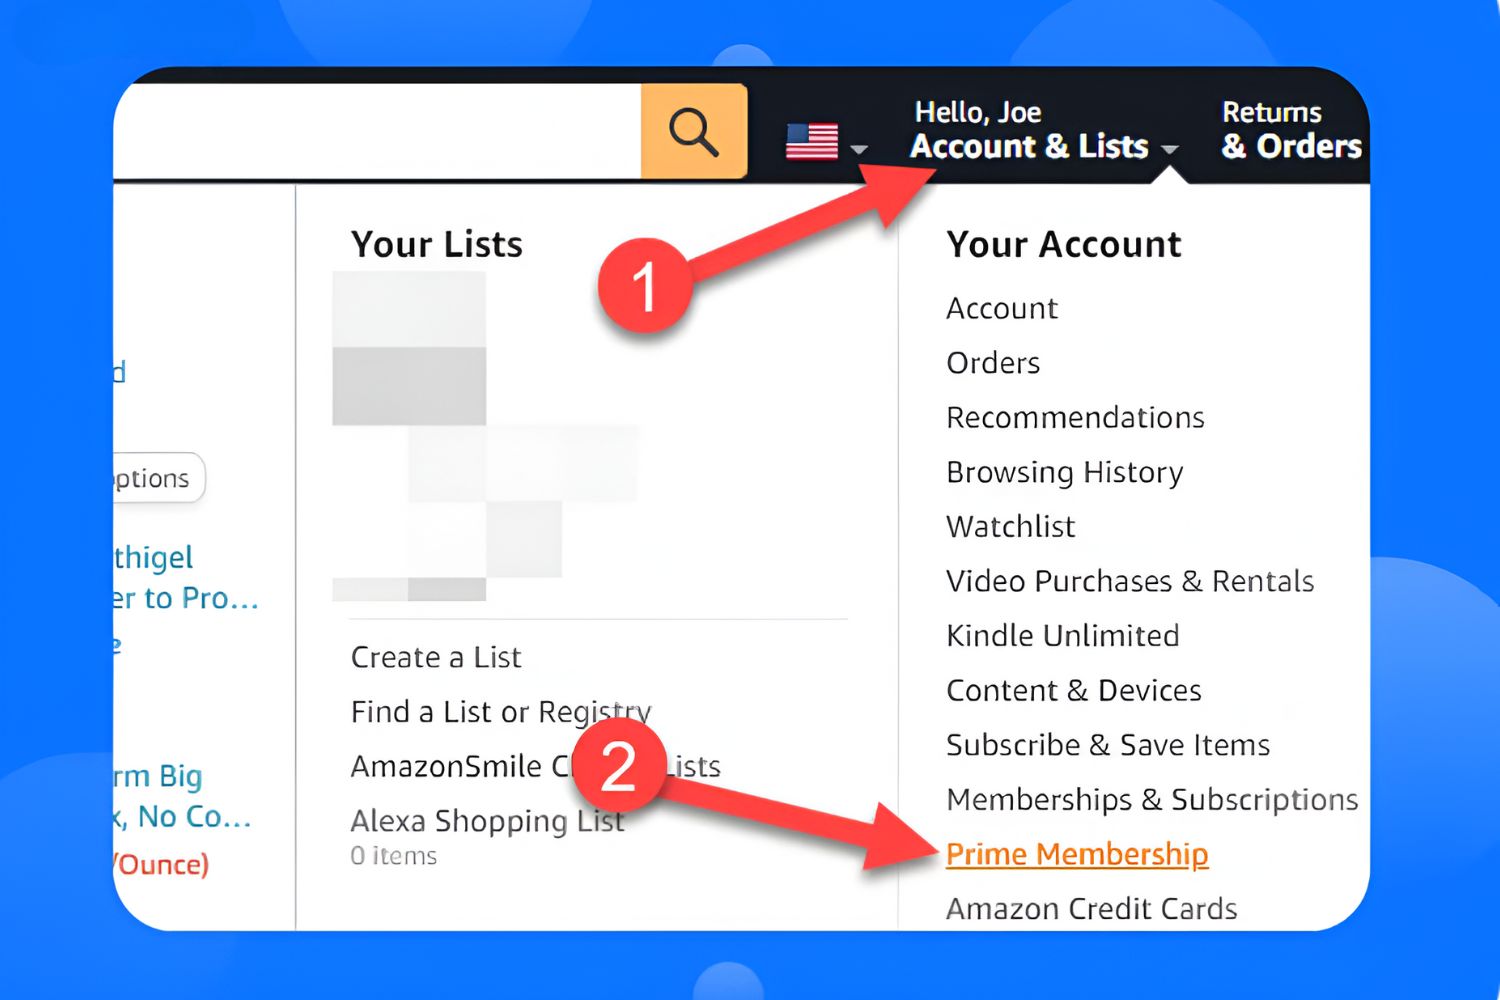
If you’re already signed in to your Amazon account, you’ll be taken directly to the Amazon homepage. However, if you’re not signed in, you’ll see a sign-in button on the top right corner of the page. Click on it to enter your login credentials and access your Amazon account.
Once you’re logged in, you’ll have access to the full range of features and services offered by Amazon Prime. It’s important to note that cancelling your Showtime subscription will not affect your Amazon Prime membership. You’ll still be able to enjoy all the other benefits that come with your Amazon Prime subscription.
By accessing the Amazon Prime website, you’ll also be able to manage your subscriptions, including Showtime. This allows you to easily make changes to your subscription plan or cancel it entirely if desired.
Now that you’ve successfully reached the Amazon Prime website, you’re ready to move on to the next step: signing in to your Amazon Prime account.
Step 2: Sign in to your Amazon Prime account
After navigating to the Amazon Prime website, the next step in cancelling your Showtime subscription is to sign in to your Amazon Prime account. This will ensure that you have access to all the necessary features and settings to manage your subscriptions.
If you’re not already signed in, look for the “Sign In” button located at the top-right corner of the Amazon homepage. Click on the button to proceed with the sign-in process.
In the sign-in page, you’ll be prompted to enter your Amazon account credentials, including your email or mobile number and your password. Make sure to accurately enter the required information to ensure a successful sign-in.
If you’re using a public computer or a device that is shared with others, it’s important to click on the “Keep me signed in” checkbox only if you trust the device and want to stay signed in. If you’re using your personal device, you can choose to stay signed in to Amazon Prime for convenience.
After entering your login information, click on the “Sign In” button to proceed. If the information provided is correct, you’ll be redirected to your Amazon Prime account dashboard, where you can manage all aspects of your subscription, including cancelling your Showtime channel.
Once you are signed in to your Amazon Prime account, you’re now ready to move on to the next step: navigating to the “Your Channels” section.
Step 3: Navigate to “Your Channels” section
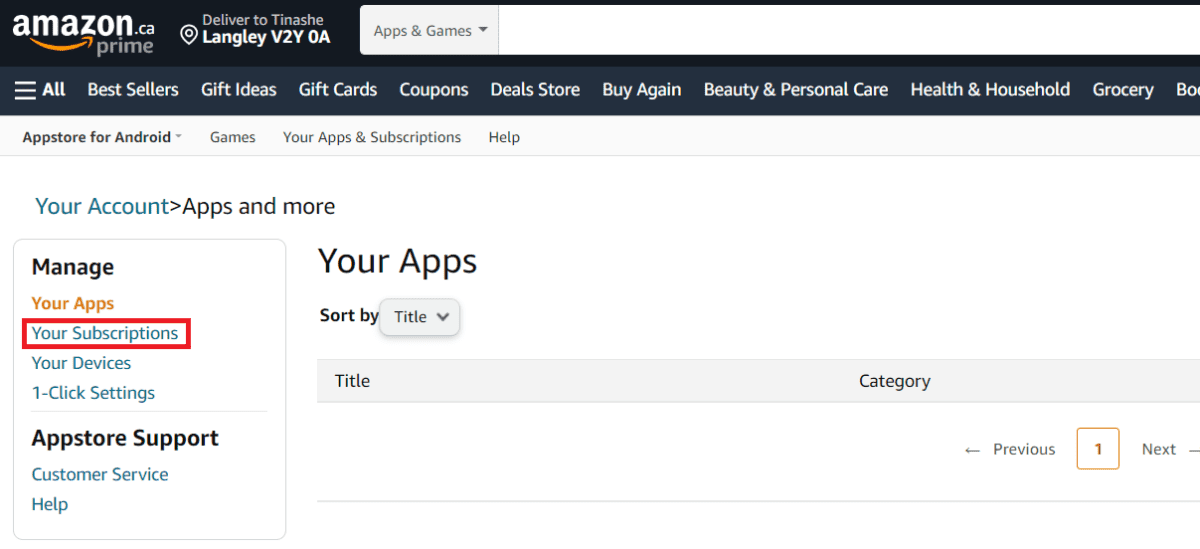
After signing in to your Amazon Prime account, the next step in cancelling your Showtime subscription is to navigate to the “Your Channels” section. This is where you can access and manage all the channels you have subscribed to through Amazon Prime.
To locate the “Your Channels” section, locate the menu icon, typically represented by three horizontal lines, in the top-left corner of the Amazon Prime website. Click on it to expand the menu options.
In the expanded menu, you’ll find a variety of options and settings. Look for the “Channels & Subscriptions” or “Your Channels” section. The specific wording may vary slightly depending on the layout of the website. Click on this section to access your subscribed channels.
Upon entering the “Your Channels” section, you’ll find a list of all the channels you have subscribed to through Amazon Prime. This includes Showtime and any other channels you may have added to your lineup.
By navigating to the “Your Channels” section, you have successfully reached the hub where you can manage your subscriptions. Now, it’s time to locate the Showtime channel from your channel list.
In the upcoming step, we will guide you on how to find the Showtime channel and proceed with cancelling your subscription. Stay tuned!
Step 4: Find the Showtime channel
Once you’re in the “Your Channels” section of your Amazon Prime account, the next step in cancelling your Showtime subscription is to locate the Showtime channel in your list of subscribed channels. This will allow you to access the specific settings and options related to your Showtime subscription.
Scroll through the list of channels until you find the Showtime channel. The list may be displayed alphabetically or based on your preferences. You can also use the search function, typically represented by a magnifying glass icon, to search for the Showtime channel directly.
Keep in mind that if you have a long list of subscribed channels, you may need to navigate through multiple pages or use the pagination controls at the bottom of the screen to find the Showtime channel.
Look for the Showtime channel logo or name in the list, and once you have located it, click on it to access the channel’s settings and subscription details.
By finding the Showtime channel in your list of subscribed channels, you’re one step closer to cancelling your subscription. In the next step, we will guide you on how to cancel your Showtime subscription and avoid any unwanted charges.
Stay with us as we move on to the next step: cancelling the Showtime subscription.
Step 5: Cancel the Showtime subscription
Now that you have located the Showtime channel in your list of subscribed channels, it’s time to proceed with cancelling your Showtime subscription on Amazon Prime. By following these simple steps, you’ll be able to stop your subscription and avoid any further charges.
Within the Showtime channel settings, you will find the option to manage your subscription. Look for the “Manage Subscription” or “Cancel Subscription” button. Clicking on this button will take you to a page where you can make changes to your subscription.
On the subscription management page, you may be presented with various options depending on your current subscription status. If you’re on a trial period or have special promotional pricing, you may see options to continue the subscription or switch to a different subscription plan.
To cancel your Showtime subscription entirely, look for the option that says “Cancel Subscription” or something similar. Click on it to proceed with the cancellation process.
Once you’ve initiated the cancellation process, you may be prompted to confirm your decision. Read through any additional information or terms that are presented to you, and then confirm the cancellation of your Showtime subscription.
After confirming the cancellation, your Showtime subscription will be immediately stopped. You won’t be able to access any Showtime content through Amazon Prime once the cancellation is processed.
Remember, cancelling your Showtime subscription will not affect your Amazon Prime membership or any other channels you have subscribed to through Amazon Prime. Only the Showtime channel will be cancelled.
Congratulations! You have successfully cancelled your Showtime subscription on Amazon Prime. In the next step, we will show you how to confirm the cancellation and ensure that you won’t be charged for any future Showtime subscriptions.
Step 6: Confirm the cancellation
After initiating the cancellation process for your Showtime subscription on Amazon Prime, it’s important to take the final step of confirming the cancellation. This step ensures that your cancellation request is fully processed, and you won’t be charged for any future subscriptions.
Once you have confirmed the cancellation of your Showtime subscription, a confirmation message will typically appear on the screen. This message will acknowledge that your cancellation request has been successful and that you will no longer have access to Showtime content through Amazon Prime.
It’s important to review this confirmation message carefully to ensure that the cancellation has been processed correctly. Look for any additional details or instructions provided in the message, such as the effective date of the cancellation or any remaining access you may have to Showtime content.
As an extra measure, it’s always a good idea to take a screenshot or note down the confirmation details for your own records. This documentation can come in handy if any issues or charges arise in the future.
After confirming the cancellation, you can go back to your channel list to verify that the Showtime channel is no longer listed as a subscribed channel. This will provide further confirmation that your cancellation was successful.
By taking the time to confirm the cancellation, you can have peace of mind knowing that your Showtime subscription on Amazon Prime has been fully cancelled and that you won’t be charged for any further subscriptions.
Great job! You have successfully cancelled your Showtime subscription on Amazon Prime. In the next section, we will provide a brief recap of the steps you have taken and conclude our guide.
Conclusion
Cancelling your Showtime subscription on Amazon Prime is a simple and straightforward process that can be completed in just a few steps. By following our guide, you have learned how to navigate the Amazon Prime website, sign in to your account, locate the “Your Channels” section, find the Showtime channel in your list of subscribed channels, cancel the Showtime subscription, and confirm the cancellation.
We understand that your streaming preferences may change over time, and it’s important to have control over your subscriptions. Cancelling your Showtime subscription allows you to free up your streaming lineup and explore new channels or services that better suit your interests.
Remember that cancelling your Showtime subscription on Amazon Prime will not affect your Amazon Prime membership or any other channels you have subscribed to through Amazon Prime. Only the Showtime channel will be cancelled. You can still enjoy all the other benefits and offerings of your Amazon Prime subscription.
We hope this guide has been helpful in guiding you through the process of cancelling your Showtime subscription. By following these steps, you can easily manage your subscriptions and ensure that you only pay for the channels you truly want to have access to.
If you ever decide to resubscribe to Showtime or any other channels on Amazon Prime, you can do so at any time by following a similar process of adding a new subscription to your account.
Thank you for choosing our guide as your resource for cancelling your Showtime subscription on Amazon Prime. We hope you found the information valuable, and we wish you a seamless streaming experience as you explore new channels and content options that align with your preferences.