Introduction
The Apple Pencil has revolutionized the way artists, designers, and creative individuals interact with their iPads. With its precision and responsiveness, the Apple Pencil has become a powerful tool for digital drawing, note-taking, and sketching. However, not everyone may be satisfied with the default sensitivity settings of the Apple Pencil. That’s where the option to adjust the Apple Pencil sensitivity comes in.
Apple Pencil sensitivity refers to the level of pressure or tilt recognition that affects the line thickness, shading, and overall responsiveness of the pencil. By adjusting the sensitivity settings, you can customize your Apple Pencil experience to match your specific artistic style or personal preference.
So, why would you want to adjust the Apple Pencil sensitivity? Well, every artist or individual using the Apple Pencil has their own unique way of using it. Some users may find the default sensitivity to be too sensitive or not sensitive enough, leading to unintended marks or a lack of control. Adjusting the sensitivity can help achieve a more natural and seamless drawing experience, optimizing your creative potential.
In this article, we will guide you through the process of adjusting Apple Pencil sensitivity. Whether you are a professional artist, a student taking digital notes, or simply an iPad user exploring the creative possibilities, this guide will help you unlock the full potential of your Apple Pencil.
What is Apple Pencil Sensitivity?
Apple Pencil sensitivity refers to the ability of the Apple Pencil and the iPad to detect and respond to different levels of pressure and tilt applied while using the digital stylus. This technology allows for a more accurate and nuanced drawing experience, mimicking the feel of traditional pen and paper.
The Apple Pencil is equipped with advanced sensors that can detect variations in pressure, allowing you to create thicker or thinner lines depending on how hard you press. This feature is particularly useful for artists who want to add depth and dimension to their digital artwork. By applying more pressure, you can achieve bolder strokes, while lighter pressure creates lighter lines.
In addition to pressure sensitivity, the Apple Pencil also has tilt sensitivity. This means that the angle at which you hold the pencil influences the shading and brush stroke effects in certain apps. By tilting the Apple Pencil, you can simulate the effect of holding a traditional pencil or brush at different angles, enabling you to create realistic and dynamic textures.
Apple Pencil sensitivity is an essential aspect of digital art and note-taking, as it enhances the overall precision and control over your drawings and handwritten notes. The technology behind the Apple Pencil allows for a highly responsive and natural feel, making it a popular choice among artists and creatives.
It is important to note that the sensitivity of the Apple Pencil can be adjusted to suit your individual preferences. While some users prefer a lighter touch with minimal pressure, others may prefer a more firm and deliberate approach. The ability to customize the sensitivity settings ensures that you can create a personalized drawing experience that matches your unique artistic style.
Now that we understand what Apple Pencil sensitivity is, let’s explore why adjusting it can be beneficial.
Why Adjust Apple Pencil Sensitivity?
While the default sensitivity settings of the Apple Pencil work well for many users, there are several reasons why you may want to adjust the sensitivity to better suit your needs:
1. Personal Preference: Every artist or user has a unique drawing style and preference. By adjusting the sensitivity, you can customize the Apple Pencil to respond exactly how you want it to. Whether you prefer a light touch or a heavier stroke, tweaking the sensitivity settings allows you to achieve the desired results.
2. Fine-tuning Control: If you find that the default sensitivity is either too sensitive or not sensitive enough for your liking, adjusting the settings can help fine-tune the level of control you have over your digital drawing or note-taking. This enables you to achieve more precise and accurate results, enhancing your overall creative output.
3. Adapting to Different Art Styles: Depending on the type of artwork or project you are working on, you may need to adjust the sensitivity settings of the Apple Pencil. For detailed illustrations that require delicate lines and shading, a higher sensitivity level may be beneficial. Conversely, for bold and expressive strokes, a lower sensitivity level can be more suitable. Being able to adapt the sensitivity to different art styles allows you to explore a wider range of creative possibilities.
4. Compatibility with Third-Party Apps: Some third-party drawing and note-taking apps have their own sensitivity settings that may not align with the default settings of the Apple Pencil. By adjusting the sensitivity of the Apple Pencil, you can ensure a seamless and consistent experience across various apps, eliminating any discrepancies or inconsistencies in line thickness and responsiveness.
5. Enhancing Workflow Efficiency: Customizing the sensitivity of the Apple Pencil can improve your workflow efficiency. By setting it up to your liking, you can focus more on your artistic process rather than being distracted by unwanted marks or insufficient control. This allows you to work more efficiently and effectively, ultimately saving you time and effort.
Overall, adjusting the Apple Pencil sensitivity provides you with greater control and customization options, enabling you to elevate your digital art and note-taking experience. Now, let’s dive into the steps on how to adjust the sensitivity of your Apple Pencil.
How to Adjust Apple Pencil Sensitivity
Adjusting the sensitivity of your Apple Pencil is a straightforward process that can be done directly on your iPad. Here are the steps to follow:
Step 1: Update Apple Pencil firmware: Before adjusting the sensitivity settings, make sure that your Apple Pencil firmware is up to date. To do this, go to the Settings app on your iPad, select “General,” then “Software Update.” If an update is available for your Apple Pencil, follow the on-screen instructions to install it.
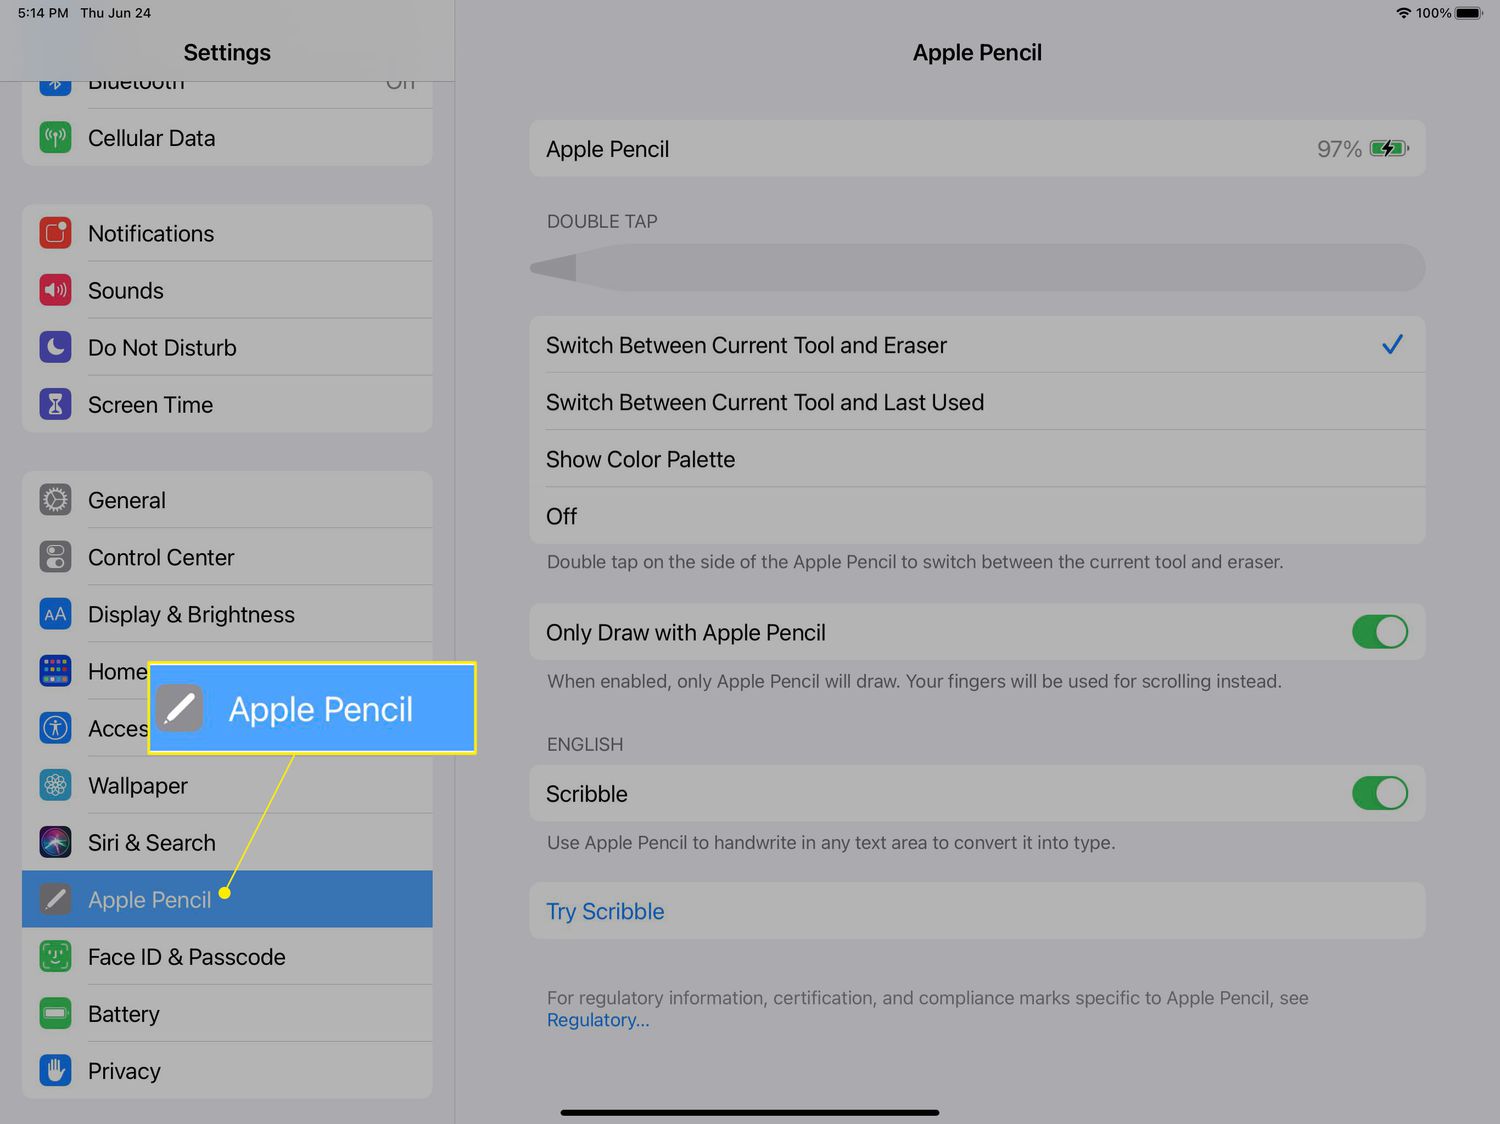
Step 2: Adjust sensitivity settings on your iPad: Once your Apple Pencil firmware is updated, navigate to the Settings app on your iPad and tap on “Apple Pencil.” Here, you will find an option called “Sensitivity.” Tap on it to access the sensitivity settings.
Within the sensitivity settings, you will typically find two options:
- Pressure Sensitivity: This allows you to control the line thickness and opacity based on the pressure applied to the Apple Pencil while drawing or writing. You can usually adjust this setting on a scale, from light pressure to heavy pressure.
- Tilt Sensitivity: This controls the shading and brush stroke effects based on the angle at which you hold the Apple Pencil. You can adjust the tilt sensitivity to your preference, whether you want more pronounced shading effects or more subtle variations.
Experiment with different sensitivity levels and test them out in your preferred drawing or note-taking app. Find the right balance that suits your artistic style and requirements.
Step 3: Use third-party apps for further customization: Some third-party drawing apps offer additional customization options for Apple Pencil sensitivity. These apps may have their own dedicated settings or presets that you can explore to fine-tune the sensitivity even further. Be sure to check the documentation or settings within your chosen app to take full advantage of these customization options.
Remember, adjusting the sensitivity settings may require some trial and error to find the optimal configuration that suits your needs. Take your time and experiment with different settings until you achieve the desired sensitivity and responsiveness from your Apple Pencil.
By following these steps, you can tailor the Apple Pencil sensitivity to your liking, allowing for a more personalized and enjoyable digital drawing or note-taking experience.
Step 1: Update Apple Pencil Firmware
Before adjusting the sensitivity settings of your Apple Pencil, it is important to ensure that you have the latest firmware installed. Updating the firmware helps in resolving any potential bugs or issues and ensures that you have access to the latest features and improvements. Here’s how you can update the firmware of your Apple Pencil:
1. Connect your Apple Pencil to your iPad: Use the lightning connector on your Apple Pencil to connect it to the lightning port on your iPad. Ensure that the connection is secure.
2. Check for updates: On your iPad, open the Settings app and tap on “General.”
3. Software Update: Scroll down and tap on “Software Update.” Check if there are any available updates for your iPad.
4. Install the update: If an update is available for your iPad, follow the on-screen instructions to download and install it. Make sure that your iPad remains connected to a stable Wi-Fi network and has sufficient battery life to complete the update process.
5. Restart your iPad: After the update is installed, restart your iPad to ensure that the changes take effect.
Updating the firmware of your Apple Pencil is crucial as it ensures compatibility with your iPad’s software and any accompanying apps specifically designed for the Apple Pencil. By keeping your Apple Pencil firmware up to date, you can enjoy the best performance and functionality that the device has to offer.
Now that you have updated the firmware of your Apple Pencil, you are ready to proceed to the next step and adjust the sensitivity settings to suit your preferences.
Step 2: Adjust Sensitivity Settings on Your iPad
Once you have updated the firmware of your Apple Pencil, you can proceed to adjust the sensitivity settings on your iPad. Here’s how:
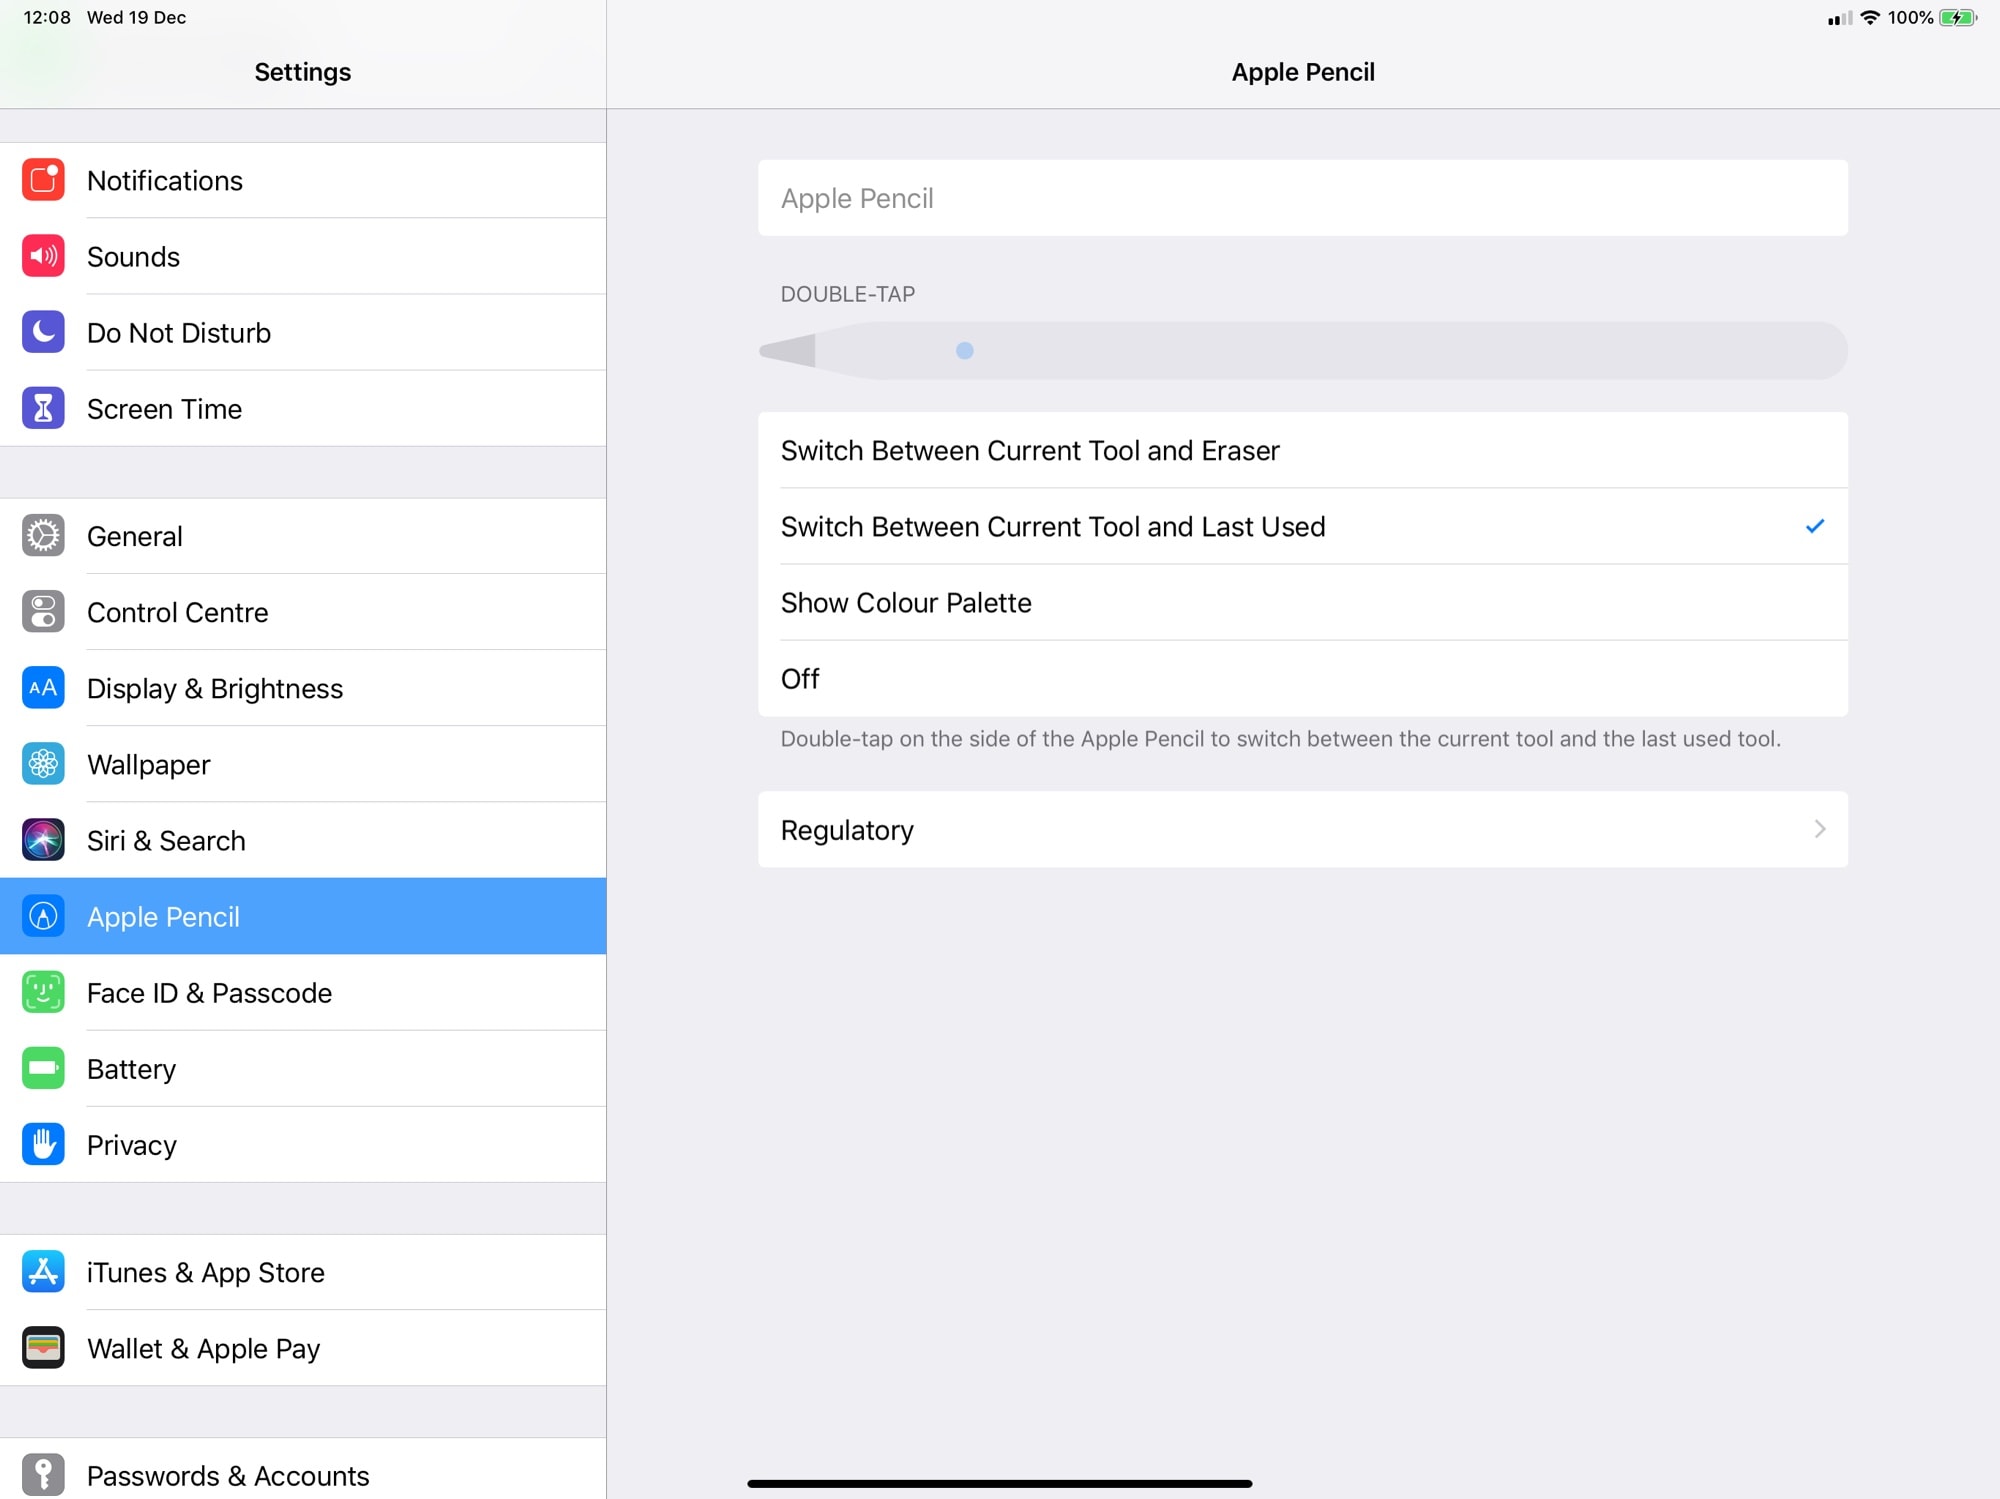
1. Open the Settings app: On your iPad’s home screen, locate the Settings app icon and tap on it to open the settings menu.
2. Go to Apple Pencil settings: In the Settings menu, scroll down and look for the “Apple Pencil” option. Tap on it to access the Apple Pencil settings.
3. Choose “Sensitivity”: Within the Apple Pencil settings, you will find an option called “Sensitivity.” Tap on it to proceed.
4. Adjust Pressure Sensitivity: Under the “Sensitivity” settings, you can typically find the “Pressure Sensitivity” option. Here, you can adjust the level of pressure required to create thicker or thinner lines. Use the slider or numerical scale to increase or decrease the pressure sensitivity to your liking.
5. Customize Tilt Sensitivity: In addition to pressure sensitivity, some iPads also offer the option to adjust “Tilt Sensitivity.” This feature allows you to control the shading and brush stroke effects based on the angle at which you hold the Apple Pencil. Use the slider or numerical scale to increase or decrease the tilt sensitivity as desired.
6. Test the settings: After adjusting the sensitivity settings, it is essential to test them out in your preferred drawing or note-taking app. Open the app and start drawing or handwriting to see how the changes affect the thickness, shading, and responsiveness of your strokes. Make further adjustments if needed until you are satisfied with the results.
Remember, different drawing or note-taking apps may have their own sensitivity settings that can override the system settings. Be sure to explore the settings within your chosen app to see if there are any additional customization options available.
By fine-tuning the sensitivity settings on your iPad, you can create a more personalized and precise drawing experience with your Apple Pencil. Take the time to experiment with different settings and find the configuration that suits your artistic style and preferences best.
Now that you have adjusted the sensitivity settings on your iPad, you can move on to the next step for further customization options, including using third-party apps.
Step 3: Use Third-Party Apps for Further Customization
In addition to adjusting the sensitivity settings on your iPad, you can further customize the Apple Pencil sensitivity by exploring third-party drawing and note-taking apps. These apps often offer advanced customization options that allow you to fine-tune the sensitivity to your exact preferences. Here’s how you can utilize third-party apps for further customization:
1. Research and select a third-party app: Browse through the App Store and research different drawing or note-taking apps that are compatible with the Apple Pencil. Look for apps that offer extensive customization options for sensitivity settings.
2. Install and open the app: Once you have chosen an app, download and install it on your iPad. Open the app to familiarize yourself with its interface and features.
3. Access the sensitivity settings: Within the app, navigate to its settings or preferences menu. Look for options related to Apple Pencil sensitivity or stylus customization.
4. Customize sensitivity to your liking: Depending on the app, you may find various adjustment sliders or numerical scales that allow you to fine-tune the pressure and tilt sensitivity of the Apple Pencil. Experiment with different sensitivity levels and test them out in the app to see how they affect your drawings or notes.
5. Save and apply the settings: Once you have customized the sensitivity settings to your satisfaction, make sure to save your changes within the app. Some apps may require you to close and reopen them for the new sensitivity settings to take effect.
Using third-party apps enables you to have even greater control over the sensitivity of your Apple Pencil. These apps often provide additional customization options that can enhance your drawing experience and cater to your specific artistic needs.
Remember, each app may have its own unique way of adjusting the sensitivity settings. Take the time to explore and experiment with the options available in different apps to find the perfect combination that suits your artistic style and workflow.
Now that you have learned how to adjust the sensitivity settings on your iPad and explore further customization options using third-party apps, you are ready to unleash the full potential of your Apple Pencil.
Conclusion
Adjusting the Apple Pencil sensitivity is a crucial step in optimizing your digital drawing and note-taking experience. By customizing the sensitivity settings, you can have more control and precision over your strokes, allowing you to create artwork that truly reflects your unique style and vision.
In this article, we explored the concept of Apple Pencil sensitivity and why it is important to adjust it. We discussed how the Apple Pencil’s pressure sensitivity and tilt recognition capabilities contribute to a more realistic and natural drawing experience. We also highlighted the benefits of adjusting the sensitivity, including personalizing the Apple Pencil to meet your preferences, fine-tuning control, and adapting to different artistic styles.
We provided three essential steps to adjust the Apple Pencil sensitivity. Firstly, we emphasized the importance of updating the Apple Pencil firmware to access the latest features and enhancements. Secondly, we guided you through the process of adjusting the sensitivity settings on your iPad, allowing you to customize the pressure and tilt sensitivity to your liking. Lastly, we encouraged you to explore third-party drawing and note-taking apps that offer additional customization options for a more personalized experience.
Remember that finding the perfect sensitivity settings may require some experimentation and adjustment. Take the time to explore different settings and test them out in your preferred apps to achieve the desired results. The journey to finding the ideal sensitivity is part of the creative process, and the possibilities are endless.
With the ability to adjust Apple Pencil sensitivity and unleash your creativity, you can embark on a digital art journey like never before. So, grab your Apple Pencil, update the firmware, adjust the sensitivity settings, and let your imagination soar.