Introduction
Instagram is not just a platform for sharing photos and videos anymore. With its ever-evolving features, Instagram has become a hub of creativity and self-expression. One of its most popular and exciting features is the ability to add music to your posts. By incorporating music into your Instagram posts, you can enhance the mood, captivate your audience, and elevate your content to a whole new level.
Adding music to your Instagram posts allows you to showcase your personality, set the tone, and create a more immersive experience for your followers. Whether you want to share a memorable moment, promote a product, or simply express yourself through a well-curated post, music adds an extra layer of emotion and engagement.
In this article, we will guide you through the process of adding music to your Instagram posts, step by step. From selecting the perfect song to customizing its placement and duration, we’ll cover everything you need to know to make your Instagram posts come alive with music.
Note that the steps mentioned in this article are based on the current version of Instagram at the time of writing. Updates to the app may result in slight variations in the user interface, but the overall process remains thesame.
So, let’s dive in and discover how you can bring music into every pixel of your Instagram feed!
Understanding Instagram’s Music Feature
Before we dive into the process of adding music to your Instagram posts, it’s important to understand how Instagram’s music feature works. Introduced in 2018, this feature allows users to add a 15-second snippet of a song to their photos or videos. Whether you’re sharing a funny meme, a beautiful landscape, or a breathtaking dance routine, the right song can take your content to new heights.
Instagram’s music feature offers a vast library of songs to choose from, covering a wide range of genres and languages. From chart-topping hits to indie gems, you’ll find a song that perfectly complements your post. The music library is regularly updated with the latest releases, ensuring you have access to the newest tracks.
When you add music to your Instagram post, your followers will see a music sticker attached to your photo or video. They can tap on the sticker to listen to a preview of the song and view the artist and title information. This feature not only enhances the user experience, but it also gives credit to the artists whose music you feature in your posts.
It’s worth noting that Instagram’s music feature may not be available in all regions due to licensing restrictions. However, if the feature is available to you, it opens up a world of creativity and artistic expression.
Now that we have a clear understanding of Instagram’s music feature and its potential benefits, let’s move on to the step-by-step process of adding music to your Instagram posts. Whether you’re an aspiring musician, a social media influencer, or simply someone who loves sharing moments with friends and family, this guide will help you make the most out of this exciting feature.
Step 1: Open the Instagram App
To begin adding music to your Instagram post, the first step is to open the Instagram app on your smartphone. Ensure that you have the latest version of the app installed to access all the features and updates.
Once you open the app, you’ll be taken to the home screen, which displays your Instagram feed. This is where you can view posts from people you follow. To move forward with adding music to your post, you need to navigate to the post creation screen.
You can reach the post creation screen in a few different ways. One way is to tap on the “+” icon located at the bottom center of the screen. This icon allows you to create a new post, whether it’s a photo or video. Another way is to swipe right from the home screen. Swiping right will open the camera screen, from which you can access the post creation screen by tapping on the square icon in the bottom left corner.
Once you’re on the post creation screen, you’ll be presented with various options for adding media to your post. These options include uploading a photo or video from your device’s gallery, taking a new photo or video using the Instagram camera, or creating a post from a story you’ve previously shared.
Take a moment to familiarize yourself with the layout and options on the post creation screen. This will ensure a smooth and efficient process as you proceed to add music to your Instagram post in the following steps.
Now that you’re on the post creation screen, you’re ready to move on to the next step: selecting or capturing a photo or video to serve as the backdrop for your music-powered post.
Step 2: Select or Capture a Photo or Video
After you’ve opened the Instagram app, the next step in adding music to your Instagram post is to select or capture a photo or video to accompany your music. The visual content you choose will serve as the backdrop for your post and help convey the message or story you want to share.
If you have a specific photo or video in mind that you want to use, you can easily select it from your device’s gallery. To do this, tap on the gallery icon (usually represented by an image thumbnail) on the post creation screen. This will open up your device’s gallery, allowing you to browse through your photos and videos. Once you’ve found the desired content, simply tap on it to select it for your post.
If you prefer to capture a new photo or video using the Instagram app, you can do so by tapping on the camera icon on the post creation screen. This will open up the Instagram camera, where you can take photos or record videos in real-time. Use the various features available, such as filters, effects, and timers, to enhance the quality and creativity of your content.
When selecting or capturing your visual content, keep in mind that it should align with the theme or message of your post. You can aim for a cohesive look by using images or videos that are similar in style or color palette. Alternatively, you can creatively juxtapose your visual and musical choices to create a dynamic and attention-grabbing post.
Once you’ve selected or captured the perfect photo or video, you’re ready to move on to the next step: adding the music sticker to your post.
Step 3: Tap on the Sticker Icon
Once you have selected or captured the photo or video for your Instagram post, the next step is to tap on the sticker icon to access the various stickers you can add to your post. Stickers are a fun and creative way to personalize your content and make it stand out from the crowd.
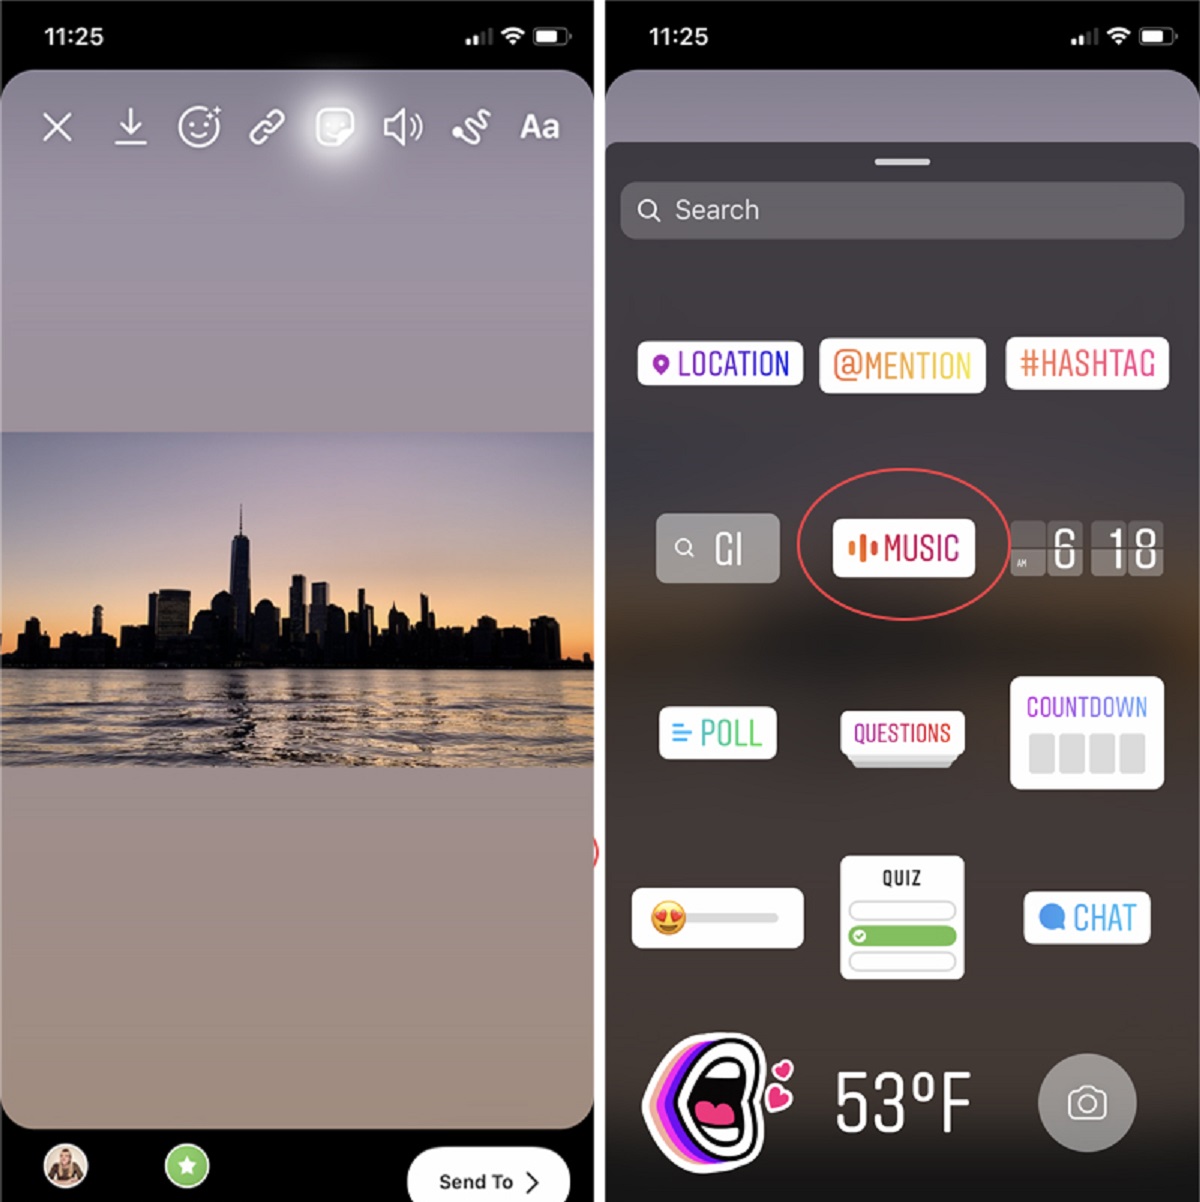
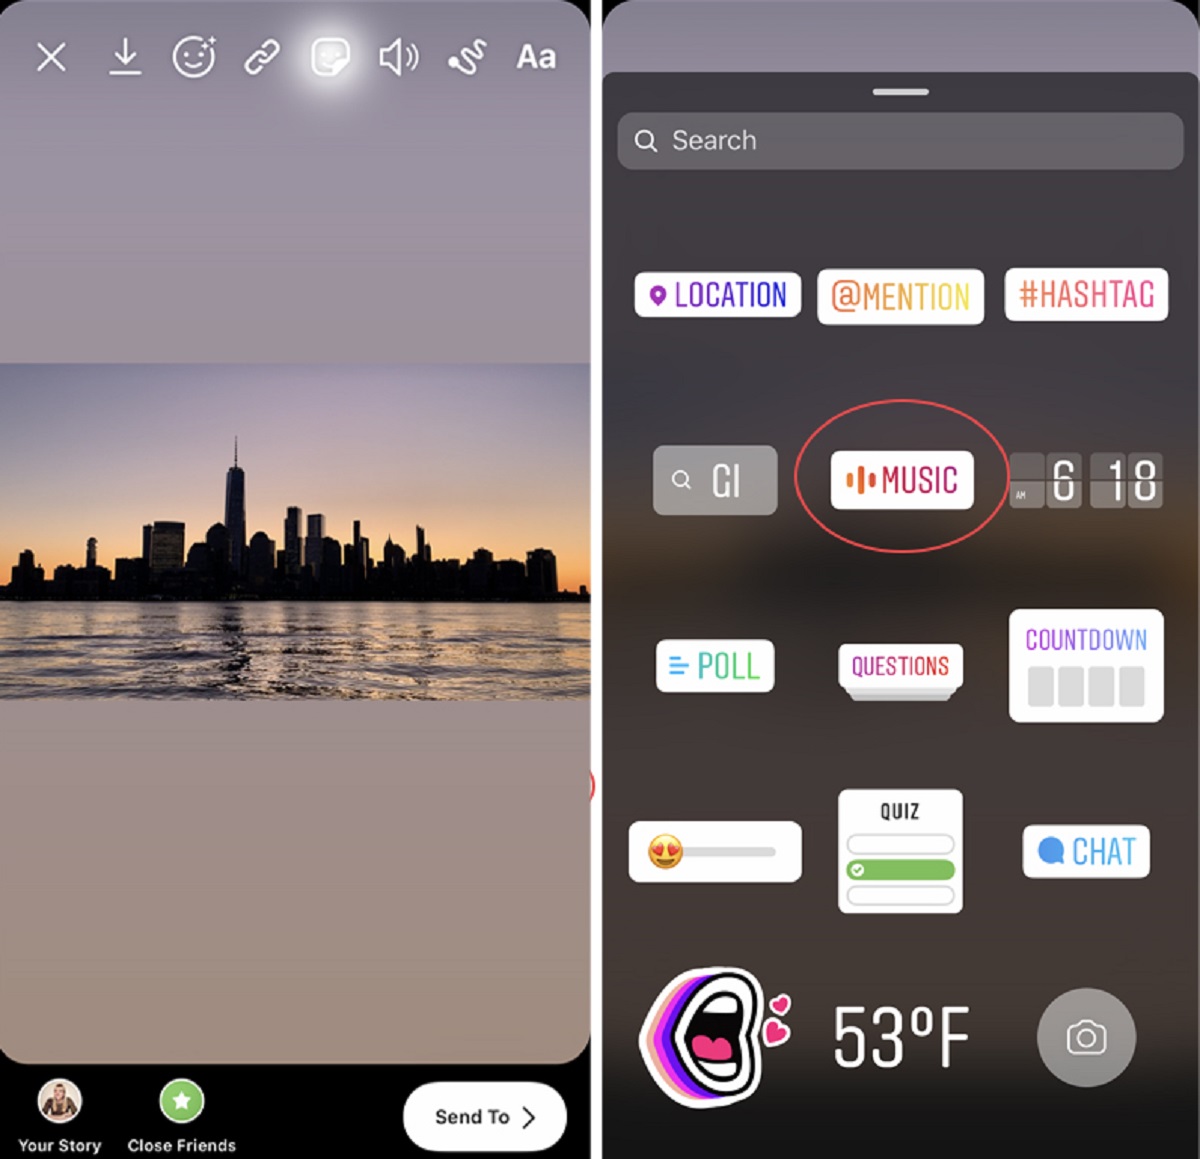
To access the sticker options, look for the square smiley face icon located in the top menu of the post creation screen. This icon represents the stickers feature in the Instagram app. Tap on it, and a wide range of sticker options will appear on your screen.
Among the sticker options, you’ll find various categories that cater to different interests and occasions. These categories typically include emoji stickers, location stickers, temperature stickers, and more. But our focus here is on the music sticker, so let’s move ahead and explore how to add it to your Instagram post.
Tap on the music sticker icon, usually represented by a music note or headphones. This will open up the music sticker menu, presenting you with different options to incorporate music into your post. Take a moment to familiarize yourself with the available choices as you move on to the next step.
Once you’ve tapped on the sticker icon and accessed the music sticker menu, you’re ready to proceed to the next step and choose the perfect song to accompany your post.
Step 4: Choose the Music Sticker
After tapping on the sticker icon and accessing the music sticker menu, it’s time to choose the perfect song to accompany your Instagram post. The music sticker feature allows you to search and select from a vast library of songs to find the one that best fits the mood and theme of your post.
On the music sticker menu, you’ll find different ways to browse and discover songs. You can start by exploring the recommended songs, which are curated based on popular trends and current music charts. This is a great option if you’re looking for a popular or trending song to add to your post.
If you have a specific song in mind, you can use the search bar to find it. Simply type in the artist, song title, or related keywords, and Instagram will present you with relevant results. This allows you to add songs that hold personal significance or directly relate to the content of your post.
Once you’ve found a song that catches your attention, you can tap on it to select it as the music for your post. Instagram provides a preview of the song, allowing you to listen to a short snippet before making your final decision. Take your time to listen to different previews and find the song that resonates with you and your post.
In addition to selecting a specific song, Instagram also offers themed song categories to make your search easier. These categories include popular genres, moods, and even specific events or celebrations. Exploring these themed categories can give you fresh ideas and help you discover songs that you may not have considered initially.
Remember, the song you choose will play a crucial role in setting the tone and enhancing the overall impact of your Instagram post. So, take your time, explore different options, and choose the music sticker that perfectly matches your vision.
Now that you’ve chosen the music sticker and selected a song, it’s time to move on to the next step: customizing the duration and placement of the song in your post.
Step 5: Search and Select a Song
Once you’ve tapped on the music sticker and accessed the music sticker menu, it’s time to search and select the perfect song to accompany your Instagram post. Instagram provides a wide range of songs to choose from, allowing you to find the one that perfectly matches the mood and theme of your content.
To search for a specific song, artist, or album, you can utilize the search bar within the music sticker menu. Simply type in relevant keywords, such as the song title or artist name, and Instagram will present you with a list of relevant results. This allows you to find songs that hold personal significance or directly relate to the content of your post.
As you browse through the search results, you can listen to a preview of each song by tapping on it. This gives you the opportunity to hear a short snippet and determine if it aligns with the vibe and atmosphere you want to create in your Instagram post.
If you’re not sure what song to choose or if you’re seeking inspiration, Instagram offers recommended songs in the music sticker menu. These recommendations are based on popular trends, current music charts, and your listening preferences. Exploring the recommended songs can introduce you to new tracks and artists that you may not have discovered otherwise.
Instagram also provides themed song categories, which can be a helpful tool when searching for the perfect song. These categories include popular genres, moods, and even specific events or celebrations. By exploring these themed categories, you may stumble upon a song that resonates deeply with your post’s theme or amplifies the emotions you want to convey.
Once you’ve found a song that appeals to you, simply tap on it to select it as the music for your Instagram post. Instagram allows you to preview your selected song before finalizing your choice, ensuring that it’s the perfect fit for your content.
Remember, the song you choose will set the mood and enhance the overall impact of your Instagram post. So take your time, search for the song that best matches your vision, and get ready to elevate your content with the power of music.
Now that you’ve found and selected your desired song, it’s time to move on to the next step: customizing the duration and placement of the song in your post.
Step 6: Customize the Song Duration and Placement
After selecting a song for your Instagram post, it’s time to customize the duration and placement of the song to ensure that it perfectly syncs with your content. This step allows you to have full control over how your chosen song plays in your post, creating a seamless integration between the music and the visuals.
Once you’ve selected a song from the music sticker menu, you’ll see the song’s title and a slider bar appear on your screen. The slider bar represents the duration of the song, and it allows you to choose the specific section you want to include in your post.
To customize the song duration, simply drag the ends of the slider bar left or right to adjust the length of the song clip. Instagram allows you to choose a segment as short as 5 seconds or up to the full duration of the song. Experiment with different durations to find the perfect snippet that enhances the impact of your post.
When customizing the song placement, you have the option to determine where the music sticker will be displayed on your post. By default, the sticker appears in the upper left corner of your post, but you can easily move it around to a different position that aligns with your creative vision.
To change the placement of the music sticker, simply tap and hold on the sticker, and then drag it to your desired location on the screen. You can place it anywhere on your photo or video, allowing you to create a visually appealing composition that integrates the music sticker organically.
Keep in mind that the song duration and sticker placement should complement your visuals and enhance the overall aesthetic of your post. Experiment with different durations and placements until you achieve the desired effect.
Once you’re satisfied with the customized song duration and sticker placement, you’re ready to move on to the next step: editing the song clip to highlight key moments in your content.
Step 7: Edit the Song Clip
After customizing the duration and placement of the song in your Instagram post, the next step is to edit the song clip to highlight key moments that perfectly synchronize with your content. Editing the song clip allows you to create a more impactful and engaging experience for your viewers.
When you tap on the selected song in your post, you’ll see a waveform representation of the song appear on your screen. This waveform represents the entire duration of the song clip that you’ve selected for your post.
To edit the song clip, you can drag and adjust the endpoints of the waveform to define the specific segment of the song that will play in your post. This gives you the ability to highlight certain parts of the song that coincide with important moments or actions in your content.
Start by identifying the sections of the song that align with the most visually striking or emotionally captivating moments in your post. For example, if you’re showcasing an exciting action sequence, you might want to emphasize a high-energy portion of the song during that specific moment.
Drag the endpoints of the waveform to select the desired section of the song that you want to emphasize. You can trim the beginning or end of the song clip to ensure it starts and ends at the perfect time. Play the song clip preview to ensure it aligns seamlessly with your visuals.
Along with editing the song clip duration, Instagram also provides additional creative tools to enhance the audio experience. You can adjust the volume of the song to ensure it’s balanced with any other audio in your post. Additionally, you can add a fade-in or fade-out effect to smoothly transition the song clip in and out.
Remember, the goal of editing the song clip is to create a harmonious blend between the music and your visuals. By highlighting key moments and synchronizing them with the song, you can create a more immersive and captivating experience for your audience.
Once you’re satisfied with the edited song clip, it’s time to move on to the next step: adding additional music stickers to further enhance your Instagram post.
Step 8: Add Additional Music Stickers
After editing the song clip for your Instagram post, you have the option to further enhance the musical experience by adding additional music stickers. These stickers can be used to showcase more songs, albums, or artists that you want to highlight and share with your audience.
To add more music stickers, simply go back to the sticker icon on the post creation screen – the square smiley face in the top menu. Tap on it, and you’ll once again have access to the sticker options, including the music sticker.
Tap on the music sticker icon to open the music sticker menu. From there, you can explore different categories and themes related to music. This can include featured songs, popular artists, playlists, and more.
Browse through the available options and select the music sticker that you want to add to your post. Just like with the initial music sticker, you have the ability to customize the duration and placement of these additional stickers.
When adding more music stickers, consider the overall aesthetic and message of your post. Choose stickers that complement the style and theme of your content. Whether you want to showcase a favorite song, promote an upcoming album, or share a playlist, these additional music stickers provide valuable opportunities to enhance your post’s musical atmosphere.
Experiment with different combinations, placements, and durations of music stickers to create an engaging and visually appealing composition. Remember, the goal is to create a cohesive and immersive musical experience that resonates with your audience.
Once you’ve added and customized the additional music stickers, it’s time to move on to the next step: previewing and sharing your music-powered Instagram post.
Step 9: Preview and Share Your Music-Powered Instagram Post
Now that you have added music and any additional music stickers to your Instagram post, it’s time to preview and share your creation with the world. Previewing your post allows you to ensure that everything looks and sounds exactly as you envisioned before it goes live on your profile.
To preview your music-powered Instagram post, simply tap on the preview button, usually represented by an eye icon. This will show you how your post will appear to your followers, complete with the selected song, customized song clip, and any additional music stickers you’ve added.
Take the time to watch your previewed post and listen to the music. Pay attention to the synchronization between the visuals and the song, ensuring they work harmoniously together. Check the placement of the music stickers to ensure they complement the overall aesthetic of your post.
If you notice any issues or feel that adjustments are necessary, you can go back and make further changes. You can modify the song clip duration, adjust sticker placements, or even switch out the song altogether if needed.
Once you’re satisfied with the preview and confident that your music-powered Instagram post reflects your vision, it’s time to share it with your followers and the wider Instagram community. Simply tap on the share button, usually represented by an arrow icon. You’ll then have the option to add a caption, apply filters, tag people, and customize any additional settings before finalizing your post.
By sharing your music-powered Instagram post, you’re inviting your audience to experience a new dimension of creativity and expression. Whether you’re showcasing a memorable moment, promoting your artistic endeavors, or simply sharing your love for music, your followers will be captivated by the combination of visuals and sound.
Remember to engage with your audience as they interact with your post. Respond to comments, answer questions, and foster a sense of community around your music-powered content. This will not only strengthen your connection with your followers but also encourage them to share and engage with your future posts.
Congratulations! You have successfully completed all the steps to add music to your Instagram post. Now, sit back and enjoy the positive reactions and engagement that your music-powered content will generate.
Conclusion
Adding music to your Instagram posts opens up a world of possibilities for creative expression, storytelling, and engagement. Through the step-by-step process outlined in this guide, you can harness the power of music to enhance the impact and emotional connection of your Instagram content.
We began by understanding Instagram’s music feature and the benefits it offers in terms of personalizing and elevating your posts. Then, we explored each step, from opening the app to selecting or capturing a photo or video as your post’s backdrop.
We delved into tapping on the sticker icon to access the music sticker menu and choosing the perfect song from a vast library. We learned how to customize the song clip’s duration and placement, ensuring it syncs seamlessly with our visuals.
Along the way, we discovered additional music stickers that can be used to highlight more songs, artists, or playlists to enrich our posts even further. Finally, we discussed the importance of previewing our music-powered Instagram post and the satisfaction that comes from sharing it with our followers.
By adding music to your Instagram posts, you can bring another layer of emotion, creativity, and entertainment to your content. Whether you’re a musician promoting your latest release, a traveler sharing breathtaking landscapes, or an entrepreneur showcasing your products, incorporating music can help you captivate your audience and create a unique experience.
Now that you have a comprehensive understanding of how to add music to your Instagram posts, it’s time to unleash your creativity and let the music be the driving force behind your captivating content. So grab your smartphone, open the Instagram app, and let your imagination run wild as you bring the power of music to every pixel of your Instagram feed!