Introduction
Welcome to the world of Chromecast! The Chromecast is a small device that allows you to stream your favorite movies, TV shows, music, and more directly to your TV. It’s a fantastic way to transform any ordinary TV into a smart one. However, there may be occasions when you need to reset your Chromecast to a new Wi-Fi network. This could be due to moving to a new home, changing your Wi-Fi provider, or simply wanting to connect your Chromecast to a different network.
Resetting your Chromecast to a new Wi-Fi network can seem like a daunting task, but fear not! In this guide, we will walk you through the step-by-step process to make it as seamless as possible. It’s important to note that resetting your Chromecast will remove all previously connected Wi-Fi networks and any other device settings. So, be prepared to set it up from scratch.
Before we dive into the reset process, it’s worth mentioning that you’ll need a few things to get started. Firstly, ensure that you have a stable internet connection and that both your Chromecast and casting device (such as a smartphone, tablet, or computer) are connected to the same network. Additionally, make sure you have the Google Home app installed on your casting device, as it will be essential for the setup process.
Now that you’re ready, let’s proceed with the step-by-step guide on how to reset your Chromecast to a new Wi-Fi network. By following these instructions, you’ll be able to enjoy streaming your favorite content on your newly connected Chromecast in no time!
Why would you need to reset your Chromecast to a new Wi-Fi?
There are several reasons why you might need to reset your Chromecast to a new Wi-Fi network. Let’s explore some of the common scenarios:
- Change of Wi-Fi network: If you have recently changed your Wi-Fi provider or upgraded your home network, you will need to reconnect your Chromecast to the new network. This ensures that your Chromecast remains connected to the internet and can continue streaming your favorite content.
- Moving to a new home: When you move to a new home or apartment, you will likely have a different Wi-Fi network. Resetting your Chromecast allows you to connect it to the new network and enjoy uninterrupted streaming in your new location.
- Troubleshooting Wi-Fi connectivity issues: In some cases, your Chromecast may encounter connectivity issues with your current Wi-Fi network. Resetting the device and connecting it to a new Wi-Fi network can sometimes resolve these problems and restore a stable streaming experience.
- Sharing Chromecast with others: If you have previously shared your Chromecast with others or given it to someone else, resetting it to a new Wi-Fi network ensures that the device is no longer linked to the previous network. This ensures greater privacy and security.
Regardless of the reason, resetting your Chromecast to a new Wi-Fi network is a straightforward process that will allow you to continue enjoying seamless streaming on your TV. The following section will guide you through the step-by-step process of resetting your Chromecast and setting it up on a new Wi-Fi network.
Step-by-step guide on resetting Chromecast to a new Wi-Fi
Resetting your Chromecast to a new Wi-Fi network involves two main steps: factory resetting the device and setting it up on the new network. Follow these steps to successfully reset your Chromecast:
- Step 1: Factory Resetting the Chromecast
- Ensure that your Chromecast is plugged into your TV and powered on.
- Locate the small button on the Chromecast device.
- Press and hold the button for approximately 25 seconds until the LED light on the Chromecast starts flashing.
- Release the button, and the Chromecast will begin the reset process. The LED light will continue flashing as the device resets.
- Wait for the Chromecast to complete the reset process. This may take a few minutes.
- Step 2: Setting up the Chromecast on a new Wi-Fi network
- Using your casting device (smartphone, tablet, or computer), open the Google Home app.
- Tap the “+” icon to add a new device.
- Follow the on-screen prompts to set up a new device.
- Select your Chromecast from the list of available devices.
- Enter the Wi-Fi network credentials for your new network and follow any additional instructions provided by the app.
- Wait for the app to connect your Chromecast to the new Wi-Fi network.
- Once the setup is complete, you’ll see a confirmation message indicating that your Chromecast is ready to use on the new network.
The first step is to factory reset your Chromecast, which erases all previously connected Wi-Fi networks and settings.
Once the Chromecast has been factory reset, you can proceed with setting it up on your new Wi-Fi network.
Congratulations! You have successfully reset your Chromecast to a new Wi-Fi network. You can now enjoy streaming your favorite content on your newly connected Chromecast!
Step 1: Factory Resetting the Chromecast
The first step in resetting your Chromecast to a new Wi-Fi network is to perform a factory reset. This process erases any previously connected Wi-Fi networks and settings, allowing you to start fresh. Follow the steps below to factory reset your Chromecast:
- Ensure that your Chromecast is plugged into your TV and powered on.
- Locate the small button on the Chromecast device. It is typically found near the power cable or on the side of the device.
- Using a paperclip, pen tip, or a similar object, press and hold the button for approximately 25 seconds.
- After holding the button, you will see the LED light on the Chromecast start flashing.
- Release the button after the LED light begins flashing.
- At this point, the Chromecast will start the reset process, indicated by a continuous flashing light.
- Wait for the Chromecast to complete the reset process, which may take a few minutes.
During the reset process, it’s important not to unplug the Chromecast or interrupt the power supply. Doing so may result in an incomplete reset and could cause issues when setting up the device on the new Wi-Fi network.
Once the Chromecast has finished resetting, it will be ready to set up on a new Wi-Fi network. Proceed to the next step to learn how to connect your Chromecast to a different Wi-Fi network successfully.
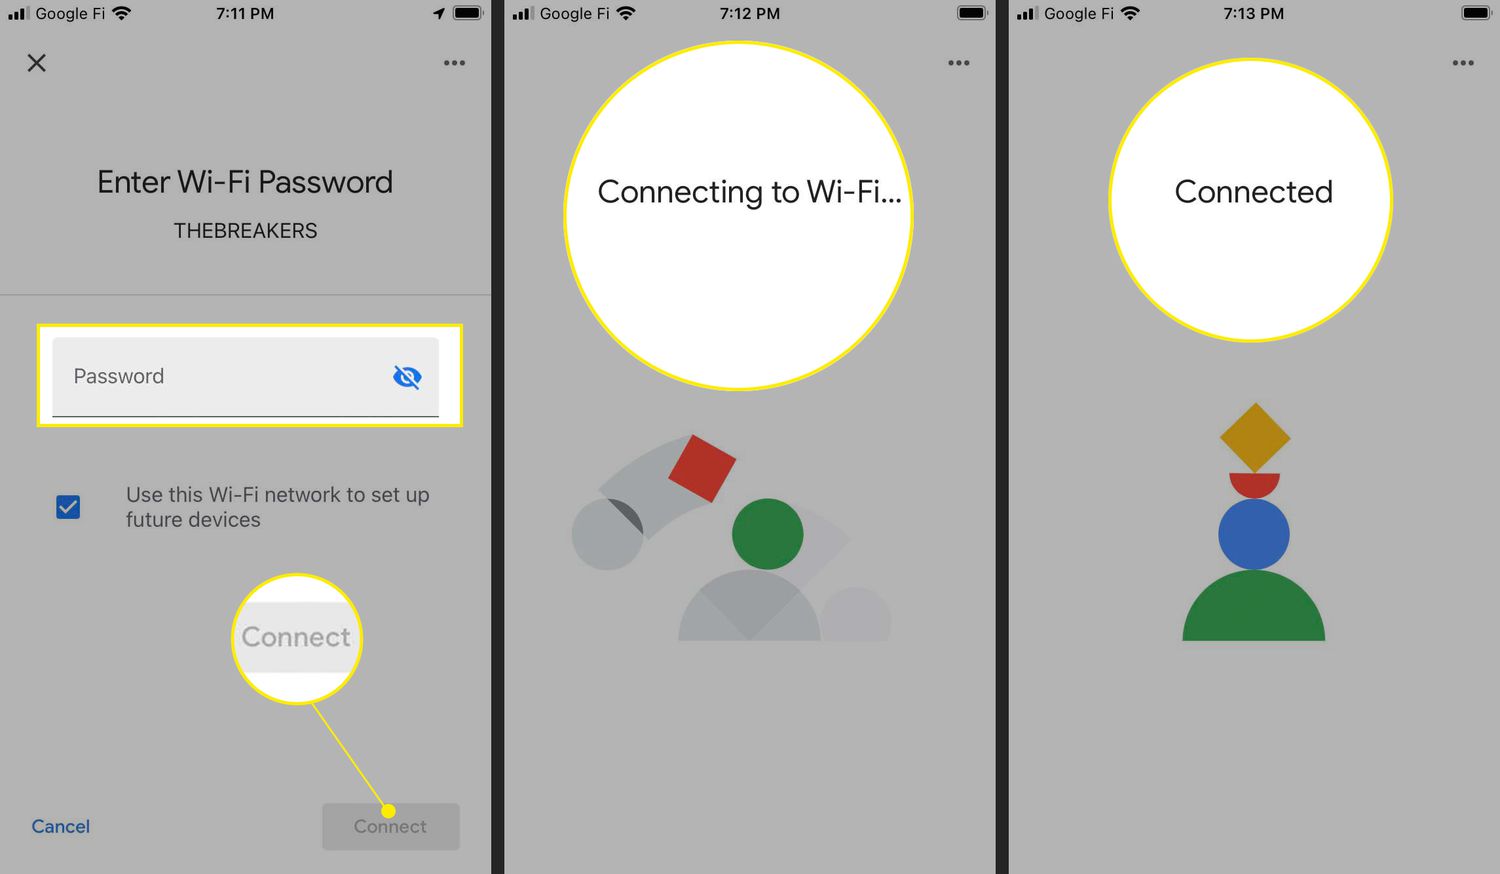
Step 2: Setting up the Chromecast on a new Wi-Fi network
After factory resetting your Chromecast, it’s time to set it up on a new Wi-Fi network. Follow the step-by-step instructions below to successfully connect your Chromecast to a different Wi-Fi network:
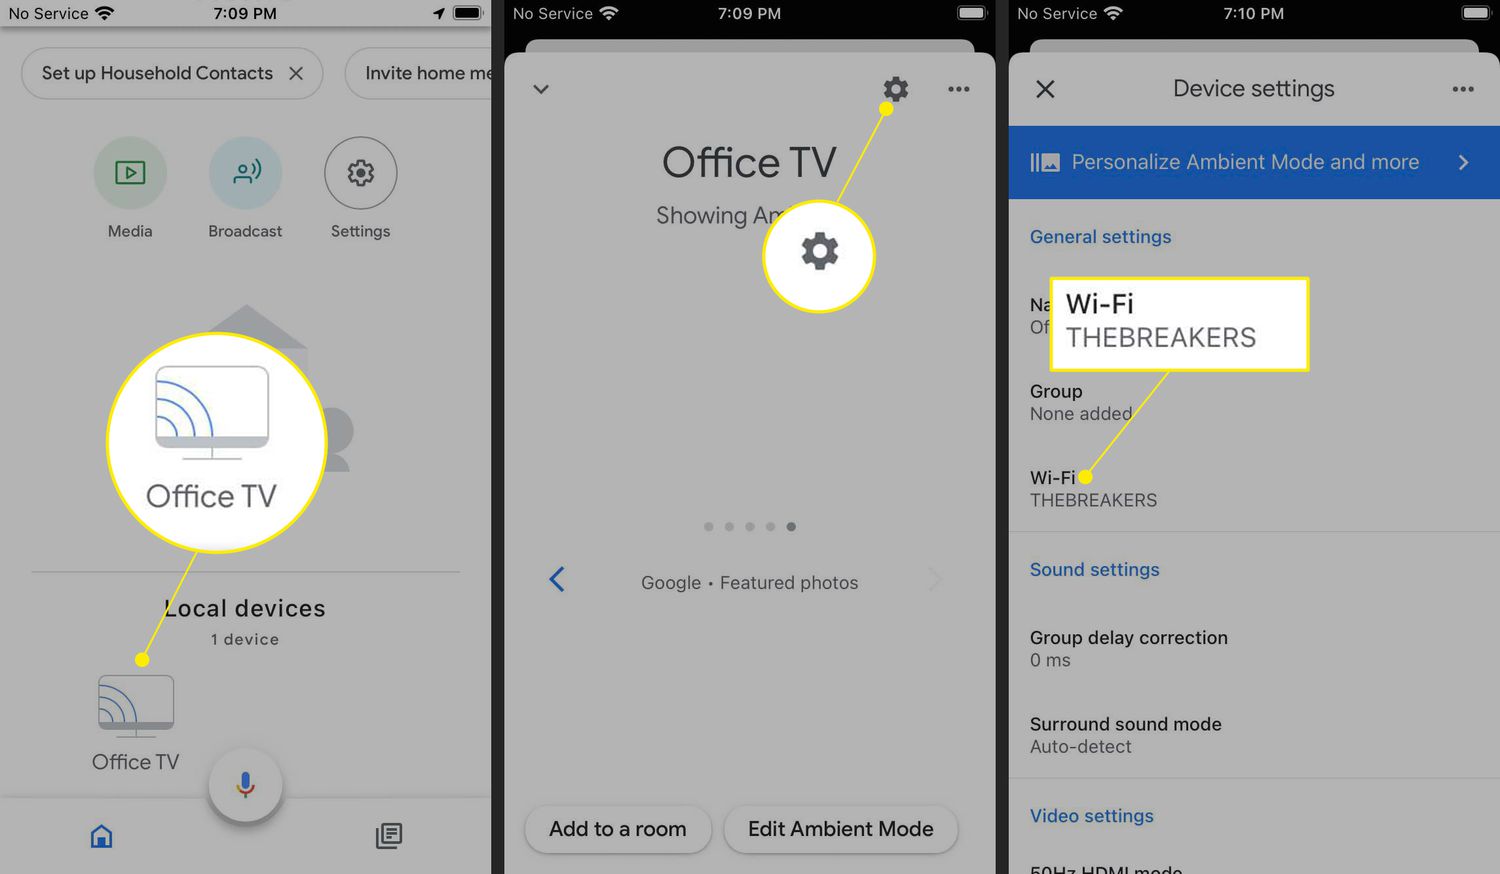
- Using your casting device (smartphone, tablet, or computer), open the Google Home app. If you don’t have the app installed, you can download it from your device’s app store.
- Tap the “+” icon in the top left corner of the app to add a new device.
- The app will search for available devices. When it finds your Chromecast, tap on it to proceed.
- Follow the on-screen prompts to set up a new device. The app will guide you through the necessary steps.
- You may be asked to provide permission for the app to access your device’s location. This is important for the setup process, as it helps the app find and connect to your Chromecast.
- Next, select your Chromecast from the list of available devices. If you have multiple Chromecast devices, make sure you choose the correct one.
- Enter the Wi-Fi network credentials for your new network. This includes the network name (SSID) and password. Make sure to enter the correct details to connect to the desired Wi-Fi network.
- Follow any additional instructions provided by the app. This may include confirming the Wi-Fi network selection or accepting terms and conditions.
- Wait for the app to connect your Chromecast to the new Wi-Fi network. This process may take a few moments.
- Once the setup is complete, you will see a confirmation message indicating that your Chromecast is ready to use on the new network.
After completing these steps, your Chromecast will be successfully set up on the new Wi-Fi network. You can now enjoy streaming your favorite content on your TV through the Chromecast.
Troubleshooting common issues during the reset process
While resetting your Chromecast to a new Wi-Fi network is usually a smooth process, it’s not uncommon to encounter a few challenges along the way. Here are some common issues that may arise during the reset process and their troubleshooting solutions:
- Chromecast not responding: If your Chromecast is unresponsive or not resetting, double-check that it is properly connected to a power source and that the LED light is flashing during the reset process. If there is still no response, try unplugging the Chromecast from the power source, waiting for a few seconds, and then plugging it back in.
- Unable to locate Chromecast: If the Google Home app is unable to find your Chromecast during the setup process, ensure that both your casting device and the Chromecast are connected to the same Wi-Fi network. Additionally, make sure that your casting device has location services enabled as this can assist in finding nearby devices.
- Wi-Fi network not appearing: If your Wi-Fi network is not appearing in the list of available networks during the setup, ensure that the network is visible and working correctly. You may need to restart your Wi-Fi router or contact your internet service provider if there are any connectivity issues.
- Incorrect Wi-Fi network credentials: Double-check that you have entered the correct Wi-Fi network credentials, including the network name (SSID) and password. Incorrect credentials will prevent the Chromecast from connecting to the new Wi-Fi network. If you’re unsure, refer to your Wi-Fi router or consult your network administrator for assistance.
- Stuck on “Connecting” or “Authenticating” stage: If the setup process gets stuck on the “Connecting” or “Authenticating” stage, try restarting both your casting device and your Wi-Fi router. This can help resolve any temporary network or connection issues that may be causing the problem.
- Factory reset not successful: If the factory reset process is not successful or the LED light on the Chromecast does not start flashing, try holding down the reset button for a longer duration (around 30 seconds) or ensuring that the button is pressed firmly. If the issue persists, contact Chromecast support for further assistance.
By troubleshooting these common issues, you’ll be able to overcome any challenges that may arise during the reset process. Remember, if you’re still experiencing difficulties, don’t hesitate to reach out to Chromecast support or consult the official support documentation for further guidance.
Conclusion
Resetting your Chromecast to a new Wi-Fi network can be necessary for various reasons, such as changing your Wi-Fi provider, moving to a new home, troubleshooting connectivity issues, or ensuring privacy when sharing the device. Although the process may initially seem daunting, following the step-by-step guide provided can help make it a seamless experience.
By factory resetting your Chromecast and setting it up on a new Wi-Fi network, you can continue enjoying streaming your favorite content on your TV. Remember to have a stable internet connection, ensure your Chromecast and casting device are connected to the same network, and have the Google Home app installed for a smooth setup.
If you encounter any issues during the reset process, such as an unresponsive device or difficulty locating your Chromecast, try troubleshooting solutions such as checking power connections, enabling location services, or restarting your Wi-Fi network. In case of persistent problems, contacting Chromecast support or referring to their official documentation can provide further guidance.
Now that you have a comprehensive understanding of how to reset your Chromecast to a new Wi-Fi network, you can confidently navigate the process whenever the need arises. Enjoy the versatility and convenience of your Chromecast as you continue to stream and cast your favorite entertainment on your TV.