Introduction
The Apple Pencil has revolutionized the way we interact with our iPads, offering a seamless and intuitive writing and drawing experience. But like any electronic device, it needs to be charged to keep it running smoothly. If you’re wondering how to know when your Apple Pencil is charged, you’re in the right place.
Whether you are using the first-generation Apple Pencil or the newer second-generation model, there are several methods to check the battery level and ensure that your Apple Pencil is ready for your creative endeavors. In this article, we will explore the different ways to keep track of your Apple Pencil’s charge status and how to properly charge it to ensure maximum performance and longevity.
Knowing the charge status of your Apple Pencil is crucial, as it allows you to plan your work or creative sessions effectively. By being aware of the battery level, you can avoid any unexpected interruptions and have a seamless and uninterrupted experience with your Apple Pencil.
So, if you’ve ever wondered how to check the charge status of your Apple Pencil, read on to find out the different methods and tips to keep your Apple Pencil charged and at its optimal performance.
How Does the Apple Pencil Charge?
The Apple Pencil relies on a unique charging mechanism that sets it apart from traditional stylus pens. Unlike regular stylus pens that require batteries, the Apple Pencil uses a built-in rechargeable battery. This not only eliminates the need for disposable batteries but also ensures a consistent and reliable power source for your creative endeavors.
The first-generation Apple Pencil charges by plugging it directly into the Lightning connector on your iPad. Simply remove the cap from the end of the Apple Pencil and insert it into the Lightning port on your iPad. This direct connection allows the iPad to transfer power to the Apple Pencil and charge it efficiently.
The newer second-generation Apple Pencil, compatible with iPad Pro models released after 2018, charges wirelessly by attaching it magnetically to the side of your iPad. The magnetic attachment not only securely holds the Apple Pencil in place but also initiates the charging process. This convenient charging method ensures that your Apple Pencil is always within reach and ready to use.
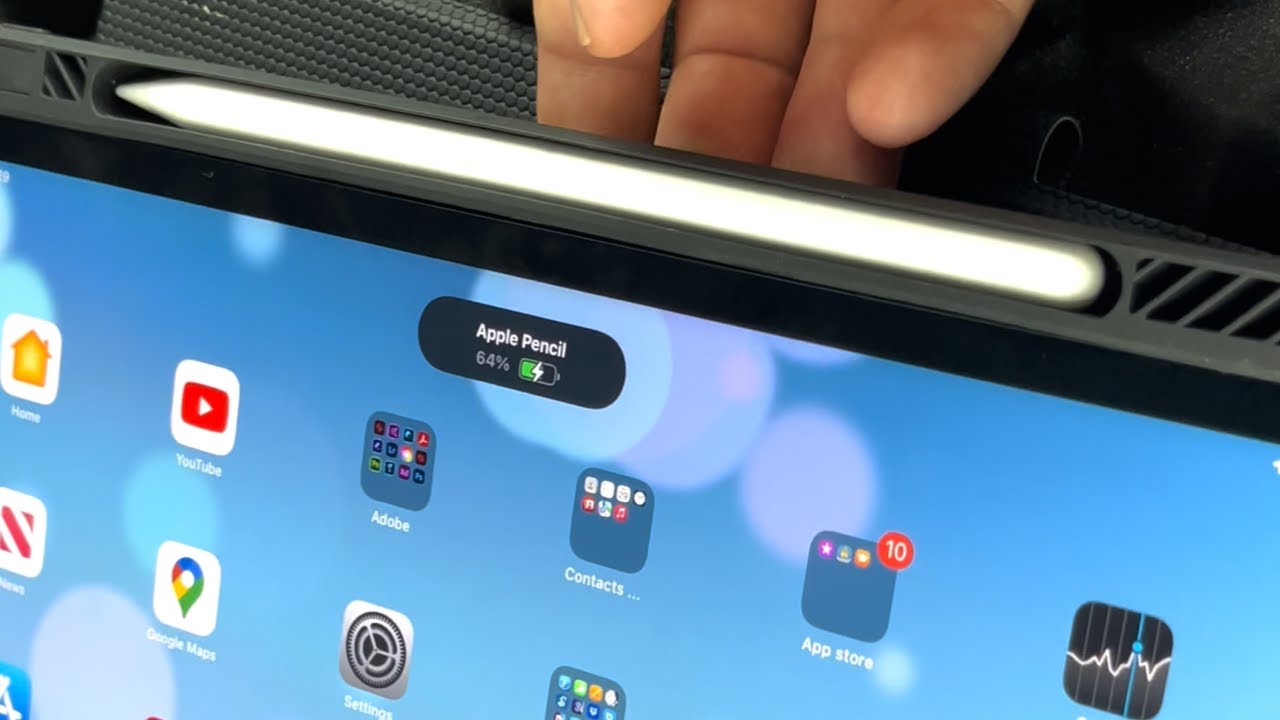
When the Apple Pencil is charging, a notification will appear on your iPad’s screen, indicating the current battery level. This visual feedback allows you to monitor the progress of the charging process and determine when your Apple Pencil is fully charged and ready to use.
It’s important to note that the charging time for the Apple Pencil may vary depending on the battery level. A completely drained Apple Pencil may take longer to charge compared to one with a partial charge. However, with the efficient charging capabilities of the Apple Pencil, you can expect a relatively fast charging time, ensuring minimal downtime between your creative sessions.
Now that you understand how the Apple Pencil charges, let’s explore the different methods to check its battery level and ensure that you always have a fully charged Apple Pencil at your disposal.
Checking the Battery Level
Keeping track of your Apple Pencil’s battery level is essential to ensure that you always have enough charge for your creative endeavors. Fortunately, there are multiple ways to check the battery level of your Apple Pencil, allowing you to stay informed and plan accordingly.
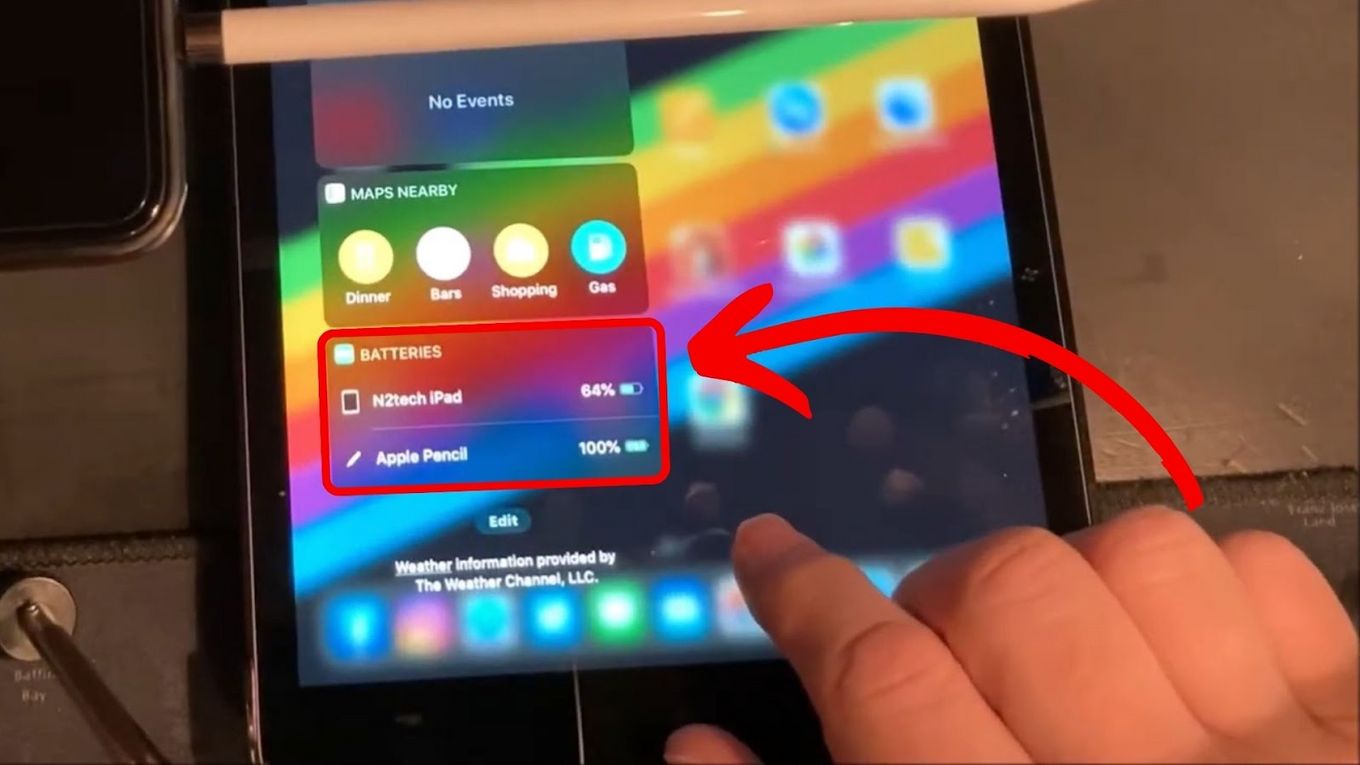
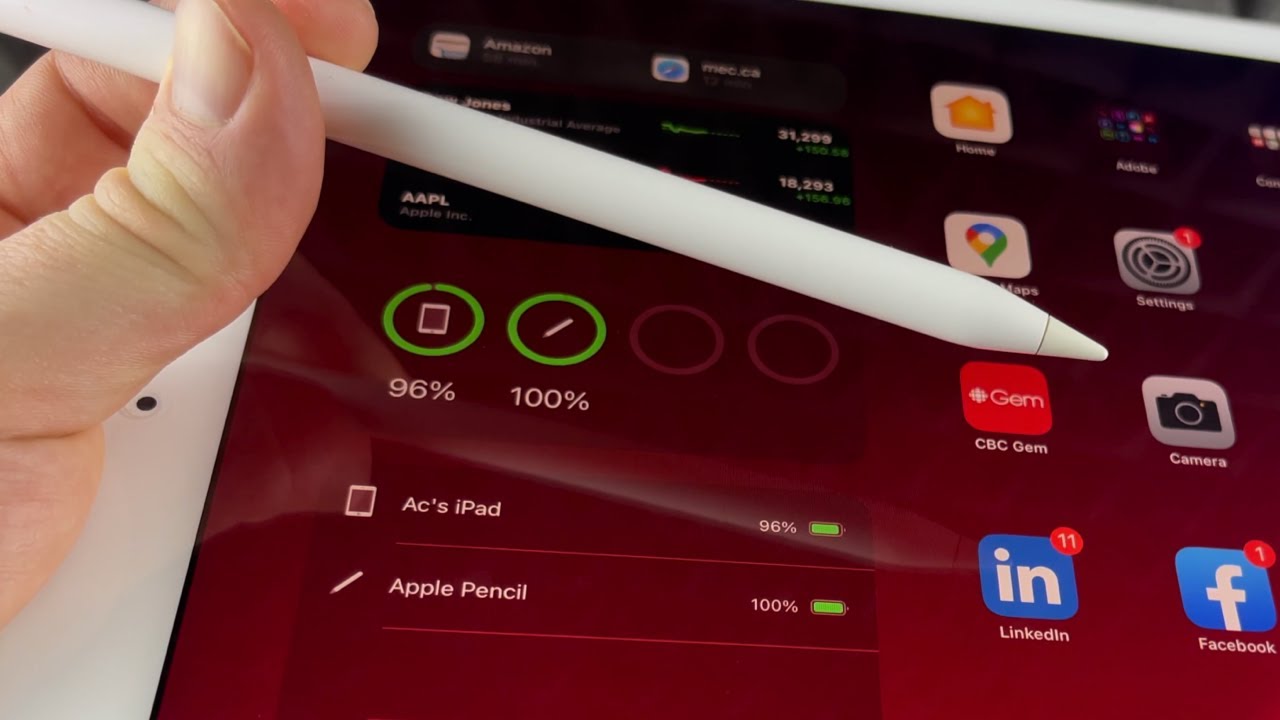
One of the easiest ways to check the battery level of your Apple Pencil is through the Battery widget on your iPad. The Battery widget provides a quick glance at the battery percentage of your connected devices, including the Apple Pencil. To access the Battery widget, swipe right on your iPad’s Home screen to open the Today View, then scroll down to find the Batteries section. Here, you can check the battery percentage of your Apple Pencil to determine if it needs to be recharged.
Another method to check the battery level of your Apple Pencil is through the Notification Center. Simply swipe down from the top-right corner of your iPad’s screen to open the Control Center and look for the battery percentage indicator. If your Apple Pencil is connected, you should see its battery level displayed alongside your device’s battery percentage.
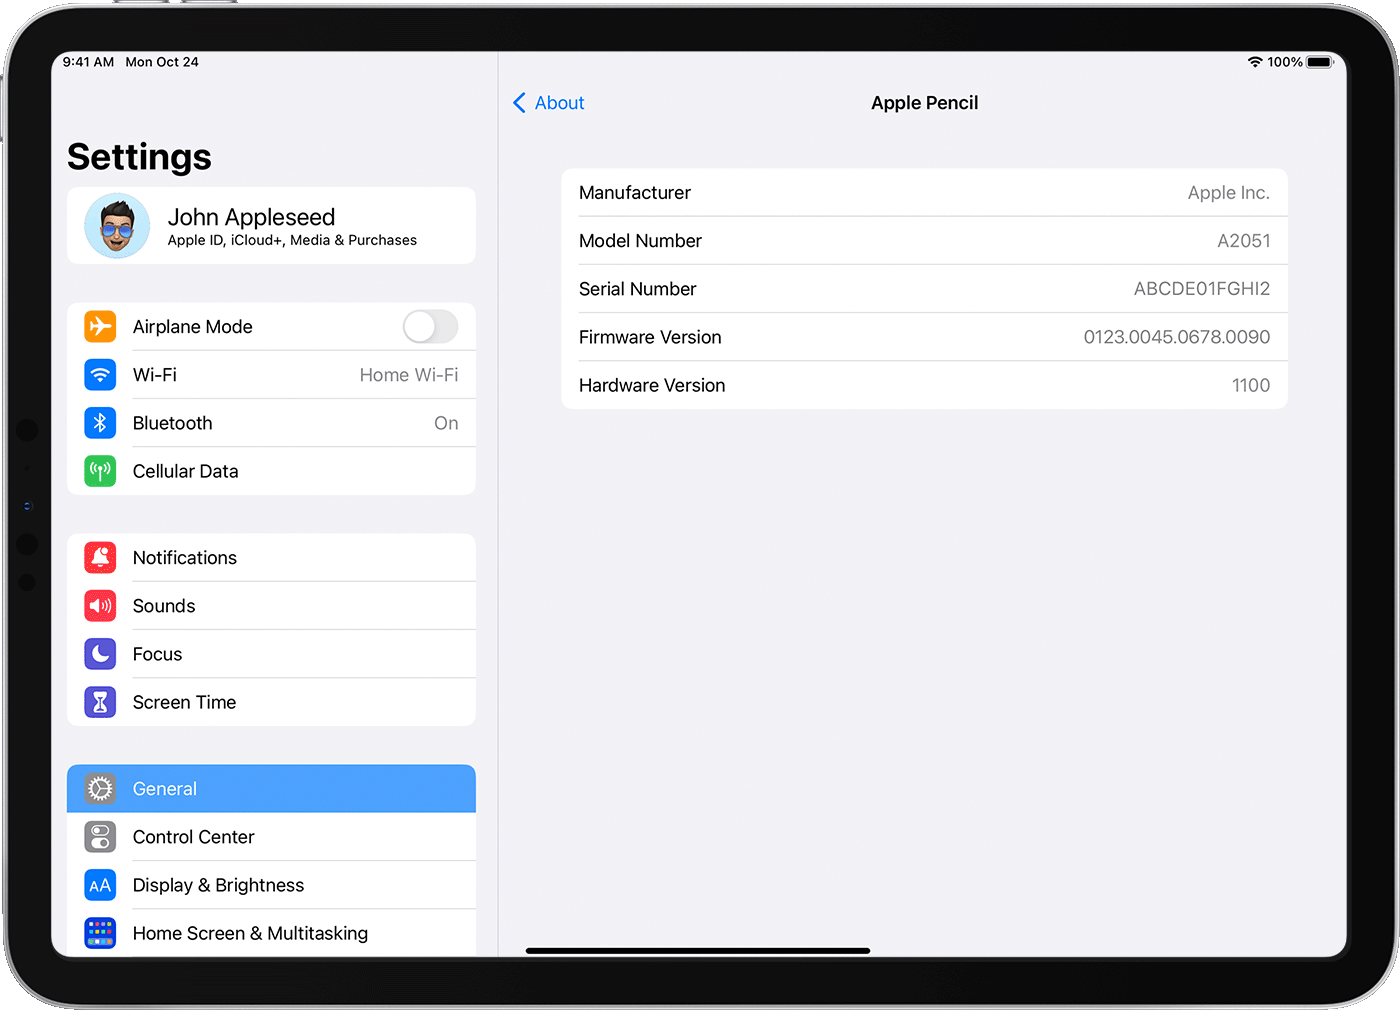
Additionally, you can check the battery level of your Apple Pencil by accessing the Pencil Settings on your iPad. Go to Settings > Apple Pencil and you will find the battery percentage displayed there. This is particularly useful if you want to view more detailed information about your Apple Pencil’s charge status or if you prefer a dedicated screen to monitor the battery level.
By regularly checking the battery level of your Apple Pencil using these methods, you can ensure that you have sufficient charge before starting any creative tasks. This allows you to plan your work accordingly and avoid any unexpected interruptions due to a low battery.
Now that we’ve covered how to check the battery level of your Apple Pencil, let’s move on to the different methods of charging the device to keep it powered and ready for use.
Using the Battery Widget
The Battery widget on your iPad is a convenient tool for monitoring the battery levels of your connected devices, including your Apple Pencil. With just a quick glance, you can determine how much charge is left in your Apple Pencil and take appropriate action if necessary.
To access the Battery widget, begin by swiping right on your iPad’s Home screen to open the Today View. You can also access the Today View by swiping down from the top-right corner of the screen. Once you’re in the Today View, scroll down until you see the Batteries section.
In the Batteries section, you’ll find a visual representation of the battery levels for all your connected devices, including your Apple Pencil. The battery icon for the Apple Pencil will display the current battery percentage. If the battery is low, the icon may change color or have a warning indicator to alert you that it needs to be recharged. This gives you an instant overview of the battery status of your Apple Pencil without the need for navigating through different menus.
Keep in mind that for the Battery widget to display accurate information about your Apple Pencil, it must be paired and connected to your iPad. If you don’t see the Apple Pencil in the Batteries section, make sure it is properly connected to your iPad and turned on.
The Battery widget is an efficient and user-friendly way to keep track of your Apple Pencil’s battery level. By regularly checking this widget, you can ensure that your Apple Pencil is sufficiently charged and ready for your creative endeavors. With this knowledge, you can plan your work accordingly and avoid any unexpected interruptions due to a low battery.
Next, we will explore another method to check the battery level of your Apple Pencil through the Notification Center. Read on to learn more about this convenient feature.
Using the Notification Center
The Notification Center on your iPad provides a quick and convenient way to check the battery level of your Apple Pencil. With just a simple swipe, you can access the Control Center and view the battery percentage of your connected devices, including the Apple Pencil.
To access the Notification Center, swipe down from the top-right corner of your iPad’s screen. This will reveal the Control Center, which houses various settings and shortcuts. Within the Control Center, you’ll find the battery percentage indicator, which displays the current level of your iPad’s battery as well as the battery level of any connected devices, such as the Apple Pencil.
If your Apple Pencil is connected and in use, the battery percentage will be shown alongside your iPad’s battery percentage. This allows you to quickly assess the battery status of your Apple Pencil without navigating through menus or widgets. If the battery level of your Apple Pencil is low, you might want to consider charging it to ensure uninterrupted usage.
It’s important to note that the Notification Center is accessible from any screen on your iPad, making it a convenient and easily accessible method to check the battery level of your Apple Pencil at any time. Whether you’re in the middle of a creative project or simply using your iPad for other purposes, a quick swipe down from the top-right corner of the screen will provide you with the battery information you need.
By regularly checking the battery level of your Apple Pencil through the Notification Center, you can stay informed and plan your work accordingly. This ensures that you have enough charge to complete your creative tasks without any unexpected interruptions.
Now that we’ve explored using the Battery widget and the Notification Center to check the battery level of your Apple Pencil, let’s move on to another method – using the Pencil Settings.
Using the Pencil Settings
Another method to check the battery level of your Apple Pencil is by accessing the Pencil Settings on your iPad. This method provides more detailed information about your Apple Pencil’s charge status and allows you to monitor it from a dedicated screen.
To access the Pencil Settings, begin by opening the Settings app on your iPad. From the home screen or the app library, locate the Settings app and tap on it to open it. Once you’re in the Settings app, scroll down and look for the “Apple Pencil” option, usually located in the list of options on the left-hand side.
Tap on the “Apple Pencil” option to open the settings specific to your Apple Pencil. Within the Apple Pencil settings, you’ll find various options related to your Apple Pencil’s functionality and settings. Along with these options, you’ll also see the battery percentage displayed at the top of the screen.
This screen not only provides you with the current battery level of your Apple Pencil but also allows you to access additional information such as the firmware version and the option to toggle features like double-tap functionality. By having this dedicated screen within the settings, you can easily and quickly check the battery level of your Apple Pencil whenever you need to.
It’s worth noting that the Pencil Settings method provides a more comprehensive overview of your Apple Pencil’s status compared to the Battery widget or the Notification Center. It’s a great option for those who prefer a dedicated screen for monitoring the battery level and other related settings of their Apple Pencil.
By regularly checking the battery level through the Pencil Settings, you can stay informed about the charge status of your Apple Pencil and plan your work accordingly. This ensures that you always have a fully charged Apple Pencil at your disposal, ready to bring your creative ideas to life.
Now that we’ve explored different methods to check the battery level of your Apple Pencil, let’s move on to the next section – charging the Apple Pencil.
Charging the Apple Pencil
Keeping your Apple Pencil charged is essential to ensure uninterrupted usage and optimal performance. The process of charging the Apple Pencil depends on whether you have the first-generation or second-generation model. Let’s explore the charging methods for each:
For the first-generation Apple Pencil, charging is straightforward. Remove the cap from the end of the Apple Pencil to reveal the Lightning connector. Insert the Lightning connector into the Lightning port on your iPad. This direct connection transfers power from your iPad to the Apple Pencil, charging it efficiently.
On the other hand, the second-generation Apple Pencil charges wirelessly. The newer iPad Pro models released after 2018 have a built-in magnetic strip on the side, specifically designed to attach and charge the Apple Pencil. Simply align the flat side of the Apple Pencil with the magnetic strip on the iPad and the magnets will securely hold it in place. This magnetic attachment initiates the charging process wirelessly, eliminating the need for physical connections.
It’s important to note that the second-generation Apple Pencil cannot be charged using the Lightning connector. The magnetic charging method is exclusive to the second-generation model and offers a more convenient and streamlined charging experience.
Regardless of which Apple Pencil model you have, it’s recommended to charge your Apple Pencil whenever its battery level is low to ensure that it’s ready for use when you need it. By adopting this proactive approach, you’ll minimize any potential disruptions due to a drained battery.
Additionally, it’s worth mentioning that you can charge your Apple Pencil using various charging adapters or accessories. For example, you can use the Apple 18W USB-C power adapter or connect it to your Mac using a USB-C to Lightning cable. These alternative charging methods can provide faster charging times, allowing you to get back to your creative tasks more quickly.
Now that you know how to charge your Apple Pencil, let’s discuss how to check the charge status while it’s charging.
Charging Methods for Apple Pencil (1st and 2nd Generation)
Charging your Apple Pencil is essential to keep it powered and ready for your creative endeavors. The charging methods differ between the first-generation and second-generation Apple Pencil. Let’s explore the charging methods for each model:
1. First-Generation Apple Pencil: The first-generation Apple Pencil charges by connecting it directly to the Lightning port on your iPad. To charge, remove the cap from the end of the Apple Pencil to reveal the Lightning connector. Insert the Lightning connector into the Lightning port on your iPad, and the iPad will transfer power to charge the Apple Pencil efficiently.
2. Second-Generation Apple Pencil: The second-generation Apple Pencil charges wirelessly by attaching it magnetically to the side of your iPad. If you own an iPad Pro model released after 2018, it features a built-in magnetic strip specifically designed to connect and charge the Apple Pencil. Simply align the flat side of the Apple Pencil with the magnetic strip on the iPad, and the magnets will securely hold it in place, initiating the wireless charging process.
It’s important to note that the second-generation Apple Pencil cannot be charged using the Lightning connector. The magnetic charging method is exclusive to the second-generation model and offers a convenient and seamless charging experience.
By understanding the specific charging method for your Apple Pencil model, you can ensure that you have the necessary accessories and know the correct procedure for charging. This helps to maintain a consistent power supply and minimizes any disruptions when using your Apple Pencil.
Additionally, it’s worth noting that you can charge your Apple Pencil using various charging adapters or accessories. For example, you can utilize the Apple 18W USB-C power adapter or connect it to your Mac using a USB-C to Lightning cable. These alternative charging methods may offer faster charging times, allowing you to get back to your creative tasks more quickly.
Now that you know the different charging methods for the Apple Pencil, let’s move on to the next section, where we will discuss how to check the charge status of your Apple Pencil while it’s charging.
Checking the Charge Status While Charging
When you’re charging your Apple Pencil, it’s helpful to keep track of its charge status to ensure that it reaches a full charge or to monitor its progress. There are a few ways to check the charge status while your Apple Pencil is connected and charging:
1. Notification on iPad: When you connect your Apple Pencil to your iPad, a notification will appear on the screen indicating the current battery level of your Apple Pencil. This visual feedback gives you a quick glance at the charge status, allowing you to monitor its progress while it’s charging. Keep an eye on the notification to ensure that your Apple Pencil reaches a full charge before you start using it again.
2. Battery Widget: As mentioned earlier, you can also check the charge status of your Apple Pencil through the Battery widget on your iPad. Access the Today View by swiping right on your iPad’s Home screen and scroll down to find the Batteries section. Here, you’ll see the battery percentage of your connected devices, including your Apple Pencil. Keep an eye on the battery percentage as it increases while the Apple Pencil charges.
3. Pencil Settings: Another way to check the charge status while your Apple Pencil is charging is by accessing the Pencil Settings on your iPad. Open the Settings app, scroll down and tap on “Apple Pencil.” In the Apple Pencil settings, you’ll find the battery percentage displayed at the top of the screen. This dedicated screen gives you a more detailed view of the charge status and helps you monitor it while the Apple Pencil is charging.
By utilizing these methods, you can stay informed about the charge status of your Apple Pencil and ensure that it reaches a full charge before you use it again. This allows for uninterrupted creative sessions and ensures that your Apple Pencil is consistently ready for use when you need it.
Next, we will discuss some charging recommendations and tips to help you maintain the battery life and maximize the performance of your Apple Pencil.
Charging Recommendations and Tips
To ensure optimal performance and longevity for your Apple Pencil, it’s important to follow certain charging recommendations and implement helpful tips. Here are some recommendations and tips to keep in mind:
1. Charge Regularly: It’s recommended to charge your Apple Pencil whenever its battery level is low, even if it’s not completely drained. Regular charging ensures that your Apple Pencil is always ready for use and minimizes the chances of running out of battery during important tasks.
2. Avoid Overcharging: While it’s important to keep your Apple Pencil charged, avoid leaving it connected to the charger for extended periods once it has reached a full charge. Overcharging can potentially impact the battery life over time. Disconnect the Apple Pencil from the charger once it reaches a full charge to preserve its battery health.
3. Avoid Extreme Temperatures: Extreme temperatures, both hot and cold, can have a negative impact on the battery life and performance of your Apple Pencil. Avoid exposing the Apple Pencil to excessive heat or cold, as it can affect the battery’s capacity and overall performance.
4. Store for Long Periods: If you’re planning to store your Apple Pencil for an extended period, make sure to charge it to at least 50% before doing so. Storing the Apple Pencil with a partially charged battery helps to maintain the battery’s health during periods of non-use.
5. Update Your iPad: It’s essential to keep your iPad’s software up to date to ensure compatibility and optimal charging performance with the Apple Pencil. Regularly check for software updates and install them when available to maintain the best charging experience.
6. Use Apple-Certified Accessories: When charging your Apple Pencil, always use Apple-certified charging cables, adapters, and accessories. Using non-certified or low-quality accessories may not provide the same level of reliability and safety, potentially affecting the charging process or even damaging your Apple Pencil.
7. Cleaning the Charging Connector: Over time, dust or debris may accumulate on the charging connector of your Apple Pencil, hindering the charging process. Periodically clean the charging connector with a soft, lint-free cloth to ensure a smooth and reliable charging connection.
By adhering to these recommendations and implementing these tips, you can optimize the charging process, maximize the battery life, and prolong the overall lifespan of your Apple Pencil.
Now that we’ve covered the charging recommendations and tips, it’s time to conclude our exploration of the various aspects of charging and monitoring the charge status of the Apple Pencil. With this knowledge, you can effectively manage the battery life of your Apple Pencil and enjoy uninterrupted creative experiences.
Conclusion
The Apple Pencil is a remarkable tool that has revolutionized digital creativity and note-taking on iPads. Keeping it charged and monitoring its battery level is crucial to ensure uninterrupted usage and optimal performance. In this article, we explored different methods to check the battery level of the Apple Pencil, including using the Battery widget, the Notification Center, and the Pencil Settings on your iPad.
We also discussed the various charging methods for both the first-generation and second-generation Apple Pencil. The first-generation model charges by connecting it directly to the Lightning port of your iPad, while the second-generation model charges wirelessly by attaching it magnetically to the side of your iPad. Understanding these charging methods enables you to keep your Apple Pencil powered and ready for use.
Furthermore, we provided recommendations and tips to help you maintain the battery life and maximize the performance of your Apple Pencil. Regular charging, avoiding overcharging, and using Apple-certified accessories are just a few practices to keep in mind. By following these suggestions, you can ensure that your Apple Pencil is always ready to bring your creative ideas to life.
Ultimately, by staying informed about the charge status of your Apple Pencil and implementing these charging and maintenance practices, you can enjoy uninterrupted creative sessions and extend the longevity of your Apple Pencil.
We hope this article has provided you with valuable insights into how to check the battery level, charge your Apple Pencil, and maintain its performance. Now, armed with this knowledge, you can make the most of your Apple Pencil and unlock its full potential for your digital creativity and productivity.