Introduction
Setting up a proxy in Firefox can be a valuable solution for users seeking enhanced privacy, security, or access to region-restricted content. By configuring a proxy, users can route their internet traffic through a different server, effectively masking their IP address and encrypting their data. This process is particularly beneficial for individuals who prioritize online anonymity and wish to safeguard their browsing activities from prying eyes.
Whether you're a privacy-conscious individual, a remote worker, or someone looking to bypass geo-blocked content, understanding how to set up a proxy in Firefox is a valuable skill. With the right proxy configuration, you can access websites and online services that might otherwise be restricted in your location, all while maintaining a layer of anonymity and security.
In this guide, we will walk you through the step-by-step process of setting up a proxy in Firefox. By following these instructions, you can gain a deeper understanding of how to leverage proxy settings to enhance your browsing experience. Whether you're using a proxy for personal privacy or professional purposes, mastering this skill will empower you to take control of your online presence and access a broader range of online content.
Now, let's delve into the specifics of how to set up a proxy in Firefox, empowering you to harness the full potential of this versatile web browser.
Step 1: Open Firefox
To initiate the process of setting up a proxy in Firefox, the first step is to launch the Firefox web browser on your device. Whether you are using a Windows, Mac, or Linux operating system, the Firefox browser can be easily accessed from your desktop or application menu. Simply locate the Firefox icon and click on it to open the browser.
Upon launching Firefox, you will be greeted by the familiar interface, featuring the address bar, tabs, and various navigation controls. Take a moment to ensure that you are running the latest version of Firefox, as this will guarantee access to the most up-to-date features and security enhancements.
If you are using a mobile device, such as a smartphone or tablet, you can open Firefox by tapping on the app icon from your home screen or app drawer. Once the browser is launched, you will be ready to proceed with the subsequent steps to configure your proxy settings.
Opening Firefox is the foundational step in the process of setting up a proxy, serving as the gateway to accessing the browser's advanced settings and configuration options. With Firefox at your fingertips, you are now prepared to delve into the next phase of the proxy setup process, which involves accessing the browser's settings to configure the proxy server details.
By successfully completing this initial step, you have positioned yourself to seamlessly navigate through the subsequent stages of setting up a proxy in Firefox. With the browser now open and ready for customization, you are poised to embark on a journey toward enhancing your online privacy, security, and accessibility through the strategic use of proxy settings.
Now that you have opened Firefox, let's move on to the next step, where we will delve into accessing the settings that will enable you to configure the proxy server details and optimize your browsing experience.
Step 2: Access the Settings
Upon opening Firefox, the next crucial step in setting up a proxy involves accessing the browser's settings. This pivotal phase serves as the gateway to a myriad of configuration options, allowing users to tailor their browsing experience to align with their specific preferences and requirements.
To access the settings in Firefox, begin by locating the three horizontal lines, often referred to as the "hamburger menu," positioned at the top-right corner of the browser window. This icon serves as the entry point to a wealth of customization and configuration options within Firefox. Upon clicking the hamburger menu, a dropdown menu will unfurl, presenting a range of features and settings for users to explore.
Within the dropdown menu, you will find an option labeled "Options." Clicking on this selection will lead you to the Firefox settings interface, where an array of categories and preferences awaits your attention. The settings interface is thoughtfully organized, presenting users with a user-friendly layout that facilitates seamless navigation and customization.
Once inside the settings interface, you will encounter a sidebar on the left-hand side, showcasing various categories such as General, Home, Search, Privacy & Security, and more. To proceed with configuring the proxy settings, direct your attention to the "General" category, which serves as a foundational hub for customizing Firefox's behavior and appearance.
Within the "General" category, you will find a subcategory labeled "Network Settings." This section is pivotal in the context of setting up a proxy, as it houses the essential configurations that govern how Firefox connects to the internet. By clicking on the "Settings" button within the "Network Settings" section, you will gain access to the interface where proxy configurations can be specified.
As you embark on this journey of accessing the settings in Firefox, it's important to approach this phase with a sense of curiosity and purpose. The settings interface is a treasure trove of customization options, empowering users to tailor their browsing environment to suit their unique needs. By navigating through the intuitive layout of Firefox's settings, you are laying the groundwork for a personalized and optimized browsing experience.
With the settings interface now within reach, you are poised to venture into the next phase of the proxy setup process, where you will delve into the intricacies of configuring the proxy settings to align with your specific objectives. As you prepare to navigate through the network settings and fine-tune your proxy configurations, you are on the cusp of unlocking a realm of possibilities within the Firefox browser.
Now that you have successfully accessed the settings in Firefox, let's proceed to the next step, where we will delve into the intricacies of navigating to the network settings and configuring the proxy details to fortify your browsing experience.
Step 3: Navigate to the Network Settings
Upon accessing the settings interface in Firefox, the next pivotal step in setting up a proxy involves navigating to the network settings. This phase serves as the gateway to a spectrum of configurations that govern how Firefox connects to the internet, including the crucial proxy settings that can enhance your browsing experience.
To embark on this journey, navigate to the "General" category within the Firefox settings interface. This foundational hub for customizing Firefox's behavior and appearance lays the groundwork for fine-tuning your browsing environment to align with your unique preferences. Within the "General" category, you will encounter a subcategory labeled "Network Settings." This section serves as a pivotal gateway to a range of configurations that dictate how Firefox interacts with the internet.
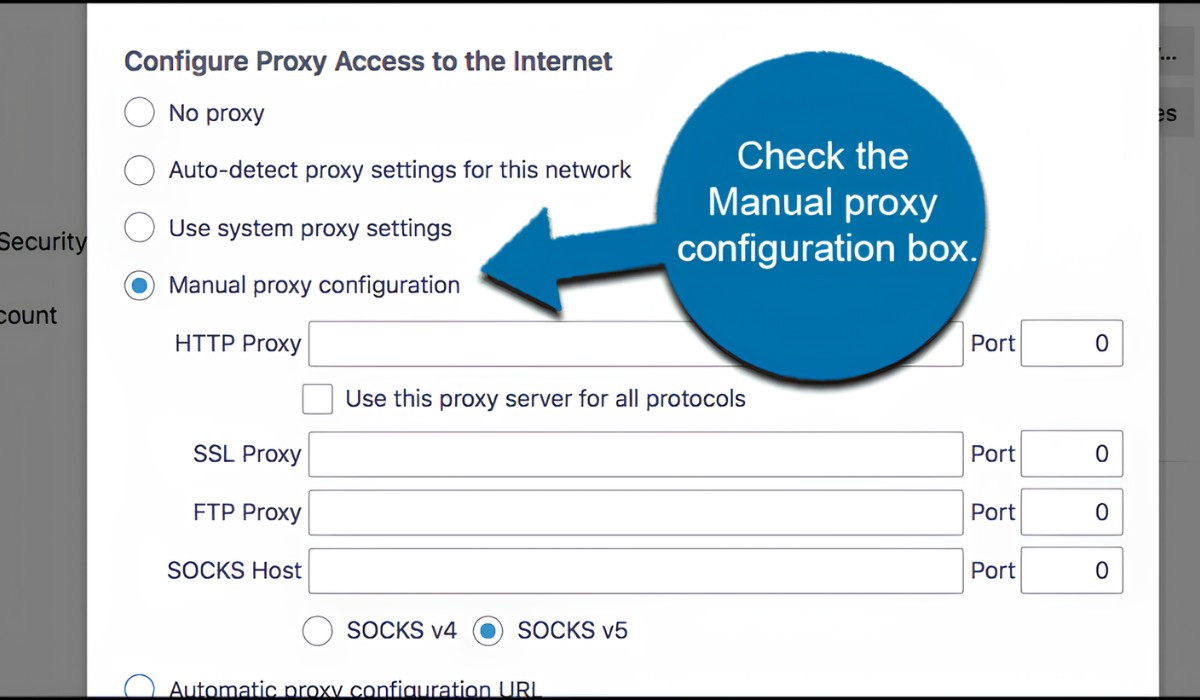
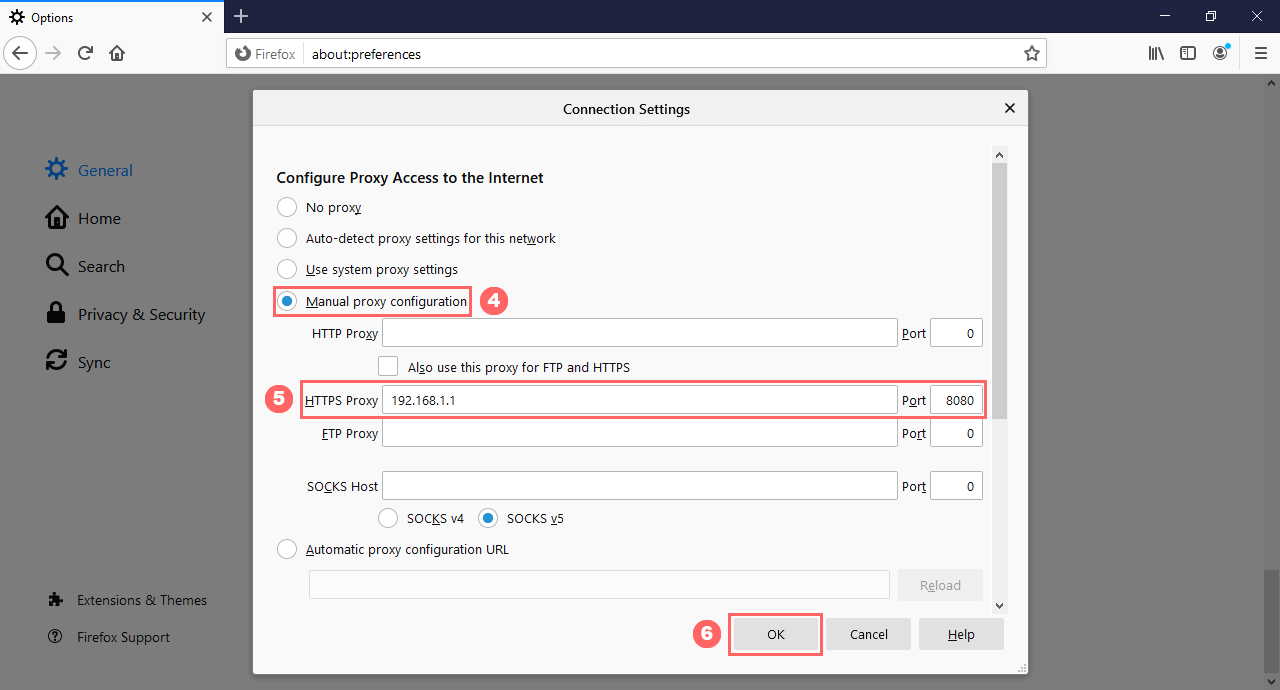
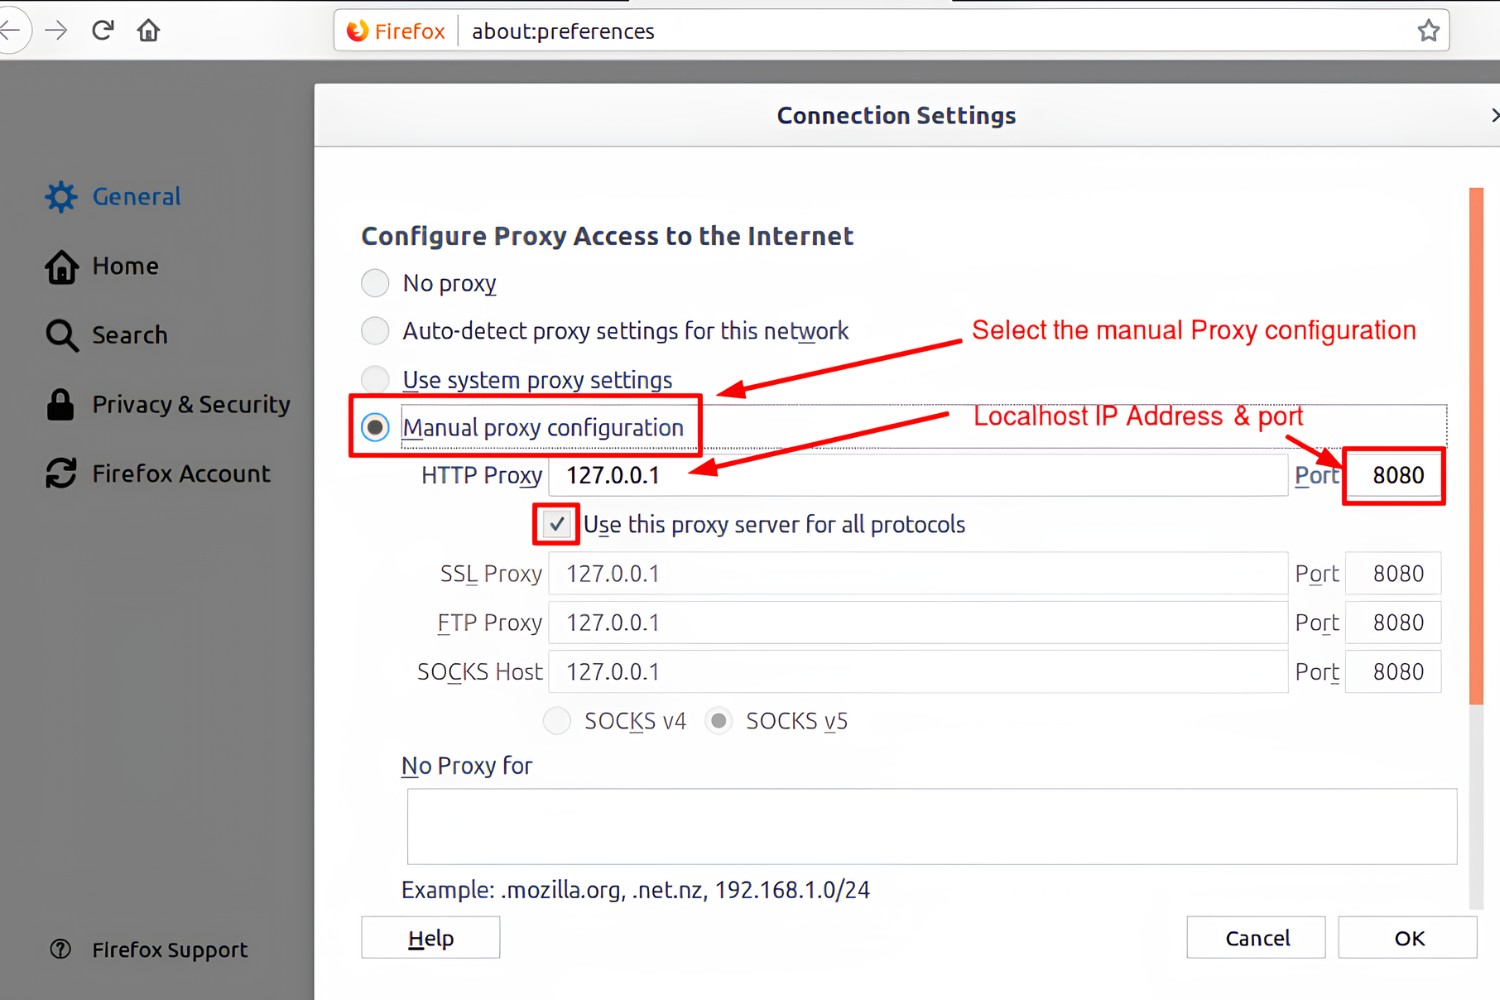
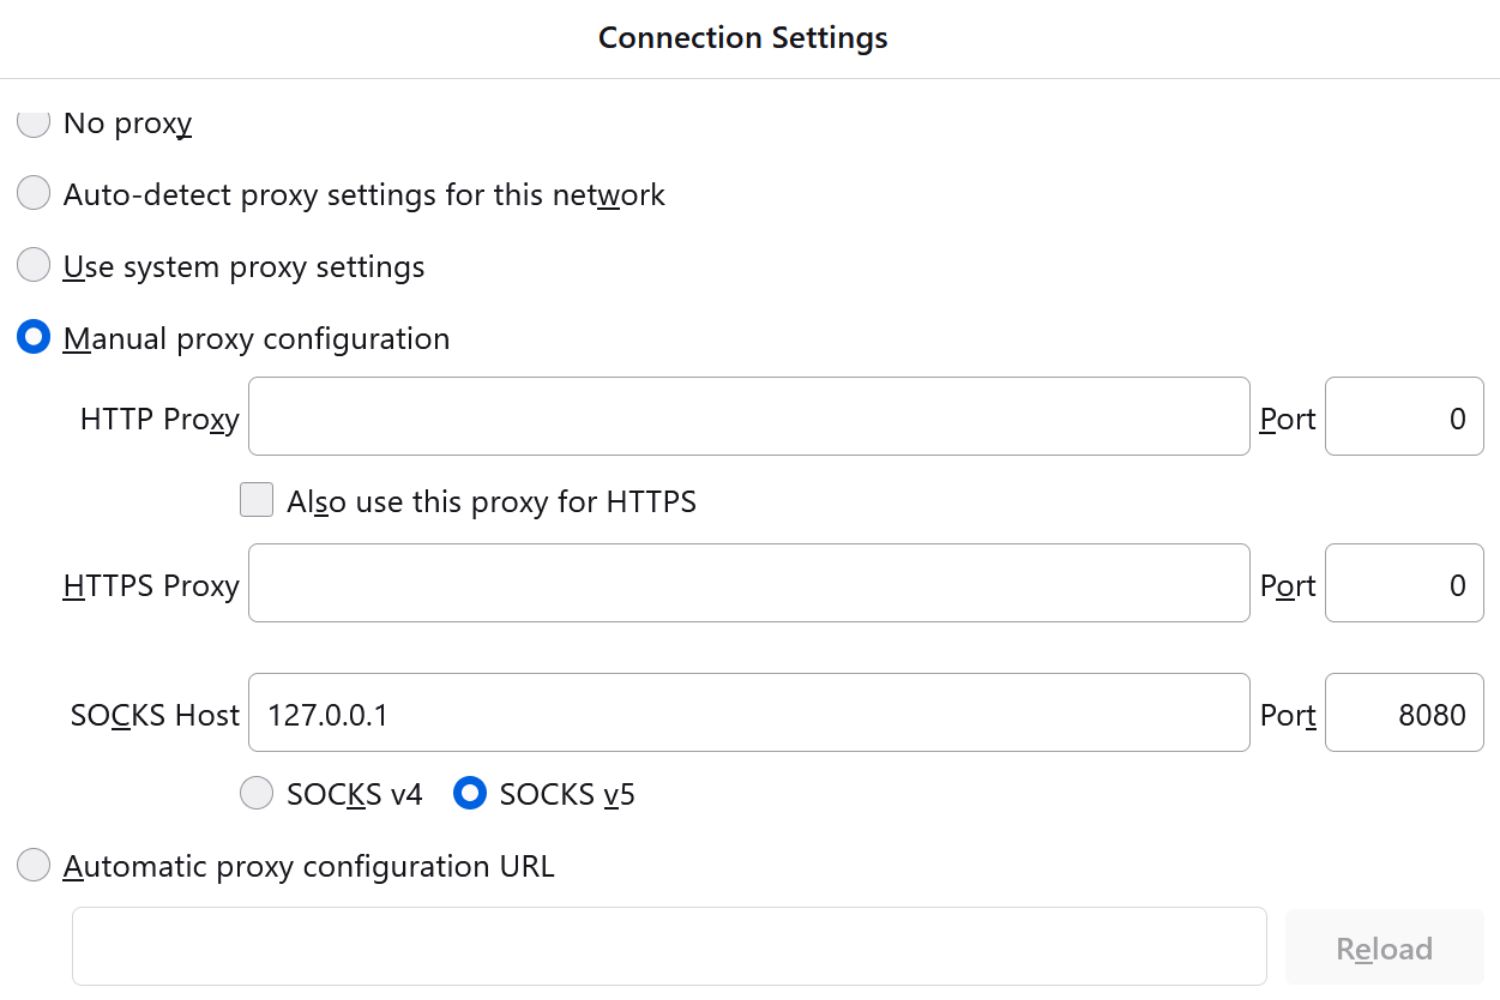
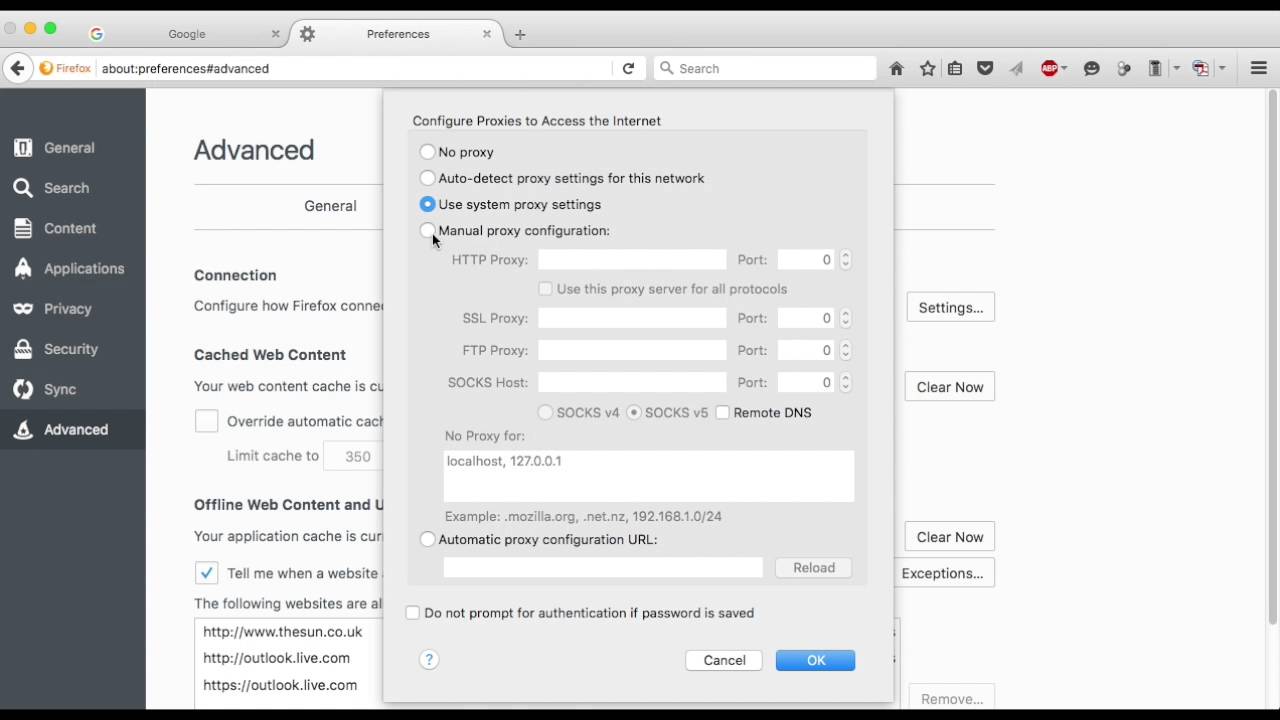
Upon clicking the "Settings" button within the "Network Settings" section, you will gain access to a comprehensive interface where proxy configurations can be specified. This interface presents a wealth of options, empowering users to tailor their network settings to align with their specific requirements. Here, you will find the "Connection Settings" dialog, which is instrumental in configuring the proxy details to fortify your browsing experience.
Within the "Connection Settings" dialog, you will encounter several options, including "No proxy," "Auto-detect proxy settings for this network," "Use system proxy settings," and "Manual proxy configuration." These options cater to diverse user preferences, offering flexibility in how users choose to route their internet traffic through proxy servers.
For users seeking a seamless and automated approach, the "Auto-detect proxy settings for this network" and "Use system proxy settings" options provide convenient solutions that leverage system configurations to streamline the proxy setup process. On the other hand, the "Manual proxy configuration" option empowers users with granular control, allowing them to input specific proxy server details, including the proxy's IP address and port number.
As you navigate through the network settings in Firefox, it's essential to approach this phase with a sense of purpose and exploration. The network settings interface is designed to accommodate a diverse range of user preferences, offering a user-friendly platform for configuring proxy details and optimizing your browsing environment.
By successfully navigating to the network settings in Firefox, you are now positioned to delve into the next phase of the proxy setup process, where you will configure the proxy details to align with your specific objectives. As you prepare to fine-tune your network settings and harness the power of proxy configurations, you are on the brink of unlocking a realm of possibilities within the Firefox browser.
Now that you have successfully navigated to the network settings in Firefox, let's proceed to the next step, where we will delve into the intricacies of configuring the proxy details to fortify your browsing experience.
Step 4: Configure Proxy Settings
Configuring proxy settings in Firefox is a pivotal phase that empowers users to tailor their browsing experience to align with their specific privacy, security, and accessibility requirements. Upon navigating to the network settings within the Firefox browser, the next step involves delving into the intricacies of configuring the proxy details to fortify your online presence.
Within the "Connection Settings" dialog, users are presented with a range of options, including "No proxy," "Auto-detect proxy settings for this network," "Use system proxy settings," and "Manual proxy configuration." Each option caters to diverse user preferences, offering flexibility in how users choose to route their internet traffic through proxy servers.
For users seeking a seamless and automated approach, the "Auto-detect proxy settings for this network" and "Use system proxy settings" options provide convenient solutions that leverage system configurations to streamline the proxy setup process. These options are particularly beneficial for individuals who prefer a hands-off approach, allowing Firefox to automatically detect and utilize proxy settings based on network configurations.
On the other hand, the "Manual proxy configuration" option empowers users with granular control, enabling them to input specific proxy server details, including the proxy's IP address and port number. This level of customization is invaluable for individuals who prioritize precision and wish to exert direct influence over their proxy configurations.
By opting for manual proxy configuration, users can specify the type of proxy they intend to use, whether it's HTTP, SSL, FTP, or SOCKS. This level of specificity ensures that users can tailor their proxy settings to suit the requirements of different online activities, such as web browsing, file transfers, or secure communications.
Furthermore, the "No proxy" option provides a straightforward solution for users who do not wish to route their internet traffic through a proxy server. This option is ideal for individuals who seek to bypass proxy usage entirely, allowing their browsing activities to proceed without intermediary server involvement.
As users navigate through the proxy configuration options, it's essential to approach this phase with a sense of purpose and exploration. The proxy settings interface in Firefox is designed to accommodate a diverse range of user preferences, offering a user-friendly platform for configuring proxy details and optimizing the browsing environment.
By meticulously configuring the proxy settings in Firefox, users can harness the power of proxy configurations to fortify their online presence, enhance privacy, and access region-restricted content. This phase marks a pivotal juncture in the process of setting up a proxy in Firefox, empowering users to take control of their internet traffic and tailor their browsing experience to align with their unique objectives.
Now that you have gained insights into the intricacies of configuring proxy settings in Firefox, you are prepared to proceed to the final step, where you will save and apply the changes to solidify your proxy configurations and embark on a seamlessly optimized browsing journey.
Step 5: Save and Apply Changes
Upon meticulously configuring the proxy settings in Firefox, the final step involves saving and applying the changes to solidify your proxy configurations and embark on a seamlessly optimized browsing journey. This pivotal phase serves as the culmination of the proxy setup process, ensuring that your specified proxy details are effectively integrated into Firefox's network settings.
To initiate this crucial step, navigate to the bottom of the "Connection Settings" dialog, where you will encounter the "OK" button. By clicking on this button, you will confirm and save the proxy configurations you have meticulously tailored to align with your specific privacy, security, and accessibility requirements.
Upon clicking "OK," Firefox will seamlessly apply the configured proxy settings, enabling your browsing activities to be routed through the designated proxy server. This seamless integration ensures that your online presence is fortified with enhanced privacy and security, as your internet traffic traverses through the specified proxy, masking your IP address and encrypting your data.
It is essential to note that by saving and applying the configured proxy settings, you are effectively fortifying your browsing environment with the tailored specifications that align with your unique objectives. Whether you are leveraging a proxy for enhanced privacy, bypassing geo-blocked content, or optimizing your browsing security, this final step solidifies your proxy configurations within Firefox, empowering you to navigate the online realm with heightened control and anonymity.
As the changes are applied, Firefox seamlessly integrates the specified proxy details into its network settings, ensuring that your browsing experience is optimized to align with your preferences. Whether you opt for automated proxy detection, system-based proxy settings, or manual configuration, the act of saving and applying the changes marks the definitive moment where your proxy configurations become an integral part of your browsing journey.
By successfully completing this final step, you have fortified your online presence with the strategic use of proxy settings, empowering you to navigate the digital landscape with enhanced privacy, security, and accessibility. As the changes take effect, you are poised to embark on a seamlessly optimized browsing experience, leveraging the power of proxy configurations to tailor your online journey according to your unique requirements.
With the changes saved and applied, you have successfully completed the process of setting up a proxy in Firefox, harnessing the full potential of proxy configurations to fortify your browsing environment and embark on a journey of enhanced online control and anonymity.